background image

25

Removing Pump Safety Plugs

To prolong the life of your NitroGro applicator, hook the applicator to a tractor, unfold it, and perform the following before placing the 

implement in storage:

1.  Pressure wash the NitroGro applicator to remove dirt and 

debris that may cause rusting.

2.  Repaint any areas where the paint has been chipped, 

scratched or worn away.

3.  Coat all earth-moving surfaces with a suitable rust 

preventative.

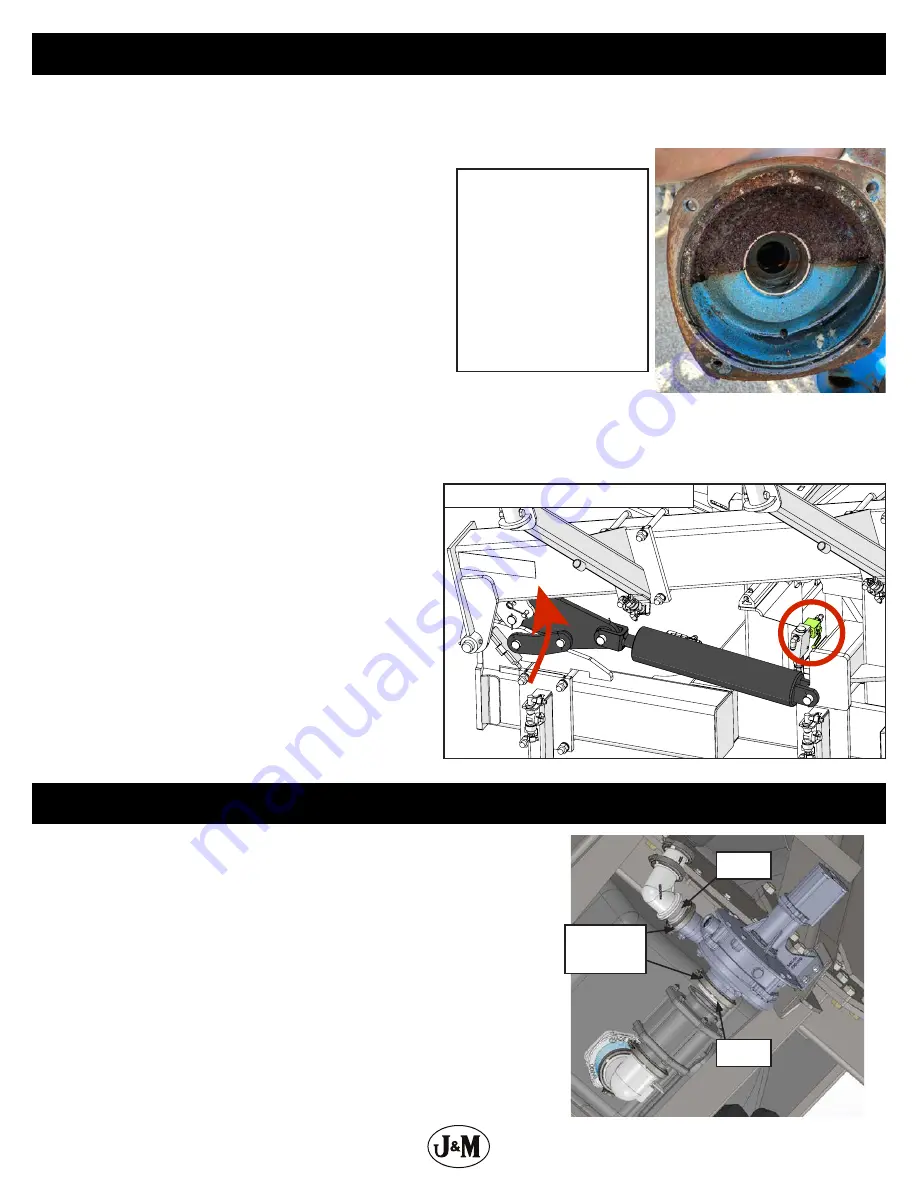
4.  Inspect for damaged or worn parts and replace before next 

use.  Examine all hydraulic hoses and fittings for wear and 

replace or tighten as necessary.

5.  Grease coulter hubs.
6.  Replace all worn, torn, or faded decals and reflectors.
7.  Flush all fertilizer from the system and winterize the applicator 

if kept in cold storage. 

IMPORTANT - To winterize your NitroGro drain the tank and all fertilizer hoses. Once the system is drained add 

approximately 50 gallons of RV antifreeze. Run the antifreeze thru the strainer, valves, check valves, and orifices until 

antifreeze comes out of all knives/orifices.

8.  Cover flow monitors from the sunlight. If flow monitors are 

exposed to the sun for a long period of time they will turn 

cloudy and become difficult to see through.

9.  Store the implement inside and sheltered from inclement 

weather on an area that is dry, level, and clear of debris.

10.  Fold up applicator and unhook from tractor. 
11.  When not in use, lock the stub wing in place by turning the 

shut-off valve off on the stub wings. This will keep the stub 

wings from unfolding when temperatures fluctuate and 

cause thermal expansion in the hydraulic system.

Storage

Do NOT use anything 

except RV antifreeze 

to winterize. 

Using anything 

else can cause 

severe damage to 

fertilizer distribution 

components and will 

VOID warranty.

Loosen the stainless clamps shown below and remove the safety plugs. Then, attach 

the pump fittings using the stainless clamp, ensuring the gasket is seated correctly 

between the pump and pump fittings. Failing to remove these plugs can cause the 

pump to run dry and cause damage. Once the pump safety plugs are removed, 

the applicator will need to be winterized before freezing temperatures occur. See 

“Storage” on page 25.

Plugs

Plugs

Stainless 

Clamps

Shut-off valve on Stub wing

Summary of Contents for 6018

Page 1: ...J M Manufacturing Co Inc 284 Railroad Street P O Box 547 Fort Recovery OH 45846 Ph 419 375 2376 Fax 419 375 2708 www jm inc com Rev 1 13 2023 O P E R A T O R S M A N U A L MODEL Operator s Manual...

Page 2: ...2...

Page 3: ...onnecting the Hydraulic Hoses 15 Hitching and Unhitching the Applicator 16 Initial Operation 16 Folding Unfolding 17 Operation 19 Raven 450 Controller Set Up 20 Raven ISOBUS Rate Controller Set Up 21...

Page 4: ...ent maintenance or iv normal wear or tear This warranty does not cover products that are previously owned and extends solely to the original purchaser of the product Should the original purchaser sell...

Page 5: ...d to indicate that failure to observe can cause damage to equipment The terms CAUTION WARNING and DANGER are used in conjunction with the Safety Alert Symbol a triangle with an exclamation mark to ind...

Page 6: ...ons A frequent cause of personal injury or death is from persons falling off equipment and being run over Do not permit persons to ride on this machine Travel speeds should be such that complete contr...

Page 7: ...0 80 ft lbs 9 16 18 170 ft lbs 5 8 18 350 ft lbs 3 4 16 400 ft lbs 20mm 475 ft lbs 22mm 640 ft lbs Always tighten hardware to these values unless a different torque or tightening procedure is listed f...

Page 8: ...andard Wash Tank Standard 9 Gallon Wash Tank Empty Weight 16 000 lbs Other Row Spacing Available Upon Request Tires Ground Compaction VF320 105R46 Alliance 172D Single Wheels 71 psi VF380 90R46 Allian...

Page 9: ...ontrol Spools Optional Quick Fill 3 Fill Standard Wash Tank Standard 9 Gallon Wash Tank Empty Weight 18 000 lbs Other Row Spacing Available Upon Request TotalWeight Weight on Axle Tongue Weight Tank E...

Page 10: ...all hardware for tightness after the unit has been operated for several hours Check that all pins and retaining rings are in good condition Replace any pins or retaining rings that are worn damaged or...

Page 11: ...olded and turn on the fertilizer pump Check if liquid is coming out of each knife injector Clean or replace knives injectors if necessary Unfolding the Wings It is recommended to unfold the side wings...

Page 12: ...12 NitroGro Components...

Page 13: ...rs Down Pressure Relief Valve and Gauge Set the center section of coulters first Spacers are included with the toolbar cylinders Add or remove spacers until the center section is positioned at the app...

Page 14: ...ing pressure spikes Connect the return line to a low pressure return port if available The low pressure return port routes oil directly to the reservoir minimizing return line pressure Low return line...

Page 15: ...with 23 coulters is considered a one down unit Similarly a 24 row applicator with 25 coulters is considered a one up unit Coulter 40 Toolbar Clearance Connect the hoses so the toolbar raises when the...

Page 16: ...tor First 30 minutes of operation 1 Ensure all coulters and nozzles are clean and working properly Clean and adjust accordingly 2 Check all hydraulic and chemical lines Be sure none of them are kinked...

Page 17: ...llow locks to fully engage as pictured below can cause severe damage to the applicator Look at the align arrows decal before field use 3 Flip Toolbars Out Toolbar Flip Circuit Red Taped Hoses Folding...

Page 18: ...ertilizer flow on off The height of this switch should be set so that it gets pressed by the parallel arm at the toolbar height that you want the fertilizer pump to shut off It should be wired in the...

Page 19: ...e agitation valve is open to allow the pump to prime NEVER run the pump dry 9 With the maintenance valve open perform initial setup of the pump as outlined in the pump operator s manual After pump set...

Page 20: ...dentification tag The meter calibration value is approximately 1 340 gallons Check the stamped valve to be sure Press the VALVE CAL button and input the calibration number that corresponds with the co...

Page 21: ...est speed can be entered for water testing and a nozzle flow check For Valve Type select PWM Closed Enter 43 for the Valve Cal If the pump does not react fast enough to a desired rate 33 can be entere...

Page 22: ...ibration of 1533 a Coil Frequency of 122 a High Limit of 220 and a Low Limit of 50 The High and Low Limits can be fine tuned using the Calibrate PWM Limits button to speed up the response time if nece...

Page 23: ...2 for the Control Deadband On the Setup PWM page enter 122 for the Coil Frequency 85 for the High Limit 20 for the Low Limit and 0 for the PWM Startup Enter the Flowmeter Calibration number approxima...

Page 24: ...an SMV Slow Moving Vehicle emblem is in place and clearly visible on the rear of the applicator Position the SMV emblem with one point of the triangle upward and as near to the rear and centered or as...

Page 25: ...orifices 8 Cover flow monitors from the sunlight If flow monitors are exposed to the sun for a long period of time they will turn cloudy and become difficult to see through 9 Store the implement insi...

Page 26: ...ning adjustment knob clockwise IMPORTANT Do not exceed 1 350 psi Center toolbar section set too deep Add cylinder spacers to lift cylinders Wings are tilted down from center toolbar section Gauge whee...

Page 27: ...IKE System pressure spikes may also damage the shaft seal and cause leakage Spikes in the 3000 5000 psi range may result from improperly synchronized hydraulic valves or quick couplers coming unplugge...

Page 28: ...the charts on pages 30 41 decide which ball is best suited for your desired GPA and Speed Only choose one ball for all flow monitors Remove the balls that are not being used The easiest way to remove...

Page 29: ...n On both 4 x24 cylinders close the valve This will prevent the cylinder from extending while the stub wings are being folded Note the cylinder stop allows a gap on the wings so that during use the wi...

Page 30: ...psi 15 23 33 41 50 59 70 78 88 20 28 40 48 59 69 81 90 102 15 Injector psi 4 8 15 20 28 33 39 45 52 7 12 20 26 34 40 47 53 61 20 Injector psi 1 6 10 15 19 25 29 33 3 10 14 20 24 30 35 40 30 Injector...

Page 31: ...0 16 20 25 29 33 3 8 13 19 23 29 33 38 40 Injector psi 2 6 9 13 16 20 1 4 8 12 16 19 23 GPM per nozzle 1 03 1 29 1 55 1 81 2 06 2 32 2 58 2 84 3 10 1 12 1 40 1 68 1 96 2 24 2 52 2 79 3 07 3 35 Flow In...

Page 32: ...37 42 49 20 Injector psi 2 5 9 12 17 20 24 5 9 14 18 23 27 31 30 Injector psi 1 4 6 9 3 5 8 11 14 40 Injector psi 2 1 3 5 GPM per nozzle 0 57 0 71 0 85 0 99 1 14 1 28 1 42 1 56 1 70 0 66 0 83 0 99 1 1...

Page 33: ...2 4 8 5 5 6 2 60 Gallons Per Acre 65 Gallons Per Acre Speed MPH 4 5 6 7 8 9 10 11 12 4 5 6 7 8 9 10 11 12 10 Injector psi 39 51 68 80 96 110 129 143 159 44 57 76 89 106 121 141 156 174 15 Injector psi...

Page 34: ...0 72 84 98 109 122 15 Injector psi 7 12 20 26 36 40 47 53 61 11 17 27 34 43 50 58 65 75 20 Injector psi 3 10 14 20 24 30 35 40 3 8 15 20 27 32 39 44 50 30 Injector psi 2 7 9 13 16 20 3 6 11 15 19 22 2...

Page 35: ...l 1 4 2 3 3 1 3 9 4 8 5 6 6 5 1 8 2 7 3 6 4 5 5 5 6 4 60 Gallons Per Acre 65 Gallons Per Acre Speed MPH 4 5 6 7 8 9 10 11 12 4 5 6 7 8 9 10 11 12 10 Injector psi 60 77 101 117 138 158 183 202 224 67 8...

Page 36: ...Orifice Pressure psi 20 31 41 51 62 72 82 93 103 27 39 51 63 76 88 100 112 124 0 107 Orifice Pressure psi 2 7 12 17 22 27 32 37 6 12 18 24 30 36 42 48 0 132 Orifice Pressure psi 5 8 12 15 18 6 9 13 17...

Page 37: ...4 1 4 6 60 Gallons Per Acre 65 Gallons Per Acre Speed MPH 4 5 6 7 8 9 10 11 12 4 5 6 7 8 9 10 11 12 0 075 Orifice Pressure psi 62 82 103 124 145 165 186 207 228 69 91 114 136 158 181 203 226 248 0 10...

Page 38: ...4 5 6 7 8 9 10 11 12 0 075 Orifice Pressure psi 24 36 47 59 70 81 93 104 116 32 45 59 72 85 98 112 125 138 0 107 Orifice Pressure psi 4 10 16 21 27 32 38 44 9 16 22 29 35 42 48 55 0 132 Orifice Pressu...

Page 39: ...3 3 0 3 7 4 5 5 2 5 9 6 6 2 6 3 4 4 2 5 0 5 7 6 5 Flow Indicator 7 16 SS Ball Level 0 2 0 8 1 3 1 9 2 4 3 0 3 5 4 1 4 6 0 5 1 1 1 7 2 3 2 9 3 5 4 1 4 7 5 3 60 Gallons Per Acre 65 Gallons Per Acre Spee...

Page 40: ...w Indicator 1 2 SS Ball Level 0 2 0 4 0 6 0 8 1 0 1 2 1 4 1 6 1 8 0 6 0 9 1 2 1 5 1 8 2 1 2 4 2 7 3 0 Flow Indicator 7 16 SS Ball Level 0 1 0 3 0 5 0 7 20 Gallons Per Acre 25 Gallons Per Acre Speed MP...

Page 41: ...1 26 1 57 1 88 2 20 2 51 2 83 3 14 3 45 3 77 Flow Indicator 1 2 SS Ball Level 3 3 4 3 5 3 6 3 3 7 4 8 5 9 6 9 Flow Indicator 7 16 SS Ball Level 1 0 1 8 2 5 3 3 4 0 4 7 5 5 6 2 7 0 1 3 2 1 3 0 3 8 4 6...

Reviews: