4
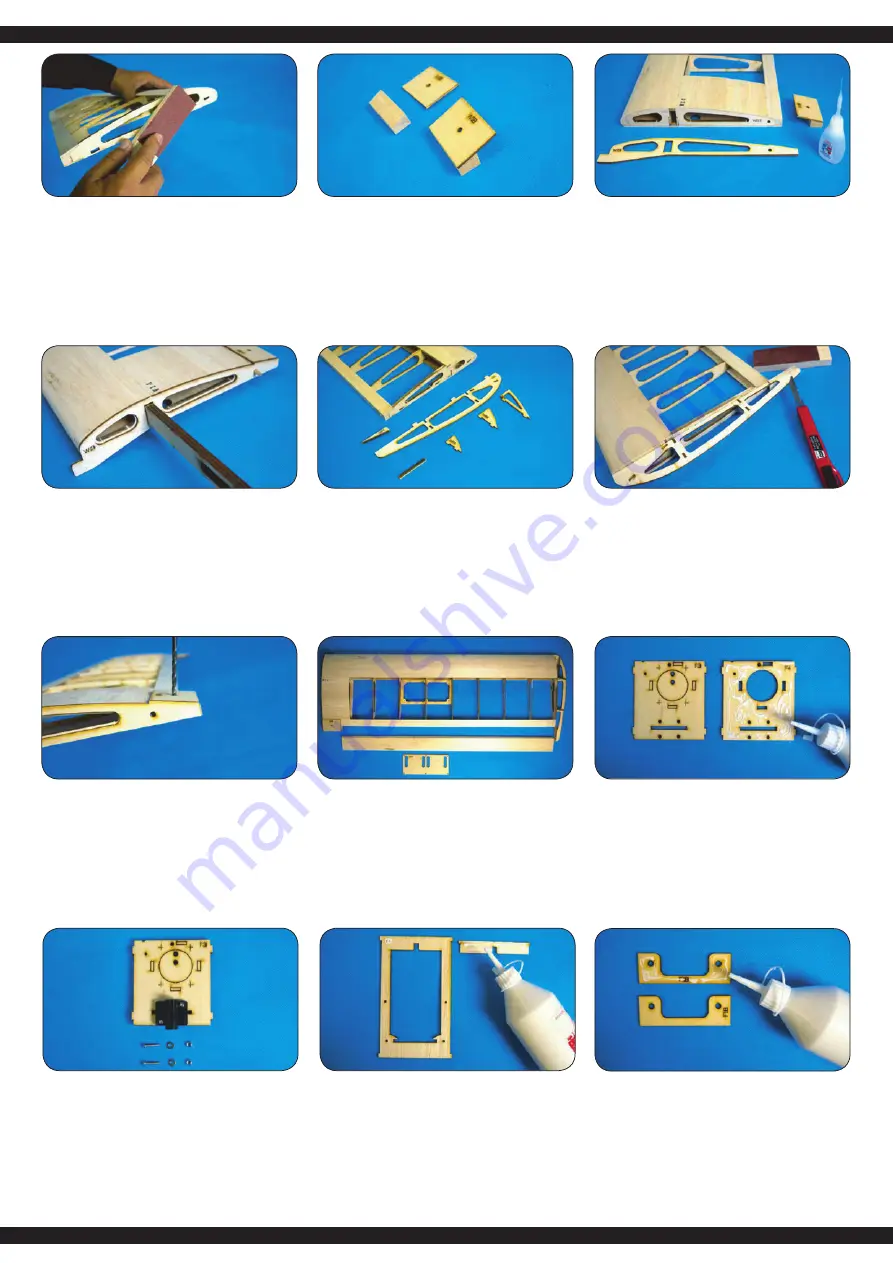
Carteggiare accuratamente con carta vetrata le irregolarità della
centina esterno della radice.
Use sanding paper to trim the wing root flat and even.
Rimuovere le parti W17 e W18. Applicare la colla sulla superficie
smussata del W17 e in collare con W18 come mostrato sopra.
Place W17 and W18 on the working table. Use instand glue to
secure the W17 onto W18 as the picture shown.
Posizionare le piastre di rinforzo (W18/17) e il rinforzo delle cen-
tinei (W19) sull‘ala e incollarle.
Try to fit the W19 and W18 onto the main wing. Use instant glue
to secure them in place.
Effettuare un foro attraverso l‘ala. Prendere un trapano da 4,2
mm e praticare il foro preforato in W18 attraverso l‘ala.
According to the hole on the W18, use 4.2mm driller to open a
vertical hole on W18 through the whole main wing.
Effettuare un foro attraverso l‘ala. Prendere un trapano da 4,2
mm e praticare il foro preforato in W18 attraverso l‘ala.
When complete the assembly of the left and right main wing, iron
the covering your preferred.
Montaggio della fusoliera
Prendere F3 e F4 dalla confezione. Incollare F3 e F4 insieme.
Assicurarsi che l‘incavo (in alto a sinistra) sia perfettamente alli-
neato tra loro. Rimuovere l‘adesivo in eccesso.
Fuselage assembly
Place F3 and F4 on the working table. Please note there is con-
cave mark on their top left side. Place F3 on the top of the F4
with concave mark on the same location applies white glue to
secure them together.
Inserire ora il connettore del ala (W29) nell‘incavo della centina
della radice. Se questo non si adatta perfettamente, carteggiare
con carta vetrata.
Try to fit the wing joiner into the main wing. If they cannot fit per
-
fect, use sanding paper to trim the contacting area.
Per la punta dell‘ala, prendere W21, W22, W23, W24, W25 e
W25-1 e posizionare sul piano di lavoro. Incollare le parti insieme
e incollarle alla centina della radice esterna dell‘ala.
Place W21, W22, W23, W24, W25, W25-1 on the working table
for assembling the wing tip. Use instant glue to secure these
parts in place.
Per completare la punta dell‘ala (W25-1) sono necessari un col-
tello e una carta vetrata.
Use sanding paper and hobby knife the trim the edges of W25-1.
Dopo che l‘adesivo si è asciugato, posizionare il supporto del
carrello di atterraggio per l‘unità di coda su F3. Assicurarsi che
la parte sporgente della staffa sporga oltre il bordo (vedi foto).
Fissare il carrello del naso con viti M3 x 15 mm e fissare con
rondelle da 3 mm e dadi M3.
When the glue is dried enough, place nose gear mount on
F3 with the longer side face outside. Insert M3x15mm screws
through the nose gear mount, F3 and F4, secure with 3mm
washers and M3 nuts.
Applicare la colla su F5 sulla parte superiore di F6. Accertarsi
che le parti si adattino perfettamente l‘una all‘altra
Place F5 on the top of F6, pay attend to the concave marks must
match each other; apply white glue to secure them together.
Per il fissaggio dell‘ala, posizionare 2 x F18 sul piano di lavoro,
ricoprirne uno con colla e incollarlo insieme.
Apply white glue to secure 2 pieces of F18 together.


