Manufacturer of Quality Air Conditioning and Heating Products • www.islandaire.com • sales@islandaire.com • (800)-886-2759
22
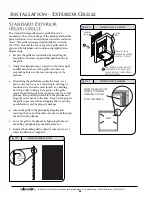
The standard (stamped) exterior grille (louver) is
mounted to the exterior flange of the plenum and held in
place with four screws inserted from inside the enclosure
closet. The grille is designed specifically for use with
the VTAC unit and the use of any other grille must be
approved by Islandaire Air Conditioning Applications
Engineering.
1. Prepare the grille for installation by installing the
four plastic fasteners supplied through the holes in
the grille.
2. Guide the alignment pins, located on the lower right
and left hand corners of the grille into their cor-
responding holes on the rear outside edge of the
plenum.
3. If installing the grille from inside the room, use a
plastic wire zip-tie or tie a short length of string or
insulated wire around several louvers as a holding
device in order to keep a firm grasp on the grille.
Angle the grille through the opening at the rear of the
plenum, then pull the grille back to the plenum and
align the screw heads to the hole. Keep a firm grip on
the grille to prevent it from dropping and/or causing
possible injury and/or property damage.
4. Attach the grille to the plenum by aligning and
inserting the hex nut threaded onto the studs through
the holes in the plenum.
5. Secure the grille to the plenum by tightening the hex nut
and adding and tightening an additional hex nut.
6. Remove the holding device (plastic wire zip-tie, etc.)
when installation is complete.
10-32 x 1”
THREADED
STUD
Figure 5
Standard Grille Fastener
INSIDE
WALL
ANGLE THE GRILLE
THROUGH THE OPENING
AT BACK OF PLENUM
STANDARD
GRILLE
PULL FORWARD TO GUIDE HEX NUTS
THROUGH HOLES IN PLENUM, THEN
TIGHTEN HEX NUTS. SECURE WITH AN
ADDITIONAL HEX NUT.
1
2
3
Figure 6
Standard Grille Installation
HOLES
SECURE THE GRILLE TO THE
PLENUM BY TIGHTENING
SCREW HEADS IN HOLES.
DO NOT OVERTIGHTEN
Figure 7
Standard Grille Installation
Installation - Exterior Grille


