background image

48

Components and Chipsets

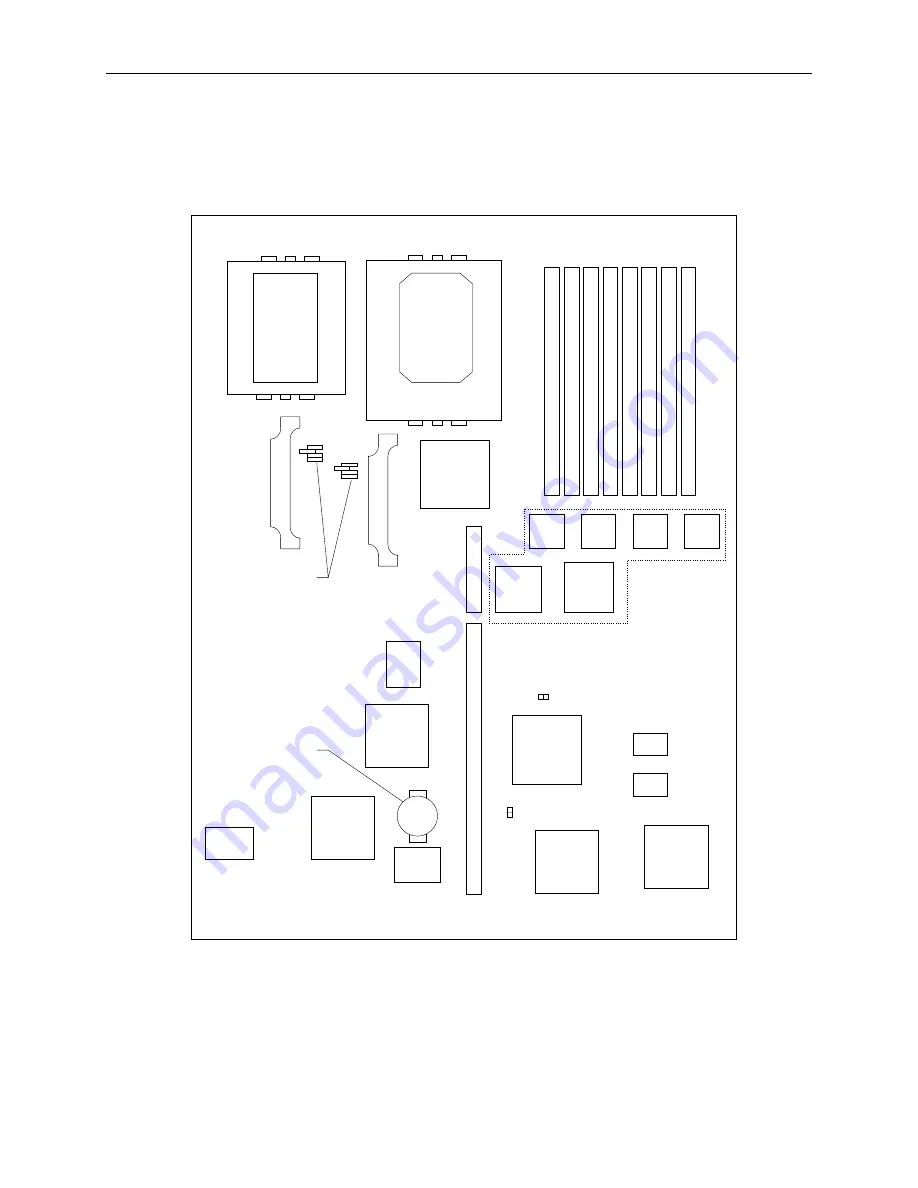
The following figure shows the locations of the major integrated components and the jumper
connectors.

Graphics
Accelerator

SCSI
Controller

Window
RAM

I/O
Controller

Palette
DAC

Lithium
Battery

PCI to
ISA
Bridge

Ethernet
Controller

MIC

MIC

MIC

MIC

OMC-
DP

OMC-
DC

PCI
Bridge

Memory Sockets

Memory
Controllers

Flash
EEPROM

Sound
Processor

J16
BIOS Jumper

CPU Frequency
Jumpers

J25
VGA Mode Jumper

Summary of Contents for TD-x10 Setup

Page 1: ...TD TDZ x10 InterServe x05 Series System Reference September 1997 DHA018650...

Page 2: ...and its file formats and audio visual displays described herein all rights reserved may only be used pursuant to the applicable software license agreement contains confidential and proprietary informa...

Page 3: ...erference Regulations of the Canadian Department of Communications Warnings Changes or modifications made to the system that are not approved by the party responsible for compliance could void the use...

Page 4: ......

Page 5: ...m Hard Disk Drive 11 SCSI Termination Card 12 Riser Card 13 System Board 14 CMOS Clock Battery 16 Power Supply 17 3 Servicing the Deskside System 19 Internal SCSI Drives 19 Floppy Disk Drive or Combo...

Page 6: ...Address Configuration 57 DMA Channels 57 Input Output Addresses 57 Memory Address Map 58 PCI to ISA Bus Interrupt Mapping 58 PCI Bus Configuration Space 59 ISA Bus IRQ Assignments 59 External Ports 60...

Page 7: ...DC Output Specifications 72 Cable Connectors 73 P1 Pinout 73 P2 Pinout 73 P3 Pinout 73 P4 Pinout 74 P5 Pinout 74 P6 P7 P8 Pinout 74 P9 Pinout 74 Desktop Fans 74 8 Peripherals 75 RAID Section 75 CD ROM...

Page 8: ...viii...

Page 9: ...or characters that you key in literally Italic Variable values that you supply or cross references Monospace Output displayed on the screen SMALL CAPS Key names on the keyboard such as D ALT or F3 Nam...

Page 10: ...ere delivered in the Windows NT Server software package u For detailed information on using Windows NT Server 4 0 refer to Windows NT Server Help u Additional online Windows NT Server 4 0 documentatio...

Page 11: ...rewdriver NOTE The parts inside the base unit are designed to fit within very tight tolerances Some force is required to remove or insert parts However if you cannot remove or install a part properly...

Page 12: ...tic Discharge Some of the sensitive components inside the base unit can be damaged by static electricity To minimize this possibility take the following precautions when working with the internal comp...

Page 13: ...the wrist strap copper foil Attach the adhesive side of the copper foil to a bare flat metal surface electrical ground inside the base unit NOTE After using a disposable wrist strap once you cannot u...

Page 14: ...card brace Processor module Top cover left side panel PCI access panel P6 bus termination card Top cover left side panel PCI access panel System board Top cover left side panel PCI access panel optio...

Page 15: ...ew on the back cover Pull the top cover back an inch and lift it off the base unit Refer to the following figure 3 Remove the two screws on the left or right side panel Then pull the panel up and out...

Page 16: ...ss panel 1 Power off the base unit and remove the top cover and side panel Lay the base unit on the right side 2 Remove the two screws at the bottom of the unit and the screw behind the PCI access pan...

Page 17: ...boards as little as possible and by the edges only Leave new parts in their protective packaging until you install them u After opening the base unit attach a disposable or reusable antistatic wrist...

Page 18: ...in the upright position 4 Replace the left or right side panel if removed 5 Replace the top cover Ensure the top cover is completely installed so the safety interlock switch engages If the cover is no...

Page 19: ...ing system parts close the base unit as described in Chapter 1 CAUTION The parts inside the base unit are designed to fit within very tight tolerances Some force is required to remove or insert parts...

Page 20: ...OM drive Refer to the following figure Power Cable SCSI Cable Audio Cable Screws CD ROM Drive 3 Disconnect the audio cable from its system board connector 4 Remove the screws holding the CD ROM drive...

Page 21: ...t the drive on a flat antistatic surface 3 Remove the screws securing the hard disk drive to the bracket Leave the grommets in the bracket Refer to the following figure Tabs Screws 4 Disable SCSI term...

Page 22: ...tion card terminates the internal SCSI cable chain If external SCSI devices are connected the card disables termination and acts as a pass through external SCSI connector To replace the SCSI terminati...

Page 23: ...Riser Card To replace the desktop riser card 1 Remove the floppy disk drive as described previously in step 2 of Floppy Disk Drive or Combo Drive leaving the cables attached 2 Remove the system hard d...

Page 24: ...he boards ISA boards must be installed in the same slots from which they were removed 9 Replace the ISA I O lock bracket 10 Connect the SCSI and power cables to the riser card if necessary 11 Replace...

Page 25: ...ts J68 J71 J74 Floppy J30 SCSI J43 ISA Bus J33 ISA Bus J32 6 Disconnect the cables from the external ports 7 Remove the jackscrews from the video parallel and serial ports 8 Remove the hex nuts from t...

Page 26: ...ect the LED and Reset cables to the system board NOTE The orange wire for the disk activity LED cable must connect to pin 1 The white wire for the power on LED cable must also connect to pin 1 The ori...

Page 27: ...r the power supply will be irreparably damaged when power is applied If you do not know the voltage range call your local utilities company for assistance To replace the power supply 1 Remove the AC p...

Page 28: ...rect voltage for your location 11 Slide the new power supply into place in the base unit Mount the power supply using the screws removed previously 12 Mount the power switch cable and grounding wire t...

Page 29: ...ge as described in Chapter 1 Accessing the System After replacing system parts close the base unit as described in Chapter 1 CAUTION The parts inside the base unit are designed to fit within very tigh...

Page 30: ...e drive to the same ID as the drive being replaced If necessary refer to the documentation delivered with the SCSI drive for instructions 7 If installing a hard disk drive attach the drive to the brac...

Page 31: ...move the screws from both sides of the drive as shown in the following figure Then slide the drive out of the base unit Power Cable Screws Floppy Cable ISA Bus Cable Red Stripe Red Stripe 4 Disconnect...

Page 32: ...D section is used in TDZ 610 workstations and some InterServe 605 servers To replace the RAID section 1 Before opening the base unit remove the RAID disk drives from the slots in the RAID section Note...

Page 33: ...ht screws removed previously 8 Connect the cables to the RAID section 9 After closing the base unit install the RAID disk drives into the same slots in the RAID section from which they were removed Sy...

Page 34: ...ive into the base unit and secure it to the chassis using the chassis screw removed previously 7 Connect the SCSI and power cables to the disk drive 8 Close the base unit Riser Card To remove the rise...

Page 35: ...om the peripheral brace Slide the peripheral brace to the back of the base unit and remove it 7 Remove the screw for the air baffle as shown in the following figure then remove the air baffle Riser Ca...

Page 36: ...module is replaced as one unit To replace the processor module 1 When opening the base unit remove the left side panel and lay the base unit on its right side 2 Remove the PCI option boards 3 Remove...

Page 37: ...unit run the AMIBIOS Setup program and record all the custom settings for your system After replacing the system board you must run the System Configuration Utility for the ISA boards Ensure you have...

Page 38: ...video parallel and serial ports 9 Using an 8 mm or five sixteenth inch nutdriver remove the hex nuts from the audio jacks Audio Jacks Serial Parallel Video Ports Port Port 10 Using a quarter inch nutd...

Page 39: ...23 Replace the riser card option board bracket option boards and SCSI and power cables 24 Replace the PCI access panel 25 Connect the external system cables to the external ports 26 Close the base un...

Page 40: ...an power cable to the system board 7 Replace the back and side panels and the top cover 8 Close the base unit Option Board Fans To replace the option board fans 1 Remove the peripheral brace 2 Disconn...

Page 41: ...Clock Battery WARNING There is a danger of explosion if the battery is incorrectly replaced Replace the battery with the same or equivalent type only as recommended by the manufacturer Dispose of use...

Page 42: ...wer cord from the back of the base unit 2 Disconnect the power cables from the riser card hard disk drives or internal RAID subsystem and DC distribution board floppy disk drive and CD ROM drive 3 Ope...

Page 43: ...power cable to the riser card 10 Connect the remaining power cables to the hard disk drives or internal RAID subsystem and DC distribution board CD ROM drive and floppy disk drive 11 Secure the clip a...

Page 44: ...h attach to the various connectors 7 Using a No 1 Phillips screwdriver remove the screws securing the power distribution board to the base unit 8 Remove the board from the base unit 9 Attach the new p...

Page 45: ...t bend twist drop or otherwise handle the SIMMs carelessly u Do not expose the SIMMs to moisture or extreme temperatures u Do not remove the SIMMs from the antistatic bag until instructed Follow these...

Page 46: ...nstall them in this order u If you are installing two SIMMs install them in the Bank 0 sockets u If you are installing four SIMMs install them in the Bank 1 sockets first and then in the Bank 0 socket...

Page 47: ...slot 6 board guide 11 Replace the graphics boards and PCI option boards 12 After you close the base unit restart the system The new memory is recognized automatically Adding Internal SCSI Devices Desk...

Page 48: ...red stripe pin 1 is adjacent to the power connector 6 After closing the base unit install the device drivers and configure the device according to the vendor s instructions if necessary Adding Extern...

Page 49: ...the I O connector board the total length of the SCSI cabling is the sum of all of the following u SCSI bus trace length on I O expansion board 12 0 inches 30 5 cm u SCSI cable inside the base unit 41...

Page 50: ...ate values for the devices to the desired settings If changing these settings to extend cable lengths or add more devices set Ultra SCSI devices to 10 0 or less NOTE The Advanced Configuration Option...

Page 51: ...s presence during startup and reads information from the board s configuration registers to assign the necessary system resources However if installing a PCI IDE controller you must set jumpers on th...

Page 52: ...system resources for the board and to prevent conflicts with option boards already installed Refer to Using the System Configuration Utility later in this chapter To install an ISA board into a deskt...

Page 53: ...n Utility The System Configuration Utility SCU is an MS DOS utility that will not run in the Windows NT environment Use the System Utilities SYSUTIL diskette delivered with your system to boot the sys...

Page 54: ...to the SCU Main Menu 9 Select Step 4 from the SCU Main Menu to save the configuration and then select Step 6 from the SCU Main Menu to exit the SCU 10 Remove the diskette from the combo drive then res...

Page 55: ...TER 13 When the Slot Selection Menu displays select the required slot and press ENTER 14 Press ESC to return to the SCU Main Menu 15 Select Step 4 from the SCU Main Menu to save the configuration 16 S...

Page 56: ...46...

Page 57: ...processors and PCI expansion bus u PCI to ISA Bridge Intel 82379AB provides the interface between the ISA expansion bus and the PCI bus u Memory eight memory sockets and Intel memory controllers supp...

Page 58: ...jumper connectors Graphics Accelerator SCSI Controller Window RAM I O Controller Palette DAC Lithium Battery PCI to ISA Bridge Ethernet Controller MIC MIC MIC MIC OMC DP OMC DC PCI Bridge Memory Sock...

Page 59: ...Palette DAC The palette DAC operates up to 175 MHz and converts the digital RGB data in the frame buffer to analog signals for the monitor The device includes two fully programmable phase locked loop...

Page 60: ...must be set to the same communications parameters baud rate parity number of data bits and number of stop bits Refer to the serial device documentation for information about setting these parameters P...

Page 61: ...he Quad processor systems use a processor card MSMT310 to add two more processors When only one or two processors are installed the P6 bus termination card MSMT311 is installed instead of the processo...

Page 62: ...are on the primary PCI bus PCI slots 1 through 4 secondary are supported by an Intergraph programmable part on the riser card PCI to ISA Bridge The Intel 82379AB System I O APIC Advanced Programmable...

Page 63: ...ddressing and control device for the DRAM array that interfaces to the OMC DP BIOS Components Flash EPROM The system board MSMT329 uses a flash EPROM chip MYPG782 for the system s Basic Input Output S...

Page 64: ...Audio Outputs Stereo Line Out MIDI Joystick MIDI In MIDI Out Up to 4 fire buttons ADPCM Audio Compression 4 1 3 1 and 2 1 Sampling Rate Range 5 KHz 44 1 KHz in 228 selectable steps Selectable Microph...

Page 65: ...wer connectors refer to Power Supply Information in this chapter The following figure shows the location of the cable and jumper connectors The CPU VRM memory sockets and riser card connectors are pro...

Page 66: ...ght Sound Channel 1 Ground 2 Left Sound Channel 3 Ground 4 ISA Bus J32 Pinout Signal Pin Signal Pin Signal Pin IRQ15 1 SD 0 15 Ground 28 IRQ14 2 SD 1 16 RSTDRV 29 IRQ10 3 SD 4 17 Ground 30 IRQ3 4 SD 5...

Page 67: ...Some channels are assigned for specific use by the system as defined below Each DMA channel appropriates full 32 bit processing For an ISA bus channels 0 through 3 are 8 bit and channels 4 through 7...

Page 68: ...itecture compatibility reasons the PCI interrupts are routed to the ISA interrupts within the ISA bridge The assertion of a PCI interrupt concludes in an ISA interrupt being asserted The 8 bit PIRQ Ro...

Page 69: ...CI slot on the riser card has four available interrupt lines INTA INTB INTC and INTD These are connected to the PCI interrupts PIRQ0 through PIRQ3 as shown below Interrupt Line Slot 1 Slot 2 Slot 3 Sl...

Page 70: ...interrupt using the System Configuration Utility and jumpers on the option board External Ports The following figures show the external ports in their proper orientation when the base unit is in the...

Page 71: ...d Keyboard Pinout Mouse Keyboard Pin Signal Pin Signal 1 MDATA 1 KDATA 2 Reserved 2 Reserved 3 Ground 3 Ground 4 Fused VCC 5V 4 Fused VCC 5V 5 MCLK 5 KCLK 6 Reserved 6 Reserved Video Pinout Pin Signal...

Page 72: ...ledge 45 Reset 46 Message 47 Select 48 Command 49 Request 50 Input Output Note Pins 12 13 14 37 and 39 are not connected all other pins not listed are connected to ground Parallel Pinout Pin Signal Pi...

Page 73: ...hart specifies the slots where graphics boards are located NOTE Systems with on board graphics use G95 accelerator on the system board rather than an installed PCI card Millennium II Dual Screen DS Mi...

Page 74: ...3 or the DEC 21050 chip for MSMT280 Some PCI option boards must be installed in a primary PCI slot as stated in the documentation delivered with the option board NOTE Full length PCI cards cannot be i...

Page 75: ...rd I3D card I3D card Slot 5 Geometry accelerator Geometry accelerator Z10 Z10 DS Z10 with Texture T Z10 T DS Slot 2 Z10 card Z10 card Z10 card Z10 card Slot 3 Z10 card Texture card Texture card Slot 4...

Page 76: ...66...

Page 77: ...ne nominal power factor of 0 6 and temperature of 25 C the power supply has a minimum efficiency of 65 percent DC Output Specifications The following table details the power supply DC output specifica...

Page 78: ...card and to the devices in the system Connector Device Connector Device P1 Riser Card P6 Auxiliary Drive or RAID section P2 CD ROM Drive P7 Auxiliary Drive P3 Auxiliary Drive P8 Auxiliary Drive P4 Aux...

Page 79: ...n and require special power signal routing Cable Connectors The following figure shows the MPCBD13 cable connectors J18 J10 J20 J13 J19 J17 J40 J16 J10 Power Pin Signal Wire Color 1 12V Yellow 2 Retur...

Page 80: ...set Red 2 Ground Black J18 Drive Installed Pin Signal Wire Color J18 1 Drive 1 Brown J18 2 Drive 2 Black J18 3 Drive 3 Red J19 Drive Installed Pin Signal Wire Color J19 1 Drive 4 Brown J19 2 Drive 5 B...

Page 81: ...141 or MPWS148 TDZ 410 u 200 Watt power supply MPWS140 TD 310 and InterServe 305 The power supply is switchable manual between 90 132 VAC or 180 264 VAC depending on the location The input frequency i...

Page 82: ...m 1 193 4 343 4 54 5 0 5 0 5 ADC Continuous Load Minimum 1 0 2 1 0 0 ADC Noise and Ripple PARD DC to 30 MHz 2 50 50 100 250 100 mVpp Max Initial Setting Tolerance 6 3 5 5 10 10 Max Regulation Line Loa...

Page 83: ...supplies Connector Device Connector Device P1 System Board P6 Hard Disk Drive P2 System Board P7 CD ROM Drive P3 System Board P8 Hard Disk Drive P4 System Board P9 Floppy Drive or Combo Drive P5 Syst...

Page 84: ...range 3 3 3V Orange 4 3 3V Orange 5 Return Key Black 6 Return Black P6 P7 P8 Pinout Pin Signal Color 1 12V Yellow 2 Return Black 3 Return Black 4 5V Red P9 Pinout Pin Signal Color 1 5V Red 2 Return Bl...

Page 85: ...ystems including u RAID section u CD ROM drive u Disk drives 1 GB 2 GB 4 GB u Floppy disk drive u Combo drive RAID Section The following figure shows the RAID Section MESAN15 assembly used in TDZ 610...

Page 86: ...Term Power 65 SCSI Data Bit 8 40 SCSI Data Bit 0 53 No Connect 66 SCSI Data Bit 9 41 SCSI Data Bit 1 54 Fault Clock Ground 67 SCSI Data Bit 10 42 SCSI Data Bit 2 55 Attention 68 SCSI Data Bit 11 J1 M...

Page 87: ...The following disk drives are used in non RAID systems For information about the RAID drives used in systems with the internal RAID section refer to the InterRAID documentation Part Number Vendor Num...

Page 88: ...SCSI termination install the Term Disable jumper and remove both Term Power jumpers from connector J8 To enable SCSI termination remove the Term Disable jumper and install both Term Power jumpers ont...

Page 89: ...on these connectors To enable SCSI termination install the proper resistors into both terminator sockets To disable SCSI termination remove both resistors from the sockets CDSK123 4 GB The following f...

Page 90: ...cable connectors on the back of the floppy disk drive Floppy Connector Power Connector Combo Drive The following figure shows the cable connectors on the combo drive Converter Connector Floppy Connect...

Page 91: ...system board u The converter connector J4 uses cable MCBLZ230 to J2 on the combo drive The following table shows the pinout of MCBLZ230 Pin Signal Pin Signal Pin Signal 1 VCC 10 MTR1 19 Ground 2 INDE...

Page 92: ...82...

Page 93: ...s dry Specifications System BIOS Quad processor system AMI BIOS core 782 Single and dual processor systems AMI BIOS core 752 Processor s Intel Pentium Pro Host Bridge Intel P6 Bus to PCI Bridge chip O...

Page 94: ...with 256 KB cache H Single 200 MHz CPU with 256 KB cache J Dual 200 MHz CPU with 256 KB cache F Quad 200 MHz CPU with 256 KB cache G Dual 200 MHz CPU Quad ready with 256 KB cache 3 Graphics 5 G95 7 Mi...

Page 95: ...0 pinout 81 Compatibility mode parallel port 50 Configuring ISA boards 43 Connecting the device SCSI devices 39 Connector pinouts 55 CPU frequency jumper connectors 51 D Desktop system servicing 9 Dis...

Page 96: ...IRQ assignments 59 ISA bus J32 pinout 56 ISA bus J33 pinout 57 ISA option boards 42 K Keyboard 83 cleaning 83 Keyboard controller function of FDC37C932 50 Keyboard port 61 L Lithium battery 49 M Memo...

Page 97: ...71 P1 pinout 73 P2 pinout 73 P3 pinout 73 P4 pinout 74 P5 pinout 74 P6 P7 P8 pinout 74 P9 pinout 74 Primary PCI slots option boards 41 Processor components 51 Processor jumpers 51 Processor module rep...

Page 98: ...57 cable connectors 55 components and chipsets 48 external ports 60 replacing 14 27 System Configuration Utility SCU 42 using 43 System disk fan MCBL172A 71 System hard disk drive replacing 11 23 Syst...

Reviews: