background image

SC User Guide — V

3.14

www.intelliview.ca

9

[email protected]

SC Interface

Section 2: SC Interface

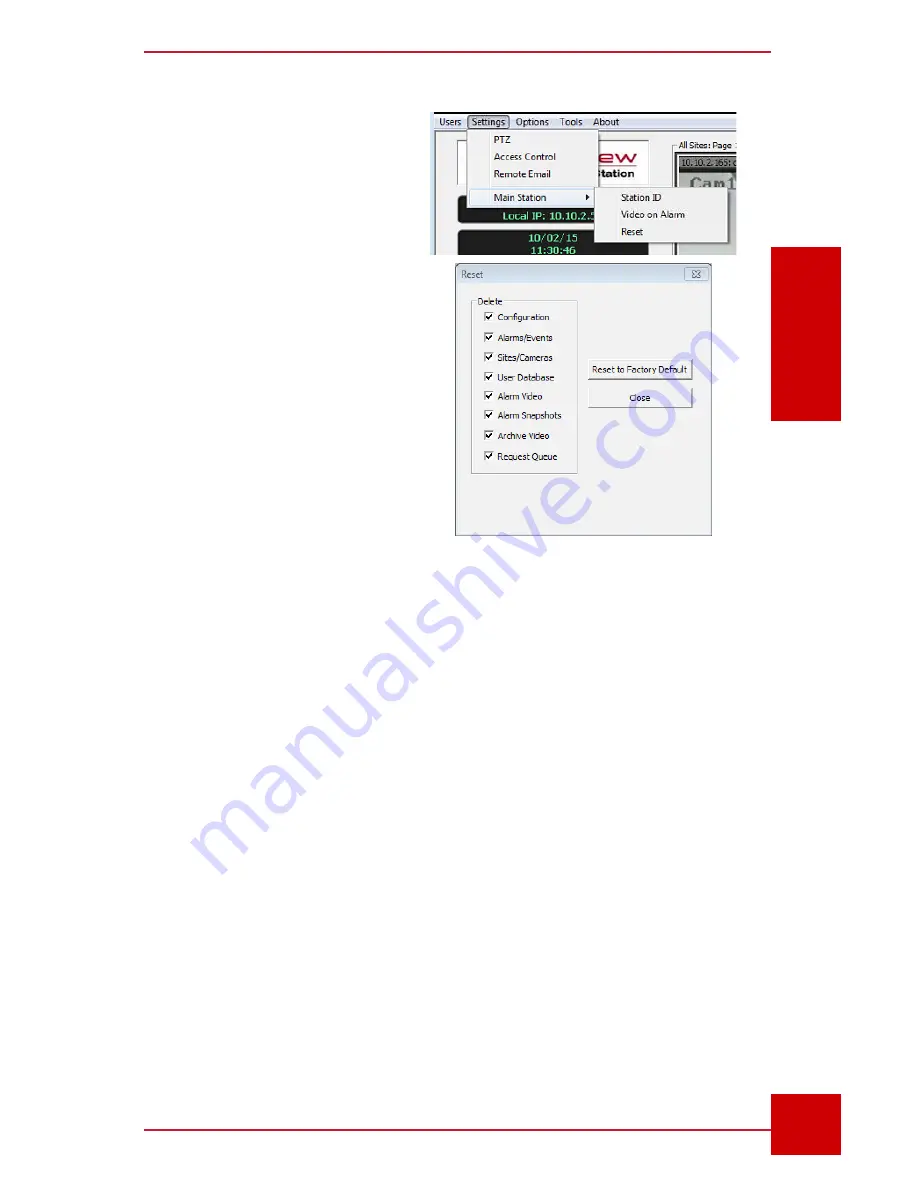
2.1  SC Settings Reset

The initial system  set up will 
be done by an IntelliView or 
IntelliView-authorized installer. 
The administrator has the highest 
level of user and device control, 
including system reset. 

The 

Reset button

 (Fig. 2) is 

located in the 

Main Station


menu, under the 

Settings

 tab.

This function allows the 
restoration of all or selected 
settings. 

2.2  SC Interface

The SC interface contains several components (Fig. 3). 
1.    Administration Toolbar (top left of the screen) allows access to: 

Users menu 

- to manage  user accounts, sign in and out of the SC.

Settings menu

 - to  configure PTZ cameras, access control devices, 

email notifications, alarm video recordings, and assign a SC ID.

Options menu 

- to set new alarms location and storage settings, and 

activate functionality of the joystick, verbal alarms, bandwidth saving.

Tools menu

 for producing the following documents: SmrtSummary, 

Count Report and Modbus Report.

2.    Status Dialog boxes (three) display the following information: 

Figure 2 - 

System Reset Button                                                 

and options 

Summary of Contents for IVT-MTS05

Page 1: ...chnologies Inc Note Please read this manual thoroughly before operating this unit and retain it for future reference IVT MTS05 support intelliview ca www intelliview ca Software Version 3 14 System Co...

Page 2: ...t IntelliView at Phone 1 403 338 0001 or 1 888 922 9235 Email support intelliview ca This guide has been prepared for users intending to utilize the full range of features of the SC working with the S...

Page 3: ...rantee is given as to the accuracy of the contents To benefit our customers corrections will be made as necessary in subsequent versions of the SC manual The information contained in this document is...

Page 4: ...es IntelliView HASM IntelliView logo SmrtHVR Smart Camera SC Station SmrtSummary are either registered trademarks or trademarks of IntelliView Technologies Incorporated in the United States and or oth...

Page 5: ...SC User Guide V3 14 www intelliview ca v support intelliview ca...

Page 6: ...2 4 4 Manually Switching Video Screens in the Video Panel 18 2 4 5 Video Feed Quality Adjustments 18 2 4 6 Color Coded Video Screens 19 3 Analytics Alarm Rules 22 3 5 1 Types of Standard Analytics Rul...

Page 7: ...nalytics Overlay Data in Alarm Video Playback 69 5 2 Alarms Always On Top 69 5 3 Speak Alarm Function 70 5 4 System Event Notifications 70 5 5 Creating and Exporting Count Reports 71 5 6 Modbus 73 6 V...

Page 8: ...ing Up a Card Reader Schedule 101 7 2 6 Setting Up an Unlock Schedule for Unrestricted Access 102 7 2 7 Setting Up a Holiday Schedule 102 7 2 8 Adding a Card Reader Profile and Assigning a Schedule 10...

Page 9: ...ure 13 Switching video screen panels 18 Figure 15 Color coded vIdeo screen info bar 19 Figure 14 VIdeo adjustment controls 19 Figure 16 A rectangular area of effect 26 Figure 17 Examples of polygon ar...

Page 10: ...al input alarm trigger settings 46 Figure 42 Remote Email Settings 47 Figure 44 Site dialog box 51 Figure 43 Add Site button in Site and Camera panel 51 Figure 45 Stream types Site dialog box 52 Figur...

Page 11: ...igure 76 Playback Controls 81 Figure 77 Export Dialog box 82 Figure 78 SmrtSUMMARY access 84 Figure 79 SmrtHVR user interface showing two horizontal slices 85 Figure 81 Vertical and horizontal SmrtSum...

Page 12: ...tick 97 Figure 97 Enabling the Joystick 97 Figure 98 Access Control Setup dialog box 98 Figure 100 Access Control tools from the Camera right click menu 99 Figure 99 The SmrtLOCK dialog box 99 Figure...

Page 13: ...SC User Guide V3 14 www intelliview ca xiii support intelliview ca...

Page 14: ...SC User Guide V3 14 www intelliview ca 1 support intelliview ca Introduction Section 1 Introduction Introduction Section 1...

Page 15: ...nd IP cameras of various combinations depending on the unit model Some of its functionalities include video capture video storage video analytics processing see Video Analytic Software Modules below a...

Page 16: ...g and management of captured video Video summary analysis for quick post investigation Fully integrated pan tilt zoom PTZ controls 1 3 Compression Technology IntelliView s SmrtHVR uses several audio v...

Page 17: ...t notification through SCADA Wi Fi GSM Wi Max a cellular network and a point to point or mesh network 5 Activating a relay 6 Counting detected objects E g people entering a building 7 Pointing a PTZ c...

Page 18: ...s capabilities that can be controlled and monitored over a standard IP based computer network using the SC video management software The SC receives video from SmrtHVR NVRs and provides a secure singl...

Page 19: ...SC User Guide V3 14 www intelliview ca support intelliview ca 6 Introduction Section 1 Introduction...

Page 20: ...SC User Guide V3 14 www intelliview ca 7 support intelliview ca SC Interface Section 2 SC Interface SC Interface Section 2...

Page 21: ...ed video 6 Video Recording Playback replays recorded alarm video and imported archived videos from 7 PTZ Camera Control provides access to PTZ controls via on screen control buttons or an IntelliView...

Page 22: ...s 2 2 SC Interface The SC interface contains several components Fig 3 1 Administration Toolbar top left of the screen allows access to Users menu to manage user accounts sign in and out of the SC Sett...

Page 23: ...r the live video preview screen All Sites button for displaying all live feed screens of active cameras Pan Tilt Zoom PTZ Controls for operating a PTZ camera connected to the SmrtHVR using the directi...

Page 24: ...multiple screens for navigating through video screens or screen sets depending on the layout used Manual Auto Screen Rotation icon center bottom to flip video screens automatically every 20 seconds ve...

Page 25: ...e SmrtHVR into the SC instead the IntelliView logo will be on constant display In this mode there is the option to show or hide the live footage of a progressing alarm using the Live Video On Alarm to...

Page 26: ...ID admin and Password admin 3 Click the OK button The SC interface will load as shown in Figure 2 Before proceeding we recommend resetting the primary User ID and Password for security purposes The i...

Page 27: ...has full access to the system a user will be able to view operate or modify only the settings and tools he has permission to as specified here For example a user whose Rule Wizard is disabled will be...

Page 28: ...dd Monitoring Station User dialog box The newly created users operator can now access the SC video management software using their new User ID and Password Users who are not given the Modify Users pri...

Page 29: ...ll sites click the All Sites button Fig 11 2 4 1 Changing Live Camera Panel Layout The video panel can display camera feeds in several layouts including single view and various grid styles When the La...

Page 30: ...The Full Screen icon can also be applied to the video panel in any layout mode To revert to the previous viewing mode click the icon again 2 4 3 Viewing Live Camera on Auto Rotation When there are mor...

Page 31: ...the Video Panel The position of live camera feed screens of a site not across sites can be rearranged in two ways 1 Click on a screen hold the mouse button drag to its new location and then release th...

Page 32: ...their info bar or on screen display OSD This is located at the top of each video screen As shown in Figure 15 the background of the OSDs are in color neon green blue red and gray The colors match both...

Page 33: ...SC User Guide V3 14 www intelliview ca support intelliview ca 20 SC Interface Section 2 SC Interface...

Page 34: ...SC User Guide V3 14 www intelliview ca 21 support intelliview ca Analytics Rules Section 3 Analytics Alarm Rules Analytics Alarm Rules Section 3...

Page 35: ...y way to manage and automate tasks to free up an operator s time and make security systems more efficient All the tasks mentioned above and more can be performed automatically and in real time by the...

Page 36: ...ppears the system will raise an alarm This can be used in theft prevention as well as safety monitoring 4 Object Left Behind The software can detect if a new object has been placed in the frame This i...

Page 37: ...be raised if a person is detected to be loitering This type of analytics looks for typical human behavior based on specific rule parameters such as time spent at a region of interest ROI 8 Digital In...

Page 38: ...ions that can force birds to land and in which other solutions may be unable to function It is automated and can be slaved to air cannons or other devices already in place 5 EFOY Voltage Monitor This...

Page 39: ...list of Modbus functionality contact IntelliView or refer to the SmrtHVR Manual 11 Speed Limit Violation Speed thresholds are defined for a radar device where if the defined speed is exceeded an alarm...

Page 40: ...effectively define sophisticated areas for application of analytic rules It is designed to eliminate the use of multiple boxes for one or more rules intended for a single monitored scene 3 1 1 Drawing...

Page 41: ...pe To draw a polygon begin by using the same methodology as with drawing a box Section 3 1 1 Once a starting point has been set slide the mouse up to the point where the line s endpoint needs to be an...

Page 42: ...intended length and move clockwise or counterclockwise until the desired direction of the arrow is achieved and then release 3 1 4 Drawing a Two Way Trip Wire A multidirectional trip wire looks like a...

Page 43: ...es the SC user to view add new and modify existing alarm rules for each camera connected to linked SmrtHVRs All changes occur in the SmrtHVR and the SC simply acts as a remote viewer and controller Ru...

Page 44: ...preview screen 4 Rule Properties This is where rules are set and configured name type preferred action when triggered among other settings 5 Object Detection Settings These settings determine the cri...

Page 45: ...dified in the Rule Properties panel F The Delete Rule button is used to permanently delete a rule that is selected in the Rule List panel G The Coupling button is used to combine rules from any camera...

Page 46: ...defined therefore the Rule Shape options are shown Rule shapes include a line applicable only to trip wire rules a rectangle and a polygon Refer to Types of Regions Section 3 1 for application of shap...

Page 47: ...ger Relay Number This enables the system to activate an external digital IO device connected through a serial or USB connection The port number of the external device needs to be specified in the text...

Page 48: ...in Section 3 1 2 Rule Shape with Time This option will appear when a rule such as Loitering Fig 26 or Liquid Leak Detection is selected The time specified tells the rule how long an object is require...

Page 49: ...Monitor rule is selected it is possible to specify the trigger time between the first and the next alarm This is similar to the Minimum Delay Between Consecutive Alarms feature except that the interv...

Page 50: ...is setting can be configured a Modbus device must first be added See Section 9 of SmrtHVR manual for setup instructions Note a technical person is required to facilitate this setup 8 Rule Shape with C...

Page 51: ...Temperature in Region Applied to thermal cameras this rule enables the system to disqualify or qualify objects based on their temperature The specified Wait Time 5 to 60 is the amount of time in seco...

Page 52: ...g specific days and times un check the Always Active box At this point the Setup Schedule button will become available Click to open the dialog box and configure rule timings 1 Per rule the scheduler...

Page 53: ...utton will enable the rule from Monday through Friday and disable it on Saturday and Sunday The Weekends button will enable the rule on Saturday and Sunday and disable it Monday through Friday Once yo...

Page 54: ...rson large object or an animal small object from a car or person large object To Set a Minimum Object Size 1 Check the box to enable this feature 2 Enter the width and height variables manually in the...

Page 55: ...hich control alarming AND The primary rule is triggered followed by or at the same time as the secondary rule being triggered An alarm will not set off if the secondary rule is triggered first The pri...

Page 56: ...er interface 2 Select a camera Existing rules for this camera will load in the panel below the camera screen If rules do not exist create add rule s 3 Click the Coupling button Fig 38 4 Click the Add...

Page 57: ...dary rule needs to be triggered to set off the alarm If the secondary rule is triggered after this period no alarm will take place 10 Click the OK button to complete the action The couplings will now...

Page 58: ...rent rules explained in Section 3 7 is disabled the alarm will not get triggered A warning message will pop up 1 Select the camera from the drop down list to show existing rules in the Rule List panel...

Page 59: ...o a command to trigger an alarm Hence an externally triggered alarm is different from one generated by the system s analytics but it can still be managed the same way To set an Externally Triggered Al...

Page 60: ...rectly managed using the SC An internet connection is necessary for email transmission In the event of internet disruption emails will be saved automatically and immediately transmitted once connectiv...

Page 61: ...heck the Server Requires Authentication box 8 Enter the Username and Password 9 In the To pane enter the recipient address es in the Default Recipient Email field Up to five email addresses can be ent...

Page 62: ...SC User Guide V3 14 www intelliview ca 49 support intelliview ca Analytics Rules Section 3 Analytics Alarm Rules...

Page 63: ...SC User Guide V3 14 www intelliview ca support intelliview ca 50 Camera Controls Section 4 Camera Management Camera Management Controls Section 4...

Page 64: ...cameras from the same location or area E g Outdoor Leak Building Entrance Exit Sites and assign cameras to a site in the manner the organization wishes to view and manage their system Sites can be add...

Page 65: ...her Frame Interval only applicable to the JPEG mode values produce higher image quality but uses more network bandwidth while lower values use lesser bandwidth The User Access pane shows the users who...

Page 66: ...o delete a site A site containing cameras cannot be deleted until the cameras associated with that site are removed Deleting a camera is described in detail in the next section But in short left click...

Page 67: ...eir location e g Facility 1 To add a camera 1 Select the Site where you want the camera to be added and right click 2 Select Add Camera from the drop down menu Fig 48 This will open the Camera dialog...

Page 68: ...eo on Alarm settings is being used for all cameras 10 Choose an Alarm Color from the drop down list The selected color will be applied to the on screen display or title bar of the camera s video feed...

Page 69: ...ly when an alarm is triggered Note When adding a PTZ camera make sure that a PTZ Protocol is selected in the Camera Settings in SmrtHVR Program Settings to enable PTZ functionality and controls To edi...

Page 70: ...has movement and zoom capabilities either on its own or via a PTZ mount The built in controller of a PTZ camera located on the edge on site and connected to a SmrtHVR enables remote movement to direc...

Page 71: ...r a green border check that a PTZ Protocol is selected in the Camera Settings in the SmrtHVR s Program Settings Controlling PTZ Cameras with On Screen Buttons In the SC the PTZ controller is located o...

Page 72: ...rection it is pointing depending on where it is positioned Left click on the video area where you want the camera to turn north south east west or a diagonal direction and hold The closer the mouse cu...

Page 73: ...izontal motion according to the Pan Speed specified in the Movement Settings The camera will sweep in one direction then in the other Auto Tilt The camera will move upwards and downwards automatically...

Page 74: ...time frame Time Between Preset Rotation Jumps This determines the time the PTZ camera spends at each preset or the time between rotation jumps during an automatic pan as indicated in the Pattern Setti...

Page 75: ...he camera place the pointer to the edge of the screen where the camera needs to go and click repeatedly or click and hold Preset lists the camera s saved presets 1 to 255 Refer to Section 4 3 3 on how...

Page 76: ...a the Settings menu in the toolbar bar 2 Select a camera only applicable if the settings dialog box was accessed via the control bar otherwise proceed to Step 3 3 Double click an undefined preset to s...

Page 77: ...SC User Guide V3 14 www intelliview ca support intelliview ca 64 Camera Controls Section 4 Camera Management...

Page 78: ...SC User Guide V3 14 www intelliview ca 65 support intelliview ca Alarm Management Section 5 Alarm Management Alarm Management Reporting Section 5...

Page 79: ...larm video clip status informs if an alarm is Pending not viewed or Acknowledged viewed or not Pending To acknowledge right click the cell and select Acknowledge or Acknowledge All On the left of colu...

Page 80: ...ngs Recording is enabled in the associated SmrtHVR then the analytics overlay will also be visible on the snapshot in addition to the violated alarm rule An alarm image can be found in three places in...

Page 81: ...ht corner are used to navigate through the alarms list In the given example rule overlays are visible The Draw Objects button show and hides alarm rules and analytics overlays Refer to Section 5 1 3 f...

Page 82: ...where analytics is running The smaller green rectangles pinpoint the alarm triggers which in this case is a person s movement These overlays will only be present and the Draw Objects button available...

Page 83: ...is instead a way to track system events It displays information such as notification of alarm email generation system restart deletion of alarm video deactivation of a camera and registration confirm...

Page 84: ...n menu 2 Select the report period date and time 3 Click the Get Count button This will bring up the report and count total for each rule in the Count Report panel When a report is selected an alarm sn...

Page 85: ...the Ctrl or Shift key of the keyboard In the Graph the X axis stands for the Rule ID and the Y axis represents the total number of count Each graph shows up to 15 days of data Bar color can be changed...

Page 86: ...te The Modbus report creation tool in the SC has no association with the Modbus Reporting checkbox feature in the SmrtHVR s Alarm Rule Setup dialog box which is for sending reports to a PLC device in...

Page 87: ...SC User Guide V3 14 www intelliview ca support intelliview ca 74 Alarm Management Section 5 Alarm Management...

Page 88: ...SC User Guide V3 14 www intelliview ca 75 support intelliview ca Video Management Section 6 Video Management Alarm Videos and Archived Videos Section 6...

Page 89: ...Detail window Note This feature will only work of the AVI Generator is running in the SmrtHVR of the camera Please ensure this is the case Refer to the latest SmrtHVR Manual for more To enable this f...

Page 90: ...the Archive videos which are stored in the SmrtHVR The archive videos are viewable as long as these are not deleted from the SmrtHVR 6 1 1 Storage Limit Settings The number of videos that can be stor...

Page 91: ...de rule and analytic overlays during video replay This button will be active if the Record Overlay Data option was enabled in the SmrtHVR during the alarm The Acknowledge button is clicked to confirm...

Page 92: ...olumn the following video status icons may be seen video downloaded and ready for playback video clip request successfully sent video clip send request failed downloaded video clip cannot be found del...

Page 93: ...ble in the SC To play Archived videos 1 Click the Archive button Fig 73 to launch the Remote Video Player window Fig 74 2 Select a camera from the drop down list top left corner of the panel beside th...

Page 94: ...low the arrow keys The Status Bar 1 long displays the current state or mode of the video such as download time or completion or if it is playing or paused etc The Status Bar 2 short displays general i...

Page 95: ...are stored in the SC s C drive by default unless a different location is selected 1 In the Archives window select a video s starting point using the slider Alternatively select an alarm video from th...

Page 96: ...ly alarm related instead of spending endless hours of video review This feature is useful when a certain occurrence or activity that was not defined in an alarm rule and therefore not detected automat...

Page 97: ...ywhere The slice could be drawn on an entrance thus giving the view of people entering and exiting The slice could be placed across several static items thus enabling users to see whether a static obj...

Page 98: ...everal elements 1 Menu Bar Contains general commands pertaining to the operation of the SmrtSummary application such as opening files and building summaries 2 Summary Area Contains the SmrtSummary dis...

Page 99: ...l modes The Summary View button Fig 81 is used to switch between the two modes of analysis The button icon and the caption on the bottom will change depending on which mode is currently active SmrtSum...

Page 100: ...Item 1 followed by Open Folder from the drop down list 2 In the Select Folder dialog box Fig 83 select a folder and then a video file 3 Click the OK button The Folder Information Box will display inf...

Page 101: ...he selected position V or H Up to 3 are possible In the given example V was selected and therefore the drop down options for the Set V Sample No are selectable If both positions are needed complete st...

Page 102: ...e available to create a full build 12 SmrtSummary will take some time to be built The status bar below the build summary window will indicate the remaining percentage for the process to complete Build...

Page 103: ...ave the current summary Click Yes to save the current summary or click No to discard it and proceed Figure 87 Loading a new summary will erase the existing one so SmrtSummary will ask you to save it 2...

Page 104: ...ilding an Optimized Report By default SmrtSummary reports span 15 minutes each If a video exceeds this length the report is broken down into 15 minute reports displayed in the summary list box It is p...

Page 105: ...f and white when On 3 Click the Start button to build this summary Note To use Opt Sum it must be On before starting a build You cannot switch after the build has started or completed in which case a...

Page 106: ...l is the same as the one used during the building process Switch between the two layouts by clicking the layout button Fig 93 Item 2 if both slice positions are in use 2 Hover the mouse over the porti...

Page 107: ...nd once done playback will stop The SmrtPlayer controls Fig 95 item 2 allow playing of video in either forward or backward direction forward backward single frame skipping in addition to playback spee...

Page 108: ...SC User Guide V3 14 www intelliview ca 95 support intelliview ca Video Management Section 6 Video Management...

Page 109: ...SC User Guide V3 14 www intelliview ca support intelliview ca 96 Accessories Section 7 Accessories Additional Accessories Section 7...

Page 110: ...f movement of the handle also controls speed of camera movement the farther you move the handle from the center the faster the camera will rotate Move the joystick left or right to rotate pan the came...

Page 111: ...ate a SmrtLOCK Access Controller into the SC 7 2 1 Setting Up Access Control The Access Control settings are accessible from the Settings menu in the toolbar Fig 99 1 Edge side Settings determines whi...

Page 112: ...t click menu it is possible to manage access of doors being monitored by that particular camera and override any active lock or unlock schedule As shown in Figure 100 the menu offers three commands Un...

Page 113: ...he controller has been set up the card reader is ready to be added and configured in the system In the SmrtLOCK dialog box click Reader from the Select submenu Click the Add button to open the Reader...

Page 114: ...edule dialog box showing an inactive red schedule Fig 104 3 Enter a name for the new schedule For example business hours 7 2 5 Setting Up a Card Reader Schedule Figure 104 Card Reader Schedule panel i...

Page 115: ...er a name for the new unlock schedule for example business hours 4 To unlock the door all day every day of the week click the 24 7 button The whole grid will turn green as shown in Figure 105 To clear...

Page 116: ...open the Reader settings dialog box Fig 103 3 Under the Schedules submenu check the Execute Unlock Schedule on Holidays box 4 Click the OK button to save the change and return to the SmrtLOCK dialog...

Page 117: ...example accounting or management 4 Select the borderless box between the Double Swipe checkbox and Reader where the red arrow is pointing in Figure 108 5 Select a schedule from the list 6 Select chec...

Page 118: ...age frequency limit The User ID is the number found on the back of access cards This is required at set up 4 Assign an Access Profile If there is none that means a profile has not yet been set This ne...

Page 119: ...other SmrtHVRs box 2 Click the Edit button This will open the Copy SmrtLOCK User dialog box Fig 109 3 Select the targeted SmrtHVR from the Available box and then click the right arrow 4 Click the OK...

Page 120: ...s Databases to Another SmrtHVR and Access Controller When readers profiles and users are added a database of each is created and stored in the SmrtHVR and the access controller connected to it It is p...

Page 121: ...f the copied database 4 Click the right arrow 5 Click the OK button to complete the action This reinstates the SmrtLOCK dialog box 6 Click the Re Index Database button Note Re indexing a database user...

Page 122: ...SC User Guide V3 14 www intelliview ca 109 support intelliview ca...

Page 123: ...SC User Guide V3 14 www intelliview ca support intelliview ca 110 Maintenance Section 8 System Info Maintenance System Technical Specs Maintenance Section 8...

Page 124: ...iview ca Maintenance Section 8 System Info Maintenance 8 System Technical Specs Maintenance Information This section contains technical information troubleshooting guide and and maintenance informatio...

Page 125: ...ed Re apply licence or contact IntelliView Camera is not showing in the Sites Cameras panel Camera is not added to the SC or camera info is incorrect or SmrtHVR is offline Add the camera to the SC and...

Page 126: ...and videos are not showing Firewall Add the SC and the SmrtHVR to the computer s Firewall There is no live video output replaced by IntelliView logo despite the SC showing the channel status as green...

Page 127: ...when you clean it After cleaning allow 30 minutes dry time before using it again 5 Remember to clean your display at regular intervals Spray dialog box cleanser onto a soft cloth and then wipe the di...

Page 128: ......

Page 129: ...Thank you for choosing For support Call 1 888 922 9235 Emailsupport intelliview ca Visit www intelliview ca...

Reviews: