background image

69

En

To control the AV receiver with the remote controller 
while you’re in Zone, you’ll need a commercially 
available multiroom remote control kit for each zone.
• Multiroom kits are made by Niles and Xantech.
These kits can also be used when there isn’t a clear line of 
sight to the AV receiver’s remote sensor, such as when it’s 
installed inside a cabinet.

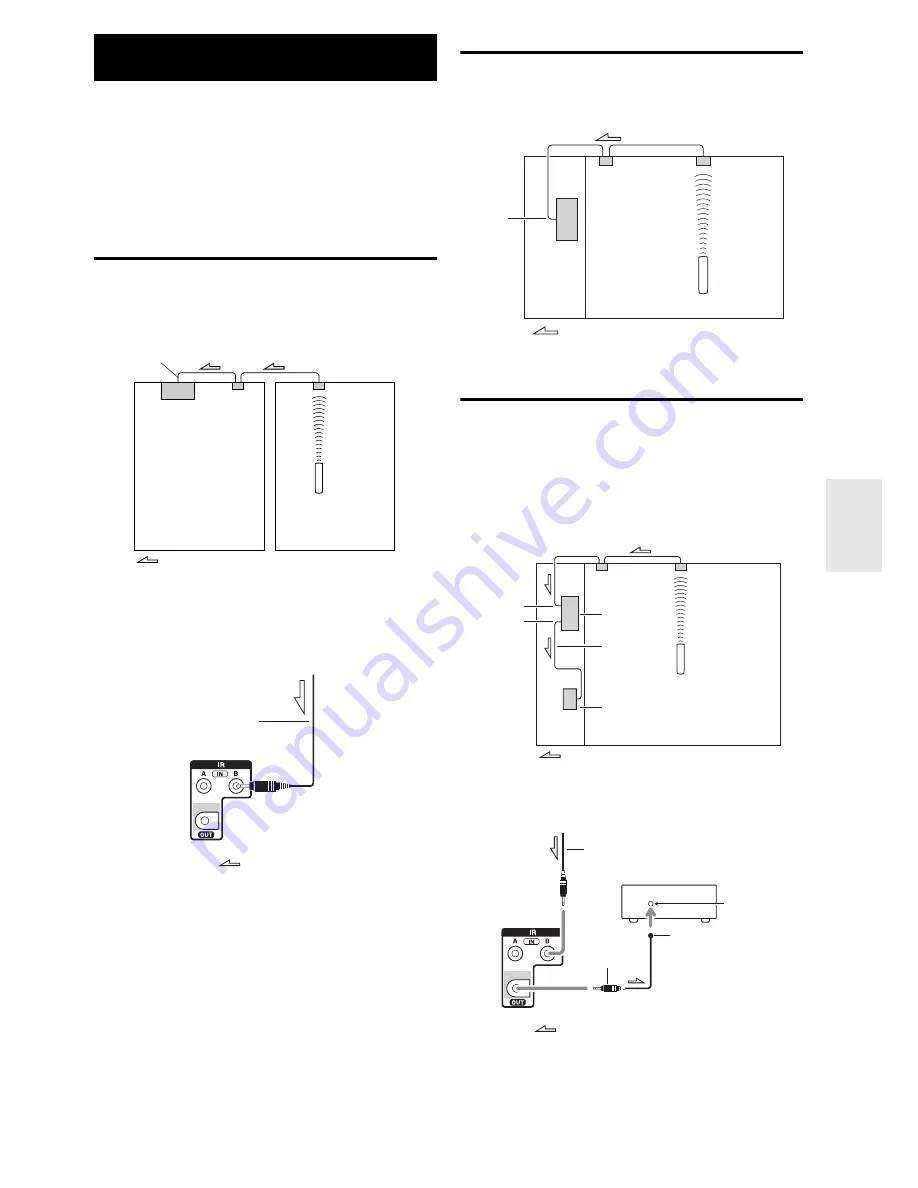
Using a Multiroom Kit with Zone

In this setup, the IR receiver in Zone picks up the infrared 
signals from the remote controller and feeds them through 
to the AV receiver in the main room via the connecting 
block.

The miniplug cable from the connecting block should be 
connected to the AV receiver’s 

IR IN


A

 or 

B

 jack, as 

shown below. The 

IR IN


A

 and 

B

 jacks are identical. Up 

to two IR receivers can be connected.

Using a Multiroom Kit with a Cabinet

In this setup, the IR receiver picks up the infrared signals 
from the remote controller and feeds them to the AV 
receiver located in the cabinet via the connecting block.

Using a Multiroom Kit with Other 
Components

In this setup, an IR emitter is connected to the AV 
receiver’s 

IR OUT

 jack and placed in front of the other 

component’s remote control sensor. Infrared signals 
received at the AV receiver’s 

IR IN


A

 or 

B

 jack are fed 

through to the other component via the IR emitter. Signals 
picked up by the AV receiver’s remote control sensor are 
not output.

The IR emitter should be connected to the AV receiver’s 

IR OUT

 jack, as shown below.

Using the Remote Controller in 
Zone and Multiroom Control Kits

Connecting 
block 

Remote controller

IR 
receiver

Main room

Zone

Signal flow

IR IN A or B

From the connecting block

Miniplug cable

AV receiver

Signal flow

Connecting 
block

Remote controller

IR 
receiver

Inside 

cabinet

Signal flow

IR IN 

A or B

Connecting 
block

IR receiver

Remote controller

Signal flow

IR Emitter

Other component

AV receiver

IR IN 

A or B

IR OUT

Remote 
control 
sensor

Other component

Emitter

IR Emitter

Signal flow

Miniplug

Miniplug cable

AV receiver

Summary of Contents for DTR-50.3

Page 1: ...AV Receiver DTR 50 3 Instruction Manual...

Page 2: ...he apparatus does not operate normally by following the operating instructions Adjust only those controls that are covered by the operating instructions as an improper adjustment of other controls may...

Page 3: ...his unit 8 Handling Notes If you need to transport this unit use the original packaging to pack it how it was when you originally bought it Do not leave rubber or plastic items on this unit for a long...

Page 4: ...ntroller doesn t work reliably try replacing the batteries Don t mix new and old batteries or different types of batteries If you intend not to use the remote controller for a long time remove the bat...

Page 5: ...AV Receiver 41 Using Headphones 41 Using Easy Macros 42 Recording 42 Advanced Setup 43 On screen Setup Menus 43 Common Procedures in Setup Menu 43 Input Output Assign 44 Speaker Setup 47 Audio Adjust...

Page 6: ...tical 3 Coaxial Component Video Switching 3 Inputs 2 Output Universal Port for the Dock for iPod iPhone 10 HD Radio 11 tuner module North American models DAB tuner module Australian models Banana Plug...

Page 7: ...ctively and has been certified by the developer to meet Apple performance standards Apple is not responsible for the operation of this device or its compliance with safety and regulatory standards Ple...

Page 8: ...Monitor Out button 44 f Remote control sensor and transmitter 4 g Tone and Tone Level buttons 63 h Display 9 i Listening Mode buttons 34 j Dimmer button North American models 40 k Memory button 29 l...

Page 9: ...uning indicators RDS indicator excluding North American models 29 AUTO indicator 28 TUNED indicator 28 FM STEREO indicator 28 h Audio input indicators i Bi AMP indicator 14 47 j Audyssey indicator 31...

Page 10: ...d AM ANTENNA terminal o PC IN jack p AC INLET q GND screw r Composite S Video and analog audio jacks BD DVD IN VCR DVR IN and OUT CBL SAT IN GAME IN PC IN TV CD IN and PHONO IN s Multichannel input ja...

Page 11: ...lay button d CH button 29 e Number buttons 29 1 When you want to change the remote controller mode target component without changing the current input source press Mode and within about 8 seconds pres...

Page 12: ...f insulation from the ends of the speaker cables and twist the bare wires tightly as shown Banana Plugs North American models If you are using banana plugs tighten the speaker terminal before insertin...

Page 13: ...with a lower impedance and use the amplifier at high volume levels for a long period of time the built in protection circuit may be activated Disconnect the power cord from the wall outlet before mak...

Page 14: ...fer with two SUBWOOFER PRE OUT jacks respectively The same signal is output from each jack Tip If your subwoofer is unpowered and you re using an external amplifier connect the subwoofer pre out jack...

Page 15: ...ou can use the AV receiver as a preamp Connect all speaker outputs to the power amplifier See the manuals supplied with your amplifier for details Note 1 Specify None for any channel that you don t wa...

Page 16: ...st picture quality some TV manufacturers label their component video sockets slightly differently Analog RGB This is a conventional analog interface to connect a PC and a display device also called D...

Page 17: ...the TV screen on the TV select the input of the HDMI component connected to the AV receiver If the TV power is off or the TV is set to another input source this may result in no sound from the AV rece...

Page 18: ...Components The on screen menus appear only on a TV that is connected to the HDMI OUT MAIN If your TV is connected to other video outputs use the AV receiver s display when changing settings C A B F D...

Page 19: ...ubwoofer sensitivity for the multichannel input see Subwoofer Input Sensitivity page 47 With connection D you can enjoy Dolby Digital and DTS To record or listen the audio in Zone 2 3 as well use D an...

Page 20: ...ons do not work See Recording for details on recording page 42 Note The AV receiver must be turned on for recording Recording is not possible while it s in standby mode If you want to record directly...

Page 21: ...omentary power surge that might interfere with other electrical equipment on the same circuit If this is a problem plug the AV receiver into a different branch circuit Do not use a power cord other th...

Page 22: ...eiver followed by 8Receiver on the remote controller The AV receiver comes on the display lights Turning Off 1 Press 8On Standby on the front panel or Press Receiver followed by 8Receiver on the remot...

Page 23: ...kyo Dock page 70 Controlling Other Components page 73 3 To adjust the volume use VOL q w 4 Select a listening mode and enjoy See also Using the Listening Modes page 34 Audyssey page 52 1 Use the input...

Page 24: ...the Display Displayed Icons Icon Description Folder Track Playback Pause Fast Forward Fast Reverse Artist Album Repeat One Track Repeat Folder USB Device Repeat Shuffle Shuffle Album iPod iPhone Play...

Page 25: ...the following formats are supported PLS M3U and podcast RSS However depending on the type of data or audio format used by the Internet radio station you may not be able to listen to some stations Not...

Page 26: ...e one currently being played back are displayed Add to My Favorites Adds a station to My Favorites list Press Top Menu to go to the top menu of the Internet Radio services Tip By pressing Search you c...

Page 27: ...server the AV receiver may not able to access the content See the instruction manual of the media server 5 Use q w to select an item and then press Enter or 1 to start playback Note Depending on the...

Page 28: ...cannot be made 6 Adjusting the Volume You can adjust the volume by adjusting the volume bar in the Remote playback window The default maximum volume level is 82 0dB If you wish to change this enter t...

Page 29: ...ows you to search for RDS radio stations that broadcast traffic information page 30 Note In some cases the text characters displayed on the AV receiver may not be identical to those broadcast by the r...

Page 30: ...t Found appears 1 Press RT PTY TP three times If the current radio station is broadcasting TP Traffic Program TP will appear on the display and traffic news will be heard as and when it s broadcast If...

Page 31: ...with the microphone tip pointed directly at the ceiling using a tripod Do not hold the microphone in your hand during measurements as this will produce inaccurate results First measurement position A...

Page 32: ...ion 6 Press Enter Audyssey MultEQ XT Room Correction and Speaker Setup starts Test tones are played through each speaker as Audyssey MultEQ XT Room Correction and Speaker Setup runs This process takes...

Page 33: ...be set to 80Hz THX If you set up your speakers using Audyssey MultEQ XT Room Correction and Speaker Setup please make sure manually that any THX speakers are set to 80Hz THX crossover page 47 Sometime...

Page 34: ...video games THX button This button selects the THX listening modes Using the Listening Modes Game THX Movie TV Music Press Receiver first Movie TV Music Game The Dolby Digital and DTS listening modes...

Page 35: ...stereo stereophonic sound Two independent audio signal channels are reproduced through two speakers D This is 5 1 channel surround sound This surround system has five main channels of sound and a six...

Page 36: ...output the same sound in mono so the sound you hear is the same regardless of where you are within the listening room T D Theater Dimensional With this mode you can enjoy a virtual surround sound even...

Page 37: ...rotating and fly by sound effects D H V Dolby Digital In this mode audio from the input source is output without surround sound processing The speaker configuration presence of speakers crossover fre...

Page 38: ...ers and home theaters just as the director intended THX Modes carefully optimize the tonal and spatial characteristics of the soundtrack for reproduction in the home theater environment They can be us...

Page 39: ...on of Dolby Pro Logic IIz Height and THX Cinema Music Games modes can be used The PLIIz indicator lights on the display S D F G H B DTS Neo 6 Cinema THX Cinema DTS Neo 6 Music THX Music S CN DTS Neo 6...

Page 40: ...ut source Pressing Enter again switches to the selected input source Audio You can change the following settings Bass Treble Subwoofer Level Center Level Dolby Volume Audyssey Dynamic EQ Dynamic Volum...

Page 41: ...resolution Signal format 1 Listening mode Sampling frequency TV CD DOCK TAPE TV CD GAME DOCK Game VCR DVR DOCK VCR DVR Selecting Speaker Layout 1 Press Receiver followed by SP Layout repeatedly to sel...

Page 42: ...ents activated by the Easy Macro mode Examples If you wished to use My Music to start the Onkyo cassette recorder you would press and hold down My Music about 3 seconds while holding down TV CD until...

Page 43: ...Setup 9 Lock Setup a b c d e f g h i 1 Monitor Out 2 HDMI Input 3 Component Video Input 4 Digital Audio Input 5 Analog Audio Input 1 Input Output Assign 1 Volume Setup 2 OSD Setup 3 12V Trigger A Setu...

Page 44: ...TVs Both Main Select this if your TVs are connected to HDMI OUT MAIN and HDMI OUT SUB Video signals are output from both HDMI outputs but HDMI OUT MAIN will become a priority depending on the resoluti...

Page 45: ...to Through 2 These settings are not available when the Monitor Out setting is set to Analog page 44 HDMI Input If you connect a video component to an HDMI input you must assign that input to an input...

Page 46: ...ng is set to Analog page 44 Here are the default assignments BD DVD VCR DVR CBL SAT GAME PC AUX TV CD PHONO PORT IN1 IN2 IN3 Select a corresponding component video input to which the video component h...

Page 47: ...turn down the volume Speaker Impedance 4ohms Select if the impedance of any speaker is 4 ohms or more but less than 6 6ohms Select if the impedances of all speakers are between 6 and 16 ohms Speakers...

Page 48: ...s function can be set only if the Subwoofer setting is set to Yes and the Front setting is set to Full Band If you re using THX certified speakers select Off THX Subwoofer Phase 0 180 Moves the subwoo...

Page 49: ...ker so that it reads 75 dB SPL at the listening position measured with C weighting and slow reading Equalizer Settings With the Equalizer settings you can adjust the tone of speakers individually with...

Page 50: ...Digital or 2 channel analog PCM source in the Mono listening mode Output Speaker Center Mono audio is output by the center speaker Left Right Mono audio is output by the front left and right speakers...

Page 51: ...t to None page 48 this setting cannot be selected If the Front High or Front Wide setting is enabled page 48 this setting is fixed to Manual Dolby Volume Off On Dolby Volume automatically adjusts the...

Page 52: ...dB 1 Dolby Digital and Dolby Digital Plus sources 2 DTS and DTS HD High Resolution sources 3 DSD Super Audio CD sources Items can be set individually for each input selector Main menu Source Setup Aud...

Page 53: ...If you want to use Audyssey Dynamic EQ or Audyssey Dynamic Volume with THX listening modes set the Loudness Plus setting to Off and set Preserve THX Settings to No page 50 If you make Dynamic Volume a...

Page 54: ...s edited using the character input screen Name To correct a character Tip To name a radio preset use Tuner to select AM or FM and then select the preset page 29 To restore a custom name to its default...

Page 55: ...ration Color Temperature Gamma Red Brightness Red Contrast Green Brightness Green Contrast Blue Brightness or Blue Contrast The receiver has been designed to incorporate setup and calibration standard...

Page 56: ...ture resolution as necessary to match the resolution supported by your TV Available only when Source has been selected in the Resolution of the Monitor Out setting page 44 Brightness 1 3 5 50 to 0 to...

Page 57: ...be selected only when the selector is set to BD DVD 1 You can select ARC if you select the TV CD input selector But you cannot if you ve selected Off in the Audio Return Channel setting page 61 Fixed...

Page 58: ...to 18 0dB With this setting you can choose how the volume level is displayed The absolute value 82 is equivalent to the relative value 0 dB Note If the absolute value is set to 82 82Ref will appear o...

Page 59: ...l is output A 12 volt trigger signal is output when the connected component is selected as the source for Main Main room Zone 2 Zone 2 Main Zone 2 Main room or Zone 2 Zone 3 Zone 3 Main Zone 3 Main ro...

Page 60: ...omponent it is displayed as Player or Recorder etc shows up and indicates the number of components when two or more are received When an p compatible component is connected to the AV receiver via an H...

Page 61: ...dio the sound will be heard from AV receiver s speakers Audio Return Channel Off Auto The audio signal from your TV tuner can be sent to the HDMI OUT MAIN of the AV receiver The audio return channel A...

Page 62: ...ay Enter the gateway address provided by your ISP DNS Server Enter the DNS server address provided by your ISP Proxy URL To use a Web proxy enter its URL here Proxy Port If you re using a Web proxy en...

Page 63: ...can protect your settings by locking the setup menus Main menu Lock Setup Setup Locked Unlocked When Locked is selected the setup menus will be locked and you cannot change any setting You can change...

Page 64: ...equires the Audyssey MultEQ XT Full Calibration method Any listening mode other than Direct is selected A pair of headphones is not connected multichannel analog input is not selected The setting is s...

Page 65: ...ut is selected Re EQ With the Re EQ function you can compensate a soundtrack whose high frequency content is too harsh making it more suitable for home theater viewing Re EQ Off On This function can b...

Page 66: ...d Zone 2 cannot be used if Speakers Type Front is set to Bi Amp page 47 When Powered Zone 2 is used listening modes that require front high front wide or surround back speakers are unavailable Connect...

Page 67: ...urns on the Z2 3 indicator lights on the display Tip The corresponding trigger output goes high 12 V To select AM or FM press Tuner input selector and Zone 2 or Zone 3 repeatedly To select the same so...

Page 68: ...lection will be retained once you have switched to other components by pressing other Remote Mode after pressing Zone The 12V triggers A B and C can be used to turn on 12V trigger capable components a...

Page 69: ...oller and feeds them to the AV receiver located in the cabinet via the connecting block Using a Multiroom Kit with Other Components In this setup an IR emitter is connected to the AV receiver s IR OUT...

Page 70: ...iver is set to on or standby You can specify how the power is fed to your iPod iPhone when the AV receiver is in standby mode page 57 Note When the UP A1 Dock with docked iPod iPhone is connected the...

Page 71: ...the remote controller that came with the AV receiver to control other iPod iPhone functions The available functionality depends on the AV receiver iPod iPhone Alarm If you use the Alarm function on yo...

Page 72: ...ch between song informations In Standard mode see 7 Display turns on backlight for a second 6 Display turns on backlight for a second 7 Press Mode to switch between the following modes Standard mode N...

Page 73: ...gory selection appears 5 Use q w to select a category and then press Enter The panel for brand name input appears 6 Use q w e r to select a character and then press Enter Repeat this step for the firs...

Page 74: ...ion menu Press Setup to end the remote mode setup 15 15 Approx 16 ft 5 m 15 off center Left Right Up Down Input sensor Transmitter Entering Remote Control Codes 1 Look up the appropriate remote contro...

Page 75: ...wing remote control codes 11807 13100 13500 TV with p Controlling a Blu ray Disc DVD Player HD DVD Player or DVD Recorder BD DVD is preprogrammed with the remote control code for controlling a compone...

Page 76: ...r A B C D buttons Note See the Controlling Your iPod iPhone about the operation of iPod iPhone page 71 c d a b i e f h g j k m l n Press the appropriate Remote Mode first TV DVD player DVD recorder Bl...

Page 77: ...ries all commands acquired will be lost and will have to be learned all over again Therefore do not discard your other remote controllers Deleting Acquired Commands 1 While holding down Remote Mode fo...

Page 78: ...lt settings namely the Easy macro commands page 42 When using Normal macros Easy macros cannot be used which includes changing the source components Using Normal Macros 1 While holding down Receiver p...

Page 79: ...and set the volume to maximum If the AV receiver stays on set the volume to minimum disconnect the power cord and reconnect your speakers and input sources If the AV receiver turns off when you set th...

Page 80: ...n in the LFE channel the subwoofer produces no sound Make sure the speakers are configured correctly 47 Check the digital audio output setting on the connected device On some game consoles such as tho...

Page 81: ...her than Through no video is output by the HDMI outputs When the resolution is set to any resolution not supported by the TV no video is output from the HDMI outputs 45 If the message Resolution Error...

Page 82: ...y Try resetting your iPod iPhone Make sure that your iPod iPhone model s TV OUT setting is set to On Make sure the correct input is selected on your TV or the AV receiver Some versions of the iPod iPh...

Page 83: ...several networked devices simultaneously the network may become overloaded and playback may be interrupted Reduce the number of playback devices on the network upgrade your network or use a switch ins...

Page 84: ...power cord from the wall outlet wait at least five seconds and then plug it back in Onkyo is not responsible for damages such as CD rental fees due to unsuccessful recordings caused by the unit s malf...

Page 85: ...ver from your PC while it is being updated Never unplug the power cord during the update process It takes maximum 60 minutes to complete the firmware update The AV receiver will retain all your settin...

Page 86: ...n your Integra AV receiver Error Code Description 10 20 The Ethernet cable was not detected Reconnect the cable properly 11 13 21 28 Internet connection error Check the following items Make sure the I...

Page 87: ...eiver indicating that the update has been completed 13 Using 8On Standby on the front panel turn off the AV receiver and then remove the USB device Do not use 8Receiver on the remote controller Congra...

Page 88: ...ideo input signals flow through the AV receiver as shown with composite video S Video PC IN Analog RGB and component video sources all being upconverted for both HDMI outputs Use these settings if you...

Page 89: ...ponents can be connected by using any of the following audio connection formats analog analog multichannel optical coaxial or HDMI When choosing a connection format bear in mind that the AV receiver d...

Page 90: ...in the Monitor Out setting page 44 and Through in the Resolution setting page 45 The on screen menus and superimposed menus are displayed via HDMI OUT MAIN Video Resolution Chart HDMI 4K 2 1080p 24 10...

Page 91: ...ther AV receiver AV amplifier via HDMI Proper linked operations are not guaranteed when more p compatible components than the above mentioned quantities are connected For p compatible TV The following...

Page 92: ...f the TV and confirm that the audio is output from the speakers of the TV and not from the speakers connected to the AV receiver 6 Select Use the speakers connected from the AV receiver from the menu...

Page 93: ...receiver via HDMI must also support HDCP 1 DVI Digital Visual Interface The digital display interface standard set by the DDWG 3 in 1999 2 HDCP High bandwidth Digital Content Protection The video encr...

Page 94: ...ease consult your ISP or computer dealer if you re unsure CAT5 Ethernet cable Use a shielded CAT5 Ethernet cable straight type to connect the AV receiver to your home network Internet Access for Inter...

Page 95: ...ecommend that you use its AC adapter to power it The AV receiver supports USB MP3 players that support the USB Mass Storage Class standard which allows USB devices to be connected to computers without...

Page 96: ...of 8 kHz 11 025 kHz 12 kHz 16 kHz 22 05 kHz 24 kHz 32 kHz 44 1 kHz 48 kHz 64 kHz 88 2 kHz and 96 kHz are supported Quantization bit 8 bit 16 bit 24 bit AAC aac m4a mp4 3gp 3g2 AAC M4A MP4 3GP or 3G2...

Page 97: ...ristics 10 dB 50 Hz BASS 10 dB 20 kHz TREBLE Signal to Noise Ratio 110 dB LINE IHF A 80 dB PHONO MM IHF A Speaker Impedance 4 or 6 16 Input Sensitivity Output Level and Impedance 1 Vp p 75 Component a...

Page 98: ...PRE OUT ZONE2 PRE LINE OUT ZONE3 PRE LINE OUT Analog Multichannel Pre Outputs 7 Subwoofer Pre Outputs 2 Speaker Outputs Main L R C SL SR SBL SBR Front Wide ZONE2 L R Front High L R Phones 1 6 3 Setup...

Page 99: ...99 En Memo...

Page 100: ...0 Fax 201 785 2650 http www integrahometheater com Integra Division of Liegnitzerstrasse 6 82194 Groebenzell GERMANY Tel 49 8142 4401 0 Fax 49 8142 4401 555 http www eu onkyo com Integra Division of 1...

Reviews: