background image

EN

EN-12 

47612267 Rev B

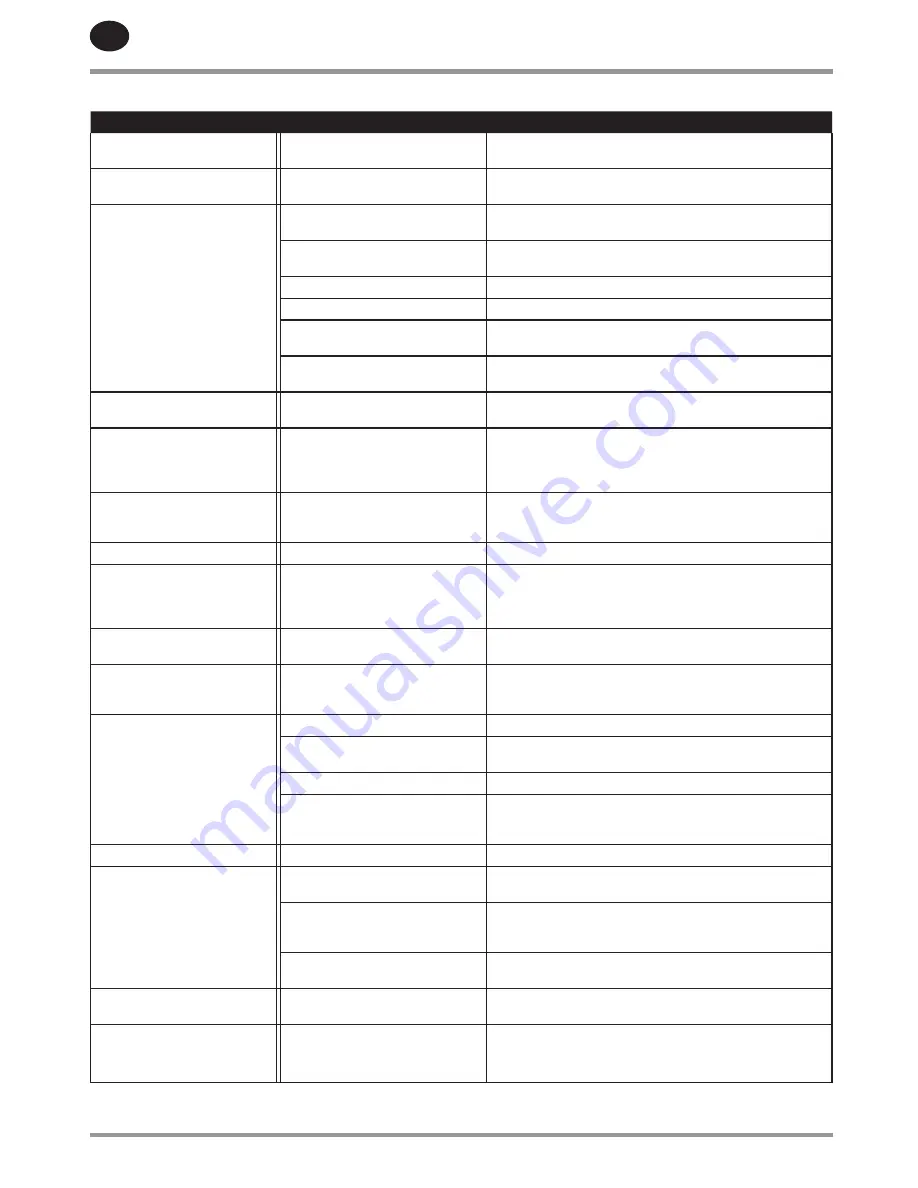
Table 4: Controller Faults (indicated on the controller)

FAULT

CAUSE

REMEDY

Emergency stop.

Emergency stop button has 
been pressed.

Identify reason why, repair fault, disengage button and 
reset controller.

Blower motor overload.

Blower is blocked, damaged or 
blower motor is faulty.

Remove blockage, repair or replace damaged 
components.

High airend discharge 
temperature.

Compressor operating above 
rated pressure.

Check and modify settings. Review system requirements 
and contact your local 

Ingersoll Rand

 representative.

Low coolant level.

Check for leaks. See also ‘discharge air is contaminated 
with coolant’. Top up coolant.

High ambient temperature.

Review installation and system parameters.

Insufficient cooling air.

Check ducting and cooling air path.

Dirty, blocked coolant cooler 
(cooling air side).

Clean or replace.

Blower motor direction of 
rotation incorrect.

Wire correctly.

Check setpoints.

Controller software has been 
changed.

Recalibrate all sensors and check setpoints.

Remote start failure.

Remote start button is pressed 
after compressor is running or 
remote start button remains 
closed.

Check operation of buttons or operating procedures.

Remote stop failure.

Remote stop button remains 
open and either start button is 
pressed.

Check operation of buttons or operating procedures.

Sensor failure.

Sensor is missing or faulty.

Install, repair or replace faulty sensor.

Compressor trips indicating 
a high compressor 
temperature.

Insufficient cooling taking place.

If compressor is watercooled or sea watercooled, check 
that the cooling water is flowing. Check that there is no 
air in the water cooling system. Check that the strainer is 
not blocked.

Controller has tripped the 
compressor.

A fault has occurred.

Repair fault / reset controller.

Invalid calibration.

Calibration done with pressure 
in compressor.

Depressurize and re calibrate with pressure pipe to 
sensor disconnected. If fault still exists, replace pressure 
transducer.

Low sump pressure.

System leak.

Located and repair.

Minimum pressure check valve 
faulty.

Repair with service kit.

Blowdown valve faulty.

Repair with service kit.

Loss of control power.

Check 110V circuit breaker. 
Check wiring.  
Check contactor KM1.

Check motor rotation.

Drive system fault.

Contact your local 

Ingersoll Rand

 representative.

Change separator element 
and/or high sump pressure.

Faulty pressure transducer 
measurement.

Calibrate and validate the wet sump and package 
discharge transducers.

Moisture separator condensate 
drain trap faulty.

Ensure condensate drain system  is functioning 
properly, and condensate is being drained. See Table 4: 
Troubleshooting Chart.

Separator element dirty or 
blocked.

Change separator element.

Machine stops but no alarm 
message

Loss of outputs of control power.

Check controller outputs (110V AC) power supply (fuses/
mini circuit breaker).

Motor current fault

Loss of control power.
Sump pressure too high.
Faulty motor or Airend.

Check control power circuit and breaker.
Check separator element pressure drop.
Contact your local Ingersoll Rand representative.

RELEASED 11/Feb/2019 01:43:20 GMT

Summary of Contents for RS45i

Page 1: ...47612267 Revision B January 2019 Save These Instructions Contact Cooled Rotary Screw Air Compressor Product Maintenance Information RS45i RS55i RS75i RELEASED 11 Feb 2019 01 43 20 GMT...

Page 2: ...REGREASING MOTOR 7 CLEANING AIR COOLED COOLING SYSTEM 7 REMOVING INSTALLING AIR COOLED COOLER 8 CLEANING WATER COOLED COOLER FOR BOTH CLEAN HARSH WATER OPTIONS 8 CLEANING MOTOR COWL 8 CLEANING CHECKIN...

Page 3: ...nt training and experience to accomplish correctly In such situations only allow Ingersoll Rand trained technicians to perform maintenance on this compressor Service or inspections beyond the procedur...

Page 4: ...hours Analysis Food grade Lubricant Ultra FG Every 2000 hours Inspect Air filter element Inspect Coolant filter element Inspect Starter box power drive module PDM filter element Analysis Shock pulse b...

Page 5: ...unscrew the coolant fill plug to verify all pressure has been released 5 Add coolant 6 Replace the coolant fill plug and restart the compressor 7 Recheck the coolant level 8 Repeat the above steps unt...

Page 6: ...posite the pivot bolt which should be left engaged by 2 3 threads with at least 6 5 mm 0 25 in clearance from the screw head to the cover Rotate the jacking bolt clockwise until the cover lifts off th...

Page 7: ...om the compressor for testing If operating conditions are particularly severe the frequency of testing and maintenance shall be increased accordingly The user shall establish the frequency of such tes...

Page 8: ...es to fully de pressurize once stopped 4 Ensure that the main power disconnect switch is locked off and tagged 5 Install cooler mounting connection at both sides of cooling sheet metal plenum and keep...

Page 9: ...ter grill 4 Pull out the filter element 5 Center the new element over the package intake opening Also note that the filter is washable with mild detergent 6 Push the filter over the grill studs so tha...

Page 10: ...or not sized to meet system requirements or requirements have been changed Contact your local Ingersoll Rand representative Air loss due to pipe hose joint or seal failure Repair or replace Air loss d...

Page 11: ...Replace Incorrect coolant has been added Drain system check for damage Clean refill with correct coolant System has been overfilled with coolant Check for damage drain excess Discharge air is contamin...

Page 12: ...or temperature Insufficient cooling taking place If compressor is watercooled or sea watercooled check that the cooling water is flowing Check that there is no air in the water cooling system Check th...

Page 13: ...in the strainer body before replacing the filter screen 5 Replace plug and tighten with wrench 6 When putting the valve back into service press the TEST button to confirm proper function TESTING CONDE...

Page 14: ...t of the refrigerating compressor lubricating oil Contact a waste disposal and recycling utility Table 7 Integrated Dryer Materials of Construction RECYCLING DISASSEMBLY Frame and panels Steel epoxy r...

Page 15: ...RELEASED 11 Feb 2019 01 43 20 GMT...

Page 16: ...ingersollrandproducts com 2019 Ingersoll Rand RELEASED 11 Feb 2019 01 43 20 GMT...

Reviews: