background image

Nets One PA user guide  |   38

Configuring a terminal for cash register integration

The Lane 5000, Lane3000 and iCT250 may be integrated with a cash register (ECR) using its network connec-
tion (ethernet). This is useful for merchants that want to increase control of the terminal usage so that there is a 
lower risk of entering the wrong amounts and to improve the quality of the bookkeeping. 
If you have a terminal that is standalone today and you want to integrate it to your ECR, call our customer ser-
vices for assistance or your cash register vendor.

Configuring an IP integrated (ethernet) terminal

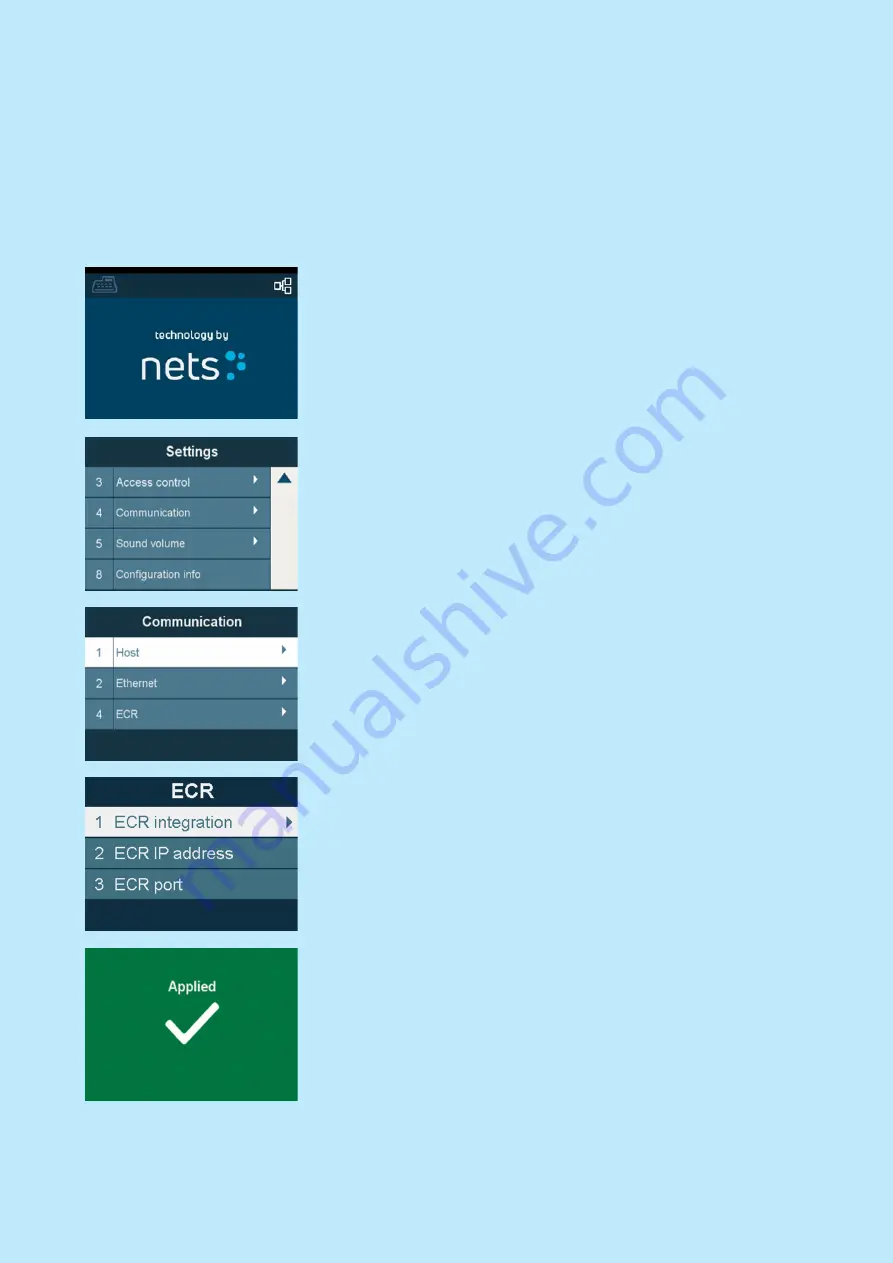
Press the Menu key and navigate to settings menu by pressing 0 
or using arrow keys and OK button


Press 4 or navigate to Communication by using the arrow keys 
and press OK

Press 4 or navigate to ECR by using the arrow keys and press 
OK

Select 1 ECR integration and set it to ON
Select 2 ECR IP address and key in the IP address of the cash 
register
Select 3 ECR port and key in the TCP port of the cash register 
application

The terminal is now ready for use with an ECR

Summary of Contents for iCT250E

Page 1: ...Nets One PA user guide 1 Nets Nordic Payment Terminals User Guide...

Page 2: ...rminal 15 Installing a Spire SPg7 Mobile terminal 16 Quick menu 17 Terminal menu structure 17 Header icons 18 List of header icons and their meaning 18 Terminal features Daily operation 19 Manual reco...

Page 3: ...ermination 44 Terminal security 44 PCI PTS compliance 44 Guidance for PIN entry 44 Periodical inspection of terminals 44 Introduction Thank you for choosing Nets Merchant Services as your payment term...

Page 4: ...e Power cable Charging unit Receipt roll Quick guide SIM card Power cable Quick guide Receipt roll SIM card Power cable Ethernet cable Quick guide Receipt roll SIM cards are supplied by Nets unless ot...

Page 5: ...inal range iCT250E Terminal overview Navigation keys to scroll up and down in menus Used to enter main menu Cancels the operation and returns to main menu Correct incorrect key entry or return to pre...

Page 6: ...50 3G Terminal overview Navigation keys to scroll up and down in menus Used to enter main menu Cancels the operation and returns to main menu Correct incorrect key entry or return to previous menu Con...

Page 7: ...terminal Lift the flap in the direction of the arrow Then slide the cover downwards in the direction of the arrow to open it Insert the roll in the terminal as shown Then close the cover again in the...

Page 8: ...he cable cover by pressing the clips upwards Lift the cover in the direction of the arrow When the cover has been removed connect the terminal power cable 1 and Ethernet cable 2 To close the cover aga...

Page 9: ...station Place the terminal on the base station The terminal will connect and is then ready for use Open the backside cover by pressing the clips downwards Insert the SIM card under the flasp labelled...

Page 10: ...e operation and return to the main menu Correct incorrect key entry or return to pre vious menu Confirm entry Installing a Lane 5000 terminal Lane 5000 is integrated with an ECR system using an Ethern...

Page 11: ...an Ethernet integration cable Please contact to your ECR sup plier for guidance on how to perform correct configuration and installation Navigation keys to scroll up and down in menus Used to entering...

Page 12: ...IM SAM compartment Please do not open unless instructed Serrated paper cutter Receipts will emerge from this slot and can be removed by pulling across the ser rated cutter Paper roll compartment Power...

Page 13: ...e cardholder presents a chip card Keypad For merchants card holder data entry Serrated paper cutter Receipts will emerge from this slot and can be removed by pulling across the serrated cutter Paper r...

Page 14: ...dle of the printer door Discard any packaging on the printer roll and fit the roll as shown The correct orientation of the paper is important it will not print if inserted the wrong way Close the prin...

Page 15: ...he two tabs upward and remove the rear cover Thread the black power supply cable into the recess on the right 1 and connect the network cable into the LAN port 2 on the back of the terminal Replace th...

Page 16: ...urface and remove the battery cover by applying pres sure on the tab and pulling upward If SIM card is not supplied by Nets please insert the SIM card into the socket labelled SIM1 Remove any packagin...

Page 17: ...inal menu structure Main menu Sub menu Sub menu Sub menu 1 Purchase 3 Refunds 1 Reversal 2 Refund 4 Other transactions 1 Force offline 5 Receipt Copies 1 Latest approved 2 Latest transaction 3 Latest...

Page 18: ...d in the terminal This symbol indicates that something is wrong with the sim card for mobile terminals There will be a text underneath showing what the problem is The battery icon tells you how much b...

Page 19: ...count If you want reconciliation to be handled auto matically at a predefined daily time please contact our customer services If you haven t reconciled your terminal at least once in the last 7 days i...

Page 20: ...mount directly When the amount is entered correctly press OK to continue Ask customer to swipe insert or tap a contactless card Customer is asked to enter PIN Press OK to continue Transaction status i...

Page 21: ...d transaction receipt Press the MENU key Press 5 or scroll down using the arrow key to Receipt copy and press OK Press 1 or scroll down to Latest approved and press OK The ter minal will now print the...

Page 22: ...eipt Press the MENU key Press 5 or scroll down using the arrow key to Receipt copy and press OK Press 2 or scroll down using the arrow key to Latest transaction and press OK This function will print a...

Page 23: ...partial amount see next chapter for refund transaction type Press the MENU key Press 3 or scroll down using the arrow key to Refunds and press OK Press 1 or select Reversal and press OK Verify that t...

Page 24: ...refunds Press the MENU key Press 3 or scroll down using the arrow key to Refunds and press OK Press 2 or scroll down using the arrow key to Refund and press OK Key in the amount you want to refund to...

Page 25: ...the customer will key in the desired tip amount and the total amount will change accordingly It is okay to proceed without adding tip by just pressing OK Total amount entry This mode is for Norway onl...

Page 26: ...t but ask whether one is wanted for the cardholder Always print the terminal will always print a receipt for the cardholder and one for the merchant Configure receipt printing modes Press the MENU key...

Page 27: ...act Nets customer services to change this information The middle area is where we display the transaction type tip amount and the total amount charged At the bottom of the box you will see whether or...

Page 28: ...rd is used the card must be opened for NFC transactions This is done by inserting the chip in the terminal while performing the transaction Wallet solution Wallet is a solution for confirming a contac...

Page 29: ...mount o Follow the terminal instructions o Key in the authorisation number when asked to do so and it will be added to the receipt No transactions above 10 000 NOK will be approved offline The merchan...

Page 30: ...connection is restored If you want to accelerate this action by initiating it manually please follow the procedure below Press the MENU key or start keying the amount directly Press 7 or scroll down u...

Page 31: ...cquirer agreement supports this func tionality The amount limit for how much it will approve offline is decided by the acquirer and the terminal can not override this amount I e if the acquirer has al...

Page 32: ...every day If the mer chant has several terminals automatic reconciliation will take place from the same terminal every time Please contact Nets customer services to activate this feature Central recon...

Page 33: ...s or log on to our merchant portal Press the MENU key or start keying the amount directly Press 8 or scroll using the arrow key to Reports and press OK Press 3 or scroll down using the arrow key to Tr...

Page 34: ...and press OK Press 1 or scroll down using the arrow key to X total and press OK Z total report This report will show the accumulated sales per card type for the terminal since the previous Z total was...

Page 35: ...and settings menu If a security code is forgotten please contact our customer services to reset the terminal and you will be able to assign a new code How to enable access control Press the menu key...

Page 36: ...elect access control by pressing 3 or navigate using the arrow keys and OK button Terminal will now ask you for your security code Key it in and press OK to continue Select which menu item you want to...

Page 37: ...Press the Menu key and navigate to settings menu by pressing 0 or using arrow keys and OK button Select Properties by pressing 1 or navigate to it by using the arrow keys and press OK Select Reboot ti...

Page 38: ...and you want to integrate it to your ECR call our customer ser vices for assistance or your cash register vendor Configuring an IP integrated ethernet terminal Press the Menu key and navigate to sett...

Page 39: ...addressing Press the Menu key and navigate to settings menu by pressing 0 or using arrow keys and OK button Press 4 or navigate to Communication by using the arrow keys and press OK Press 2 or naviga...

Page 40: ...press OK The terminal will ask for Subnet mask Key it in and press OK The terminal will ask for DNS1 and DNS2 If set key it in and press OK or continue navigating by pressing OK The terminal will ask...

Page 41: ...other sim cards then follow the procedure below to enter PIN and change the APN Press the Menu key and navigate to settings menu by pressing 0 or using arrow keys and OK button Press 4 or navigate to...

Page 42: ...od The terminal will connect automatically once every 24hrs to see if there are any updates this procedure is only for manually checking if there is a change to download Software updates will also be...

Page 43: ...ntil the terminal starts up approx 30 seconds Try again If the terminal is still frozen remove the power cable or battery and ensure that the display goes dark Replace the power cable battery If the t...

Page 44: ...shield accessory to be fitted by merchant before use If you require a privacy shield and one has not been supplied please contact your Nets helpdesk for assistance If the payment terminal from Nets is...

Reviews: