background image

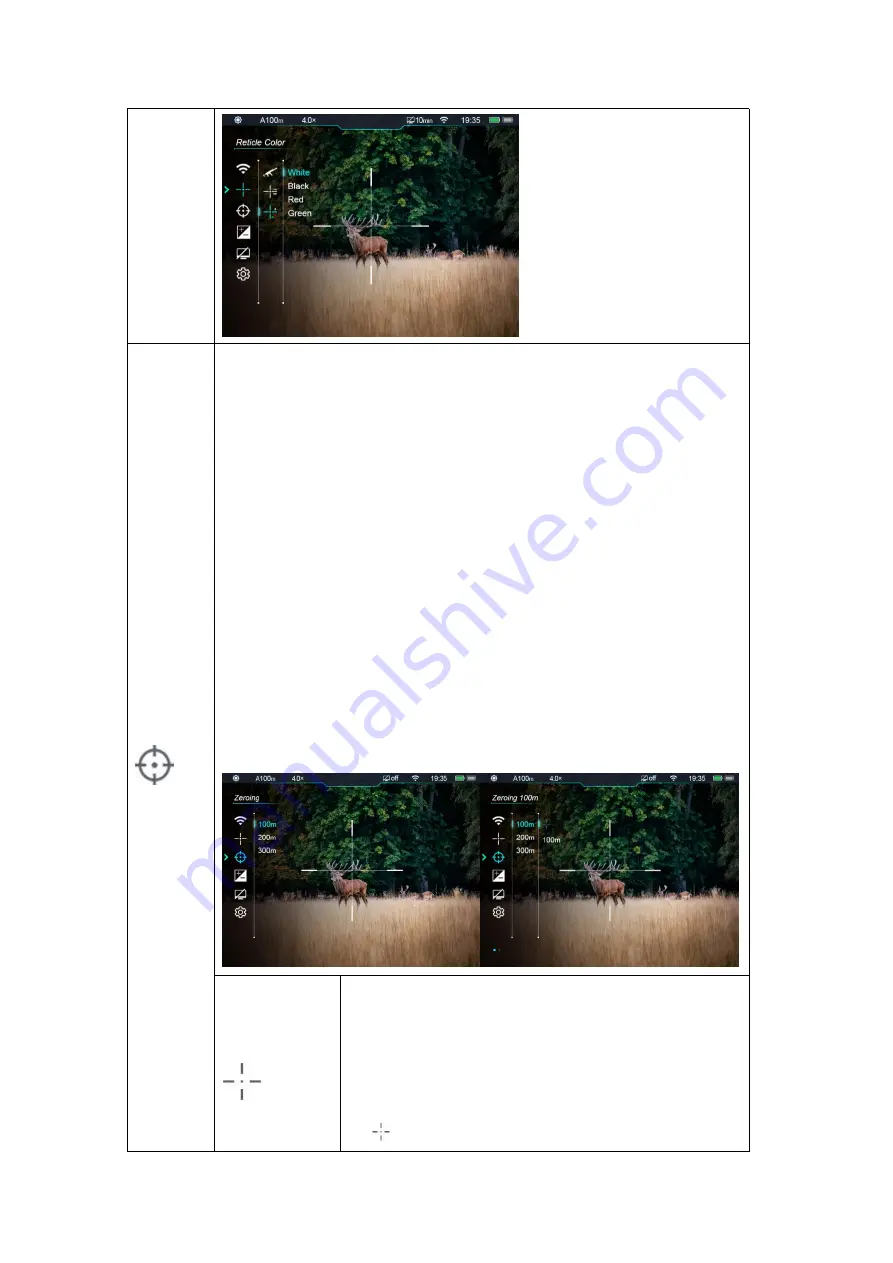
Zeroing

Please set up the zeroing profile and zeroing distance before carrying out any

zeroing operation.

The Tube series supports any zeroing distance between 1 and 999 meters.

Press and hold the rotary encoder (7) to open the advanced menu;

Turn the rotary encoder (7) to select the "Zeroing" function option;

Press the rotary encoder (7) to open the secondary menu of the zeroing

function, where displays 3 zeroing distances;

Turn the rotary encoder (7) to select the zeroing distance according to the

distance set for the target;

Press the rotary encoder (7) to confirm the zeroing distance, and open the

zeroing distance submenu, including two options, that is "Zeroing" and

"Zeroing Distance";

Zeroing

If the preset zeroing distance is consistent with that

displayed on the device, you can perform zeroing directly

following the steps as below:

Turn the rotary encoder (7) to select the

zeroing

function

;

Summary of Contents for TD50L

Page 1: ...Tube Series Operating Manual V1 0 InfiRay Technologies Co Ltd...

Page 2: ...he mounting rings mm 30 Max Recoil Power on Rifled Weapon g s 1000 Degree of protection IP code IP67 Amount of built in memory GB 16 Weight without replaceable battery g 1000 Dimension mm 395 85 75 AP...

Page 3: ...ions with long operating hours and can be widely used for hunting observation and positioning in low visibility conditions It adopts a 30mm standard pipe diameter to meet the requirements of the gener...

Page 4: ...button 7 Rotary encoder 8 USB cap 9 Type C interface 10 LED indicator 11 Battery holder cover 12 18500 battery 13 Focusing ring of the objective lens 14 Lens cap V Button Operations Button Device Sta...

Page 5: ...g on off Rotary Encoder Home screen Open the shortcut menu Open the advanced menu Adjust image magnification Shortcut menu screen Adjust specific parameters of a function Save and go back to the home...

Page 6: ...insert the adapter into a 100 240V power socket to charge the battery pack When charging a lightning charging icon appears on the battery icon and the LED indicator on the device is in red When the i...

Page 7: ...When charging please do not leave the battery unattended Do not connect the battery to the power supply for more than 24 hours after it is already fully charged It is not recommended to connect third...

Page 8: ...o be replaced At this time it will switch to the internal battery automatically VII External Power Supply The Tube series supports external power supplies such as the portable power source for a mobil...

Page 9: ...s It is recommended to use a torque wrench to tighten the screws of the installation clamps so as to avoid damaging the scope body due to being over tightened and the recommended torque shall not exce...

Page 10: ...ntdown icon turns from 3 to 0 the device shuts down When the device is powering off and saving data do not disconnect it from the power source Otherwise the data cannot be saved Press the power button...

Page 11: ...the figure on the right is the position of the point of impact This mark is only for illustration It should actually be a bullet hole If the point of impact and the aiming point the center point of t...

Page 12: ...process appears in the lower middle position of the display area for 2s and meanwhile the current magnification is updated in real time in the top menu bar XII Photo Taking and Video Recording The Tu...

Page 13: ...indicating hours minutes seconds and XXX indicating the serial number of the three digit multimedia file The serial number of the multimedia file cannot be reset Caution The maximum duration of a vide...

Page 14: ...image mode day mode night mode 2 Current zeroing profile and zeroing distance e g A100m 3 Current optical magnification e g 4 0 4 Standby status and time OFF by default 5 Wi Fi status Wi Fi is disabl...

Page 15: ...nd of the selected option will be highlighted Image contrast Turn the encoder 7 to select the option and press the encoder 7 to adjust the image contrast from level 1 to 5 Image sharpness Turn the enc...

Page 16: ...modify the parameters of the current option or go to the submenu The position of the cursor indicates the selected option the icon of which will change from white to blue The operation of secondary an...

Page 17: ...n or off Reticle Selecting Zeroing Profile Press and hold the rotary encoder 7 to open the advanced menu Turn the rotary encoder 7 to select the Zeroing Profile function option Press the rotary encode...

Page 18: ......

Page 19: ...e secondary menu of the zeroing function where displays 3 zeroing distances Turn the rotary encoder 7 to select the zeroing distance according to the distance set for the target Press the rotary encod...

Page 20: ...the picture and meanwhile the freezing icon is displayed on the display Turn the rotary encoder 7 to move the reticle position until the reticle center aims at the position of the point of impact For...

Page 21: ...ates to the new zeroing distance synchronously Standby Setting the standby state and duration In the advanced menu turn the rotary encoder 7 to select the Standby option Press the rotary encoder 7 to...

Page 22: ...s the rotary encoder 7 to open the secondary menu of Settings Turn the rotary encoder 7 to select Date Press the rotary encoder 7 to activate the date reset function with the time in the format of YY...

Page 23: ...encoder 7 to activate the time reset function Turn the rotary encoder 7 to set the correct hour and minute Press the rotary encoder 7 to switch between the hour and minute After setting press and hold...

Page 24: ...ection and return to the menu screen Units of Measure Selecting the Units of Measure Press the rotary encoder 7 to open the secondary menu of Settings Select Units of Measure and press the rotary enco...

Page 25: ...ary encoder 7 to open the secondary menu of Settings Select Factory Reset and press the rotary encoder 7 to open the secondary menu for factory reset Press the rotary encoder 7 to select Yes for resto...

Page 26: ...ss the rotary encoder 7 to query the relevant information about the current scope Press and hold the rotary encoder 7 to exit and return to the upper menu 16 PIP Picture in Picture PIP provides a floa...

Page 27: ...nd the values of measurement distance are displayed on the right side Three pre defined target values are provided as follows Deer 1 7m high Wild boar 0 7m high Hare 0 2m high Adjust the device to mov...

Page 28: ...are displayed if there is no operation within 8s Press or press and hold any button to invoke the GUI information You can operate the buttons and the menu only after the GUI information is displayed X...

Page 29: ...ill also be restored to the default factory setting XX Product Update and Description to APP The Tube series thermal imager supports control with an app You can transmit images in real time operate th...

Page 30: ...installed the device will restart and enter the operation mode XXI Technical Inspection Perform a technical inspection to check the following items each time before you use the device Exterior of the...

Page 31: ...are present or the background is not even Calibration is required Calibrate the images as instructed in Section 9 of the user manual Images are too dark The display is not bright enough Adjust the dis...

Page 32: ...rks in the range of the device which may cause interference To enable stable network access you are advised to move the device to an area with a limited number of Wi Fi networks or an area without Wi...

Reviews: