


17
Time Zone Settings
Time Zone: Select the desired time zone in the scroll box, and then click “Save”
to save it.
There are 33 time zones for your selection.
If Daylight Saving Time is applied in your region, please enable daylight saving
time.
After settings completed, please click the button “Save”.
NTP Settings
Set the NTP server’s IP address, synchronization interval, etc.
After completed, please click the button “Save”.
Sync now
There are two sync modes: local sync and NTP sync.
Local Sync means the system time is consistent with that of local PC. In the
NTP Sync mode, the system will automatically adjust time to the same as that
of NTP Server.
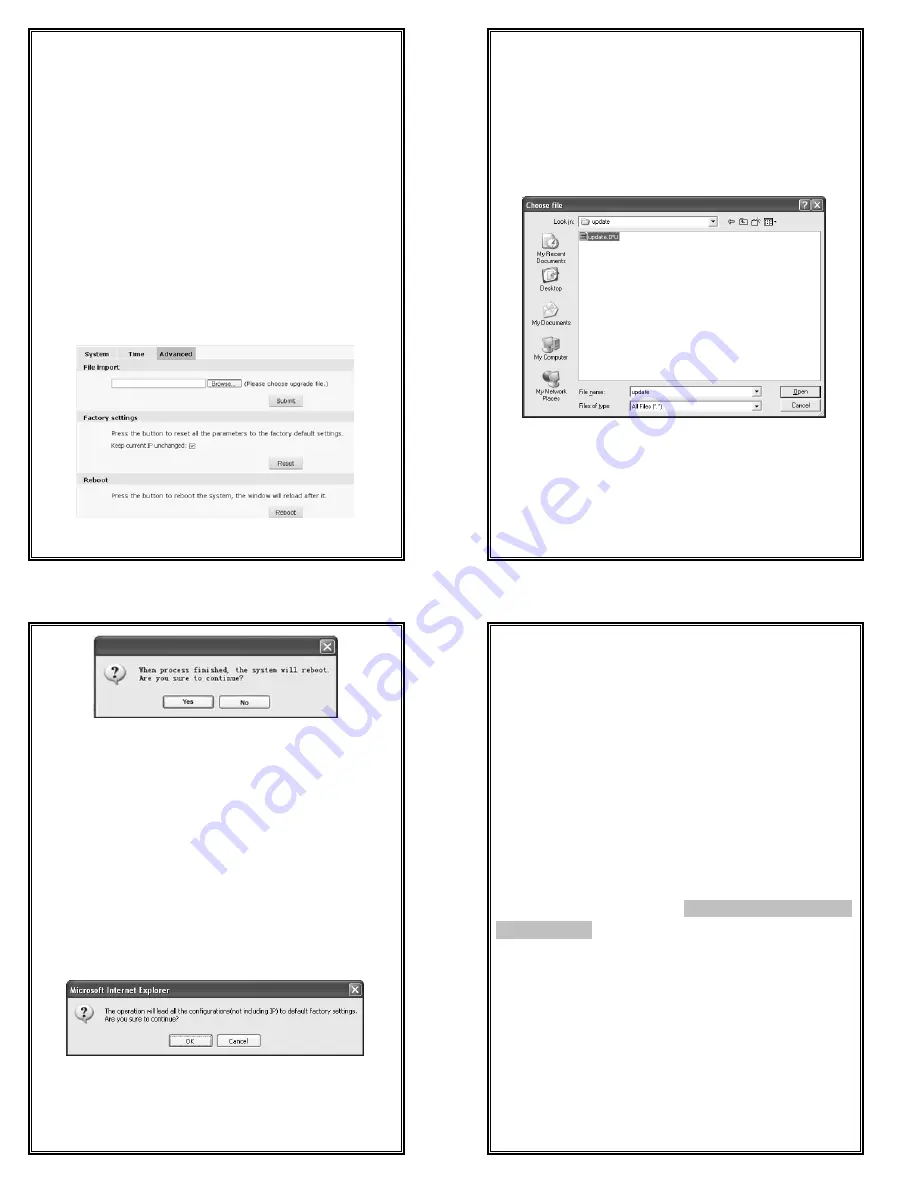
4.2.3 Advanced Settings
Figure 4-5 “Advanced” Settings
18
Software Update
Free software update is provided for V6812IR-H0 series camera, and this
update service can reduce system maintenance budget.
Confirm the requirement submitted by user, we will provide the latest software
for download, and help user to update the V6812IR-H0 series camera.
Follow the steps below to update software:
Click “Browse” button on the interface and the file selection dialog box will
pop up.
Figure 4-6
Select update file, and press “Open” button. The selected update file will be
displayed in the box before “Browse”.
After that, click “Submit” button to update software, the following information
will appear:
19
Figure 4-7
Click “Yes” button, run the program to finish the update.
The response time is due to the program type. You may wait a long time for
some program. Do not power off during the update process. Power-off will
make update fail, even damage the original program or unable to update again.
After update successfully, it needs to reboot the system. There is time prompt in
the web page during reboot. After reboot, it will skip to new web page to run
new program.
Note:
Available only for the super user.
Factory Settings
V6812IR-H0 series camera provides online reset function, which greatly
facilitates reset adjustment.
Select
“Keep current IP unchanged”, click “Reset” button and the system will
pop up a message as below:
Figure 4-8
Click “OK”, all the parameters (excluding IP address) will be reset to the
factory default settings.
If “Keep current IP unchanged” is unselected, the IP address will be reset to the
20
factory default settings.
There is time prompt in the web page during reset. After reset, it will skip to
new web page.
If current IP unchanged, you can access web page directly. If IP address resets
to
192.168.1.100, you can’t access web page. Then, you have to set PC’s IP address
to 192.168.1 section, such as 192.168.1.25. After that, access web page
to change
camera’s
IP address and save, PC’s IP address will restore to the corresponding
section.
Note:
1.
To avoid error happens, the operation of online reset function should be
performed under qualified personnel’s guide.
2.
Default IP address is 192.168.1.100, and default subnet mask is
255.255.255.0.
3.
Do not power off during reset, or else the reset will fail.
Online Reboot
Click “Reboot” button, the dialog box
“
This operation will take 90 seconds, are
you sure to continue
?”
pop up.
Click “OK” and the system will restart. There is
time prompt in the web page during reboot. After reboot, it will skip to new
web page.
Note:
Available only for the super user.


