background image

Manual Index Everest-D

Index Braille Printer Company

Page 23

Version 4.32

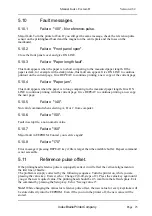
5.10

Fault messages.

5.10.1

Failure  "100" - No reference-pulse.

Major fault. Turn the printer off/on. If you still get the same message, check the reference-pulse
sensor on the printinghead board and the magnet on the centre plate and the fuses on the
mainboard.

5.10.2

Failure  "Front panel open".

Close the front panel cover and give ON LINE.

5.10.3

Failure  "Paper length fault".

This fault appears when the paper is to short comparing to the measured paper length. If the
paper is dark, for example with a dark picture, this fault can appear. Give ON LINE to continue
printout on the current page. Give REPEAT to continue printing a new copy of the current page

5.10.4

Failure  "Paper jam".

This fault appears when the paper is to long comparing to the measured paper length. Give ON
LINE to continue printing with the current page. Give REPEAT to continue printing a new copy
the next page.

5.10.5

Failure  "140".

Not valid command when selecting A, B or C from computer.

5.10.6

Failure "150".

Fault in setup file, a non numeric value.

5.10.7

Failure "160"

Major fault in EEPROM. Contact your service agent!

5.10.8

Failure "170"

Error message if pressing REPEAT key if file is larger then the available buffer. Repeat command
is not accessible.

5.11

Reference pulse offset.

If the printinghead reference pulse is improperly setted, in will effect the vertical alignement on
the first line of braille.
The problem is simply corrected by the following sequence: Turn the printer on, while you are
pressing the value key. Everest echo ; Change # (0-40, steps of 2). Press the value key again until
you get the new required value. The printing head should be 2-3 mm from the left side plate. Exit
the command by pressing the Setup key. Echo: “Saving value #”.

Note!

 While changing the values for reference pulse offset, the new value for every keystroke will

be stored directly into the EEPROM. Even if the you turn the printer off, the new value will be
stored.

Summary of Contents for Everest-D

Page 1: ...5 5 3 3 12 Page layout guideline 18 5 3 4 Option 19 5 3 4 1 Word wrap 19 5 3 4 2 Auto linefeed 19 5 3 4 3 Form Feed 19 5 3 4 4 Volume 19 5 3 4 5 Impact level 19 5 3 4 6 Delay 19 5 3 4 7 7 Printning Speed 19 5 3 4 8 8 Graphic dot distance 20 5 3 4 9 9 Text dot distance 20 5 3 4 10 Set up 20 5 3 4 11 Line Type 20 5 4 Selftest 20 5 5 Factory setting 20 5 6 Training mode 20 5 7 Braille manual printout...

Page 2: ...saPoint graphic 42 9 5 Changes in setup from computer 42 9 5 1 Change setup by ESC sequences 43 Position 0 Activated braille code 43 Position 1 Type of braille code 43 Position 2 6 8 Dot braille 43 Position 3 Capital prefix 44 Position 4 Baudrate 44 Position 5 Number of databits 44 Position 6 Parity 44 Position 7 Number of stopbits 44 Position 8 Handshake 44 Position 9 Character per line 44 Positi...

Page 3: ...Manual Index Everest D IndexBraillePrinterCompany Page 3 Version 4 32 INDEX EVEREST D 100 cps Interpoint Braille printer User manual version 4 32 ...

Page 4: ...ollector underneath the printer 6 Pull out the two plastic printinghead transportation lockings located in the sheetfeeder Save them together with the transportation material in the box It is important that you replace them if you by any reason need to ship the printer Note Printer should be shipped only in original packing 7 Put both paper guides on the top of the sheet feeder We understand that ...

Page 5: ...anual Index Everest D IndexBraillePrinterCompany Page 5 Version 4 32 1 2 Unpacking checklist INDEX EVEREST D USER MANUAL BRAILLE DOCUMENT COLLECTOR USER MANUAL INKPRINT BRAILLE PAPER CABLES SUPPORT DISK ...

Page 6: ...s in the Pro printer emulation 3 Operating the printer This chapter is a short hand manual that explains how to run the printer 3 1 How to start up 3 1 1 Load paper 1 Adjust the sheet feeder to the correct paper width by adjusting the left paper mechanism Don t forget to lock it 2 Release the pick up rollers by moving the control on the button on the side of the sheet feeder upwards and fill it wi...

Page 7: ...nd centronics interface When turning on the Everest both ports are ready to receive information As soon as the printout has started Everest will close the non active port The ports are designed to follow the international standards for printers as far as possible When using Everest together with a standard PC you can use standard centronics and a serial cable 3 1 5 Serial communication cable Evere...

Page 8: ...ber of printed pages and the active Braille table 3 2 3 Start printing Connect the printer to your computer load the paper and turn it on Everest will feed one page and echo INDEX EVEREST READY Everest is ready for use with the default factory settings If you need additional information to change the parameters please refer to that section in the manual 3 3 Default setup To change the active defau...

Page 9: ...Manual Index Everest D IndexBraillePrinterCompany Page 9 Version 4 32 3 5 Flow schematic for Setup ...

Page 10: ... feed one sheet through the printer 4 1 3 Help The HELP key in the print mode is used get a printout of active printer settings The printout is two pages and includes the software version Braille code active setup parameters for Braille code paper layout serial communication and options Pressing the Help key in Setup mode will give printout of the new settings in setup even then the value is not s...

Page 11: ...nnec tion pages will be in single sided mode 4 2 2 Single sided In the single sided mode Everest will print out the text on the under side of the paper It is possi ble to change to the upper side of the printer in setup with the module SETUP PAGE LAYOUT PRINT SIDED 1 2 default 1 down 4 2 3 Normal In the normal print mode the Everest will print the Braille as it is formatted in the text file The te...

Page 12: ... can produce large quantities of Braille without using your computer during the printout Printer buffer is 400K 400 pages of Braille It is also possible to copy a part of your text file When using the COPY function you will be guided by the speech feedback Copy function includes the following keys REPEAT MULTIPLE 1 and 10 With REPEAT and MULTIPLE you can choose between the different copy functions...

Page 13: ... from page to page To print the complete file press REPEAT x 2 Echo Print file Note If the loaded file is exceeding the size of the buffer of the buffer the error message fail 170 will be given and the file from the computer will be cut off The remaining part of the file will be removed from the transmission It is then possible to select a printout of the received part of the file After the printo...

Page 14: ...le copy mode that will override the software com mand 4 4 Remaining copies to print While printing multiple copies of a document it is possible to get a message of the number of copies left to print by the following command 1 Press Off line 2 Press Help The printer will echo the remaining number of copies to print and at what page the printout was interrupted Number of copies page Example Print a ...

Page 15: ...ored in the active DEFAULT SETUP A B or C It is not possible to change in a non active default setup If you want to interrupt without saving your changes in the setup just turn off the printer before you end the setup mode The keys GROUP ITEM and VALUE are organized in a tree structure where GROUP is the selection of four major groups ITEM is the different items to change in each group and VALUE i...

Page 16: ...nges stop bit in serial communications from 1 bit to 2 bits 1 Press SETUP while power on 2 Press GROUP until the printer echo SERIAL COMMUNICATION 3 Press ITEM until the printer echo STOP BITS 4 Press VALUE until the printer echo TWO 5 Press SETUP to save the change in DEFAULT SETUP A To abandon the setup simply turn off the printer 5 3 1 Braille Code In this group the following items can be chang...

Page 17: ... 2 3 5 3 3 1 Characters per line With item characters per line you select the value for of characters per line Max char lilne Interpoint is 42 iterline is 48 5 3 3 2 Left margin The option left margin gives the width of your margin Select of lines Note The items B margin and Left margin decreases the of characters per line 5 3 3 3 B margin Binding margin is used to get an extra width on your margi...

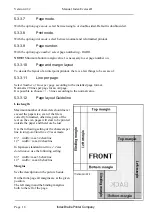
Page 18: ...age format Normal is 29 lines per page for an A4 page It is possible to choose 3 lines according to the normal value 5 3 3 12 Page layout Guideline Line length Maximum number of characters should never exceed the paper size even if the file is correctly formatted otherwise parts of the text on the even pages will start to be printed outside the paper and therefore be lost Use the following setting...

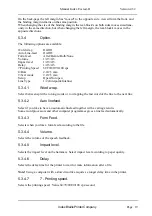
Page 19: ... mm Setup Open Not open Line Type 1 2 Interpoint Inteline 5 3 4 1 Word wrap Select between split the to long words or to wrapping the last word of the line to the next line 5 3 4 2 Auto linefeed Select if you like to have an automatic linefeed together with a carriage return Some word processors and other computer programmes gives a linefeed automatically 5 3 4 3 Form Feed Selects when you like a ...

Page 20: ...lity and long time durability The first page will print a pattern of all hammers according to the active page layout setting with the number for each hammer After page five it will return to page one and then continuously repeat the same sequence in a never ending printout 5 5 Factory setting Command group power The printer will reload all parameter settings except operation defined Braille code O...

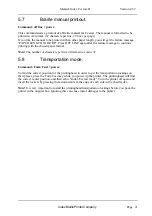
Page 21: ...n paper format Note The number of characters per line will remain as value 32 5 8 Transportation mode Command Form Feed power To find the correct position for the printinghead in order to get the transportation lockings on their places press the Form Feed key while you power up the printer The printinghead will find the correct center position and then echo Index Everest ready Turn the printer off...

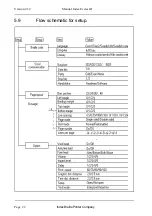
Page 22: ...IndexBraillePrinterCompany Manual Index Everest D Version 4 32 Page 22 5 9 Flow schematic for setup ...

Page 23: ... Give REPEAT to continue printing a new copy the next page 5 10 5 Failure 140 Not valid command when selecting A B or C from computer 5 10 6 Failure 150 Fault in setup file a non numeric value 5 10 7 Failure 160 Major fault in EEPROM Contact your service agent 5 10 8 Failure 170 Error message if pressing REPEAT key if file is larger then the available buffer Repeat command is not accessible 5 11 R...

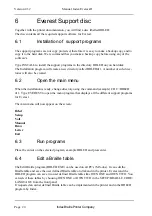
Page 24: ...e main menu When the installation is ready change directory using the command example CD C BRLED 411 Type EVEREST to open the menu program that displays all the different support programs for Everest The main menu will now appear on the screen Brled Setup Volt Manual Draw Letter Exit 6 3 Run programs Place the cursor on the selected program example BRLED and press enter 6 4 Edit a Braille table Th...

Page 25: ...Braille cells Therefore there is a recommendation to select reformatted printout on Everest or format the text in the computer with a shorter line length than the active line length on Everest this will give space for random extra Braille characters Contracted Braille Grade 2 Contracted Braille are normally created with a Grade 2 translation program such as Duxbury or similar This program can be i...

Page 26: ...edit an operator defined Braille table you are free to edit all positions in the Braille cell number prefix capital prefix and prefix for a string of capital letters It is also possible to edit 2 or more Braille cells that corresponds to one ASCII sign Max 15 characters In addition and for use in literary grade 1 Braille you can edit if a Braille sign is capital letter if a Braille sign is a figur...

Page 27: ...n the information screen you can always see what Braille table it is and the source table that has been used When you edit OWN ONE or OWN TWO it is possible to add the following information to the information screen F9 Approved by organization name editor and date and four lines for comments Select 1 7 to edit the line that you have selected When INDEX BPC is implementing a user defined Braille ta...

Page 28: ... OK Fail Test 2 RAM memory Y N OK Fail Note This test requires 20 seconds Test 3 Parameter EEPROM Y N OK Fail Note This test requires 2 minutes Test 4 PROGRAM PROM Version and no Test 5 Speech PROM Version and no Test 6 Table PROM Version and no Test 7 Number of pages For each test the program runs the activated function until you have confirmed with an Y yes or N No Test 8 Speech Y N Printer spea...

Page 29: ...h the function keys F1 F4 F5 will set all positions to unchanged F7 Will append a text file to a temporary driver F10 will open a new menu where you can save the file in the same or in a new name 6 7 2 Load Setup file Press F2 to load a Setup file You can now first choose what type of file you like to load example TXT IND or To create a permanent file load the file called SETUP IND The file is a s...

Page 30: ...nly a single or a few positions that has to be changed in a driver Do the following operation 1 Press F5 to set all for Unchanged 2 Change the required items 6 7 7 Append driver to text To append a text to a driver do the following operation Load the temporary driver that you intend to use Press F7 Choose file type and press Enter then choose directory and file and press enter again The temporary ...

Page 31: ...BRLED and press enter On the screen this menu will now appear General Parameter settings Advanced parameter setting Send file to Everest Help Exit Choose any of the options above by using the arrow keys Enter or use the key representing the inverse letter on each line 6 8 2 General parameter settings Normally we recommend that you change all the different printing speeds for the same adjust ment w...

Page 32: ...teps Every step in compensation 0 15mm Choose the required adjustment value by using the arrow keys and press the Enter key You will then automatically return to the previous menu where you can choose either to change an other option or return to main menu 6 8 4 Send file to Everest Choose Send file to Everest The following menu will appear Send file to LPT1 Send file to LPT2 Send file to Com1 Sen...

Page 33: ... be displayed 6 9 2 Find your way in the on screen manual When the manual is displayed on the screen you will first see the table of contents You can now use the arrow keys to move the cursor Place the cursor on the selected headline in the table of contents and press Enter The cursor will move to the selected item 6 9 3 Print the manual The manual can also be printed on your Everest It is formatt...

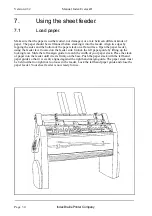
Page 34: ...e Open the paper feeder using the feeder lever located on the feeder side Unlock the left paper guide by lifting up the locking lever Slide the left margin guide to match the width of your paper stack Place the stack of paper into the feeder until it rests firmly on the base Push the paper stack with the left hand paper guide so that it is evenly aligned against the right hand margin guide The pap...

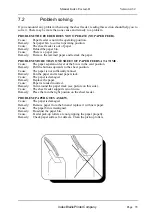
Page 35: ...APER FEEDS AT A TIME Cause The paper separation lever of the bin is in the card position Remedy Pull the buttons upwards to the sheet position Cause The paper is not sufficiently fanned Remedy Fan the paper and reload paper stack Cause The paper is damaged Remedy Replace the paper Cause Paper is loaded incorrect Remedy Turn around the paper stack see picture on this side Cause The sheet feeder sup...

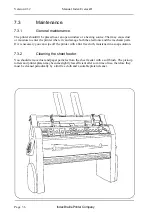
Page 36: ...amage both the electronic and the mechanic parts If it is necessary you can wipe off the printer with a lint free cloth moistened in a soap solution 7 3 2 Cleaning the sheet feeder You should remove dust and paper particles from the sheet feeder with a soft brush The pick up rollers and printer platen may become slightly less efficient after som time of use therefore they must be cleaned periodica...

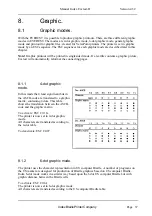
Page 37: ...dot graphic mode In this mode the 4 least significant bits in the ASCII code are translated to a graphic matrix containing 4 dots This table shows the translation between the ASCII code and the graphic matrix To activate ESC Ctrl G The printer is now set in 4 dot graphic mode All characters are translated according to the 4 dot table To deactivate ESC Ctrl F 8 1 2 6 dot graphic mode The printer us...

Page 38: ...2 0 high resolution graphic 2 5 normal graphic The relation of number of dots per line in graphic mode is the following 2 0mm is 1 5 A4 paper 32 char line in text mode gives 48 char line in gragphic mode 2 5mm is 1 18 A4 paper 32 char line in text mode gives 37 char line in graphic mode 8 1 5 Versapoint graphic files printout To print graphic files created for Versapoint use the following commands...

Page 39: ...cal Graphic mode 2 5 c Select type of monitor 0 EXIT 1 HERCULES 720 x 348 2 EGA 640 x 350 3 VGA 640 x 480 After choosing the monitor the following is displayed 8 2 2 4 Draw function keys F1 DRAW Draw F2 ERASE Erase F3 MOVE THE CURSOR Move the cursor without drawing F4 SAVE LOAD DOS format A directory filename filetype directory max 8 characters file name max 8 characters filetype extension 3 chara...

Page 40: ...TER c Start the program by typing LETTER and press the ENTER key d Select text height from the table on the screen 1 Character set 1 SMALL height 6 dots that means approximately 13 7mm 2 Character 2 LARGE height 8 dots that means approximately 18 0 mm e Select paper width from the table on the screen 1 Paper width A4 210mm 2 Paper width A3 280mm d Letter is ready to use The letter program can prin...

Page 41: ...ncel Automatic perforation skip ESC P 80 Proportional Space Mode ESC Q 81 Deselect Proprinter XL ESC R 82 Reset Tabs ESC S 83 Super Subscript Print ESC T 84 Cancel Sub Superscript Print ESC U 85 Uni directional Print ESC W 87 Double Wide Print ESC X 88 Set Horizontal Margins ESC Y 89 Dual Density Bit Image Graphics ESC Z 90 High Density Bit Image Graphics ESC 0 48 1 8 Inch Line Spacing ESC 1 49 7 ...

Page 42: ...SC D Select 8 dot braille cell ESC 1 Start 6 dot graphic ESC End 6 dot graphic ESC G Start 4 dot graphic ESC F End 4 dot graphic ESC A Start 6 dot braille printout for Versapoint files ESC B End 6 dot braille printout for Versapoint files ESC O Start End Setup sequence from computer 9 4 VersaPoint graphic ESC A Start 6 dot braille printout for Versapoint files ESC B End 6 dot braille printout for ...

Page 43: ...Example Change only the Volume for setup A to 3 and only the Impact level to position 5 for setup B The file below change only these two parameters ESC O A a x x x x x x x x x x x x x x x x x x x x x x 2 x x x x x x x x x x x x x x x x x b x x x x x x x x x x x x x x x x x x x x x x x 4 x x x x x x x x x x x x x x x x ESC O position 22 2 volume 3 position 23 4 Impact level 5 ESC means that you sho...

Page 44: ...48 characters per line Position 10 Left margin 0 1 2 3 characters in margin Position 11 B margin 0 1 2 3 characters in B margin Position 12 Top margin 0 1 2 3 lines in top margin Position 13 Bottom margin 0 1 2 3 lines in bottom margin Position 14 Line spacing 0 0 5 mm 1 0 75mm 2 0 90mm 3 0 95mm 4 1 0 mm 5 1 05mm 6 1 1 mm 7 1 50mm 8 2 0 mm Position 15 Pagemode 0 Single side 1 Double side Position ...

Page 45: ...line 1 1 lines and so on until 9 9 lines Position 31 39 Position 30 39 position is all set 0 in main software 0 IDLE 9 6 Page numbering selection by ESC sequences While printing several documents that should be connected to each other as one document it is possible to select continius page numbering To choose continuing number from the of the previous document send the following ESC sequence in th...

Page 46: ...IndexBraillePrinterCompany Manual Index Everest D Version 4 32 Page 46 10 Serial communication cables 10 1 Cable configuration Index Apple McIntosh ...

Page 47: ...ion LF Line Feed VT Vertical Tabulation FF Form Feed CR Carrige Return SO Shift Out SI Shift In DLE Data Link Escape DC1 Device Control 1 XON DC2 Device Control 2 DC3 Device Control 3 XOFF DC4 Device Control 4 NAK Negative Acknowledgement SYN Syncronous Idle ETB End Of Transmission Block CAN Cancel Line EM End Of Medium SUB Substitute even used as EOF End Of File ESC Escape FS File Separator GS Gr...

Page 48: ... multiple cell 27 Edit a prefix 27 Edit information screen 27 ESCSequences 42 F Factory setting 20 Flow schematic for Setup 9 22 FormFeed 10 19 Front panel 8 10 Front panel controls 15 G Generalgraphicmode 38 Grade 1 Braille 25 Grade 2 Braille 25 Graphic 37 Graphicmode 19 Graphic programs 33 38 Group 15 H Help 10 High resolution graphic 38 I Impactlevel 19 Installation of support programs 24 Inter...

Page 49: ...tup 8 15 20 Setupkeys 15 Setupprogram 29 Sheetfeeder 34 Singlesided 11 Splitpage 12 Standardcommands 10 Start BRLED 25 Start printing 8 Status printout 27 T Test program 28 Text mode 20 Topmargin 17 Trainingmode 8 20 Transmissionparameters 7 Transparent mode 41 Transportation mode 21 U Unpacking 4 Using the sheet feeder 34 V Value 16 VersaPointgraphic 38 42 Voltage compensation 30 Volume 19 Word w...

Reviews: