background image

Programming IDEC SmartRelay

3-17

IDEC SmartRelay User’s Manual

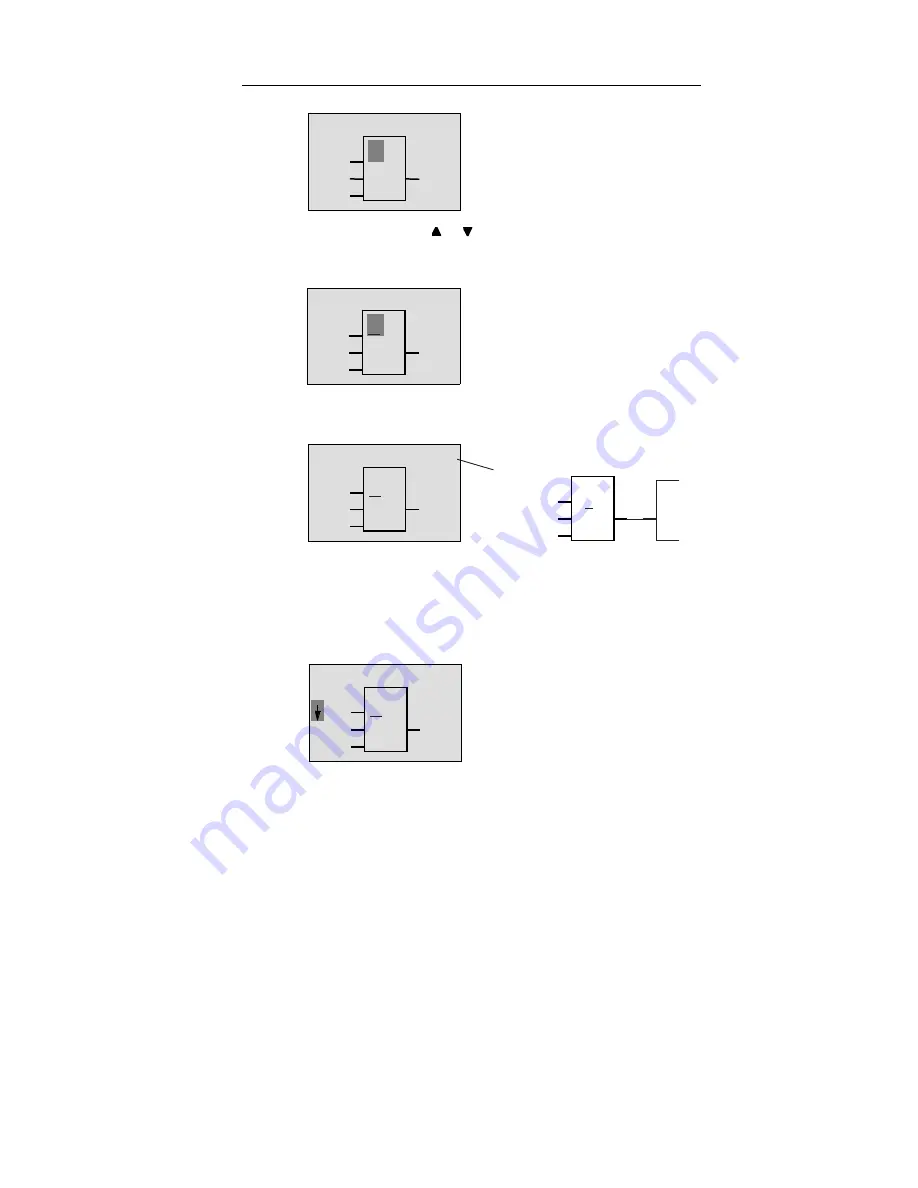
Now press the key   or  , until the OR block appears in
the display:

Press OK to conclude your selection.

You have now entered the first block. Each block you enter
receives a number, the block number. All you have to do
now is wire the inputs of the block. To do this, proceed as
follows:
Press OK.

1

B01

Q1

The cursor is still in the block and
appears in the form of a solid block.

The first block in the list of general
functions is AND. The cursor appears in
the form of a solid block, indicating that
you have to select a block.

B01

Q1

 >

1

B01

Q1

B01

>

1

Q1

Your entire program looks
like this

Block
number

 >

1

The following appears in the display panel

B01

Q1

Co

_

&

Summary of Contents for SmartRelay FL1A-H12RCE

Page 1: ...IDEC SmartRelay Manual March 2001 www idec com ...

Page 2: ...rved in particular in the event of a patent being granted or the registration of a utility model or design Disclaimer of Liability We have checked the contents of this manual for compliance with the hardware and software described Nevertheless discrepancies may exist However the data in this manual is reviewed regularly and any necessary corrections will be included in subsequent editions Suggesti...

Page 3: ...nnecting outputs 2 10 2 3 Switching IDEC SmartRelay On Resumption of Power Supply 2 12 3 Programming IDEC SmartRelay 3 1 3 1 Connectors 3 2 3 2 Blocks and Block Numbers 3 4 3 3 From the Circuit Diagram to IDEC SmartRelay 3 7 3 4 The 4 Golden Rules for Working with IDEC SmartRelay 3 10 3 5 Overview of IDEC SmartRelay s Menus 3 12 3 6 Entering and Starting a Program 3 13 3 6 1 Switching to memory ca...

Page 4: ...nd Connectors Co 4 2 4 2 List of General Functions GF 4 4 4 2 1 AND 4 6 4 2 2 AND with RLO edge detection 4 6 4 2 3 NAND AND Not 4 7 4 2 4 NAND with RLO edge detection 4 8 4 2 5 OR 4 8 4 2 6 NOR OR Not 4 9 4 2 7 XOR exclusive OR 4 10 4 2 8 NOT negation inverter 4 10 4 3 Fundamentals of Special Functions 4 11 4 3 1 Description of the inputs 4 11 4 3 2 Time response 4 12 4 3 3 Clock buffering 4 13 4...

Page 5: ...30 4 4 9 Seven day time switch 4 31 4 4 10 Twelve month time switch 4 36 4 4 11 Up Down counter 4 38 4 4 12 Operating hours counter 4 41 4 4 13 Symmetrical clock pulse generator 4 44 4 4 14 Asynchronous pulse generator 4 45 4 4 15 Random generator 4 46 4 4 16 Frequency trigger 4 48 4 4 17 Analog trigger 4 50 4 4 18 Analog comparator 4 53 4 4 19 Stairwell light switch 4 57 4 4 20 Dual function swit...

Page 6: ... 6 2 6 3 Copying a Program from IDEC SmartRelay to the Memory Cartridge 6 5 6 4 Copying from the Memory Cartridge to IDEC SmartRelay 6 6 7 IDEC SmartRelay Software 7 1 7 1 Possible Applications for IDEC SmartRelay Software 7 2 7 2 Connecting IDEC SmartRelay to PC 7 3 7 3 Transfer Settings 7 4 8 Applications 8 1 8 1 Stairwell or Hall Lighting 8 2 8 1 1 Demands on stairwell lighting 8 2 8 1 2 Previo...

Page 7: ... 8 14 8 3 2 Advantages of using IDEC SmartRelay 8 16 8 4 Industrial Gate 8 18 8 4 1 Demands on the gate control system 8 18 8 4 2 Previous solution 8 19 8 4 3 Enhanced IDEC SmartRelay solution 8 21 8 5 Fluorescent Lights 8 22 8 5 1 Demands on the lighting system 8 22 8 5 2 Previous solution 8 23 8 5 3 Fluorescent light control with FL1A H10RCB 8 24 8 6 Water Pump 8 26 8 6 1 Demands on the control ...

Page 8: ...ns A 3 FL1A H10RCB FL1A B10RCB A 3 Technical Specifications A 6 FL1A H12RCE FL1A H10RCA FL1A B10RCA A 4 Technical Specifications A 9 FL1A H12RCE FL1A B12RCE B Determining Memory Requirements B 1 C Determining the Cycle Time C 1 D IDEC SmartRelay Without a Display D 1 E IDEC SmartRelay Menu Structure E 1 F Order Numbers F 1 G Abbreviation G 1 ...

Page 9: ...formation on wiring in the IDEC SmartRelay manual as well as in the IDEC SmartRelay product information that is supplied with each device You can get further information on programming IDEC SmartRelay via the PC in the WindLGC online help system WindLGC is the IDEC SmartRelay programming software for PCs It runs under WINDOWS and will help you get to know IDEC SmartRelay and to write test print ou...

Page 10: ... or damage to property can result if proper precautions are not taken Note Draws your intention to particularly important information on the product handling the product or to a particular part of the documentation Warning Only qualified personnel should be allowed to install and work on this equipment Qualified personnel are defined as persons who are authorized to commission to ground and to tag...

Page 11: ...ons that are often required in day to day operation such as functions for on off delays and current impulse relays Time switch Binary markers Inputs and outputs according to the device type What can IDEC SmartRelay do You can use IDEC SmartRelay for domestic and installation engineering tasks e g stairway lighting external lighting sun blinds shutters shop window lighting etc switch cabinet engine...

Page 12: ...nd 4 outputs with dimensions of 72 x 90 x 55 mm FL1A B10 FL1A B12 without a display with dimensions of 72 x 90 x 55 mm FL1A H12SND FL1A H12RCE and FL1A B12RCE with 8 inputs 6 Digital inputs and 2 Analog inputs and 4 outputs with dimensions of 72 x 90 x 55 mm IDEC SmartRelay includes 29 ready to use general and special functions for program creation It s your choice The variety of options can be ad...

Page 13: ...lay s designation contains information on various characteristics 10 Total I Os 12 Total I Os R Relay outputs without R Transistor output C Integrated seven day time switch H Variant with display B Variant without display We also use icons to describe the different types of IDEC SmartRelay They are used whenever information refers to only some of the IDEC SmartRelay variants Standard variant with ...

Page 14: ... A Relay FL1A B12RCE 4 x 230 V 10 A Relay FL1A B10RCA 4 x 230 V 10A Relay FL1A B10RCB 4 x 230 V 10A Relay Also with analog inputs Certification recognition and approval IDEC SmartRelay has UL CSA and FM certification UL listing mark Underwriters Laboratories UL to UL 508 standard file no E116536 CSA Certification Mark Canadian Standard Association CSA to standard C22 2 No 142 file no LR 48323 FM a...

Page 15: ...iated components in potentially explosive areas IDEC SmartRelay carries CE marking complies with the VDE 0631 and IEC 1131 standards and has interference suppression to EN 55011 limit class B Shipbuilding certification has been granted ABS American Bureau of Shipping BV Bureau Veritas DNV Det Norske Veritas GL Germanischer Lloyd LRS Lloyds Register of Shipping PRS Polski Rejestr Statków IDEC Smart...

Page 16: ...Getting to Know IDEC SmartRelay 1 6 IDEC SmartRelay User s Manual ...

Page 17: ... tightly The maximum torque is 0 5 Nm see Section 2 2 Keep wiring distances as short as possible If longer wires are necessary a shielded cable should be used You should lay wires in pairs a neutral conductor together with a phase conductor or signal conductor Isolate AC wiring and high voltage DC wiring with rapid operating sequences from low voltage signal wiring Ensure that the wires have the r...

Page 18: ... install and uninstall IDEC SmartRelay with the aid of an illustration of the FL1A H10RCB The measures described also apply to all other IDEC SmartRelay modules Installing To install IDEC SmartRelay on a DIN rail proceed as follows 1 Place IDEC SmartRelay on the rail 2 Swivel it onto the rail so that the snap catch on the back of IDEC SmartRelay engages Depending on the type of DIN rail used the s...

Page 19: ...EC SmartRelay User s Manual Removing To remove IDEC SmartRelay proceed as follows 1 Insert a screwdriver in the hole shown in the picture at the lower end of the snap catch and pull the snap catch downwards 1 2 2 Swivel it away from the DIN rail ...

Page 20: ...t the connectors are covered If they are not there is a danger of touching live parts 2 2 1 Connecting the Power Supply FL1A H10RCB and FL1A B10RCB are suitable for line voltages with a rating of 100V AC and 240V AC Other Types are suitable for 12V DC 24V DC or 24V AC supply voltage Note the information on connection in the product information document shipped with your device and the technical sp...

Page 21: ...proceed as follows L1 L N M FL1A H12RCE B12RCE FL1A H10RCB B10RCB Protection by fuse if required recommended FL1A H12RCE B12RCE 0 8 A FL1A H12STD 2 0 A L M idec idec L1 N Note IDEC SmartRelay has protective insulation A ground terminal is not necessary idec SmartRelay idec SmartRelay FL1A H12RCE B12RCE 0 8A FL1A H12SND 2 0A ...

Page 22: ...for IDEC SmartRelay FL1A H12RCE FL1A B12RCE I1 I6 I7 I8 Circuit state 0 5V DC 5V DC Input current 1 0 mA 0 05 mA Circuit state 1 8V DC 8V DC Input current 1 5 mA 0 1 mA FL1A H12SND I1 I6 I7 I8 Circuit state 0 5V DC 5V DC Input current 1 0 mA 0 05 mA Circuit state 1 8V DC 8V DC Input current 1 5 mA 0 1 mA FL1A H10RCA FL1A B10RCA FL1A H10RCB FL1A B10RCB Circuit state 0 5V AC 40V AC Input current 1 0...

Page 23: ...am cycle for IDEC SmartRelay to recognize the new circuit state The cycle time of the program processing depends on the size of the program In the appendix you can find a description of a short test program that will help you to work out the current cycle time Fast inputs IDEC SmartRelay apart from FL1A H10RCB FL1A B10RCB FL1A H10RCA and FL1A B10RCB also has inputs for frequency functions The same...

Page 24: ...n be used as normal digital inputs or as analog inputs How the input is used depends on its purpose in the IDEC SmartRelay control program You can use the digital capability of the input with I7 I8 and its analog capability with the identifiers AI1 and AI2 Also see Section 4 1 Note Always use twisted wires for analog signals and keep them as short as possible ...

Page 25: ...ou can also pick up analog signals between the power supply and ground L M idec FL1A H10RCB B10RCB L1 N L1 N idec Warning Existing safety regulations VDE 0110 and IEC 1131 as well as UL and CSA prohibit the connection of different phases to the inputs of FL1A H10RCB B10RCB The inputs of FL1A H12RCE B12RCE are non isolated and therefore require the same reference potential ground as the power suppl...

Page 26: ...e following properties The maximum switched current depends on the type of load and the number of operations You will find more information on this in the technical specifications When switched on Q 1 the maximum current is 10 amperes 8A at 240V AC for a non inductive load and 3 amperes 2A at 12 24V AC DC for an inductive load Connecting To connect the load to FL1A R variants proceed as follows Pr...

Page 27: ...are short circuit proof and overload proof A separate voltage supply to the load is not necessary since IDEC SmartRelay supplies the load with voltage Prerequisites for transistor outputs The load connected to IDEC SmartRelay must have the following properties The maximum switched current is 0 3 amperes per output Connecting To connect the load to IDEC SmartRelay with transistor outputs proceed as...

Page 28: ...ve a power switch How IDEC SmartRelay responds when switched on depends on the following Whether a program is stored in IDEC SmartRelay Whether a program module is connected Whether it is a IDEC SmartRelay variant without a display FL1A B The state IDEC SmartRelay was in before power off The table indicates IDEC SmartRelay s response to the possible situations ...

Page 29: ... power on with program With stored pro gram from SmartRelay With program copied from Memory cartridge to SmartRelay Try to remember the 4 simple rules for starting IDEC SmartRelay 1 If there is no program in IDEC SmartRelay or on the connected memory cartridge IDEC SmartRelay with display displays the message No Program 2 If there is a program on the program module it is automatically copied to ID...

Page 30: ... STOP to RUN the LED changes from red to green 4 If you have switched on retentivity for at least one function or are using a function with retentivity permanently switched on its current values are retained at power off Note If a power failure occurs while you are entering a program you will find when the power is restored that IDEC SmartRelay no longer contains the program You should therefore s...

Page 31: ...s and outputs after START in the main menu not FL1A B Switch IDEC SmartRelay to parameterization mode not FL1A B The LED lights up green FL1A B only Action by IDEC SmartRelay The inputs are not read The program is not executed The relay contacts are always open or the transistor outputs are switched off Action by IDEC SmartRelay IDEC SmartRelay reads the state of the inputs IDEC SmartRelay calcula...

Page 32: ...Installing and Wiring IDEC SmartRelay 2 16 IDEC SmartRelay User s Manual ...

Page 33: ...ations in small machine and apparatus construction FL1A B variants are not programmed on IDEC SmartRelay Programs from WindLGC or from memory cartridge of other IDEC SmartRelay devices are transferred into IDEC SmartRelay In the first section of the chapter a brief example will help you get to know how to use IDEC SmartRelay We begin by introducing two basic terms connector and block and showing y...

Page 34: ...s is identified by the letter I and a number When you look at IDEC SmartRelay from the front you can see the connectors for the inputs at the top The letter Q and a number identifies each output You can see the connectors of the outputs in the figure below L1 N I1 I2 I3 I4 I5 I6 Q1 Q2 Q3 Q4 I7 I8 inputs Outputs idec SmartRelay ...

Page 35: ... unlikely to be new to you We introduced the connectors hi lo and x in order to facilitate program entry for you hi high has the fixed state 1 and lo low has the fixed state 0 If you don t want to wire an input on a block use the x connector You can find out what a block is on the next page IDEC SmartRelay recognizes the following connectors Connectors Inputs I1 I6 I7 AI1 I8 AI2 Outputs Q1 Q4 lo S...

Page 36: ...mation into output information With earlier variants of IDEC SmartRelay you had to wire up the individual elements in the control cabinet or terminal box When you program IDEC SmartRelay you connect connectors with blocks To do this simply select the connection you require from the Co menu Co stands for connector Logic operations The simplest blocks are logic operations AND OR We have made the spe...

Page 37: ...martRelay This shows that a further block is connected Input Connection is not required Output Block Assigning a block number Whenever you insert a block in a program IDEC SmartRelay assigns that block a number IDEC SmartRelay uses the block number to indicate the connections between the blocks The block numbers are therefore chiefly meant to help you find your way around the program I1 I2 I3 B01 ...

Page 38: ...m results of logic or other operations more than once This saves you the work required to enter things again as well as memory space and ensures that your circuit remains clear Note To make working with IDEC SmartRelay particularly efficient we recommend that you draw up a diagram overview of the program This will make it easier to create the program You can then enter the block numbers assigned b...

Page 39: ... You create a circuit In IDEC SmartRelay by connecting blocks and connectors to each other S1 S3 Wiring of the input s I3 x Q1 1 I1 I2 x Program in SmartRelay Wiring of the outputs To implement a circuit in IDEC SmartRelay begin at the output of the circuit The output is the load or the relay that is supposed to operate K1 S1 K1 S2 E1 E1 is switched on and off by means of the switches S1 OR S2 AND...

Page 40: ... circuit for IDEC SmartRelay You now need to connect the inputs and outputs to IDEC SmartRelay Wiring Connect switches S1 to S3 to the screw connectors of IDEC SmartRelay Connect S1 to connector I1 on IDEC SmartRelay Connect S2 to connector I2 on IDEC SmartRelay Connect S3 to connector I3 on IDEC SmartRelay Only 2 inputs of the OR block are used so the third input must be marked as unused The x ne...

Page 41: ...martRelay 3 9 IDEC SmartRelay User s Manual Wiring example The following table shows you the wiring based on a 240 VAC variant of IDEC SmartRelay Load L1 N S 1 S 3 S 2 L1 N Wiring of the inputs Wiring of the outputs L1 N ...

Page 42: ...the same time Change the values of times and parameters in parameterization mode Switch to parameterization mode by pressing the 2 keys ESC and OK at the same time Rule 2 Outputs and inputs Always enter a circuit from output to input You can connect an output to several inputs but not several outputs to one input You can t connect an output to a preceding input within a program path Insert markers...

Page 43: ... block Press ESC to exit circuit input When the cursor appears in the form of a solid block you should select a connector block Use the keys or to select a connector block Press OK to accept a selection Press ESC to go back one step Rule 4 Planning Before you enter a circuit draw up a complete plan of it on paper or program IDEC SmartRelay directly using WindLGC IDEC SmartRelay can only store comp...

Page 44: ...r r rg g g g C C C Cl l l le e e ea a a ar r r r P P P Pr r r rg g g g S S S Se e e et t t t C C C Cl l l lo o o oc c c ck k k k P P P PC C C C C C C Ca a a ar r r rd d d d C C C Ca a a ar r r rd d d d Main menu Programming menu PC card menu S S S Se e e et t t t C C C Cl l l lo o o oc c c ck k k k S S S Se e e et t t t P P P Pa a a ar r r ra a a am m m m OK OK ESC ESC Parameterization menu Progra...

Page 45: ...ect IDEC SmartRelay to the power and turn it on The following message appears on the display Switch IDEC SmartRelay to programming mode To do this press the keys and OK at the same time The fact that you have to press the keys simultaneously prevents anyone pressing them and switching to programming mode inadvertently No Program OK ESC When you press the keys IDEC SmartRelay s main menu appears Pr...

Page 46: ...ay then displays the first output Use the and keys to select the other outputs At this point you begin to enter your circuit 3 6 2 First Program Let s have a look at the following circuit a parallel connection of two switches Circuit diagram How a circuit is represented in a circuit diagram Edit Prg Clear Prg Set Clock IDEC SmartRelay s programming Q1 IDEC SmartRelay s first output K1 S1 K1 S2 E1 ...

Page 47: ...Q1 is controlled by an OR block Program I1 and I2 are connected to the input of the OR block S1 to I1 and S2 to I2 Thus the program in IDEC SmartRelay looks like this Wiring The wiring is as follows Switch S1 acts on input I1 and switch S2 on input I2 E1 is connected to relay Q1 I1 I2 x Q1 1 L1 N I1 I2 I3 I4 I5 I6 Q1 Q2 Q3 Q4 L1 N S1 S2 L N idec SmartRelay ...

Page 48: ...eft At this point enter only the first block the OR block Press OK to switch to input mode The cursor no longer appears in the form of an underline instead it appears as a solid block that flashes on and off At the same time IDEC SmartRelay offers you the first list for selection Select the GF list by pressing until GF appears and press OK IDEC SmartRelay then displays the first block in the list ...

Page 49: ... All you have to do now is wire the inputs of the block To do this proceed as follows Press OK 1 B01 Q1 The cursor is still in the block and appears in the form of a solid block The first block in the list of general functions is AND The cursor appears in the form of a solid block indicating that you have to select a block B01 Q1 1 B01 Q1 B01 1 Q1 Your entire program looks like this Block number 1...

Page 50: ...umps to the next input of the OR block Now connect input I2 to the input of the OR block You know how to do this already 1 Switch to input mode OK 2 Select the Co list keys or 3 Accept the Co list OK 4 Select I2 keys or 5 Accept I2 OK Thus I2 is now connected to the input of the OR block 1 The following appears in the display panel B01 Q1 x 1 Q1 I1 B01 1 The following appears in the display panel ...

Page 51: ...ccept the Co list OK 4 Select x keys or 5 Accept x OK Thus all the block s inputs are now wired The program is now complete IDEC SmartRelay returns to output Q1 If you want to have another look at your first program you can use the or key to move the cursor through the program 1 The following appears in the display panel B01 Q1 Q1 Your entire program so far looks like this in IDEC SmartRelay I1 I2...

Page 52: ...r to page 3 33 Note IDEC SmartRelay has now stored your program permanently so that it will not be lost in the event of a power failure The program is stored in IDEC SmartRelay until you expressly delete it by entering the appropriate command 2 Return to the main menu ESC Switching IDEC SmartRelay to RUN 3 Move to Start keys or 4 Accept Start OK IDEC SmartRelay switches to RUN In RUN IDEC SmartRel...

Page 53: ...o 09 00 Q 1234 State display Let s have a look at that in our example I 123456 Mo 09 00 Q 1234 RUN L1 N S1 S2 1 When switch S1 is closed voltage is applied to input I1 which has the state 1 SmartRelay calculates the states of the outputs with the program Output Q1 has the state 1 here When Q1 has the state 1 SmartRelay operates relay Q1 and the consumer at Q1 is supplied with voltage I1 I2 Q1 When...

Page 54: ...rtRelay 3 22 IDEC SmartRelay User s Manual The next step You have now successfully entered your first circuit In the next section we will show you how to make changes to existing programs and use special functions in them ...

Page 55: ...nd program we have to modify the first one slightly Let s begin by looking at the circuit diagram for the second program In IDEC SmartRelay the program looks like this You will recognize the OR block and output relay Q1 from the first program Only the off delay is new L1 I1 I2 x N Q1 S1 S2 You already know the first part of the circuit Switches S1 and S2 operate a relay This relay switches on cons...

Page 56: ... Program and press OK 3 Select Edit Prg from the programming menu by moving to Edit Prg and press OK You can now modify the existing program Inserting an additional block in a program Move the cursor to the B of B01 B01 is the block number of the OR block At this point we insert the new block Press OK Select the SF list B key Press OK Q1 B01 Move the cursor Press Q1 BN The SF list contains the blo...

Page 57: ...ral function IDEC SmartRelay displays the block of the function The cursor is in the block and appears in the form of a solid block Use the or key to select the block you want R The inserted block receives the block number B02 Block B01 which has been connected up to now to Q1 is automatically connected to the uppermost input of the inserted block The cursor is positioned at the uppermost input of...

Page 58: ...ts using the reset input and set the time for the off delay using the T parameter In our example we don t use the reset input of the off delay We wire it with x You learned how to do this in the first program but just to remind you here is the procedure again 1 Position the cursor under the R key or 2 Switch to input mode OK 3 Select the Co list keys or 4 Accept the Co list OK 5 Select x keys or 6...

Page 59: ...rameterization mode and can be modified there B02 T T 00 00s Time value Time unit The cursor appears on the first position of the time value To change the time value proceed as follows Use the keys and to move the cursor to different positions Use the keys and to change the value When you have entered the time value press OK Setting the time Set the time T 12 00 minutes 1 Move the cursor to the fi...

Page 60: ...changed in parameterization mode Type of protection T cannot be changed in parameterization mode B02 T T 12 00m B02 T T 12 00m 9 Conclude your input OK Checking the program This branch of the program for Q1 is now complete IDEC SmartRelay displays the Q1 output You can have another look at the program on the display Use the keys to move through the program Use or to move from block to block and us...

Page 61: ...Programming IDEC SmartRelay 3 29 IDEC SmartRelay User s Manual IDEC SmartRelay is now in RUN again I 123456 Q 1234 Mo 09 00 ...

Page 62: ...h IDEC SmartRelay to programming mode 3 finger grip 2 Select Edit Prg by pressing OK 3 Position the cursor at the input of Q1 i e under B02 using the key 4 Press OK 5 Connect block B01 instead of block B02 directly to output Q1 Select the BN list and press OK Select B01 and press OK Result Block B02 is now deleted because it is no longer used anywhere within the entire circuit Block B01 is now con...

Page 63: ...C SmartRelay to programming mode 3 finger grip 2 Select Edit Prg by pressing OK 3 Position the cursor at the input of Q1 i e under B02 4 Press OK 5 Set the connector x instead of block B02 at the Q1 output Select the Co list and then press OK Select x and then press OK Result Block B02 is now deleted because it is no longer used anywhere within the entire circuit and all the blocks that are connec...

Page 64: ... as the old one However you can delete the old block and insert a new one You can insert whichever block you like 3 6 8 on the Display If you have entered a program and want to exit Edit Prg with ESC IDEC SmartRelay checks whether you have wired all the inputs of all the blocks correctly If you have forgotten an input or parameter IDEC SmartRelay displays the first place at which you have forgotte...

Page 65: ...rg or 4 Accept Clear Prg OK If you do not want to delete the program leave the on No and press OK If you are sure that you want to delete the program stored in IDEC SmartRelay proceed as follows 5 Move the to Yes or 6 Press OK IDEC SmartRelay deletes the program Program PC Card Start Edit Prg Clear Prg Set Clock Clear Prg No Yes IDEC SmartRelay switches to the programming menu To prevent you from ...

Page 66: ...g the limit values of a counter RAM The area in which IDEC SmartRelay stores the current actual values e g the counter status Timer The area IDEC SmartRelay uses for time functions such as the off delay REM The area in which IDEC SmartRelay stores actual values that have to be retained e g the count value of an operating hours counter In blocks with selective use of the retentive feature this memo...

Page 67: ...ntive on delay 2 1 1 0 Seven day time switch 6 2 0 0 Twelve month time switch 2 0 0 0 Up down counter 2 2 0 2 Operating hours counter 2 0 0 4 Symmetrical clock pulse generator 1 1 1 0 Asynchronous pulse generator 3 1 1 0 Random generator 2 1 1 0 Frequency trigger 3 3 1 0 Analog trigger 4 2 0 0 Analog comparator 3 4 0 0 Stairwell light switch 1 1 1 0 Dual function switch 2 1 1 0 Message texts 1 0 0...

Page 68: ...still 42 Par memory areas free you are one REM memory area short to run an additional operating hours counter Calculation Free memory areas divided by the required number of memory areas Carry out this calculation for each memory area required Par RAM timer REM The lowest value shows you the maximum number of functions you can use Nesting depth A program path consists of a series of function block...

Page 69: ...available in IDEC SmartRelay Normally these are all the connectors all the general functions and all the special functions that the respective IDEC SmartRelay variant knows These elements also include all the blocks you have created in IDEC SmartRelay before you call up the BN list When IDEC SmartRelay no longer displays everything IDEC SmartRelay no longer displays all elements if No further bloc...

Page 70: ...the inputs I7 and I8 which can also be used as AI1 and AI2 depending on how they are programmed If the inputs are used as I7 and I8 the signal applied is interpreted as a digital value If they are used as AI1 and AI2 the signals are interpreted as analog values In the case of special functions which can only be effectively connected with analog inputs on the input side only the analog inputs AI1 a...

Page 71: ...y in your program as a startup flag It is automatically reset after the first cycle of program processing In setting deletion and evaluation memory marker M8 can be used in the same way as memory markers M1 to M7 in all subsequent cycles Note The signal applied at the marker s output is always that of the last program cycle The signal is not changed within a program cycle Levels Voltage levels are...

Page 72: ...unctions exist Circuit diagram representation Representation in IDEC SmartRelay Designation of the general function Series connection of normally open contacts AND see page 4 6 AND with RLO edge detection see page 4 6 Parallel connec tion of normally closed contacts NAND AND not see page 4 7 NAND with RLO edge detection see page 4 8 Parallel connec tion of normally open contacts OR see page 4 8 Se...

Page 73: ... 5 IDEC SmartRelay User s Manual Circuit diagram representation Representation in IDEC SmartRelay Designation of the general function Double change over XOR exclusive OR see page 4 10 Inverter NOT negation inverter see page 4 10 ...

Page 74: ...e closed If an input pin of this block is not wired x then the following applies to the input x 1 Logic table for AND 1 2 3 Q 0 0 0 0 0 0 1 0 0 1 0 0 0 1 1 0 1 0 0 0 1 0 1 0 1 1 0 0 1 1 1 1 4 2 2 AND with RLO Edge Detection Symbol in IDEC SmartRelay The output of AND with RLO edge detection only adopts the state 1 when all inputs have the state 1 and at least one input had the state 0 in the previ...

Page 75: ...tacts is repre sented in a circuit diagram as Symbol in IDEC SmartRelay The output of NAND only adopts the state 0 if all the inputs have the state 1 i e they are closed If an input pin of this block is not wired x then the following applies to the input x 1 Logic table for NAND 1 2 3 Q 0 0 0 1 0 0 1 1 0 1 0 1 0 1 1 1 1 0 0 1 1 0 1 1 1 1 0 1 1 1 1 0 1 3 Q 2 Cycle 1 2 3 4 5 6 7 8 9 10 ...

Page 76: ...put pin of this block is not wired x then the following applies to the input x 1 Timing diagram for NAND with RLO edge detection 4 2 5 OR The parallel connection of a number of normally open contacts is represented in a circuit diagram as follows Symbol in IDEC SmartRelay The output of the OR adopts the state 1 if at least one input has the state 1 i e it is closed If an input pin of this block is...

Page 77: ... in a circuit diagram as follows Symbol in SmartRelay The output of NOR only adopts the state 1 if all the inputs have the state 0 i e they are switched off As soon as any of the inputs is switched on state 1 the output of NOR is set to 0 If an input pin of this block is not wired x then the following applies to the input x 0 Logic table for NOR 1 2 3 Q 0 0 0 1 0 0 1 0 0 1 0 0 0 1 1 0 1 0 0 0 1 0 ...

Page 78: ...t x 0 Logic table for XOR 1 2 Q 0 0 0 0 1 1 1 0 1 1 1 0 4 2 8 NOT Negation Inverter A normally closed contact is sented in a circuit diagram as Symbol in IDEC SmartRelay The output adopts the state 1 if the input has the state 0 In other words NOT inverts the state at the input The advantage of the NOT function can be illustrated by the following example you no longer require normally closed conta...

Page 79: ...4 3 1 Description of the Inputs Connection inputs The connections that can be made to other blocks or to the inputs of the IDEC SmartRelay device are described here S set The input S allows you to set the output to 1 R reset The reset input R takes priority over all other inputs and switches outputs to 0 Trg trigger Use this input to start the execution of a function Cnt count This input records c...

Page 80: ... parameter This input is not wired Set parameters for the block T time This input is not wired Set times for a block No number This input is not wired Set time bases P priority This input is not wired Set priorities 4 3 2 Time Response Parameter T With some of the special functions it is possible to parameterize a time value T When specifying the time note that the values to be entered depend on t...

Page 81: ...hat this deviation doesn t result in the clock running inaccurately in C variants the time switch is regularly compared with a high precision time base and adjusted accordingly This results in a maximum time error of 5s a day 4 3 3 Clock Buffering The internal clock of a IDEC SmartRelay module has a power buffer and continues to run if there is a power failure The ambient temperature affects the d...

Page 82: ... The Gain and Offset parameters allow the internal representation of an analog value to be aligned with the actual measured value Parameter Minimum Maximum Connector voltage in V 0 10 Internal process image 0 1000 Gain in 0 1000 Offset 999 999 A connector voltage of 0 to 10 V is mapped internally to values of 0 to 1000 A connector voltage greater than 10 V is also represented as 1000 in the intern...

Page 83: ...parable representations from circuit diagrams as well as an indication as to whether the function in question has parameterizable retentivity Circuit diagram representation Representation in IDEC SmartRelay Description of the special function Re On delay see page 4 18 Off delay see page 4 20 On off delay see page 4 22 R K1 K1 Q Trg K1 Retentive on delay see page 4 24 R S K1 K1 Latching relay see p...

Page 84: ...ial function Re Interval time delay relay see page 4 29 Edge triggered interval time delay relay see page 4 30 Seven day time switch see page 4 31 Twelve month time switch see page 4 36 Up and down counter see page 4 38 Re Operating hours counter see page 4 41 Symmetrical clock pulse generator see page 4 44 Asynchronous pulse generator see page 4 45 ...

Page 85: ...tion in IDEC SmartRelay Description of the special function Re Random generator see page 4 46 Fre Par Frequency trigger see page 4 48 Analog trigger see page 4 50 Analog comparator see page 4 53 Stairwell light switch see page 4 57 Dual function switch see page 4 59 En P Par Message texts see page 4 61 ...

Page 86: ...arameter T T is the time after which the output is switched on output signal is switched from 0 to 1 Output Q Q switches on after expiration of the defined time T if Trg is still set Parameter T Please note the parameter values for the T parameter in Section 4 3 2 Timing diagram Trg T T Ta starts Q The bold part of the timing diagram ap pears in the on delay symbol Description of function When the...

Page 87: ...ime T the output is set to 1 after the time T has elapsed there is a delay between the input being switched on and the output coming on If the state at the Trg input switches back to 0 before the time T has elapsed the time is reset The output is reset to 0 if the state at the Trg input is 0 In the event of a power failure the elapsed time is reset ...

Page 88: ... starts the off delay timer Input R The input R resets the elapsed time for the off delay and sets the output to 0 Parameter T T is the period after which the output is switched off output signal is switched from 1 to 0 Output Q Q switches on when Trg does but remains on when Trg switches off until the delay period T has elapsed Parameter T Please note the parameter values for the T parameter in S...

Page 89: ...hanges from 1 to 0 the current time Ta starts in IDEC SmartRelay and the output remains set If Ta reaches the values specified via T Ta T the output Q is reset to 0 off delay If the Trg input switches on and off again the time Ta starts again The input R Reset resets the elapsed time Ta and the output before the set time delay Ta has elapsed In the event of a power failure the elapsed time is rese...

Page 90: ...s the time TH for the on delay A falling edge change from 1 to 0 starts the time TL for the off delay Parameter Par TH is the time after which the output is switched on output signal is switched from 0 to 1 TL is the time after which the output is switched off output signal is switched from 1 to 0 Output Q Q switches on after the parameterized time TH has elapsed if Trg is still set and switches o...

Page 91: ...rg switches back to 0 before the time TH has elapsed the time is reset When the state at the input changes to 0 again the timed period TL elapses If the state at the input Trg remains at 0 at least for the duration of the parameterized time TL the output is set to 0 after the time TL has elapsed there is a delay between the input being switched off and the output going off If the state at the inpu...

Page 92: ...g trigger input to start the time for the on delay Input R Input R resets the time for the on delay and sets the output to 0 Parameter T T is the time after which the output is switched on output state is switched from 0 to 1 Output Q Q is switched on when the delay period T has elapsed Parameter T Please refer to the note in Section 4 3 2 when specifying the values Timing diagram Trg T Ta starts ...

Page 93: ...ut changes from 0 to 1 the current time Ta starts When Ta reaches the time T output Q is set to 1 Another switching operation at the Trg input has no effect on Ta The output and the time Ta are not reset to 0 until the state of the R input changes to 1 again In the event of a power failure the elapsed time is reset ...

Page 94: ...S and R are both 1 at the same time then the output is reset Parameter Par This parameter is used to switch retentivity on or off Rem off no retentive feature on the state can be stored retentively Output Q Q switches on when S does and remains on until the input R is set Timing diagram Switching behavior A latching relay is a simple binary memory cell The signal at the output depends on the state...

Page 95: ...al Sn Rn Q Remarks 0 0 x State remains the same 0 1 0 Reset 1 0 1 Set 1 1 0 Reset resetting has priority over setting After power failure the signal that was valid before the power failure is set at the output but only if the retentive feature was switched on ...

Page 96: ...on or off Rem off no retentive feature on the state can be stored retentively Output Q Q switches on when Trg is sent and remains switched on until T expires Timing diagram Description of function Every time the state at the input Trg changes from 0 to 1 the output Q changes its state i e the output switches on or off Use the R input to reset the current impulse relay to its initial state i e the ...

Page 97: ...ime Ta and while the input is set to 1 Parameter T Please refer to the note on the T parameter in Section 4 3 2 Timing diagram Description of function When the input Trg switches to the state 1 the output Q immediately switches to the state 1 At the same time the elapsed time Ta starts running the output remains set If Ta reaches the value specified by means of T Ta T the output Q is reset to 0 pu...

Page 98: ...itches on when Trg does but remains on when Trg switches off until the delay period T has elapsed Parameter T Please refer to the note on the T parameter in Section 4 3 2 Timing diagram Description of function When the input Trg switches to the state 1 the output Q immediately switches to the state 1 At the same time the time Ta starts running If Ta reaches the time specified for T Ta T the output...

Page 99: ...nection Description Parameters No 1 No 2 No 3 The No cam parameter is used to set the on and off times for each of the cams of the seven day time switch You specify the times in terms of day and time Output Q Q switches on when the parameterizable cam is switched on Timing diagram 3 examples No1 Daily 06 30 hours to 08 00 hours No2 Tuesday 03 10 hours to 04 15 hours No3 Saturday and Sunday 16 30 h...

Page 100: ...n one cam that is the same as the off time on another cam on the seven day time switch then the on and off times conflict In such cases cam 3 has priority over cam 2 and cam 2 has priority over cam 1 Parameter assignment window The parameter assignment window for cam no 1 for example is as follows Day of the week The letters after D have the following meanings M Monday Monday T Tuesday Tuesday W W...

Page 101: ...the day of the week 3 Use the and keys to select one or more days of the week 4 Use the key to move the cursor to the first position for the on time 5 Set the on time Use the and keys to change the value To move the cursor from one position to another use the and keys You can only select the value at the first digit means no switching operation 6 Use the key to move the cursor to the first positio...

Page 102: ...10 to 04 15 on Tuesday and from 16 30 to 23 10 at the weekend Three cams are required for this Here is the parameter assignment window for cams 2 and 3 from the above timing diagram Cam 1 Cam 1 switches on the output of the seven day time switch every day from 05 30 to 07 40 Cam 2 Cam 2 switches on the output of the seven day time switch every Tuesday from 03 10 to 04 15 B01 No1 D MTWTFSS On 05 30...

Page 103: ...ay User s Manual Cam 3 Cam 3 switches on the output of the seven day time switch every Saturday and Sunday from 16 30 to 23 10 Result No Monday Wednesday Tuesday Saturday Friday Thursday Sunday 1 3 1 2 3 Q 1 1 1 1 B01 No3 D SS On 16 30 Off 23 10 ...

Page 104: ...es for the cam of the twelve month time switch Output Q Q switches on when the parameterizable cam is switched on Timing diagram MM DD On 02 20 Off 04 03 On Off February 20 April 3 Feb Mar Apr Description of function At the on time the twelve month time switch switches the output on and at the off time it switches the output off The off date indicates the date on which the output is reset to 0 The...

Page 105: ...n March 1 and switched off on April 4 switched on again on July 7 and switched off on November 19 For this you require 2 twelve month time switches each of which is configured for one of the on periods The outputs are then linked by an OR block B01 No MM DD On 03 01 Off 04 04 B02 No MM DD On 07 07 Off 11 19 1 March 4 April 7 July 19 November B01 B02 On ...

Page 106: ...n Input R The R input can be used to reset the internal count value and the output to zero Input Cnt The counter counts the changes from state 0 to state 1 at the Cnt input Changes from state 1 to state 0 are not counted Maximum count frequency at the input connectors 5 Hz Input Dir The Dir input allows you to specify the counting direction as follows Dir 0 count up Dir 1 count down Parameter Par ...

Page 107: ...he internal counter value and the output to 000000 As long as R 1 the output remains set to 0 and the pulses at the input Cnt are not counted Par parameter setting If the internal counter value is greater than or equal to Par output Q is set The counter remains the same in the case of under or overflow Lim can be anything between 0 and 999999 Rem This parameter switches the retentive feature of th...

Page 108: ... SmartRelay Functions 4 40 IDEC SmartRelay User s Manual If the retentive feature is switched on when a power failure occurs the counter status remains the same and this value is used once power is restored ...

Page 109: ...al is not 1 Ral 1 The counter is stopped The input R resets the output The remaining period of the service interval MN is set to MN MI The previously elapsed time remains stored Input En En is the monitoring input IDEC SmartRelay measures the length of time in which this input is set Input Ral Ral 0 Hours can only be counted if R is not 1 Ral 1 The counter is stopped The input Ral Reset all resets...

Page 110: ... 0 to 9999 Output Q If the remaining time MN 0 see timing diagram the output is set MI parameterized count value MN remaining time OT total time elapsed since the last 1 signal at the Ral input Timing diagram 1h x R 1h R x Par Q R Ral En MN MI OT MN 0 The counter stops counting as long as Ror Ral is set MI 5h MI Defined time period MN Remaining time OT Total elapsed time since last 1 signal at the...

Page 111: ...The internal counter OT continues to run The Ral input resets the output Q and the counter for the remaining time to the specified value MI The internal counter OT also is reset to 0 You can look at the current values for MN and OT during program execution in parameterization mode Limit value for OT When you reset the hours counter with the signal R the accumulated time remains stored in OT The ma...

Page 112: ...o the note in Section 4 3 2 when specifying the values Timing diagram Description of function The parameter T specifies the length of the on and off periods Use the En enable input to switch the clock pulse generator on The pulse generator sets the output to 1 for the time T then to 0 for the time T and so on until the En input is a 0 Note on the relay outputs Relay outputs that switch under load ...

Page 113: ...tput signal of the asynchronous clock pulse generator when active Parameter Par You can set the pulse duration TH and the interpulse period TL Output Q Q switches on and off cyclically with the times TH and TL Timing diagram Description of function You can set the pulse duration and interpulse period using the parameters TH Time High and TL Time Low Both parameters have the same time base they can...

Page 114: ... 0 to 1 at the En enable input starts the on delay time of the random generator A falling edge change from 1 to 0 starts the off delay time of the random generator Parameter Par The on delay time is set randomly between 0 s and TH The off delay time is set randomly between 0 s and TL TL must have the same time base as TH Output Q Q switches on after the on delay time has elapsed if Trg is still se...

Page 115: ...time has elapsed If the state at the input En switches back to 0 before the on delay time has elapsed the timer is reset If the state at the input En changes again to 0 a random time off delay time between 0 s and TL is defined and started If the state at the input En remains at 0 at least for the duration of the off delay time the output is set to 0 after the off delay time has elapsed If the sta...

Page 116: ...ar Input Cnt At the Cnt input apply the input that supplies the pulses to be counted Use Inputs I5 I6 for rapid counts not FL1A H10RCA FL1A B10RCA FL1A H10RCB and FL1A B10RCB max 1 kHz Any other input or circuit component for lower frequencies Parameter Par SW SW G_T SW on threshold SW off threshold G_T time period over which the signal pulses applied are counted Output Q Q switches on or off depe...

Page 117: ... below the off threshold Par parameter setting B03 Par SW 0050 SW 0048 G_T 01 00s On threshold Degree of protection Time interval for pulses Off threshold SW is the on threshold It can be any frequency in the range 0000 to 9999 SW is the off threshold It can be any frequency in the range 0000 to 9999 G_T is the time interval in which the pulses applied to Cnt are measured G_T can be a period betwe...

Page 118: ...DEC SmartRelay Connection Description Input Ax At the output Ax apply the analog signal to be evaluated Use the connectors I7 AI1 or I8 AI2 0 10 V corresponds to 0 1000 internal value Parameter Par SW SW Gain in Value range 0 1000 Offset Value range 999 SW on threshold Value range 9990 to 19990 SW off threshold Value range 9990 to 19990 Output Q Q is set or reset depending on the threshold values ...

Page 119: ...ion of function The function reads in the analog value AI1 or AI2 The Offset parameter is then added to the analog value This value is then multiplied by the Gain parameter If this value exceeds the on threshold SW the output Q is set to 1 Q is reset to 0 again if the value violates the off threshold SW ...

Page 120: ...and Offset parameters are used to adapt the sensors used to the relevant application Parameter assignment B03 Par SW 00000 SW 00000 0050 Gain in Degree of protection On threshold Off threshold Press key Offset SW 00000 SW 00000 0050 200 Display in PARAM mode example B02 Par SW 400 SW 200 Ax 20 ...

Page 121: ...nection Description Inputs Ax and Ay At the Ax and Ay inputs apply the analog signals whose difference is to be evaluated Use the connectors I7 AI1 and I8 AI2 Parameter Par Gain in Value range 0 1000 Offset Value range 999 Threshold value Output Q Q is set to 1 if the difference between Ax and Ay exceeds the threshold value Gain and Offset parameters Refer to the information in Section 4 3 6 on th...

Page 122: ... following arithmetic operations 1 The value parameterized for Offset is added to Ax and Ay 2 Ax and Ay are multiplied by the Gain parameter 3 The function produces the difference between the analog values Ax and Ay If this value exceeds the threshold value parameterized under the output Q is set to 1 Otherwise Q is reset to 0 Rule for calculation Q 1 when Ax offset gain Ay offset gain threshold v...

Page 123: ... 4 55 IDEC SmartRelay User s Manual Par parameter setting The Gain and Offset parameters are used to adapt the sensors used to the relevant application B03 Par 00000 0050 200 Gain in Degree of protection Threshold value Offset ...

Page 124: ...g operation is to be triggered e g burner on The real temperatures are to be displayed in PARAM mode Temperature sensors with the following technical specifications are available 30 to 70 o C 0 to 10V DC Application Internal Representation 30 to 70 o C 0 to 10V DC 0 to 1000 0 o C 300 Offset 300 Value range 30 to 70 o C 100 1000 Gain 100 1000 0 1 10 Switching threshold 15 o C Threshold value 15 Par...

Page 125: ...lay Connection Description Input Trg Use the Trg trigger input to start the time for the stairwell light switch off delay Parameter T T is the time after which the output is switched off output state changes from 1 to 0 Minutes are set as the default time base Output Q Q is switched off when the time T has elapsed 15 s before the time has elapsed the output switches to 0 for 1 s Parameter T Please...

Page 126: ...a reaches the time T the output Q is reset to 0 Another switch at the input Trg during Ta resets Ta retrigger option In the event of a power failure the elapsed time is reset Changing the time base You can also set other values for the warning time and warning duration Time Base T Warning Time Warning Duration Seconds 750 ms 50 ms Minutes 15 s 1 s Hours 15 min 1 min Only relevant for programs with...

Page 127: ...light When the output Q is switched on it can be reset with Trg Parameter Par TH is the time after which the output is switched off output state changes from 1 to 0 TL is the length of time that has to be set for the input to activate the permanent light function Output Q The output Q switches on with Trg and switches off again after a parameterizable time depending on the length of the pulse to T...

Page 128: ... to 1 If the time Ta reaches the time TH the output Q is reset to 0 In the event of a power failure the elapsed time is reset If the state 0 changes to 1 at the input Trg and 1 remains set at least for the time TL the permanent light function is activated and the output Q is switched on permanently If the input Trg is switched again TH is reset and the output Q is switched off Ta starts TH Q Trig ...

Page 129: ...tput Output Q Q has the same state as the input En Limitation A maximum of 5 message text functions are possible Description of function If the state at the input changes from 0 to 1 the message text you have parameterized is displayed in RUN mode If the state at the input changes from 1 to 0 the message text is not displayed If several message text functions have been triggered with En 1 the mess...

Page 130: ...w for Par Use the key to select a line that is to contain a message text Press the OK key to switch to edit mode for this line Use the and keys to select the letter to be displayed To move the cursor from one position to another use the and keys Press OK to apply the changes or ESC to exit edit mode To output a parameter e g display a measurement or function value as a message text in a line selec...

Page 131: ...dit mode Use the and keys to select between the blocks to be displayed and the corresponding parameters Use the and keys to select the block or the parameter to be displayed To select the parameter press OK Press the ESC key to exit parameter assignment mode Your changes are applied B01 T ar P ...

Page 132: ...IDEC SmartRelay Functions 4 64 IDEC SmartRelay User s Manual ...

Page 133: ...switch You can set the parameters In programming mode In parameterization mode In parameterization mode the programmer sets a value for a parameter We introduced parameterization mode so parameters can be changed without having to change the program A user can change the times without having to change into programming mode The advantage of this is that the program and thus the circuit is protected...

Page 134: ...version of IDEC SmartRelay has a clock time switch those versions of IDEC SmartRelay that have a clock have the letter C in their name e g FL1A H10RCB Set Clock allows you to set IDEC SmartRelay s time switch 5 1 1 Parameters The following can be parameters The delay times of a time relay The switching times cams of a time switch The threshold value of a counter The monitoring time of an operating...

Page 135: ...am option from the parameterization menu 2 Press the OK key IDEC SmartRelay displays the first parameter If parameters cannot be set you can use ESC to return to the parameterization menu 3 Select the desired parameter or The parameter displays in a separate window 4 To change a parameter select it and press OK B01 T Block number Parameter abbreviation Set Clock Set Param B01 T T 12 00m Ta 00 00m ...

Page 136: ...nt at which you want to make the change or 2 Change the value or 3 Accept the value OK B01 T Ta 00 00m To move or To change value or Finished OK T 01 00m You cannot change the unit of the delay time for the parameter T in parameterization mode This is only possible in programming mode Current value of a time T If you view a time T in parameterization mode it looks like this You can change the set ...

Page 137: ...ike this IDEC SmartRelay displays the circuit state of the time switch rather than the circuit state of a cam The circuit state of the time switch depends on all three cams No1 No 2 and No 3 The time switch is off state 0 at the output The time switch is on state 1 at the output B02 No1 Day Su On 09 00 Off 10 00 The circuit state of the time switch is displayed 1 0 1 ...

Page 138: ...ameters of an operating hours counter in parameterization mode it looks like this Current value of a threshold switch If you view the parameter of a threshold switch in parameterization mode it looks like this Cnt 000028 B05 Par B06 Par Lim 000300 B03 Par MI 0100h MN 0017h OT 00083h Off threshold Switching threshold Remaining time Measured value Current count value Operating hours elapsed On thres...

Page 139: ...ct the day of the week or 4 Move the cursor to the next position or 5 Change the value or 6 Set the clock to the correct time Repeat steps 4 and 5 7 Conclude your input OK Setting the time in programming mode 1 Switch to programming mode and OK at the same time 2 Select Program and press OK 3 Select using or Set Clock and press OK Now you can set the day of the week and the time as described above...

Page 140: ...programming or parameterization mode and switch IDEC SmartRelay to RUN 2 Press OK and The current time is put forward by one hour Change the time in the opposite direction in the same way 3 Press OK and The current time is put back by one hour Time displayed Time displayed after change Mo 09 17 I 12345678 Q 1234 Mo 09 17 I 12345678 Q 1234 Time displayed after change Mo 10 17 I 12345678 Q 1234 ...

Page 141: ...e programs Duplicate programs Send programs by ground mail Write and test programs in the office and then transfer them to a different IDEC SmartRelay in the cabinet IDEC SmartRelay is supplied with a cover You must order the memory cartridge separately Note You do not require a memory cartridge for permanently storing the program in your IDEC SmartRelay The IDEC SmartRelay program is already stor...

Page 142: ... memory cartridge with program protection if you intend to edit it further You can start up a program on a memory cartridge with know how protection but not read it for the purpose of editing 6 2 Removing and Inserting Program Memory Cartridge When you remove a red memory cartridge know how protection and copy protection always remember that the program stored on the memory cartridge can only run ...

Page 143: ... Do not put your finger or an object made of metal or any other conductive material in the open shaft of the memory cartridge The socket for the memory cartridge may be live if L1 and N have been incorrectly wired Only a trained technician should change the memory cartridge ...

Page 144: ...the memory cartridge and ease the memory cartridge out of the shaft a little You can now remove the memory cartridge Inserting the memory cartridge The shaft for the memory cartridge is chamfered at the lower right edge The memory cartridge also has a chamfered edge This prevents you from inserting the memory cartridge the wrong way around Insert the memory cartridge into the shaft until it engage...

Page 145: ...cartridge into the shaft 2 Switch IDEC SmartRelay to programming mode and OK at the same time 3 Move the to PC Card 4 Press OK The transfer menu appears 5 Move the to IDEC SmartRelay Card 6 Press OK IDEC SmartRelay copies the program to the memory cartridge When IDEC SmartRelay has finished copying it automatically returns to the main menu Program PC Card Start Program PC Card Start IDEC SmartRela...

Page 146: ... cartridge containing your program you can copy the program to IDEC SmartRelay in two ways Automatically when IDEC SmartRelay starts up power on Via IDEC SmartRelay s PC Card menu Note Please note that not all programs stored on the memory cartridges can be read in all IDEC SmartRelay variants If necessary read Section 6 1 again Automatic copying when IDEC SmartRelay starts up Proceed as follows 1...

Page 147: ... RUN you must ensure that the system you are controlling with IDEC SmartRelay does not represent a source of danger 1 Move the to Start 2 x key 2 Press OK Using the PC Card menu to copy Read the note about changing the memory cartridge To copy a program from the memory cartridge to IDEC SmartRelay proceed as follows 1 Insert the memory cartridge 2 Switch IDEC SmartRelay to programming mode and OK ...

Page 148: ...fer menu appears 5 Move the to Card IDEC SmartRelay key or 6 Press OK Result IDEC SmartRelay copies the program from the memory cartridge to IDEC SmartRelay As soon as IDEC SmartRelay has finished copying IDEC SmartRelay automatically displays the main menu PC Card Card IDEC SmartRelay ...

Page 149: ...elay alternative The IDEC SmartRelay programming software represents an alternative to the conventional means of planning 1 Develop your applications at your desk 2 Simulate the application in your computer and test whether or not it functions properly before the circuit is actually put to use 3 Print out the entire circuit in a block diagram or in several block diagrams sorted according to output...

Page 150: ...read the product information documentation and the text files on the CD ROM To install the software simply follow the instructions on the installation program To start the installation program proceed as follows installation on CD ROM should start automatically 1 Select and start SETUP EXE in Windows 95 98 and Windows NT 4 0 either by choosing Start Run and entering the line drive Setup or by clic...

Page 151: ...martRelay to PC IDEC SmartRelay Mode There are two ways to connect the PC and IDEC SmartRelay IDEC SmartRelay is either switched to transfer mode when it is on or automatically when the IDEC SmartRelay power supply is switched on and the transfer cable is in place To switch IDEC SmartRelay to PC IDEC SmartRelay mode proceed as follows 1 Switch IDEC SmartRelay to programming mode Press and OK at th...

Page 152: ... 3 Transfer Settings To transfer programs between the PC and IDEC SmartRelay you must make certain settings in the IDEC SmartRelay software You can make these settings using the menu of the software you are using WindLGC Specify which IDEC SmartRelay WindLGC works out which IDEC SmartRelay variant you will need to use the written program Options Interface You can enter the serial port to which IDE...

Page 153: ...8 7 8 3 Ventilation system 8 14 8 4 Industrial gate 8 19 8 5 Fluorescent lights 8 23 8 6 Water pump 8 27 8 7 Further applications 8 31 Note The IDEC SmartRelay applications are provided free of charge to our customers The examples they contain are not binding and are included to provide general information on how IDEC SmartRelay can be used Customer specific solutions may be different The user is ...

Page 154: ...n the stairwell the lights should go out in order to save energy 8 1 2 Previous Solution Conventionally there have been two ways to control such a lighting system as follows By means of a current impulse relay By means of automatic stairway lighting The wiring for the two lighting systems is identical Lights Switches Distribution by means of current impulse relay or automatic stairway lighting Dis...

Page 155: ...tended period of time e g for cleaning purposes The permanent on switch is usually on the stairwell lighting timer unit which may be difficult or impossible to access 8 1 3 Lighting System with IDEC SmartRelay You can use a IDEC SmartRelay module to replace the stairwell lighting timer or the current impulse relay And you can implement both functions timed off delay and current impulse relay in a ...

Page 156: ...ing a corridor or stairwell lighting system Only the automatic lighting timer current impulse relay is replaced Additional functions are entered directly in IDEC SmartRelay Current impulse relay with IDEC SmartRelay In the event of a gate pulse at input I1 output Q1 switches over Automatic stairway lighting system with IDEC SmartRelay In the event of a gate pulse at input I1 output Q1 switches on ...

Page 157: ...r the set time of 6 minutes T 06 00m has elapsed off delay When the switch is pressed twice The light is switched on permanently the latching relay is set via the current impulse relay When the switch is pressed for 2 seconds The light is switched off on delay switches off both the permanent light and the normal light this branch of the circuit is used twice You can enter these circuits several ti...

Page 158: ... flash before it goes off automatically You can integrate various central functions Central off Central on panic button Control of all lights or individual circuits by a daylight control switch Control by the integrated time switch e g permanent light only until 24 00 hours no enabling at certain times Automatic switching off of the permanent light after a preset time has elapsed e g after 3 hours...

Page 159: ...y The door must remain open until there is nobody in the doorway anymore If there is nobody in the doorway it must close automatically after a short time Outside Inside B1 B2 Limit switch closed Limit switch open Main switch Q1 S1 S2 Motion detector Main switch Motion detector Motion detector A motor with a safety clutch generally drives the door This prevents people from being caught or injured i...

Page 160: ...on detectors detect nothing for a minimum period K4 enables the close operation 8 2 3 Door Control System with IDEC SmartRelay IDEC SmartRelay allows you to considerably simplify the circuit You need only connect the motion detectors the limit switches and the master contactors to IDEC SmartRelay K2 K2 K1 K3 K3 Open Close S2 S1 K3 B1 B2 K3 K4 K4 B K B S2 Open door W Auxiliary circuit L1 N ...

Page 161: ...omponents used K1 Master contactor Open K2 Master contactor Close S1 NC contact Limit switch Closed S2 NC contact Limit switch Open B1 NO contact Infrared motion detector Outside B2 NO contact Infrared motion detector Inside N I1 I2 I3 I4 I I6 Q1 Q2 Q3 Q Idec SmartRelay K1 K2 Open Close B1 B2 S1 L1 N ...

Page 162: ...lock diagram that corresponds to the circuit diagram of the conventional solution You can simplify this circuit using IDEC SmartRelay s functions Use the off delay to replace the latching relay and on delay The following function block diagram illustrates this simplification 1 1 1 I4 I3 I1 I2 x Q2 Q1 x 10 s Close Open Limit switch Door closed Limit switch Door open Motion detector Q1 Q2 ...

Page 163: ... connect a buzzer to one of IDEC SmartRelay s outputs to indicate when the door is about to close You can include time and direction dependent enabling of door opening so that it only opens operating hours or only from the inside to the outside after closing time 8 2 5 Enhanced FL1A H10RCB Solution Wiring of the enhanced IDEC SmartRelay solution L1 N I1 I2 I3 I4 I5 I6 K1 K2 Open Close B1 B2 S2 S1 ...

Page 164: ...x No1 Day Mo Fr On 09 00 Off 18 00 No2 Day Sa On 08 00 Off 13 00 No1 Day Mo Fr On 09 00 Off 19 00 No2 Day Sa On 08 00 Off 14 00 tput Motion detector B1 Motion detector B2 I3 Limit switch Door closed I6 Control switch Close door Detecting motion Motor for opening Motor for closing I1 I2 Motion detector B1 Motion detector B2 T 10 s x I5 Control switch Door open Q2 Close output I4 Limit switch Door o...

Page 165: ...15 is operated the door is to be constantly open or The motion detectors indicate that somebody is approaching the door and The door is not yet fully open limit switch at I4 Motor for closing Output Q2 is switched on and closes the door when the following occurs The control switch at 16 is operated the door is to be constantly closed or The motion detectors indicate that there is nobody near the d...

Page 166: ...Flow sensor The room contains an extractor fan and a fresh air fan Both fans are monitored by a flow sensor The pressure in the room must not be allowed to rise above atmospheric pressure The fresh air fan must only switch on when the extractor fan is triggered by the flow sensor A warning lamp indicates if one of the fans fails The circuit diagram for the previous solution is as follows K5 K5 S1 ...

Page 167: ...it with several switching devices in addition to the flow sensors A single IDEC SmartRelay module can replace the analyzer circuit Wiring of the ventilation system with FL1A H10RCB Components used K1 Master contactor K2 Master contactor S0 NC contact Stop switch S1 NO contact Start switch S2 NO contact Flow sensor S3 NO contact Flow sensor H1 Indicator lamp H2 Indicator lamp L1 N I1 I2 I3 I4 I5 I6...

Page 168: ...tor fan I3 Exhaust air flow sensor x 8 3 2 Advantages of Using IDEC SmartRelay Using a IDEC SmartRelay module requires fewer switching devices That saves installation time and space in the control cabinet Under certain circumstances it may even allow you to use a smaller control cabinet Additional options when using IDEC SmartRelay The free output Q4 can be used as a potential free signaling conta...

Page 169: ...2 Off Fault Q3 x x I3 Exhaust air flow sensor I2 Off Fault T 10 s T 10 s x x x I3 Exhaust air flow sensor I4 Fresh air flow sensor Q1 exhaust fan Q2 exhaust fan Q3 I1 You can also generate a message via output Q4 The relay contacts of output Q4 are always closed when the system is running Relay Q4 does not release unless there is a power failure or a fault in the system This contact can be used fo...

Page 170: ...System The gate is opened and closed by operating a switch in the gatehouse The gateman is able to monitor the operation of the gate at the same time The gate is normally fully opened or closed However movement of the gate can be halted at any time A flashing light is activated 5 seconds before the gate begins to move and continues for as long as the gate is in motion A safety pressure bar ensures...

Page 171: ...agram shows one possible gate control circuit Wiring of the gate control system with FL1A H10RCB K1 K5 K3 S1 S0 K3 K2 N K1 H1 K4 S5 p K6 K1 S2 S2 K3 K2 K4 S5 p S1 K3 K1 Close Flashing light Auxiliary circuit K6 Close K5 S4 S3 L1 N I1 I2 I3 I4 I5 I6 Q1 Q2 Q3 Q4 K1 K3 Open Close S4 S3 L N S1 S2 S0 S5 p S5 p Flashing light H1 Open Close Stop idec SmartRelay ...

Page 172: ...Relay solution T 5 s T 5 s x x x x Q1 Open Q3 Flashing light Q2 Close I3 I4 I3 I6 I5 I1 I2 Q2 Q1 Safety bar Gate is closed Gate is open Stop switch Open Start switch Stop switch Close start switch T 2 s I2 I1 Open start switch Close start switch Open Start switch The open and close start switches move the gate in the appropriate direction provided it is not already moving in the other direction Th...

Page 173: ... enhanced solution the gate will automatically open again when the safety bar is operated x x I6 Safety bar x Q2 I3 I4 Gate is open Stop switch x I1 Q2 Open start switch T 5 s Q1 Open T 5 s x Q2 Close I3 I6 I5 I2 Q1 Safety bar Gate is closed Stop switch Close start switch Q3 Flashing light T 2 s ...

Page 174: ...fficiency fluorescent lights arranged in rows of tubes are often used They are subdivided into switching groups according to how the room is used 8 5 1 Demands on the Lighting System The fluorescent lights are switched on and off locally If there is sufficient natural light the lights on the window side of the room are automatically switched off by means of a brightness sensitive switch The lights...

Page 175: ...witch the lights on and off locally after they have been switched off centrally Components required Switches S1 to S4 Daylight control switch B1 Time switch E1 Interval time delay relays K1 and K2 Remote control switches with central off K3 to K6 Disadvantages of the previous solution To implement the required functions a large amount of circuitry is necessary The large number of mechanical compon...

Page 176: ...ht Control with FL1A H10RCB Components used S1 to S4 NO contact Switches B1 NO contact Daylight control switch L1 N I1 I2 I3 I4 I5 I6 Q1 Q2 Q3 Q4 L1 N E2 E3 E4 B1 lx Fluorescent lamp 1 E5 Fluorescent lamp 2 Fluorescent lamp 3 Fluorescent lamp S1 S2 S3 S4 idec SmartRelay ...

Page 177: ...martRelay provided the switching capacity of the individual outputs is not exceeded In the case of greater capacities you should use a power contactor Connect the brightness sensitive switch directly to one of IDEC SmartRelay inputs You don t need a time switch since this function is integrated in IDEC SmartRelay Fewer switching devices are required so you can install a smaller sub distribution un...

Page 178: ...illustrates how such a rainwater supply system works The rainwater is collected in a large water butt From the water butt it is pumped by a pumping station into a piping system provided for it From there it can be drawn off in the same way as the normal household water supply If the water butt should run dry it can be topped up with mains water Run dry prevention on Mains water inlet on Run dry pr...

Page 179: ...dry prevention system 8 6 2 Previous Solution The pump and a solenoid valve are controlled by means of a pressure switch and 3 float switches that are fitted in the rainwater butt The pump must be switched on when the pressure in the cylinder falls below the minimum level Once the operating pressure has been reached the pump is switched off again following a short overrun period of a few seconds T...

Page 180: ...mp On systems using single phase AC pumps you must fit a contactor if the AC pump requires a higher current than can be switched by the output relay Q1 The power of a solenoid valve is so low that it can normally be controlled directly K1 Master contactor Y1 Solenoid valve S1 NO contact Pressure switch S2 NO contact Float switch S3 NC contact Float switch S4 NC contact Float switch L1 N I1 I2 I3 I...

Page 181: ...ecial Features and Enhancement Options The function diagram shows how you can connect up the control system for the pump and the solenoid valve Its layout corresponds to that of the current flow diagram You also have the possibility of incorporating additional functions for specific applications that would only be possible with the inclusion of extra equipment if you were using conventional techno...

Page 182: ...ctions Step switch e g for fans Boiler sequence control Control system for several pump sets with centralized operation Cutting device e g for detonating fuses Monitoring length of use e g in solar energy system Intelligent foot buttons e g to select speeds Control of an elevating platform Impregnation of textiles heating and conveyor control system Silo filling system And many more You can also f...

Page 183: ...additional functions for their domestic or building installation Here are some examples Home security You can program IDEC SmartRelay to switch a lamp on regularly or open and close your shutters while you are on holiday Heating system You can program IDEC SmartRelay to run the circulation pump only when water or heat is really required Cooling systems You can program IDEC SmartRelay to thaw your ...

Page 184: ...Applications 8 32 IDEC SmartRelay User s Manual ...

Page 185: ...0 55 C Storage transport 40 C 70 C Relative humidity IEC 68 2 30 From 5 to 95 no condensation Air pressure 795 1080 hPa Pollutants Free from corrosive gases Mechanical environmental conditions Type of protection IP20 Vibrations IEC 68 2 6 10 57 Hz constant amplitude 0 15 mm 57 150 Hz constant acceleration 2 g Shock IEC 68 2 27 18 shocks Half sine 15g 11ms IEC 68 includes VDE 0631 Drop IEC 68 2 31 ...

Page 186: ...EN 50082 2 Burst pulses IEC 801 4 Severity 3 2 kV supply and signal lines Energy carriers Single pulse surge applies only to FL1A H10RCB FL1A B10RCB IEC 801 5 Severity 2 0 5 kV power lines symmetrical 1 kV power lines asymmetrical Information on IEC VDE safety Measurement of clearance and creepage distance IEC 664 IEC 1131 EN 50178 draft 11 94 UL 508 CSA C22 2 No 142 Also VDE 0631 for FL1A H10RCB ...

Page 187: ...AC 10 30 mA 10 20 mA Voltage failure bridging 100 V AC 240 V AC Typically 10 ms Typically 20 ms Power loss at 100 V AC 240 V AC 1 1 3 5 W 2 3 4 6 W Clock buffering at 25 _C Typically 80 h Accuracy of the real time clock Max 5 s a day Digital inputs Number 6 Electrical isolation No Input voltage L1 Signal 0 Signal 1 40 V AC 79 V AC Input current at Signal 0 Signal 1 0 03 mA 0 08 mA Delay time at 0 ...

Page 188: ...ar 25 000 switching cycles 10 x 58 W at 230 240 V AC Fluorescent tubes conventionally compensated 25 000 switching cycles 1 x 58 W at 230 240 V AC Fluorescent tubes uncompensated 25 000 switching cycles 10 x 58 W at 230 240 V AC Short circuit proof cos 1 Power protection B16 600A Short circuit proof cos 0 5 to 0 7 Power protection B16 900A Parallel switching of outputs to increase power Not permit...

Page 189: ...Technical Specifications A 5 IDEC SmartRelay User s Manual FL1A H10RCB FL1A B10RCB Initial Contact Resistance 100mOhm at 1A at 24V Mechanical Life 10Million No Load 10Hz ...

Page 190: ...r loss at 24 V 0 2 0 5 W 0 3 1 8 W AC Clock buffering at 25 _C Typically 80 h Accuracy of the real time clock Max 5 s a day Digital inputs Number 8 6 Electrical isolation No No Input voltage L Signal 0 Signal 1 5 V DC 8 V DC 5 V AC 12 V AC Input current at Signal 0 Signal 1 0 3 mA I1 I6 0 05 mA I7 I8 1 0 mA I1 I6 0 1 mA I7 I8 1 0 mA 2 5 mA Delay time at 0 after 1 1 after 0 Typically 1 5 ms Typical...

Page 191: ...at 1000 W Fluorescent tubes with electr control gear 25 000 switching cycles 10 x 58 W Fluorescent tubes conventionally compensated 25 000 switching cycles 1 x 58 W Fluorescent tubes uncompensated 25 000 switching cycles 10 x 58 W Short circuit proof and overload proof Yes Short circuit current limitation Approx 1 A Derating None throughout the entire temperature range Short circuit proof cos 1 Po...

Page 192: ... Protection of output relay if desired Max 16 A characteristic B16 Switching rate Mechanical 10 Hz Electrical 10 Hz Ohmic load lamp load 10 Hz 2 Hz Inductive load 0 5 Hz 0 5 Hz Minimum Switching Load 500mA 12V Initial Contact Resistance 100mOhm at 1A at 24V Mechanical Life 10Million No Load 10Hz ...

Page 193: ...idging Typically 5 ms Power loss 0 1 1 2 W at 12 24 V DC Clock buffering at 25 _C Typically 80 h Accuracy of the real time clock Max 5 s a day Electrical isolation No Reverse polarity protection Yes Digital inputs Number 8 Electrical isolation No Input voltage L Signal 0 Signal 1 5 V DC 8 V DC Input current at Signal 0 Signal 1 1 0 mA 1 5 mA Delay time at 0 after 1 1 after 0 Typically 1 5 ms Typic...

Page 194: ...at 1000 W Fluorescent tubes with electr control gear 25 000 switching cycles 10 x 58 W Fluorescent tubes conventionally compensated 25 000 switching cycles 1 x 58 W Fluorescent tubes uncompensated 25 000 switching cycles 10 x 58 W Short circuit proof and overload proof Short circuit current limitation Derating None throughout the entire temperature range Short circuit proof cos 1 Power protection ...

Page 195: ...Hz Minimum Switching Load 500mA 12V Initial Contact Resistance 100mOhm at 1A at 24V Mechanical Life 10Million No Load 10Hz Switching capacity and service life of the relay outputs Switching cycles million Switched current A 0 1 0 2 0 3 0 4 0 5 3 2 1 0 6 0 7 0 8 0 9 1 0 Maximum 2 A Maximum 3 A Maximum 3 A 12 24 V AC DC 115 120 V AC 230 240 V AC Ohmic load Figure A Switching capacity and service lif...

Page 196: ...cycles million Switched current A 0 1 0 2 0 3 0 4 0 5 2 4 6 8 10 Maximum 10 A Maximum 10 A Maximum 10 A 12 24 V AC DC 115 120 V AC 230 240 V AC Figure B Switching capacity and service life of the contacts at highly inductive load to IEC 947 5 1 DC13 AC15 contactors solenoid coils motors ...

Page 197: ...Relay If no more blocks from a list fit into IDEC SmartRelay you will not be able to select the list again If a memory area is occupied you have to optimize your circuit or use a second IDEC SmartRelay Determining the amount of memory required When you calculate the memory requirements of a circuit you must always include all the individual areas of the memory Example B03 6 0 0 2 B02 0 0 0 0 B06 B...

Page 198: ... Timer REM Blocks B01 OR 0 0 0 0 1 B02 AND 0 0 0 0 1 B03 Time switch 6 2 0 0 1 B04 On delay 1 1 1 0 1 B05 Clock pulse generator 1 1 1 0 1 B06 AND 0 0 0 0 1 Resources occupied by the program 8 4 2 0 6 Memory limitations in IDEC SmartRelay 48 27 16 15 56 Still available in IDEC SmartRelay 40 23 14 15 50 The program therefore fits into IDEC SmartRelay ...

Page 199: ...created in IDEC SmartRelay and produces a value during processing in parameterization mode from which the current cycle time can be calculated Test program 1 Create the test program by linking an output or marker to a threshold switch and by switching a clock pulse generator at its input which is switched on by a hi signal 2 Parameterize the two blocks as shown below A clock pulse is generated in ...

Page 200: ...mory 1 fa cycle time in seconds Explanation The clock pulse generator T 0 changes its output signal every time the program is executed A level high or low thus lasts exactly one cycle A period therefore lasts 2 cycles The threshold switch indicates the ratio of periods per 2 seconds which results in the ratio of cycles per second Edge change of clock pulse generator each time the program is execut...

Page 201: ... N RUN STOP SmartRelay Output 4 x l 10A Idec Less is definitely more The advantages for you More cost efficient than models with a display Requires less space in the cabinet than conventional hardware More flexible and less costly than separate hardware units Advantageous for applications in which two or three conventional switching devices can be replaced Very easy to use Cannot be used by unauth...

Page 202: ... therefore have modified startup characteristics Startup characteristics If a IDEC SmartRelay memory cartridge is inserted a program stored there will be copied to the device immediately after IDEC SmartRelay has been switched on thus overwriting an existing program If a PC CABLE is inserted IDEC SmartRelay automatically goes into PC IDEC SmartRelay mode when it is switched on Using the PC softwar...

Page 203: ...tructure Set Clock We 08 31 MM DD YY 01 11 00 Clear Prg No Yes Program PC MemoryCard Start Card SmartRelay SmartRelay MemoryCard PC SmartRelay Set Clock Clear Prg Edit Prg Q1 PC SmartRelay Stop Press ESC OK OK OK OK OK OK OK OK ESC ESC ESC ESC ESC ESC ESC ESC ...

Page 204: ...IDEC SmartRelay Menu Structure E 2 IDEC SmartRelay User s Manual ...

Page 205: ...pe No 12 24V DC 6 2 4 Yes Yes FL1A H12RCE 12 24V DC 6 2 4 FL1A B12RCE 24V DC 6 2 4 Tr Yes FL1A H12SND 24V AC 6 4 Yes Yes FL1A H10RCA 24V AC 6 4 Yes FL1A B10RCA 100 240V AC 6 4 Yes Yes FL1A H10RCB 100 240V AC 6 4 Yes FL1A B10RCB Table B Cable and Accessories Name Function Type No Memory Cartridge Yellow FL1A PM1 Memory Cartridge Red FL1A PM2 PC Cable FL1A PC1 WindLGC FL9Y LP1CDW ...

Page 206: ...Type Numbers F 2 IDEC SmartRelay User s Manual ...

Page 207: ... for counter Co Connector Dir Direction e g for counter En Enable e g for switching on the clock pulse generator No Cams time switch parameters o SmartRery device designation without display Par Parameter R Reset R SmartRery device designation relay outputs S Set e g setting the latching relay SF Special functions T Time parameter Trg Trigger parameter ...

Page 208: ...Abbreviations G 2 IDEC SmartRelay User s Manual ...

Page 209: ...nics Authorized Distributor Click to View Pricing Inventory Delivery Lifecycle Information IDEC FL1A H12SND FL1A PM1 FL1A PM2 FL1A PSP1 FL1A H12RCE FL1A H10RCA FL1A B12RCE FL1A B10RCA FL1A B10RCB FL1A H10RCB FL1A PC1 ...

Reviews: