background image


1 Description of the measuring instrument

1

MultiHandy 2025

Q

ui

ck

 G

ui

de

 • 

Ve

rs

io

1.

0

To obtain the Operating Instructions with 
HYDROcenter, see HYDROcenter, page 5.

1 DESCRIPTION OF THE MEASURING 

INSTRUMENT

This section describes the scope of delivery, connec-
tions, keys and the display of the measuring instru-
ment.

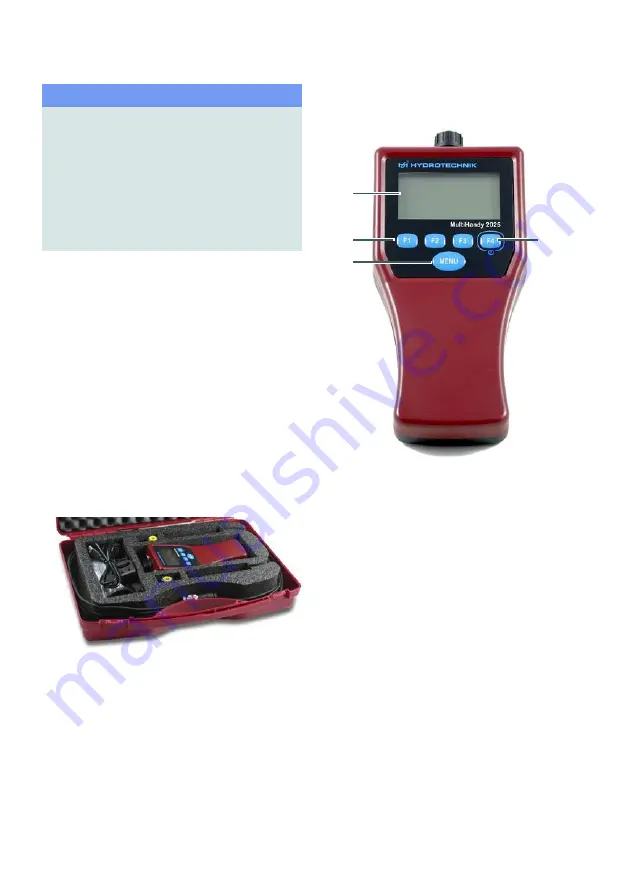
1.1 Measuring instrument case

Measuring instrument case:
• 1 MultiHandy 2025
• 1 USB cable
• 1 power supply for USB cable with country adapter
• 2 ISDS pressure sensors with 2.5 m cable
• 2 MINIMESS direct connections
• 1 carrying strap set (including fastening eyelets)
• 1 Quick Guide
• 1 General Safety Informations and Warnings

1.2 Measuring instrument

The MultiHandy 2025 is a dual-channel measuring in-
strument which provides the user with all functions
needed for professional and challenging metrology.
The measuring instrument is operated via 4 function
keys and a menu key.
You can connect the measuring instrument to a PC
and charge it using the USB interface. We recom-
mend the HYDROlink6 software for downloading the
measurement data. Alternatively, you can use the
HYDROcom6 software.

Note

This Quick Guide is a supplement to the Operating 
Instructions and is not a replacement for these.

You can obtain the Operating Instructions via the 
manufacturer's website 
(HYDROTECHNIK.COM) or the HYDROcenter 
software.

Observe the enclosed sheet on the General 
Safety Information and Warnings.

A

 Display

B

 Function keys

C

 Menu key

D

 On/off button (F4)

A

B
C

D

Summary of Contents for HYDROTECHNIK MultiHandy 2025

Page 1: ...EN Version 1 0 EN Firmware Version 1 0 TKZ L3160 00 78 00EN MultiHandy 2025 Quick Guide...

Page 2: ...s 1 2 Measuring instrument The MultiHandy 2025 is a dual channel measuring in strument which provides the user with all functions needed for professional and challenging metrology The measuring instru...

Page 3: ...C D E F Switches instrument on Opens main menu Selects marked entry Switches display illumination on off Switches instrument off press for 2 seconds Changes view Current measurement values Min max Mea...

Page 4: ...urs 7 Remove the USB cable from the measuring in strument 8 Remove the power supply from the socket 2 2 Basic settings After you have charged the measuring instrument you can switch it on When you swi...

Page 5: ...ormat and time Use F1 to select format or time and press MENU Press F1 or F2 to change the selected value Press MENU to save your entry 4 Press F4 to return to the DEVICE menu 5 Press F1 to select Dat...

Page 6: ...downloaded 3 Run the installation file Confirm the confirmation prompts if applicable 4 Follow the installation instructions The installation is complete when the link is dis played on the desktop How...

Page 7: ...F4 If applicable use F4 to confirm the calibration notice The ISDS sensors are detected by the measuring instrument The display shows the current meas urement values p1 displays the measurement value...

Page 8: ...ave a measurement series 1 Press F3 2 If necessary change the Scanrate using MENU 3 Start the measurement series by pressing F3 The display shows a progress bar on the right side 4 Press F2 to display...

Reviews: