background image

This device complies with part 15 of the FCC Rules. 

Operation is subject to the condition that this device does 

not cause harmful interference.

BASIC MANUAL

1-1-32 Kamiminami, Hirano-ku, Osaka 547-0003, Japan

HF/VHF/UHF ALL MODE

TRANSCEIVER

|705

Summary of Contents for IC-705

Page 1: ...This device complies with part 15 of the FCC Rules Operation is subject to the condition that this device does not cause harmful interference BASIC MANUAL HF VHF UHF ALL MODE TRANSCEIVER 705...

Page 2: ...em The IC 705 employs an RF direct sampling system under 25 MHz RF signals are directly converted to digital data in the ADC and then processed in the FPGA This system is a leading technology marking...

Page 3: ...om is not responsible for the destruction damage to or performance of any Icom or non Icom equipment if the malfunction is because of Force majeure including but not limited to fires earthquakes storm...

Page 4: ...the display is touched briefly one short beep sounds Touch for 1 second If the display is touched for 1 second one short and one long beep sound D DTouch screen precautions The touch screen may not p...

Page 5: ...ndicate keys Routes to the Set modes and Setting screens Routes to the Set mode Setting screens and the setting items are described in the following manner SET Time Set Date Time Date Instruction exam...

Page 6: ...n uppercase letter Selects alphabet mode or numeric mode Enters a space Moves the cursor forward Clears the entered character Selects the character type Saves the entry Cancels the entry and returns t...

Page 7: ...space 8 DV MEMORY Your Call Sign NAME AB ab 12 16 CALL SIGN A to Z 0 to 9 space 8 Repeater List GROUP NAME NAME AB ab 12 16 SUB NAME AB ab 12 8 CALL SIGN GW CALL SIGN A to Z 0 to 9 space 8 DV GW Inte...

Page 8: ...l 3 1 Using the VFO mode 3 1 D D Selecting VFO A or VFO B 3 1 D D Equalizing VFO A and VFO B 3 1 Selecting the operating band 3 2 Selecting the operating mode 3 2 Setting the frequency 3 3 D D Using t...

Page 9: ...Formatting 6 1 Saving the setting data 6 2 Unmounting 6 2 7 GPS OPERATION 7 1 Confirming the GPS signal receiving 7 1 Checking your location 7 1 GPS Logger function 7 2 8 SET MODE 8 1 Set mode descrip...

Page 10: ...her objects contact the inside of the transceiver or make incorrect contact with connectors on the side panel This could cause an electric shock or damage the transceiver R RWARNING NEVER operate or t...

Page 11: ...ged CAUTION DO NOT use non Icom microphones Other microphones have different pin assignments and may damage the transceiver DO NOT push PTT unless you actually intend to transmit BE CAREFUL The transc...

Page 12: ...se a fire overheating or cause the battery cells to rupture R RWARNING NEVER use deteriorated battery packs They could cause a fire CAUTION DO NOT expose the battery pack to rain snow saltwater or any...

Page 13: ...y occur causing a decrease in communication speed and an unstable connection In such cases use this device away from the other devices or stop using those devices D DCharging caution R RDANGER NEVER c...

Page 14: ...s OFF before connecting or disconnecting optional equipment 1 Attach the microphone s split ring to the plate 2 Attach the microphone plate to the GND terminal with its bolt 3 Plug the microphone into...

Page 15: ...ustion Blinking The battery is almost fully exhausted No icon When a DC power supply 13 8 V DC is connected the battery is not being charged because The battery is completely charged Charging Power ON...

Page 16: ...nd to turn the DR function ON or OFF 6VOLUME RF GAIN SQUELCH CONTROL z z Rotate to adjust the audio output level p 3 1 z z Push to display the setting menu then rotate to adjust the RF gain sensitivit...

Page 17: ...Y z z In the CW mode pushing the key automatically tunes the operating frequency to a close by CW signal p 4 13 z z In the DV mode push to display the RX History list or hold down for 1 second to capt...

Page 18: ...m 1 8 inch MIC 2 5 mm L LConfirm that the transceiver is OFF before connecting or disconnecting optional equipment 8GROUND TERMINAL GND p 13 2 Connect to ground to prevent electrical shocks TVI BCI an...

Page 19: ...s function is ON 7GPS ICON p 7 1 Displays the status of the GPS receiver Touch the icon to display the GPS INFORMATION screen 8GPS ALARM ICON Displayed when the GPS Alarm function is ON 9Bluetooth ICO...

Page 20: ...curred 28AGC ICON p 4 3 Displayed while the Auto Gain Control AGC is ON 291 4 ICON p 3 3 Displayed while the 1 4 Tuning function is ON 30VFO MEMORY ICONS p 3 1 Displays VFO A or VFO B when the VFO mod...

Page 21: ...DUP ON 1 W DUP 2 5 W 5 W 10 W 2 6 BASIC MANUAL PANEL DESCRIPTION 2 2 D DFUNCTION screen FUNCTION screen list 1 Touch for 1 second to select the function 2 Touch for 1 second to open its function menu...

Page 22: ...to open the MENU screen in the selected mode L LTo close the MENU screen push L LTouching 1 or 2 at the bottom of the screen selects MENU screen 1 or 2 D DQUICK MENU z z Push to open the QUICK MENU sc...

Page 23: ...unction is OFF M CH Selects Memory channels Memory mode and Call channel mode only When using the DR function selects an individual station or preset repeater L LTo assign this function hold down for...

Page 24: ...ual for details Selecting the VFO Memory or Call channel mode L LTo select the Call channel mode select the 144 or 430 band 1 Touch the VFO MEMORY icon Opens the VFO MEMORY screen 2 Touch VFO MEMO or...

Page 25: ...in step 2 z z Touch the MHz digits for 1 second on the standby screen L LTouch to return to the previous screen Selecting the operating mode You can select between the SSB LSB USB SSB data LSB DATA U...

Page 26: ...p 3 2 Example USB 2 Touch the kHz digit for 1 second Opens the TS SSB screen 3 Touch the desired tuning step Example 0 1 k The tuning step is set and returns to the previous screen D DAbout the 1 Hz...

Page 27: ...3 ENT 7 000 MHz 7 ENT 5 100 MHz 5 1 ENT 144 680 MHz 1 4 4 6 8 ENT Changing from 21 280 MHz to 21 245 MHz 2 4 5 ENT L LTouching first enters the same MHz digits as the operating frequency Entering the...

Page 28: ...out of an amateur band s frequency range L LYou can change the Band Edge Beep settings in the following menu SET Function Band Edge Beep L LIf Beep Level is set to 0 no beep sounds SET Function Beep L...

Page 29: ...ch ENT Example 14 1 Entry example 1 ENT 4 Edit the upper band edge frequency then touch ENT Example 14 25 Entry example 2 5 ENT The edited band edge is saved and returns to the previous screen TIP You...

Page 30: ...band edge is saved and returns to the previous screen Inserting a Band Edge You can insert a new Band Edge line and enter new band frequencies between two entered band edges 1 Open the User Band Edge...

Page 31: ...djust Example RF GAIN 3 Rotate RF gain You can adjust the receive sensitivity If a strong interfering signal is received rotate counterclockwise to reduce the RF gain L L RFG is displayed when the RF...

Page 32: ...It becomes the S meter while receiving 5 Touch RF POWER and rotate to adjust the transmit output power between 0 and 100 in 1 steps L LIn the AM mode the maximum transmit output power is a quarter of...

Page 33: ...th another station or use the Monitor function p 4 2 5 Release PTT Returns to receive Setting the maximum transmit power The maximum transmit power depends on the power source When using an external D...

Page 34: ...ctive for the higher bands 144 MHz 430 MHz P AMP Amplifies received signals NOTE When you use the preamp while receiving strong signals the receiving signal may be distorted In such case turn OFF the...

Page 35: ...y holding down L LWhile monitoring the RIT function is temporarily OFF L LWhile monitoring the settings for the Noise Reduction Notch filter and Twin PBT are temporarily OFF Monitor function The Monit...

Page 36: ...ly reduces the receiver gain When that signal disappears the transceiver may not receive the weak signal because of the AGC action In that case select FAST or touch AGC for 1 second to open the AGC sc...

Page 37: ...the overlapped area To shift the IF left or right set PBT1 and PBT2 to the same value The PBT is adjustable in 50 Hz steps in the SSB CW and RTTY modes and 200 Hz in the AM mode In this case the cente...

Page 38: ...50 Hz 600 Hz to 3 6 kHz 100 Hz FIL 2 1 2 kHz FIL 3 500 Hz CW FIL 1 1 2 kHz 50 Hz to 500 Hz 50 Hz 600 Hz to 3 6 kHz 100 Hz FIL 2 500 Hz FIL 3 250 Hz RTTY FIL 1 2 4 kHz 50 Hz to 500 Hz 50 Hz 600 Hz to 2...

Page 39: ...ch NOTCH L LTouching NOTCH changes between AN Auto Notch MN Manual Notch and OFF 3 To close the FUNCTION screen push D DSetting the Manual Notch filter When Manual Notch is selected adjust the filtere...

Page 40: ...se you can adjust the attenuation level and blanking depth and width in the NB menu 1 Push Opens the FUNCTION screen 2 Touch NB for 1 second Turns ON the Noise Blanker and opens the NB menu 3 Touch th...

Page 41: ...filter width SSB mode The transmit filter width for the SSB and SSB D modes can be set WIDE wide MID middle or NAR narrow can be selected only in the SSB mode L LThe filter can be independently set on...

Page 42: ...s displayed L LTouching the Multi function meter sets the meter to Po SWR ALC COMP Vd or Id 6 Push to open the Multi function menu 7 Touch MIC GAIN and then rotate to adjust it by speaking into the mi...

Page 43: ...4 105 MHz VFO B Transmit frequency D DUsing the Quick Split function The Quick Split function enables you to automatically equalize the frequency and mode of the VFOs to the displayed VFO and activate...

Page 44: ...CW pitch to between 300 and 900 Hz in 5 Hz steps 5 To close the Multi function menu push D DSetting the key speed You can set the keying speed of the internal electronic keyer 1 Select the CW mode 2 P...

Page 45: ...nction menu and then adjust the KEY SPEED p 4 11 while operating the paddle 5 To close the BKIN menu push Full Break in operation In the Full Break in mode the transceiver automatically transmits whil...

Page 46: ...T menu You can set the following items Side Tone Level Side Tone Level Limit Keyer Repeat Time Dot Dash Ratio Rise Time Paddle Polarity Key Type MIC Up Down Keyer EDIT 001 SET CW KEY SET Auto Tuning f...

Page 47: ...de MENU 2 Center Fix mode Key Action 1 2 Selects the Function menus SPAN Touch In the Center mode selects the scope span 2 5 5 0 10 25 50 100 250 or 500 kHz Touch for 1 second Resets to the 2 5 kHz sp...

Page 48: ...or is displayed in the upper side corners of the SPECTRUM SCOPE screen The frequency is outside the lower edge The frequency is outside the higher edge When the frequency goes further away Scope Out...

Page 49: ...e item to set Example FFT Scope Waveform Type 4 Touch the option to set L LSee below for details on the setting items and their options 5 To close the AUDIO SCOPE SET screen push TIP You can set each...

Page 50: ...ng data You can save the following data onto the card The transceiver s settings Communication receive log and contents Automatic answering voice audio in the DV mode Voice audio for the Voice TX func...

Page 51: ...it out 5 To close the SD CARD screen push several times When the transceiver is OFF You can remove the card starting from step 4 of the steps described above Saving the setting data The Memory channel...

Page 52: ...displayed GPS GPS Set GPS Select NOTE If you cannot receive GPS data manually set the date and time p 9 1 TIP To prolong the battery life in the GPS mode Manually update your location with the receive...

Page 53: ...display your route as you move on the software map L LThe log files may not be compatible with all mapping software L LSee the Advanced Manual for details on copying the log files onto your PC NOTE T...

Page 54: ...can also rotate to scroll through the items 4 Touch the item to open the its setting screen or to open its next tree level 5 Repeat steps 3 and 4 to open the desired item s setting screen L LTo go bac...

Page 55: ...ory mode when the Home Channel frequency or the Home Channel Memory is selected the Home CH Beep sounds L LIn the DR screen when the Home Channel Access repeater is set in FROM the Home CH Beep sounds...

Page 56: ...g time to Long OFF Turns OFF the function Auto Short Sets the Power saving time to Short Auto Middle Sets the Power saving time to Middle No signal is received for 5 seconds 60 ms 30 ms Standby Recept...

Page 57: ...he frequency and mode to the VFO that is not displayed VFO A or AFO B according to the SPLIT Offset setting OFF Turns OFF the function ON Turns ON the function SPLIT Offset Default 0 000 MHz Sets the...

Page 58: ...he signal strength level the operating mode and the operating frequency are announced when you push MODE SPEECH Default OFF Turns the operating mode announcement ON or OFF OFF The selected operating m...

Page 59: ...ts down the transceiver when you turn it OFF Standby Shutdown Displays the Standby Shutdown option dialog when you turn it OFF SET Function Remote MIC Key A Default Home CH B Default VFO MEMO Default...

Page 60: ...the previously selected scan While scanning push to stop the scan Hold down for 1 second to open the SCAN SELECT screen Function Description Temporary Skip Push to set the frequency to be skipped whi...

Page 61: ...disappears When any other received signal disappears a regular beep sounds L LThe standby beep sounds even when Key Touch Beep is set to OFF L LThe standby beep output level depends on the Beep level...

Page 62: ...ET DV Set Digital Monitor Default Auto Selects a receive mode when is pushed in the DV mode Auto Receives in the DV mode or the FM mode depending on the received signal Digital Receives in the DV mode...

Page 63: ...ame is automatically created as shown in the example below Log start date and time 1st January 2020 15 30 00 File name 20200101_153000 csv The log contents are not displayed on the transceiver You can...

Page 64: ...50 5 Your altitude unit meters Records to one decimal place RPT Call Sign JP3YHJ JP3YHJ A Repeater call sign DV mode only TX Call Sign CQCQCQ Blank TX Call sign DV mode only RX Call Sign Blank JA3YUA...

Page 65: ...s to one decimal place SSID A Caller s SSID if sent 0 1 to 15 A to Z D PRS Symbol Car Icon Converts to text None Code Course 123 Caller s course unit degrees Speed 23 5 Caller s speed unit km h Record...

Page 66: ...utput Default OFF Sets the Beep and Speech audio output setting of the microUSB port when Output Select of USB is set to AF OFF The beep and speech audio are not output ON The beep and speech audio ar...

Page 67: ...keyer RTTY transmission using an external keypad SET Connectors CI V CI V Address Default A4 Sets the CI V address in hexadecimal code L L A4 is the default address of the IC 705 CI V Transceive Defau...

Page 68: ...the call sign and the message of the caller station when a call is received OFF Does not display the caller station s call sign and message Normal The caller station s call sign and message automatica...

Page 69: ...r Call Sign Displays and scrolls the call sign of the target station My Call Sign Displays and scrolls your own call sign L LWhen Your Call Sign is selected and if the call sign and name of the caller...

Page 70: ...Japanese L LWhen this item is set to English Display Language is not displayed When you set the system language of the transceiver to Japanese the transceiver has the capability to display both Englis...

Page 71: ...Bluetooth device when its power is turned ON OFF Does not connect to the paired device ON Automatically connects to the last connected device Pairing Connect Searches for the Bluetooth device to conne...

Page 72: ...plied or a data device is connected the Power Save mode is automatically turned OFF regardless of this setting OFF Turns OFF the function ON The Power Save mode is enabled when no communication or ope...

Page 73: ...LAN function ON or OFF SET WLAN Set Connection Settings Access Point Displays the Access Point to connect L LSee the Advanced Manual for details SET WLAN Set Connection Settings Manual Connect SSID De...

Page 74: ...emotely control the IC 705 Serial Port UDP Valid after Restart Default 50002 Sets a port number for the serial data transfers between the IC 705 and the remote station when you remotely control the IC...

Page 75: ...fer depending on the transceiver version Selects the date format from yyyy mm dd mm dd yyyy and dd mm yyyy y year m month d day SET SD Card Opening Picture Selects the picture that is displayed at pow...

Page 76: ...s Memory channel contents filter setting and so on will all be cleared so you will need to rewrite your operating settings L LSee page 10 2 for details Others SET Others Information Voltage Displays t...

Page 77: ...05 has a rechargeable Lithium battery to backup the internal clock If you connect the transceiver to a power source the battery is charged and it keeps the correct clock setting However if you do not...

Page 78: ...the transceiver again If the problem still exists perform a Partial reset as described to the right If the problem still exists after a Partial reset perform an All reset also described to the right...

Page 79: ...SET Others Reset 2 Touch All Reset 3 Touch NEXT 4 After carefully reading the displayed message touch YES to perform the All reset L LAfter resetting the default VFO mode screen is displayed When you...

Page 80: ...eadset AM In the FM mode the Tone Squelch function is turned ON Turn OFF the Tone Squelch function AM Sensitivity is too low and only strong signals are heard The Attenuator is activated Turn OFF the...

Page 81: ...OFF the function p 4 2 There is no response after transmitting The Duplex function is ON and the transmit and receive frequencies are different Touch DUP several times in the FUNCTION screen to turn...

Page 82: ...RX histories or sound data A microSD card is not inserted Insert a microSD card p 6 1 No SD Card is found is displayed A microSD card is not recognized Confirm that a microSD card is inserted p 6 1 Re...

Page 83: ...or BNC 50 Power supply requirement 13 8 V DC 15 for external DC power 7 4 V DC specified Icom s battery pack Operating temperature range 10 C 60 C 14 F 140 F Frequency stability Less than 0 5 ppm 10 C...

Page 84: ...MHz band Less than 6 dB V emf 2 144 430 MHz band Less than 6 dB V emf 3 AM BW 4 kHz 60 Modulation 12 dB SINAD 1 8 2 999999 MHz Less than 16 dB V emf 1 3 0 29 999999 MHz Less than 6 dB V emf 1 50 MHz...

Page 85: ...Output power Less than 10 mW MHz D DBluetooth Version Bluetooth Version 4 2 Transmission Output Class 2 Profile HFP HSP SPP GATT Serial over LE The maximum number of paired Bluetooth devices 5 devices...

Page 86: ...th your local regulations Others VS 3 Bluetooth headset LC 192 multi bag An external antenna tuner for the IC 705 is coming soon About the free download software CS 705 programming software RS MS1A Fo...

Page 87: ...d CP 23L to the IC 705 s DC 13 8 V jack DC 13 8 V Accepts regulated DC power of 13 8 V DC 15 through the supplied DC power cable L LThe maximum transmit power depends on the power source When using an...

Page 88: ...Memory RT1 RT8 to be transmitted z z Push a switch to send memory content z z Hold down the switch for 1 second to repeatedly send memory content L LTo use the external keypad turn ON the following i...

Page 89: ...put Output impedance 50 unbalanced SP Connect a microphone standard stereo headphones or external speaker The output impedance and output level differ depending on the amplifier that is used L LYou ca...

Page 90: ...pre calculated safe distances for different antenna types for different frequency bands Further information can be found at http www arrl org Typical amateur radio installation Exposure distance assum...

Page 91: ...netic energy is within the FCC allowable limits for occupational use always adhere to the following guidelines DO NOT operate the radio without a proper antenna attached as this may damage the radio a...

Page 92: ...limitation the warranties of merchantability and of fitness for any purpose The Contributing Authors and Group 42 Inc assume no liability for direct indirect incidental special exemplary or consequent...

Page 93: ...press Zlib A Python interface to zlib written by A M Kuchling amk amk ca is available in Python 1 5 and later versions see http docs python org library zlib html zlib is built into tcl http wiki tcl t...

Page 94: ...editing v Keyboard Type v 8 6 M MAX TX PWR 3 10 Memory mode 3 1 MENU screen 2 7 Meter 3 9 Microphone gain 3 10 Microphone plate 1 1 microSD card 6 1 Monitor function 4 2 Multi function Dial 2 8 Menus...

Page 95: ...VI BASIC MANUAL MEMO...
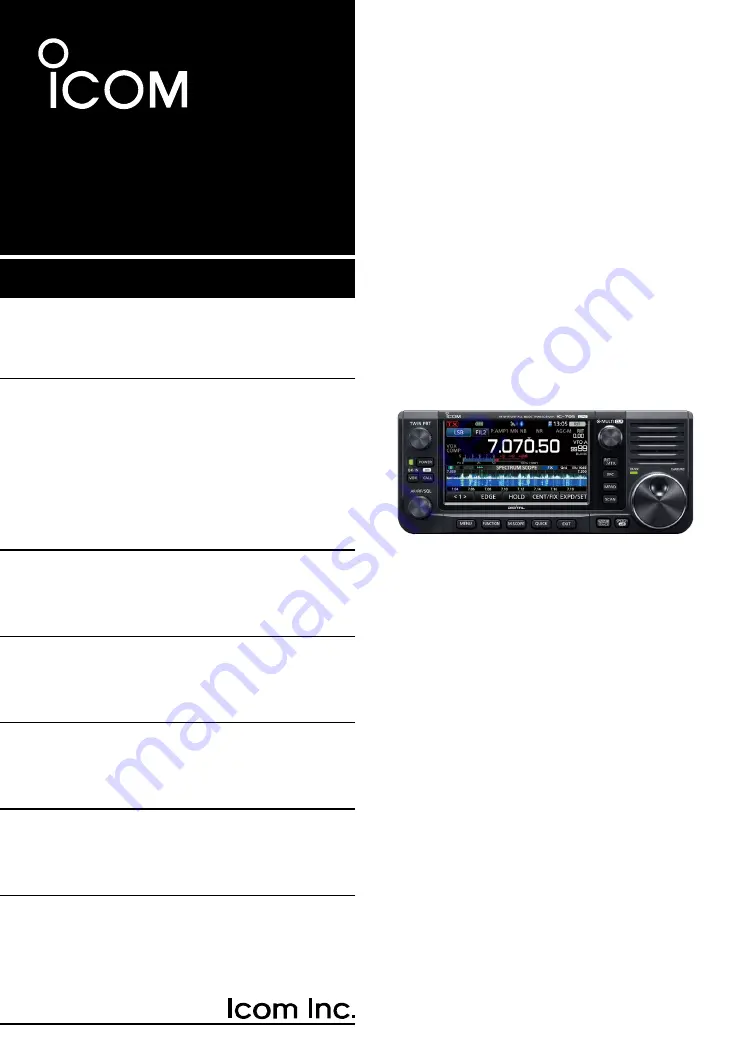
Page 96: ...A7560D 1EX 1 Printed in Japan 2020 Icom Inc Jul 2020 1 1 32 Kamiminami Hirano ku Osaka 547 0003 Japan...

Reviews: