background image

TITAN HD USER MANUAL

84

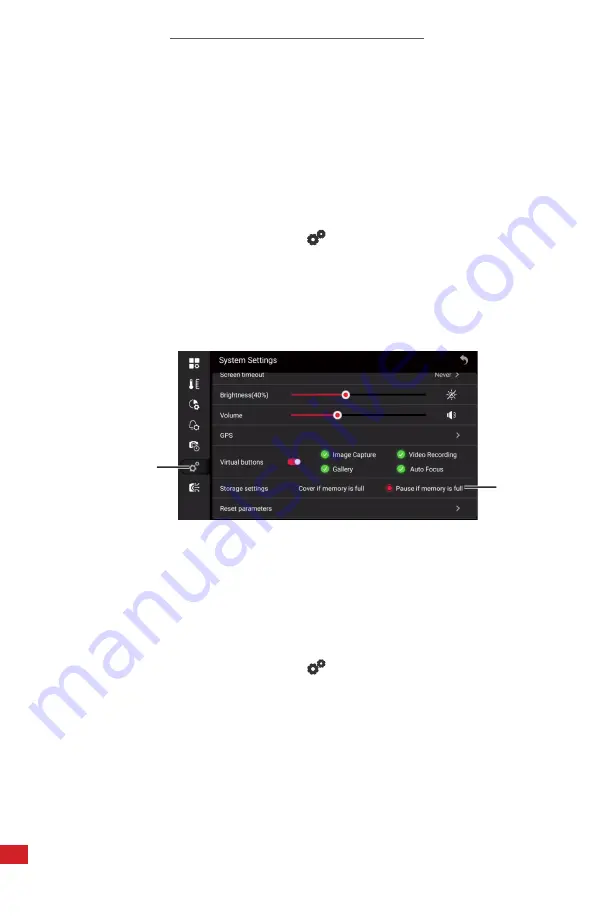
8-21-13   Storage Settings

The user can determine what happens in the event the memory of the device 

becomes full. Covering the memory replaces the oldest file with a newly captured 

file. Pausing media capture prevents new media collection until a new memory 

card is inserted into the device.

Adjust memory settings as follows:

1. 

Using the touchscreen, tap the settings icon to open the Settings Menu.

2.  Tap the System Settings icon:

3.  Press-and-hold on the touchscreen; then, drag to scroll through the options.

4.  Tap an option next to Storage Settings: Cover if Memory is Full or Pause if 

Memory is Full. Changes are applied automatically. 

5.  Press the Previous button continuously to exit the menu.

2.

4.

8-21-14   GPS

GPS is enabled by default. Change GPS settings as follows: 

1. 

Using the touchscreen, tap the settings icon to open the Settings Menu.

2.  Tap the System Settings icon:

3.  Press-and-hold on the touchscreen; then, drag to scroll through the options.

4.  Tap GPS.

5.  Toggle the GPS feature to the OFF position by tapping the switch next to 

the option. Switch turns gray when inactive. Enable the feature by tapping 

the switch again. The switch turns red when active. 

6.  Press the Previous button continuously to exit the menu.

Summary of Contents for TITAN HD

Page 1: ...IMPORTANT SAFETY INFORMATION INSIDE 2105 W Cardinal Dr Beaumont TX 77705 ICI cameras fall under US Federal Law and Export Control For more information contact us 409 861 0788 sales infraredcameras co...

Page 2: ...TITAN HD USER MANUAL 2 Revision History 01 2023 001 Document created...

Page 3: ...ucture 16 5 1 Appearance and Definitions of Housing Interface 16 Package Includes 18 Quick Start Instructions 19 7 1 Tripod Setup 19 7 2 Battery Installation 20 7 3 Memory Card Installation 22 7 4 Cha...

Page 4: ...age 37 8 11 1 1 Interval Photography 38 8 11 1 2 Video Snapshot 39 8 11 1 3 Auto Save Images 39 8 11 2 Record a Video 39 8 11 2 1 Choose a Video File Type 40 8 11 3 Review Media 40 8 11 3 1 View Image...

Page 5: ...e Alarms 59 8 18 2 Adjust Alarm Threshold 60 8 18 3 Alarm Accessibility 61 8 18 3 1 Visual Alarm Settings 61 8 18 3 2 Audible Alarm Settings 61 8 18 4 Alarm Snapshot 62 8 18 4 1 Enable Disable Alarm S...

Page 6: ...8 21 11 Display Brightness Settings 83 8 21 12 Volume Settings 83 8 21 13 Storage Settings 84 8 21 14 GPS 84 8 21 15 Compass 85 8 21 16 Smart Capture 85 8 21 17 Lens Type 85 8 21 18 Device Informatio...

Page 7: ...ibration 96 10 4 Storage 96 Troubleshooting 97 11 1 Thermal imager does not power on 97 11 2 Thermal imager shuts off unexpectedly 97 11 3 No thermal image 97 11 4 Unclear or dark visible images 97 11...

Page 8: ...mission of Infrared Cameras Inc The documentation must not in whole or part be copied photocopied reproduced translated or transmitted to any electronic medium or machine readable form without prior c...

Page 9: ...crossed out wheeled bin symbol indicates that waste electrical and electronic equipment should not be discarded together with unseparated household waste but must be collected separately All local au...

Page 10: ...itted from the first 1 1000th of an inch of a subject Environment of use industrial and petrochemical buildings electrical plants security rooms science labs animal reserves as well as environmental c...

Page 11: ...TITAN HD USER MANUAL 11 2 9 Training To read about infrared training visit https infraredtraininginstitute com...

Page 12: ...rged in the specified charging time If you continue to charge the battery it can become hot and cause an explosion or ignition Injury to persons can occur Do not attach the batteries directly to a car...

Page 13: ...rs Clean the case with a damp cloth and a weak soap solution Do not use abrasives isopropyl alcohol or solvents to clean the case or lens screen Be careful when cleaning the infrared lens Do not clean...

Page 14: ...ame Rate 30 Hz Humidity 10 to 95 non condensing Pixel Operability 99 Shock Vibration 25 G 2 G Dimensions without lens 140 mm x 210 mm x 115 mm L x W x H 0 5 mm 5 51 x 8 27 x 4 53 L x W x H 0 02 Weight...

Page 15: ...vity Correction 0 01 to 1 0 IP Rating IP54 Interval Photography Yes Alarm Snapshot Yes Point Line Area Measurements Yes WLAN Support Yes Bluetooth Support Yes Cloud Services No Laser Class II 650 nm 1...

Page 16: ...Focus Button 4 Lens Cover 5 Power Sleep Mode 6 Interface Slot Cover 7 Diopter Knob 8 Visible Light Camera 9 LED Light 1 5 8 13 9 14 10 15 11 12 16 17 6 2 3 4 7 10 Laser 11 Germanium Lens 12 Focus Adju...

Page 17: ...er 23 Diopter Knob 24 Thumbstick 25 Review 26 OK Program Button AI 27 Back Cancel Close 28 1 4 20 Mount 29 Battery Bay 28 29 20 18 19 21 22 23 25 24 26 27 THE THUMBSTICK IS A FOUR WAY DIRECTIONAL JOYS...

Page 18: ...ANUAL 18 ENSURE ALL SYSTEM EQUIPMENT AND COMPONENT ITEMS ARE PRESENT BEFORE BEGINNING INSTALLATION 6 Package Includes Titan HD Device Battery x2 Power Adapter SD Card HDMI Cable Type C Cable USB Cable...

Page 19: ...S TO BE IMAGED TO ENSURE THE EQUIPMENT WILL NOT BE MOVED OR KNOCKED DOWN USING A DIVIDING BARRIER WILL HELP KEEP TRIPODS SEPARATE FROM THE PATH 7 Quick Start Instructions or Mount the fully charged de...

Page 20: ...EMPERATURE MEASUREMENTS AND BEST IMAGE QUALITY THIS TIME CAN OFTEN VARY BY ENVIRONMENTAL CONDITIONS IT IS BEST TO WAIT A MINIMUM OF 10 MINUTES FOR THE DEVICE TO COMPLETELY WARM UP B Power on device 7...

Page 21: ...ndex finger and thumb pull to remove battery DO NOT FORCE THE BATTERY INTO THE BATTERY BAY IF USER FEELS SIGNIFICANT RESISTANCE REMOVE THE BATTERY AND ENSURE METAL CONTACTS ARE ALIGNED BEFORE TRYING T...

Page 22: ...il a clicking sound is heard To eject the memory card press down until a click is heard then release The memory card will be ejected from the device DO NOT FORCE MICRO SD CARD INTO THE SLOT THE SIDE O...

Page 23: ...e C port of the device ENSURE THE IMAGER IS NEAR ROOM TEMPERATURE BEFORE CHARGING THE DEVICE DO NOT CHARGE IN EXTREMELY HOT OR COLD AREAS THE BATTERY CAPACITY MAY BE DECREASED IF CHARGED IN AN EXTREME...

Page 24: ...IS BLUE THE LIGHT FLASHES BLUE WHEN THE BATTERY IS PLACED AND CHARGING WHEN THE BATTERY IS FULLY CHARGED THE LIGHT IS STEADY BLUE Insert batteries into the battery charging base Plug the Type C end o...

Page 25: ...BE DECREASED IF CHARGED IN AN EXTREME TEMPERATURE ENVIRONMENT IF YOU DO NOT USE THE IMAGER FOR A LONG PERIOD OF TIME PUT THE DEVICE IN A COOL AND DRY ENVIRONMENT THE BATTERY WILL DISCHARGE OVER TIME...

Page 26: ...index marks on the new lens and lens mount Push the lens into the lens mount then rotate the lens 90 clockwise MAKESURETOHOLDTHECAMERAFIRMLYINBOTHHANDSWHENCHANGING THE LENS A B Firmly grip around the...

Page 27: ...e black cable into the power adapter 3 Plug power adapter into a 110 120V electrical outlet 8 1 2 Charging via Power Adapter 1 Insert batteries into the battery charging base 2 Plug the Type C end of...

Page 28: ...e than 3 seconds to open the shut down menu 2 Ensure a restart is necessary as there is not a confirmation prompt then tap Power Off on the touchscreen to power the device off Press the Back button to...

Page 29: ...imaging applications Correct focus makes sure that the infrared energy is correctly directed onto the pixels of the detector This leads to accurate data collection 8 5 1 Focus Modes The device comes w...

Page 30: ...th fine adjustment with a relatively large but slow rotation and rapid change with a smaller but faster rotation Furthermore for a very slow rotation the lens moves in very small discrete steps allowi...

Page 31: ...nd holding the Auto Focus button for 2 seconds A brief pop up shows the feature is enabled Press and hold the Auto Focus button again to disable the feature 8 5 5 Laser aided Focus The laser can be se...

Page 32: ...the angle of the lens and touchscreen to view targets in hard to reach places To change the lens angle hold the camera firmly by the viewfinder with one hand and tilt the body of the camera with the o...

Page 33: ...in order to zoom out Thermal Camera Digital Camera Switch switches between thermal and visible feeds Press and hold to switch between feeds Hide the OSD hides the on screen data and leaves only the Q...

Page 34: ...ion of Interest 12 Hot Spot 13 Image Display Window 14 Level Span Mode 15 Battery 16 Parameter Settings 17 Image Mode 18 Level Span Bar 19 Image Polarity Color Palette 20 Analysis Tools 21 Laser Range...

Page 35: ...ures cannot be disabled Enable Virtual buttons as follows 1 Using the touchscreen tap the settings icon to open the Settings Menu 2 Tap the System Settings icon 3 Press and hold the on the screen then...

Page 36: ...volume of the device To open the Connections Menu place a finger at the top of the screen and swipe down Tap a feature to enable it Feature is white when enabled Tap again to disable the feature Featu...

Page 37: ...X is user defined prefix added to the file name Y is time stamp and IR DC denotes infrared or visual The time stamp is a combination of YYYYMMDDHHMMSS Save images as follows 1 Find and aim the device...

Page 38: ...switch turns red when active Disable the option by tapping the switch again Switch turns gray when inactive 4 Tap the first input box next to Interval A keyboard appears 5 Use the keyboard by tapping...

Page 39: ...t the Settings Menu 8 11 2 Record a Video Save videos as follows 1 Choose the appropriate file type see 8 11 2 1 Choose a Video File Type 2 Find and aim the device at the target 3 Adjust the focus unt...

Page 40: ...open the Settings Menu The Function Settings tab opens by default 2 Press and hold the on the screen then drag up or down on the touchscreen to scroll to the Video Format options 3 Tap an option IRV...

Page 41: ...nd fast forward the video Press and hold then drag left or right on the timeline to scroll through the video Full screen mode closes automatically when video is finished playing the user can also pres...

Page 42: ...icon 5 Choose an option Keyboard input Tap the input field Keyboard automatically opens Use the keyboard by tapping the touchscreen to input preferred text Press the Back button to close the keyboard...

Page 43: ...a is to be erased then tap the delete icon Deleted media cannot be recovered 5 Tap Confirm to erase media Tap Cancel prevent deletion 6 Press the Back button to exit the gallery 1 2 3 4 8 12 Image Mod...

Page 44: ...NCE FROM THE TARGET WHEN PERFORMING IMAGE ALIGNMENT THE PROPER DISTANCE IS DETERMINED BY USING THE DISTANCE SETTINGS IMAGE MAY REQUIRE REALIGNMENT WHEN CHANGING INSPECTION LOCATIONS 8 12 1 Image Align...

Page 45: ...Back button to exit the menu 8 14 Non uniformity Correction NUC Non uniformity correction NUC is used to compensate for the non uniformity of detector pixels or other optical interference A common ne...

Page 46: ...vice falls between the maximum and minimum temperature detected if a number falls outside this range the image may wash out i e the extraneous energy in the viewing environment may reduce the perceive...

Page 47: ...ld to set temperature value 2 Span adjustment press and hold on the Level Span bar then slide left to decrease the maximum and increase the minimum temperature or slide to the right to increase the ma...

Page 48: ...n Settings tab opens by default 2 Tap the hued rectangle next to Isotherm A color wheel appears 3 Press and hold on the color wheel then drag to select a new hue Selected hue appears in a small circle...

Page 49: ...Display Window captured images or add them retroactively to saved images in the gallery Create an analysis object as follows 1 Using the touchscreen tap the Analysis icon ROI 2 Tap a measurement icon...

Page 50: ...ettings icon 3 Toggle the preferred option to the On position by tapping the switch The switch turns red when active Disable the option by tapping the switch again Switch turns gray when inactive Spot...

Page 51: ...temperature see Section 8 17 2 Global Environmental Settings 8 17 1 3 1 Enable Disable Regional Environmental Parameters Enable disable the regional parameters of an ROI as follows 1 Tap an existing...

Page 52: ...erature 4 Press and hold then drag up or down on the rotary dial or tap or to adjust the setting 5 Tap to save changes Tap X to cancel changes The window closes 6 Tap anywhere on the Image Display Win...

Page 53: ...raph Display a graph on screen as follows 1 Using the touch screen tap on an analysis object Object is highlighted red when selected A Pop up Menu appears 2 Tap the Graph icon Data is charted on graph...

Page 54: ...ge Display Window to close the Pop up Menu 8 17 1 7 Delete All Analysis Objects Analysis objects are deleted without confirmation Ensure an object should be removed before deleting Deleted objects can...

Page 55: ...the available options 4 Tap Export Template icon 5 Tap the input field A keyboard appears 6 Use the keyboard by tapping the touchscreen to input text 7 Tap to close the keyboard 8 Tap Confirm to save...

Page 56: ...ws 1 Using the touchscreen tap the settings icon to open the Settings Menu 2 Tap the Analysis Settings tab 3 Tap the hued rectangle next to ROI Color A color wheel appears 4 Tap a color to select a ne...

Page 57: ...tap the settings icon to open the Settings Menu 2 Tap the Analysis Settings tab 3 Under Full Frame toggle Center to the On position by tapping the switch next to the option The switch turns red when...

Page 58: ...NU CHANGE THE FULL FRAME SETTINGS TO ADJUST THE GLOBAL PARAMETERS GLOBAL PREFERENCES ARE USEFUL IN CONTROLLED ENVIRONMENTS WHERE ATMOSPHERIC VARIABLES ARE EXPECTED TO REMAIN STABLE USERS CAN CREATE EX...

Page 59: ...costly repairs or shut downs 8 18 1 Enable Disable Alarms By default the imager alarm thresholds for each analysis object is disabled The user has the ability to enable each analysis object alarm ind...

Page 60: ...ng the switch again Switch turns gray when inactive Options for analysis object appear Maximum Temperature Minimum Temperature and Delta T 4 Tap an alarm to enable it A green appears next to an active...

Page 61: ...flashing by tapping the bell again Enable disable the feature as follows 1 Using the touchscreen tap the settings icon to open the Settings Menu 2 Tap the Alarm Settings icon 3 At the bottom of the sc...

Page 62: ...een again to disable the feature The feature is gray when inactive 4 Press the Back button continuously to exit the menu Changes are saved 8 18 4 2 Adjust Alarm Snapshot Settings Change the alarm snap...

Page 63: ...ce functions and features are disabled while snapshot mode is active user should enable isotherms and define parameter settings before initiating an alarm snapshot series 8 18 4 4 Alarm Snapshot Acces...

Page 64: ...recording Tap the play icon to replay the audio Tap the delete icon to delete audio 4 Tap the X to close the recording window 5 Tap the Save icon to save media Press the Back button to cancel saving 8...

Page 65: ...es If the operation fails Check your network connections 5 Press the Save icon to save annotation 6 Tap the Save icon to save media Press the Back button to cancel saving OCR 8 19 2 3 QRC Annotations...

Page 66: ...ap the X to close the annotation window without saving text media 8 Tap the Save icon to save media Tap Yes to save as a copy and preserve the original text audio or tap No to overwrite previous text...

Page 67: ...otation window 6 Tap the Save icon to save media Tap Yes to save as a copy and preserve the original text audio or tap No to overwrite previous text audio Press the Back button to cancel saving 7 Pres...

Page 68: ...yboard automatically opens Use the keyboard by tapping the touchscreen to input text Press the Back button to close the keyboard Press the Save icon to save annotation To review voice annotation tap t...

Page 69: ...he color wheel 7 Press and hold on the color wheel then drag to select a hue Selected hue appears in a small circle next to the color wheel Press the X icon to cancel and sketch on image 8 Press and h...

Page 70: ...ull screen mode Press left or right on the thumbstick to cycle through adjacent media 4 Tap the Image Options icon 5 Tap the Generate Report icon 6 Tap the save icon to save the report as a PDF Press...

Page 71: ...reader Tap the OCR icon Point the device at the target and tap the camera icon Renaming happens automatically Scan a QR Code with the reader Tap the QRC icon Scan the QR Code Renaming happens automat...

Page 72: ...select all reports 5 Tap the delete icon 6 Tap Confirm to erase media Tap Cancel prevent deletion 7 Press the Back button continuously to exit the Settings Menu 8 Press the Back button continuously to...

Page 73: ...ap an input field A keyboard appears 5 Use the keyboard by tapping the touchscreen to input preferred text 6 Press the Back button to close the keyboard 7 Using the touchscreen tap the Confirm to save...

Page 74: ...HEN A NEW TEMPERATURE RANGE IS SELECTED WAIT PATIENTLY AS THE CALIBRATION CAN TAKE UP TO 1 MINUTE TO COMPLETE CHANGING THE TEMPERATURE UNIT AUTOMATICALLY ADJUSTS THE READOUT OF THE TEMPERATURE SCALE T...

Page 75: ...subjects consistently throughout the capture process Commercial photographers can use the grid system to create compelling and well composed thermal images Enable the image grid as follows 1 Using the...

Page 76: ...passwords connect automatically skip to Step 9 Networks that require a password present a pop up 6 Open the keyboard by tapping the network password input box Use the keyboard by tapping the touchscr...

Page 77: ...y the manuacturer of the external device that is to be connected A pop up appears on the thermal device 7 Ensure the passcodes on both devices match then tap Pair on both devices to connect the device...

Page 78: ...nge the name of the hotspot by clicking Hotspot Name A pop up appears Tap the input box to open the keyboard Use the keyboard by tapping the touchscreen to input the new device name Tap Confirm to acc...

Page 79: ...connection see Section 8 21 5 WLAN Hotspot Disable automatic date and time selection as follows 1 Using the touchscreen tap the settings icon to open the Settings Menu 2 Tap the System Settings icon...

Page 80: ...Date A calendar appears Tap or at the top of the calendar to cycle through the months Tap a date to select a day Tap the calendar header to open the year options Press and hold then drag up or down o...

Page 81: ...usly to exit the menu 8 21 8 3 Time Zones The time zone is automatically adjusted for the user Manually set the time zone as follows 1 Using the touchscreen tap the settings icon to open the Settings...

Page 82: ...change the screen timeout settings The screen can be set to power off after 5 minutes 10 minutes or 30 minutes Auto shut off can also be disabled Change power management settings as follows 1 Using t...

Page 83: ...gs icon 3 Press and hold on the touchscreen then drag to scroll through the options 4 Press and hold on the slider next to Brightness then drag left or right to adjust the screen brightness Changes ar...

Page 84: ...the options 4 Tap an option next to Storage Settings Cover if Memory is Full or Pause if Memory is Full Changes are applied automatically 5 Press the Previous button continuously to exit the menu 2 4...

Page 85: ...curacy 8 21 16 Smart Capture 8 21 17 Lens Type The camera automatically gathers lens information from an attached lens Visit the System Settings tab of the Settings Menu to see lens information The FO...

Page 86: ...a Info Information is displayed 4 Press the Previous button continuously to exit the menu 2 4 8 21 19 Format the Memory Card Remove the memory card from the device and insert it into an appropriate sl...

Page 87: ...es all user settings accounts databases etc excluding system settings To reset the system settings perform a factory reset If measurements are skewed the user should try adjusting the emissivity and a...

Page 88: ...e device restarts several times during the reset process Have patience as this operation can take several minutes After the final restart use the touchscreen to select a device language and establish...

Page 89: ...sing the touchscreen tap the settings icon to open the Settings Menu 3 Tap the System Settings icon 4 Press and hold on the touchscreen then drag to scroll through the options 5 Tap Software Update 6...

Page 90: ...tap the settings icon to open the Settings Menu 3 Tap the System Settings icon 4 Press and hold on the touchscreen then drag to scroll through the options 5 Tap Software Update 6 Tap Update from SD C...

Page 91: ...If the file is corrupted temperature readings become skewed Contact customer service if there is an issue IF YOUR PACKAGE INCLUDES ADDITIONAL LENSES A SEPARATE CALIBRATION FILE IS REQUIRED FOR EACH LE...

Page 92: ...etal wood water skin and cloth are particularly good at radiating energy and it is easy to get relatively accurate measurements For surfaces that are good at radiating energy high emissivity the emiss...

Page 93: ...ber 0 95 Wood 0 85 Brick 0 75 Tape 0 96 Brass plate 0 06 Human skin 0 98 PVC plastic 0 93 Polycarbonate 0 80 Oxidized copper 0 78 Rust 0 80 Paint 0 90 Soil 0 93 SURFACES WITH AN EMISSIVITY OF 0 60 MAK...

Page 94: ...e of an ROI 9 3 3 Atmospheric Temperature The imager has temperature compensation to correct environmental sources of energy as this can affect the measurement results Temperature readings are especia...

Page 95: ...nd voice annotation features of the device to create notes 9 3 5 Atmospheric Transmittance Electromagnetic radiation flows through the atmosphere everyday Most of this energy is absorbed but some of t...

Page 96: ...ce the cloth and repeat the wiping process 10 2 Disinfecting the Camera Surface Do not use corrosive cleaning solutions on the optical glass components It is recommended to disinfect the camera surfac...

Page 97: ...rofessional equipment to clean the lens 11 4 Unclear or dark visible images Turn on lights in imaging area Turn on device light If lens is foggy use professional equipment to clean the lens 11 5 Tempe...

Page 98: ...TITAN HD USER MANUAL 98 11 6 Camera out of focus Adjust focus ring 11 7 Memory card error Insert memory card...

Page 99: ...ers scientists inspectors and operators in space power companies medical pulp and paper food industry research and development and various process industries You can see our products and services used...

Reviews: