background image


Chapter 1.  Introduction

 5

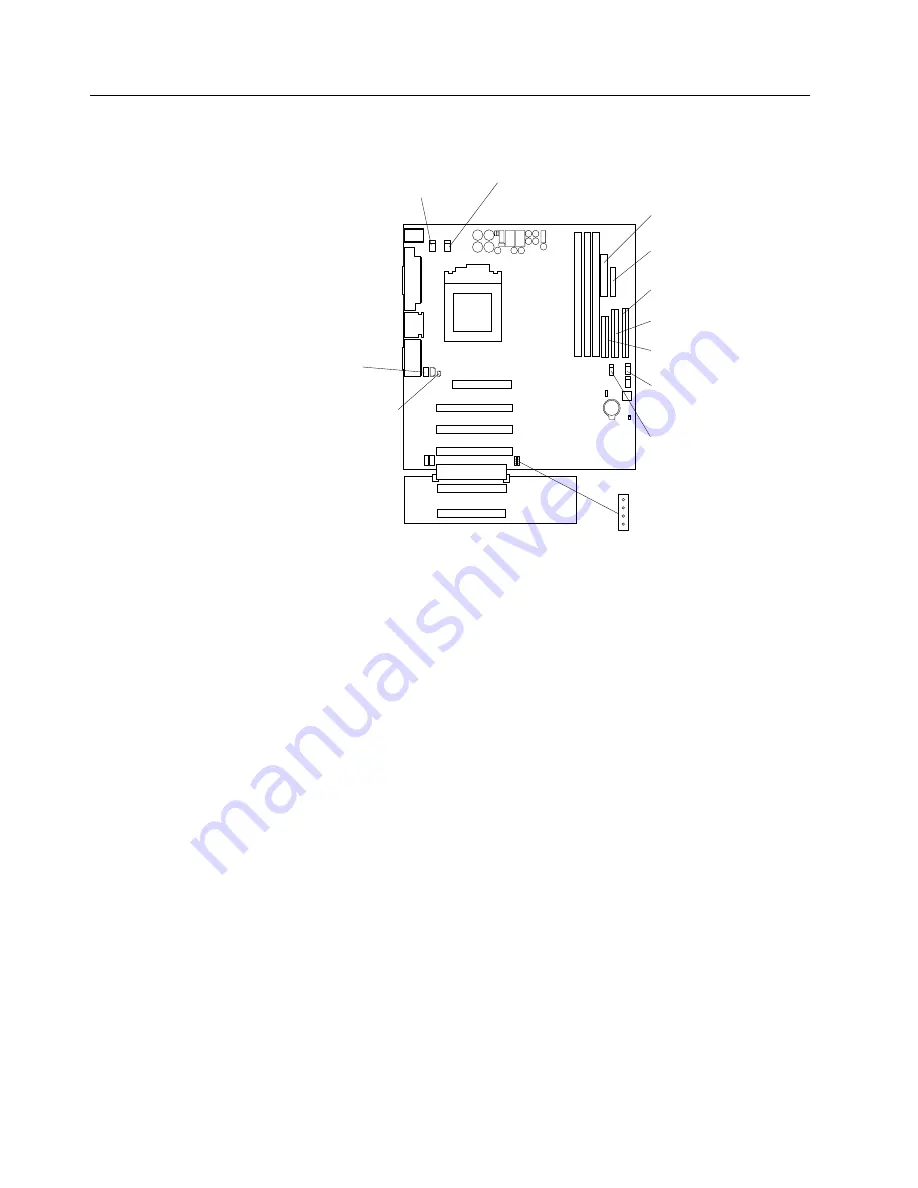
System board internal cable connectors

The following illustration identifies system and extender board connectors for internal 
cables.

System fan 2
(SYSFA2)

Support-bracket
assembly fan
(SYSFA3)

Intrusion (J2)

Microprocessor
fan sink
(CPUFA1)

Secondary IDE
(IDE2)

Main power
(JWR1)

Front panel
connector
(J1)

Diskette drive
(FDD1)

Primary IDE
(IDE1)

SCSI LED
(J3)

CD audio
(JCD1)

Internal speaker
(CON2)

Summary of Contents for xSeries 200VL

Page 1: ...ions Start the server Install options Drives Microprocessors Adapters Memory Did the server start correctly Yes No Use ServerGuide to set up and configure hardware Did configuration complete Use ServerGuide to install operating system Use ServerGuide to install applications such as IBM systems management software and IBM ServeRAID programs System is ready to use Go to the Server Support flow chart...

Page 2: ...troubleshooting information provided with your server to determine the cause of the problem and the action to take Flash the latest levels of BIOS diagnostics and RAID code You can download this code at http www ibm com pc support No No Yes Yes Yes Check all cables for loose connections and verify that all optional devices you installed are on the ServerProven list You can view the ServerProven li...

Page 3: ...IBM IBM xSeries 200 and xSeries 200VL Installation Guide SC32 P041 70 ...

Page 4: ...Appendix A Warranty information on page 39 and Appendix B Notices on page 49 Second Edition September 2001 Copyright International Business Machines Corporation 2001 All rights reserved US Government Users Restricted Rights Use duplication or disclosure restricted by GSA ADP Schedule Contract with IBM Corp ...

Page 5: ...a security U bolt 21 Installing the cover 22 Cabling the server 23 Chapter 3 Server power controls and indicators 25 Turning on the server 25 Turning off the server 25 Server controls and indicators 26 Chapter 4 Configuring your server 27 Starting the utility programs 28 Using the Configuration Setup Utility program 28 Using the SCSISelect utility program some models 28 Using the PXE boot agent ut...

Page 6: ... 43 Appendix B Notices 49 Edition notice 49 Trademarks 50 Important notes 50 Electronic emission notices 51 Federal Communications Commission FCC statement 51 Industry Canada Class A emission compliance statement 51 Australia and New Zealand Class A statement 52 United Kingdom telecommunications safety requirement 52 European Union EMC Directive conformance statement 52 Taiwan electrical emission ...

Page 7: ...uin asennat tämän tuotteen lue turvaohjeet kohdasta Safety Information Avant d installer ce produit lisez les consignes de sécurité Vor der Installation dieses Produkts die Sicherheitshinweise lesen Prima di installare questo prodotto leggere le Informazioni sulla Sicurezza Les sikkerhetsinformasjonen Safety Information før du installerer dette produktet Antes de instalar este produto leia as Info...

Page 8: ...vi IBM xSeries 200 and xSeries 200VL Installation Guide Antes de instalar este producto lea la información de seguridad Läs säkerhetsinformationen innan du installerar den här produkten ...

Page 9: ...connectors 4 Remove all cables from devices Electrical current from power telephone and communication cables is hazardous To avoid a shock hazard Do not connect or disconnect any cables or perform installation maintenance or reconfiguration of this product during an electrical storm Connect all power cords to a properly wired and grounded electrical outlet Connect to properly wired outlets any equ...

Page 10: ...sure to hazardous laser radiation There are no serviceable parts inside the device Use of controls or adjustments or performance of procedures other than those specified herein might result in hazardous radiation exposure DANGER Statement 4 CAUTION Use safe practices when lifting 18 kg 39 7 lb 32 kg 70 5 lb 55 kg 121 2 lb Some laser products contain an embedded Class 3A or Class 3B laser diode Not...

Page 11: ... has the following label attached Hazardous voltage current and energy levels are present inside any component that has this label attached There are no serviceable parts inside these components If you suspect a problem with one of these parts contact a service technician Statement 13 DANGER 1 2 Overloading a branch circuit is potentially a fire hazard and a shock haz ard under certain conditions ...

Page 12: ...x IBM xSeries 200 and xSeries 200VL Installation Guide ...

Page 13: ...server model and serial numbers are located on labels on the bottom of the server and on the lower right side of the bezel Note Your server keys cannot be duplicated by locksmiths If you lose them order replacement keys from the key manufacturer The key serial number and the telephone number of the manufacturer are on a tag attached to the keys If you plan to install your server in a rack you need...

Page 14: ... ac Video ATI Rage XL video adapter Compatible with SVGA and VGA 8 MB SDRAM video memory Size Height 470 mm 18 5 in Depth 508 mm 19 9 in Width 165 mm 6 5 in Weight approximately 19 5 kg 43 lb when fully configured or 15 9 kg 35 lb minimum Integrated functions One 10BASE T 100BASE TX Intel Ethernet controller with Alert on LAN and Wake on LAN support Two serial ports Parallel port Two USB ports Key...

Page 15: ...ally lethal or extremely hazardous procedure step or situation Handling static sensitive devices Attention Static electricity can damage electronic devices and your system To avoid damage keep static sensitive devices in their static protective packages until you are ready to install them To reduce the possibility of electrostatic discharge observe the following precautions Limit your movement Mov...

Page 16: ... illustration shows the locations of major components in your server Note The illustrations in this document might differ slightly from your hardware Adapter retaining bracket Adapter support bracket Drive cage Microprocessor Memory modules Cover Support bracket assembly EMC shield Filler panel Intrusion switch Front door ...

Page 17: ... system and extender board connectors for internal cables System fan 2 SYSFA2 Support bracket assembly fan SYSFA3 Intrusion J2 Microprocessor fan sink CPUFA1 Secondary IDE IDE2 Main power JWR1 Front panel connector J1 Diskette drive FDD1 Primary IDE IDE1 SCSI LED J3 CD audio JCD1 Internal speaker CON2 ...

Page 18: ...6 IBM xSeries 200 and xSeries 200VL Installation Guide ...

Page 19: ...bility when the feet are placed in the stabilizing position If the feet on your system are similar to the feet in the first illustration below rotate them a quarter turn inward to move them out of the way or a quarter turn outwards to provide stability If the feet on your system are similar to the feet in the following illustration complete the following steps to place the feet in the stabilizing ...

Page 20: ...ustration shows the rear feet located on the bottom rear of the server 5 Rotate the foot outward until the foot locks into place 6 Complete steps 2 through 5 for each foot Note When you need to access the inside of the server to install options you might find it easier to lay the server on its side If you do so make sure the feet are in the horizontal position see the previous steps Otherwise the ...

Page 21: ...server and peripheral devices and disconnect all external cables and power cords 3 If necessary unlock the server cover 4 Pull out on the cover release latch which will slide the cover toward the rear of the server about 12 7 mm 0 5 in Then remove the cover from the server and set it aside To replace the side cover see Installing the cover on page 22 Attention For proper cooling and airflow replac...

Page 22: ...d peripheral devices and disconnect all external cables and power cords then remove the side cover See Removing the side cover on page 9 for details 3 Disconnect the support bracket assembly fan cable from the connector SYSFA3 on the system board For the location of the fan cable connector see System board internal cable connectors on page 5 4 Locate the end of the support bracket assembly near th...

Page 23: ...ve PCI expansion slots Your server supports 5 0V and universal PCI adapters it does not support 3 3V adapters Your server uses a rotational interrupt technique to configure PCI adapters Because of this technique you can install a variety of PCI adapters that currently do not support sharing of PCI interrupts If you are installing or replacing an adapter that will control your startup boot drive in...

Page 24: ...static sensitive devices on page 3 1 Review the safety precautions listed in Safety on page v 2 Turn off the server and peripheral devices and disconnect all external cables and power cords then remove the side cover For more information about removing the side cover see Removing the side cover on page 9 3 Determine which PCI expansion slot you will use for the adapter Note If you are installing o...

Page 25: ...ly grasp the adapter by its top edge or upper corners and align it with the expansion slot guides then press the adapter firmly into the PCI expansion slot Attention When you install an adapter in the server be sure that it is completely and correctly seated in the PCI expansion slot before you turn on the server Incomplete insertion might cause damage to the system board or the adapter 11 Connect...

Page 26: ...able connectors on page 5 Note If you are installing or replacing an adapter that will control your startup boot drive install the adapter in PCI expansion slot 2 4 If you have another adapter to install or remove do so now 5 If you have installed a full length adapter rotate the front adapter support bracket to the closed locked position 6 Reinstall the rear adapter retaining bracket then rotate ...

Page 27: ...you must attach the 5 25 in conversion kit supplied with your option to the 3 5 in drive Refer to the documentation that comes with the option for the conversion kit installation instructions Note Only 3 5 in options that ship with proper mounting hardware can be supported in the 5 25 in bays If you have a tape backup drive in your server use a dry process cleaning cartridge to clean the tape head...

Page 28: ...tic sensitive devices on page 3 1 Review the safety precautions listed in Safety on page v 2 Turn off the server and peripheral devices and disconnect the external cables and power cords then remove the side cover see Removing the side cover on page 9 for details 3 Remove the support bracket assembly and disconnect the fan cable from the connector SYSFA3 on the system board See Removing the suppor...

Page 29: ...ust have a SCSI adapter installed Plug one connector of the SCSI signal cable into the back of the drive and the other end of the cable into the connector on the SCSI adapter See Installing an adapter on page 12 Note Make sure to route the signal cable so that it does not block the air flow to the rear of the drives or over the microprocessor 9 If you have another drive to install or remove do so ...

Page 30: ... electricity For details on handling these devices see Handling static sensitive devices on page 3 1 Review the safety precautions listed in Safety on page v 2 Turn off the server and peripheral devices and disconnect all external cables and power cords then remove the cover see Removing the side cover on page 9 for details 3 Remove the support bracket assembly and disconnect the fan cable from th...

Page 31: ... Removing the support bracket assembly on page 10 for details See System board internal cable connectors on page 5 for the location of the fan cable connector 13 Reinstall the side cover See Installing the cover on page 22 for details 14 Reconnect the external cables and power cords then turn on the peripheral devices and the server Installing memory modules Your server comes with a dual in line m...

Page 32: ... the location of the fan cable connector 4 Install the DIMM a If you are installing a DIMM in connector 1 remove the AGP video adapter Remove the AGP video adapter only if you are replacing the DIMM in connector 1 See Working with adapters on page 11 for the location of the AGP slot b Open the retaining clip on each end of the DIMM connector Attention To avoid breaking the retaining clips or damag...

Page 33: ...ort bracket assembly on page 10 and System board internal cable connectors on page 5 for the location of the fan cable connector 7 Replace the side cover See Installing the cover on page 22 8 Reconnect the external cables and power cords then turn on the peripheral devices and the server If you want to remove a DIMM reverse these steps Installing a security U bolt To help prevent hardware theft yo...

Page 34: ...r remove do so now 5 Reinstall the side cover See Installing the cover for details 6 Thread the cable through the U bolt and around an object that is a part of or permanently secured to the building structure or foundation and from which it cannot be removed then fasten the cable ends together with a lock 7 Reconnect the external cables and power cords then turn on the peripheral devices and the s...

Page 35: ... the stabilizing position so that they properly support the server See Moving the stabilizing feet on page 7 5 Reconnect the external cables and power cords to the server and then plug the power cords into properly grounded electrical outlets 6 Turn on the peripheral devices then turn on the server Cabling the server Note The illustrations in this document might differ slightly from your hardware ...

Page 36: ...24 IBM xSeries 200 and xSeries 200VL Installation Guide ...

Page 37: ... if this feature is supported by your operating system and places the server in standby mode Note After turning off the server wait at least 5 seconds before you press the power control button to turn on the server again You can press and hold the power control button for more than 4 seconds to cause an immediate shutdown of the server and place the server in standby mode You can use this feature ...

Page 38: ...t is located on the Ethernet RJ 45 connector on the rear of the server Ethernet transmit receive activity When this light is on there is activity between the server and the network The Ethernet transmit receive activity light is located on the Ethernet RJ 45 connector on the rear of the server Hard disk drive activity light When this light is on the hard disk drive is in use Power on light This st...

Page 39: ...gent Utility The Preboot eXecution Environment PXE Boot Agent Utility program is part of the BIOS code that comes with your server You can use this program to select legacy operating system wake up support to set menu wait times and to select whether to display the PXE setup prompt or disable it For information on how to start this utility see Starting the PXE boot agent utility program on page 29...

Page 40: ...nstructions that appear on the screen Using the SCSISelect utility program some models SCSISelect is a built in menu driven configuration utility program that you can use to View the default SCSI IDs Locate and correct configuration conflicts Note If your server has a redundant arrays of independent disks RAID adapter installed use the configuration method that is supplied with the RAID adapter to...

Page 41: ...Enter to select a choice from the menu Press Esc to return to the previous menu Press the F4 key to exit 4 Follow the instructions on the screen to change the settings of the selected items then press Enter Using the ServerGuide CDs The ServerGuide CDs provide state of the art programs to detect the server model and hardware options that are installed configure the server hardware provide device d...

Page 42: ...30 IBM xSeries 200 and xSeries 200VL Installation Guide ...

Page 43: ... correct the problems See the Troubleshooting chart on page 33 for more information Customized support page You can create a customized support page on the World Wide Web that is specific to your hardware including frequently asked questions parts information technical hints and tips and downloadable files In addition you can choose to receive electronic mail e mail notifications whenever new info...

Page 44: ...the primary drive Start the CD from the primary drive ServeRAID program cannot view all installed drives or cannot install NOS Ensure that there are no duplicate SCSI IDs or IRQ assignments Ensure that the hard disk drive is connected properly The Operating System Installation program continuously loops Make more space available on the hard disk ServerGuide will not start your NOS CD Ensure that t...

Page 45: ... your monitor refer to the information that comes with the monitor for adjusting and testing instructions If the items above are correct and the screen remains blank call for service Wavy unreadable rolling distorted screen or screen jitter If the monitor self tests show the monitor is OK consider the location of the monitor Magnetic fields around other devices such as transformers appliances fluo...

Page 46: ...d a DIMM bank if it detected a problem or a DIMM bank could have been manually disabled If the problem persists call for service Option Suggested action An IBM option that was just installed does not work Verify that 1 The option is designed for the server 2 You followed the installation instructions that came with the option 3 The option is installed correctly 4 You have not loosened any other in...

Page 47: ...support page that is specific to your hardware complete with Frequently Asked Questions Parts Information Technical Hints and Tips and Downloadable Files In addition you can choose to receive e mail notifications whenever new information becomes available about your registered products You also can order publications through the IBM Publications Ordering System at http www elink ibmlink ibm com pu...

Page 48: ... the applicable level of service Engineering Change management Occasionally there might be changes that are required after a product has been sold IBM or your reseller if authorized by IBM will make selected Engineering Changes ECs available that apply to your hardware The following items are not covered Replacement or use of non IBM parts or nonwarranted IBM parts All warranted parts contain a 7 ...

Page 49: ...rvices and custom installations Service availability and service name might vary by country or region For more information about these services contact your IBM marketing representative Country Telephone number Austria Österreich 01 24 592 5901 Belgium Dutch Belgie 02 210 9820 Belgium French Belgique 02 210 9800 Canada Toronto only 416 383 3344 Canada Canada all other 1 800 565 3344 Denmark Danmar...

Page 50: ...38 IBM xSeries 200 and xSeries 200VL Installation Guide ...

Page 51: ...you have a hardware problem and deciding what action is necessary to fix the problem IBM hardware repair If the problem is determined to be caused by IBM hardware under warranty trained service personnel are available to provide the applicable level of service either on site or at an IBM service center as determined by IBM Engineering Change management Occasionally there might be changes that are ...

Page 52: ...ement consists of two parts Part 1 and Part 2 Be sure to read Part 1 and the country unique terms in Part 2 that apply to your country or region Part 1 General Terms This Statement of Limited Warranty includes Part 1 General Terms and Part 2 Country unique Terms The terms of Part 2 replace or modify those of Part 1 The warranties provided by IBM in this Statement of Limited Warranty apply only to ...

Page 53: ...d installation will be provided WITHOUT WARRANTIES OF ANY KIND Warranty Service To obtain warranty service for a Machine contact IBM or your reseller If you do not register your Machine with IBM you may be required to present proof of purchase During the warranty period IBM or your reseller if approved by IBM to provide warranty service provides without charge certain types of repair and exchange ...

Page 54: ...r reseller for any reason You should remove all such information from the Machine prior to its return Limitation of Liability Circumstances may arise where because of a default on IBM s part or other liability you are entitled to recover damages from IBM In each such instance regardless of the basis on which you are entitled to claim damages from IBM including fundamental breach negligence misrepr...

Page 55: ...laces laws of the country in which you acquired the Machine in the first sentence laws of the State of New York ASIA PACIFIC AUSTRALIA The IBM Warranty for Machines The following paragraph is added to this Section The warranties specified in this Section are in addition to any rights you may have under the Trade Practices Act 1974 or other similar legislation and are only limited to the extent per...

Page 56: ...ings shall continue from the stage they were at when the vacancy occurred If one of the parties refuses or otherwise fails to appoint an arbitrator within 30 days of the date the other party appoints its the first appointed arbitrator shall be the sole arbitrator provided that the arbitrator was validly and properly appointed The English language version of this Agreement prevails over any other l...

Page 57: ...e arbitration fee will be borne by the losing party unless otherwise determined by the arbitral award During the course of arbitration this Agreement will continue to be performed except for the part which the parties are disputing and which is undergoing arbitration EUROPE MIDDLE EAST AFRICA EMEA THE FOLLOWING TERMS APPLY TO ALL EMEA COUNTRIES The terms of this Statement of Limited Warranty apply...

Page 58: ... Kenya Kuwait Liberia Malawi Malta Mozambique Nigeria Oman Pakistan Qatar Rwanda Sao Tome Saudi Arabia Sierra Leone Somalia Tanzania Uganda United Arab Emirates United Kingdom West Bank Gaza Yemen Zambia and Zimbabwe this Agreement will be governed by English Law and disputes relating to it will be submitted to the exclusive jurisdiction of the English courts and 5 in Greece Israel Italy Portugal ...

Page 59: ...wing replaces items one and two of the first paragraph of this Section 1 death or personal injury or physical damage to your real property solely caused by IBM s negligence and 2 the amount of any other actual direct damages up to 125 percent of the charges if recurring the 12 months charges apply for the Machine that is the subject of the claim or which otherwise gives rise to the claim Applicabi...

Page 60: ...f this Section 1 death or personal injury or physical damage to your real property solely caused by IBM s negligence 2 the amount of any other actual direct damages or loss up to 125 percent of the charges if recurring the 12 months charges apply for the Machine that is the subject of the claim or which otherwise gives rise to the claim The following item is added to this paragraph 3 breach of IBM...

Page 61: ...eriodically made to the information herein these changes will be incorporated in new editions of the publication IBM may make improvements and or changes in the product s and or the program s described in this publication at any time without notice INTERNATIONAL BUSINESS MACHINES CORPORATION PROVIDES THIS PUBLICATION AS IS WITHOUT WARRANTY OF ANY KIND EITHER EXPRESS OR IMPLIED INCLUDING BUT NOT LI...

Page 62: ...both Other company product or service names may be the trademarks or service marks of others Important notes Processor speeds indicate the internal clock speed of the microprocessor other factors also affect application performance CD ROM drive speeds list the variable read rate Actual speeds vary and are often less than the maximum possible When referring to processor storage real and virtual sto...

Page 63: ...ion against harmful interference when the equipment is operated in a commercial environment This equipment generates uses and can radiate radio frequency energy and if not installed and used in accordance with the instruction manual may cause harmful interference to radio communications Operation of this equipment in a residential area is likely to cause harmful interference in which case the user...

Page 64: ...ws of the Member States relating to electromagnetic compatibility IBM cannot accept responsibility for any failure to satisfy the protection requirements resulting from a nonrecommended modification of the product including the fitting of non IBM option cards This product has been tested and found to comply with the limits for Class A Information Technology Equipment according to CISPR 22 European...

Page 65: ...pprovals for the country in which the equipment will be installed IBM power cords for a specific country or region are usually available only in that country or region IBM power cord part number Used in these countries and regions 13F9940 Argentina Australia China PRC New Zealand Papua New Guinea Paraguay Uruguay Western Samoa 13F9979 Afghanistan Algeria Andorra Angola Austria Belgium Benin Bulgar...

Page 66: ...ombia Costa Rica Dominican Republic Ecuador El Salvador Guatemala Guyana Haiti Honduras Jamaica Japan Korea South Liberia Mexico Netherlands Antilles Nicaragua Panama Peru Philippines Saudi Arabia Suriname Taiwan Trinidad West Indies United States of America Venezuela IBM power cord part number Used in these countries and regions ...

Page 67: ...0 retaining clips 20 DIMM connector locations 20 diskette drive 2 installing 15 documentation CD 1 drive bay filler panel 16 drives installing 15 E electrical input 2 electronic emission Class A notice 51 environment air temperature 2 humidity 2 expansion bays 2 expansion slots 2 F FCC Class A notice 51 features 2 filler panel 16 H hard disk drive installing 15 heat output 2 I installing adapters ...

Page 68: ...elect Utility program 27 SCSISelect utility program starting 28 server configuring 27 model number 1 serial number 1 turning off 25 turning on 25 server keys request replacement 1 ServerGuide startup problems 32 ServerGuide CDs 29 service summary 35 side cover removing 9 size 2 specifications 2 static electricity 3 static sensitive devices handling 3 support bracket removing 10 support page custom...

Page 69: ......

Page 70: ...IBM Part Number 32P0417 Printed in the United States of America 32P 417 ...

Reviews: