


Chapter 9. Check, Adjust, Remove, and Replace Procedures
9-9
The Flash Memory is housed on the LCB and contains the library vital product data
(VPD) such as configuration settings.
Removal Procedure
1.
Using the Operator Panel, take the library offline. See “Taking the Library
Offline/Online” on page 7-23.
2.
If you are able to communicate with the library using the Web User Interface,
save the library configuration settings in a file using the
Save/Restore
window of
the Web User Interface.
3.
Power OFF the library by toggling the power supply switch on both supplies to
the OFF (O) position.
4.
Disconnect the power cables from the library power supply units.
5.
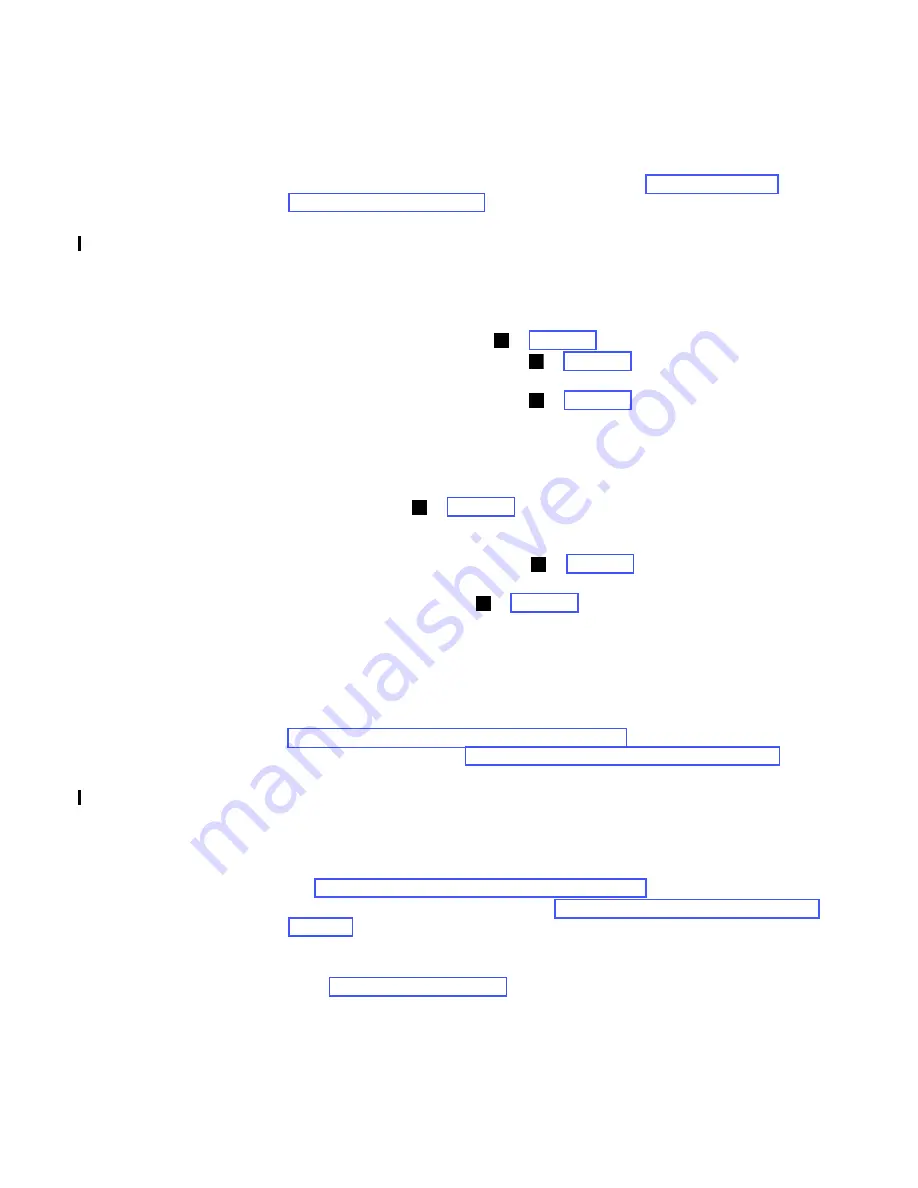
Disconnect the Ethernet cable ( in Figure 9-6) from the Library Control Blade.
6.
Loosen the two blue thumb screws ( in Figure 9-6) on the Library Control
Blade by turning them counterclockwise.
7.
Place two fingers under the handle ( in Figure 9-6) and slowly pull the Library
Control Blade toward you while supporting it from underneath.
Replacement Procedure
1.
Remove the packaging from the replacement Library Control Blade.
2.
Grasp the handle ( in Figure 9-6) while supporting the Library Control Blade
from underneath and insert it into the rear of the library. Then, carefully push it
into the library.
3.
Tighten the two blue thumb screws ( in Figure 9-6) on the Library Control
Blade by turning them clockwise.
4.
Connect the Ethernet cable ( in Figure 9-6) to the Library Control Blade.
5.
Connect the power cables to the library power supply units.
6.
Power ON the library by toggling the power supply switch on both supplies to
the ON (|) position.
7.
Confirm that the library firmware installed is the latest version. Note the
firmware revision number using the
System Summary
window of the Web User
Interface and check against the latest firmware version at
http://www-03.ibm.com/servers/storage/support
. To update the library
firmware, if necessary, see “Methods of Updating Firmware” on page 7-20.
8.
If you saved a previous library configuration, restore the configuration settings
on the Library Control Blade from a file using the
Save/Restore
window of the
Web User Interface. If you were not able to communicate with the library and
save the library configuration, ask your customer to restore the last saved
configuration.
9.
From the Operator Panel, run the
Library Verify
test in the
Service Mode
menu.
See “Running Library Verify Diagnostics” on page 7-5.
10.
If requested, take the library online. See “Taking the Library Offline/Online” on
page 7-23.
11.
Package the failed Library Control Blade in the same packaging that the new
Library Control Blade was shipped to you in, and return to IBM.
12.
Go to “End of Call” on page 7-26.
3
1
2
2
1
3
Summary of Contents for L5U
Page 1: ...IBM System Storage TS3400 Tape Library Maintenance Information Machine Type 3577 GA32 0572 03...
Page 2: ......
Page 3: ...IBM System Storage TS3400 Tape Library Maintenance Information Machine Type 3577 GA32 0572 03...
Page 6: ...iv TS3400 Tape Library Maintenance Information...
Page 14: ...xii TS3400 Tape Library Maintenance Information...
Page 52: ...1 36 TS3400 Tape Library Maintenance Information...
Page 84: ...3 14 TS3400 Tape Library Maintenance Information...
Page 92: ...4 8 TS3400 Tape Library Maintenance Information...
Page 106: ...5 14 TS3400 Tape Library Maintenance Information...
Page 109: ...Chapter 6 Installing the Library 6 3 Figure 6 1 Components removed to reduce weight a34z0177...
Page 194: ...8 40 TS3400 Tape Library Maintenance Information...
Page 260: ...11 8 TS3400 Tape Library Maintenance Information...
Page 266: ...12 6 TS3400 Tape Library Maintenance Information...
Page 274: ...B 2 TS3400 Tape Library Maintenance Information...
Page 293: ......
Page 294: ...Part Number 45E5263 Printed in USA GA32 0572 03 1P P N 45E5263...


