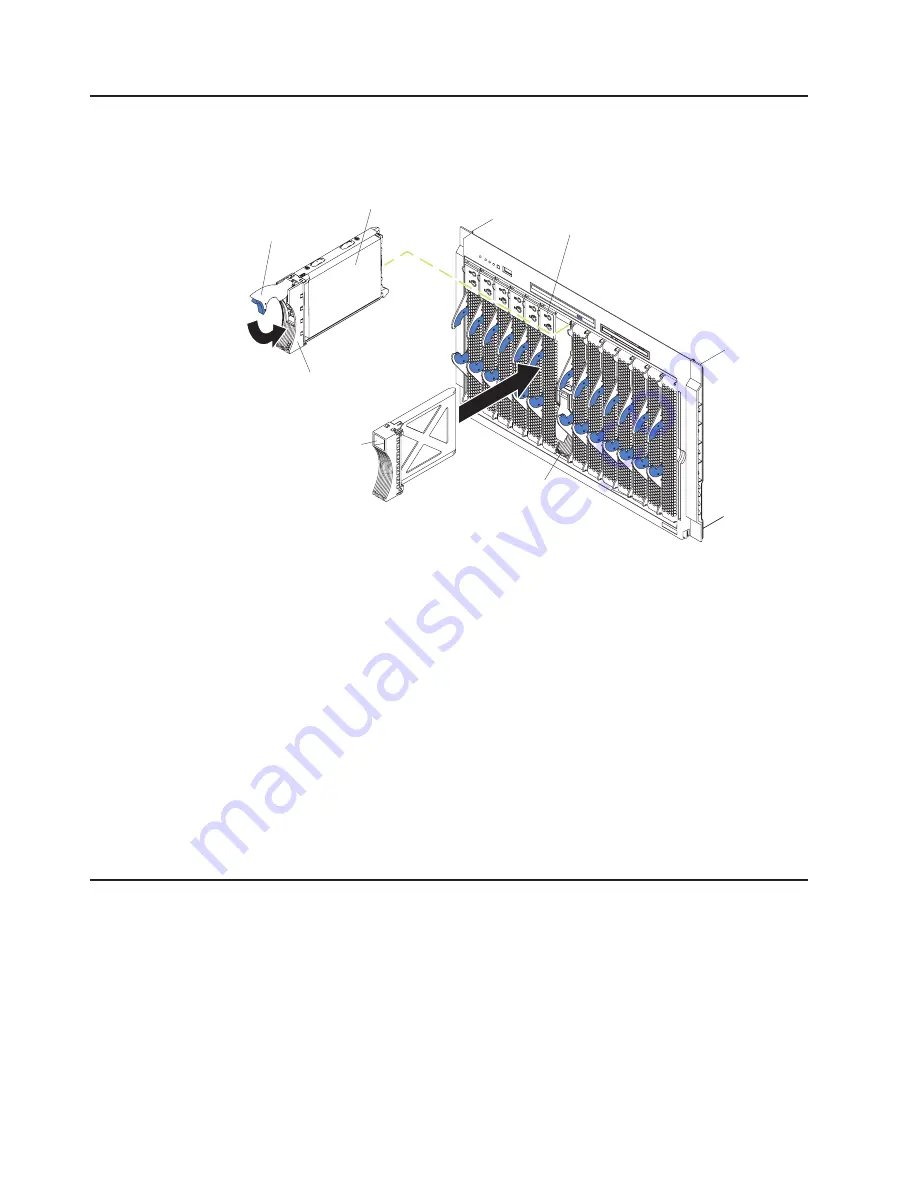
Replacing a SCSI hot-swap hard disk drive
If a hard disk drive in the storage expansion unit fails, you can replace it without
turning off the blade server.
Storage
expansion unit
Blade
Drive tray
Drive handle
(in open position)
Hard disk drive
Filler
panel
Complete the following steps to replace a SCSI hot-swap hard disk drive in a
storage expansion unit hot-swap bay.
Attention:
To maintain proper system cooling, do not operate the BladeCenter
unit for more than one minute without either a hot-swap hard disk drive or a filler
panel installed in each storage expansion unit bay.
1. Read Appendix B, “Safety information,” on page 97 and “Installation guidelines”
on page 27.
2. Locate the defective hard disk drive (look for an amber status LED that is lit on
the front of the hard disk drive).
3. Make sure the hard disk drive has stopped spinning.
4. Move the handle on the hard disk drive to the open position (perpendicular to
the hard disk drive), and pull the hot-swap hard disk drive assembly from the
bay.
5. Within one minute, install the replacement hard disk drive in the hot-swap bay
(see “Installing a SCSI hot-swap hard disk drive” on page 48 for instructions).
Replacing the battery
IBM has designed this product with your safety in mind. The lithium battery must be
handled correctly to avoid possible danger. If you replace the battery, you must
adhere to the following instructions.
Note:
In the U.S., call 1-800-IBM-4333 for information about battery disposal.
If you replace the original lithium battery with a heavy-metal battery or a battery with
heavy-metal components, be aware of the following environmental consideration.
Batteries and accumulators that contain heavy metals must not be disposed of with
50
BladeCenter HS20 Type 8832: Hardware Maintenance Manual and Troubleshooting Guide
Summary of Contents for eServer BladeCenter HS20 Type 8832
Page 1: ...BladeCenter HS20 Type 8832 Hardware Maintenance Manual and Troubleshooting Guide ...
Page 2: ......
Page 3: ...BladeCenter HS20 Type 8832 Hardware Maintenance Manual and Troubleshooting Guide ...
Page 6: ...iv BladeCenter HS20 Type 8832 Hardware Maintenance Manual and Troubleshooting Guide ...
Page 10: ...viii BladeCenter HS20 Type 8832 Hardware Maintenance Manual and Troubleshooting Guide ...
Page 18: ...8 BladeCenter HS20 Type 8832 Hardware Maintenance Manual and Troubleshooting Guide ...
Page 64: ...54 BladeCenter HS20 Type 8832 Hardware Maintenance Manual and Troubleshooting Guide ...
Page 66: ...56 BladeCenter HS20 Type 8832 Hardware Maintenance Manual and Troubleshooting Guide ...
Page 118: ...108 BladeCenter HS20 Type 8832 Hardware Maintenance Manual and Troubleshooting Guide ...
Page 119: ...Appendix B Safety information 109 ...
Page 120: ...110 BladeCenter HS20 Type 8832 Hardware Maintenance Manual and Troubleshooting Guide ...
Page 121: ...Appendix B Safety information 111 ...
Page 122: ...112 BladeCenter HS20 Type 8832 Hardware Maintenance Manual and Troubleshooting Guide ...
Page 123: ...Appendix B Safety information 113 ...
Page 124: ...114 BladeCenter HS20 Type 8832 Hardware Maintenance Manual and Troubleshooting Guide ...
Page 136: ...126 BladeCenter HS20 Type 8832 Hardware Maintenance Manual and Troubleshooting Guide ...
Page 137: ...Appendix B Safety information 127 ...
Page 138: ...128 BladeCenter HS20 Type 8832 Hardware Maintenance Manual and Troubleshooting Guide ...
Page 139: ...Appendix B Safety information 129 ...
Page 140: ...130 BladeCenter HS20 Type 8832 Hardware Maintenance Manual and Troubleshooting Guide ...
Page 141: ...Appendix B Safety information 131 ...
Page 146: ...136 BladeCenter HS20 Type 8832 Hardware Maintenance Manual and Troubleshooting Guide ...
Page 152: ...142 BladeCenter HS20 Type 8832 Hardware Maintenance Manual and Troubleshooting Guide ...
Page 156: ...146 BladeCenter HS20 Type 8832 Hardware Maintenance Manual and Troubleshooting Guide ...
Page 157: ......
Page 158: ... Part Number 49Y0165 Printed in USA 1P P N 49Y0165 ...


