Note:
After turning off the blade server, wait at least 30 seconds for its hard disk
drives or flash drives to stop spinning before you remove the blade server
from the BladeCenter unit.
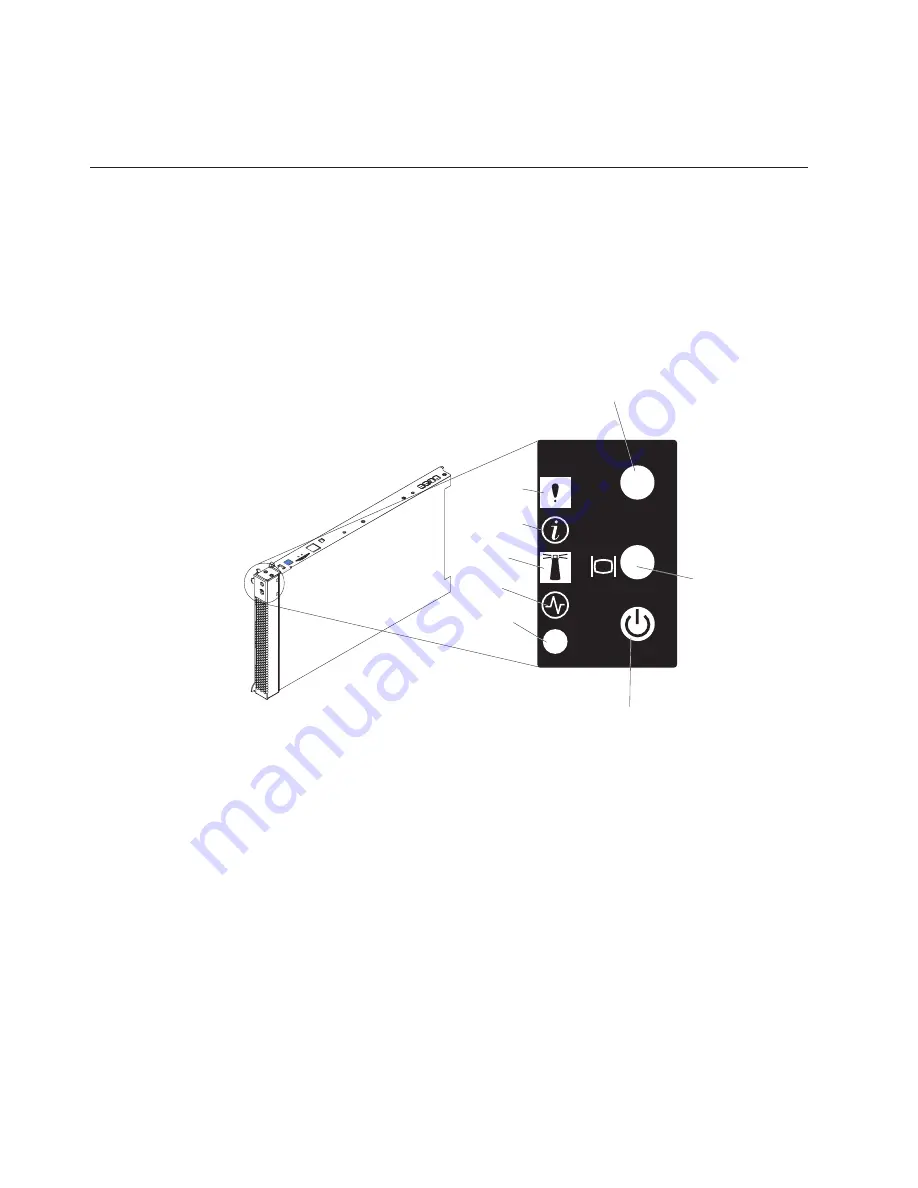
Blade server controls and LEDs
This section describes the controls and light-emitting diodes (LEDs) on the blade
server.
Notes:
1. The control panel door is shown in the closed (normal) position in this
illustration. To access the power-control button, you must open the control panel
door.
2. The illustrations in this document might differ slightly from your hardware.
CD/diskette/USB select button:
Press this button to associate the CD-ROM drive,
diskette drive, and USB port with this blade server. The LED on this button flashes
while the request is being processed, then is steady when the ownership of the
CD-ROM drive, diskette drive, and USB port has been transferred to this blade
server. It can take up to 20 seconds for the operating system in this blade server to
recognize the CD-ROM drive, diskette drive, and USB port.
If there is no response when you press the CD/diskette/USB select button, you can
use the management-module Web interface to determine whether local control has
been disabled on the blade server.
Keyboard/mouse/video select button:
Press this button to associate the keyboard
port, mouse port, and video port with this blade server. The LED on this button
flashes while the request is being processed, then is steady when the ownership of
the keyboard, mouse, and video has been transferred to this blade server. It can
take up to 20 seconds to switch the keyboard, video, and mouse control to the
blade server.
Blade-error
LED
Information
LED
Location
LED
Activity
LED
Power-on
LED
CD/diskette/USB
select button
Keyboard/ mouse/
video select button
CD
Power-control button
Figure 4. Controls and LEDs
10
BladeCenter HS20 Type 8832: Hardware Maintenance Manual and Troubleshooting Guide
Summary of Contents for eServer BladeCenter HS20 Type 8832
Page 1: ...BladeCenter HS20 Type 8832 Hardware Maintenance Manual and Troubleshooting Guide ...
Page 2: ......
Page 3: ...BladeCenter HS20 Type 8832 Hardware Maintenance Manual and Troubleshooting Guide ...
Page 6: ...iv BladeCenter HS20 Type 8832 Hardware Maintenance Manual and Troubleshooting Guide ...
Page 10: ...viii BladeCenter HS20 Type 8832 Hardware Maintenance Manual and Troubleshooting Guide ...
Page 18: ...8 BladeCenter HS20 Type 8832 Hardware Maintenance Manual and Troubleshooting Guide ...
Page 64: ...54 BladeCenter HS20 Type 8832 Hardware Maintenance Manual and Troubleshooting Guide ...
Page 66: ...56 BladeCenter HS20 Type 8832 Hardware Maintenance Manual and Troubleshooting Guide ...
Page 118: ...108 BladeCenter HS20 Type 8832 Hardware Maintenance Manual and Troubleshooting Guide ...
Page 119: ...Appendix B Safety information 109 ...
Page 120: ...110 BladeCenter HS20 Type 8832 Hardware Maintenance Manual and Troubleshooting Guide ...
Page 121: ...Appendix B Safety information 111 ...
Page 122: ...112 BladeCenter HS20 Type 8832 Hardware Maintenance Manual and Troubleshooting Guide ...
Page 123: ...Appendix B Safety information 113 ...
Page 124: ...114 BladeCenter HS20 Type 8832 Hardware Maintenance Manual and Troubleshooting Guide ...
Page 136: ...126 BladeCenter HS20 Type 8832 Hardware Maintenance Manual and Troubleshooting Guide ...
Page 137: ...Appendix B Safety information 127 ...
Page 138: ...128 BladeCenter HS20 Type 8832 Hardware Maintenance Manual and Troubleshooting Guide ...
Page 139: ...Appendix B Safety information 129 ...
Page 140: ...130 BladeCenter HS20 Type 8832 Hardware Maintenance Manual and Troubleshooting Guide ...
Page 141: ...Appendix B Safety information 131 ...
Page 146: ...136 BladeCenter HS20 Type 8832 Hardware Maintenance Manual and Troubleshooting Guide ...
Page 152: ...142 BladeCenter HS20 Type 8832 Hardware Maintenance Manual and Troubleshooting Guide ...
Page 156: ...146 BladeCenter HS20 Type 8832 Hardware Maintenance Manual and Troubleshooting Guide ...
Page 157: ......
Page 158: ... Part Number 49Y0165 Printed in USA 1P P N 49Y0165 ...


