background image

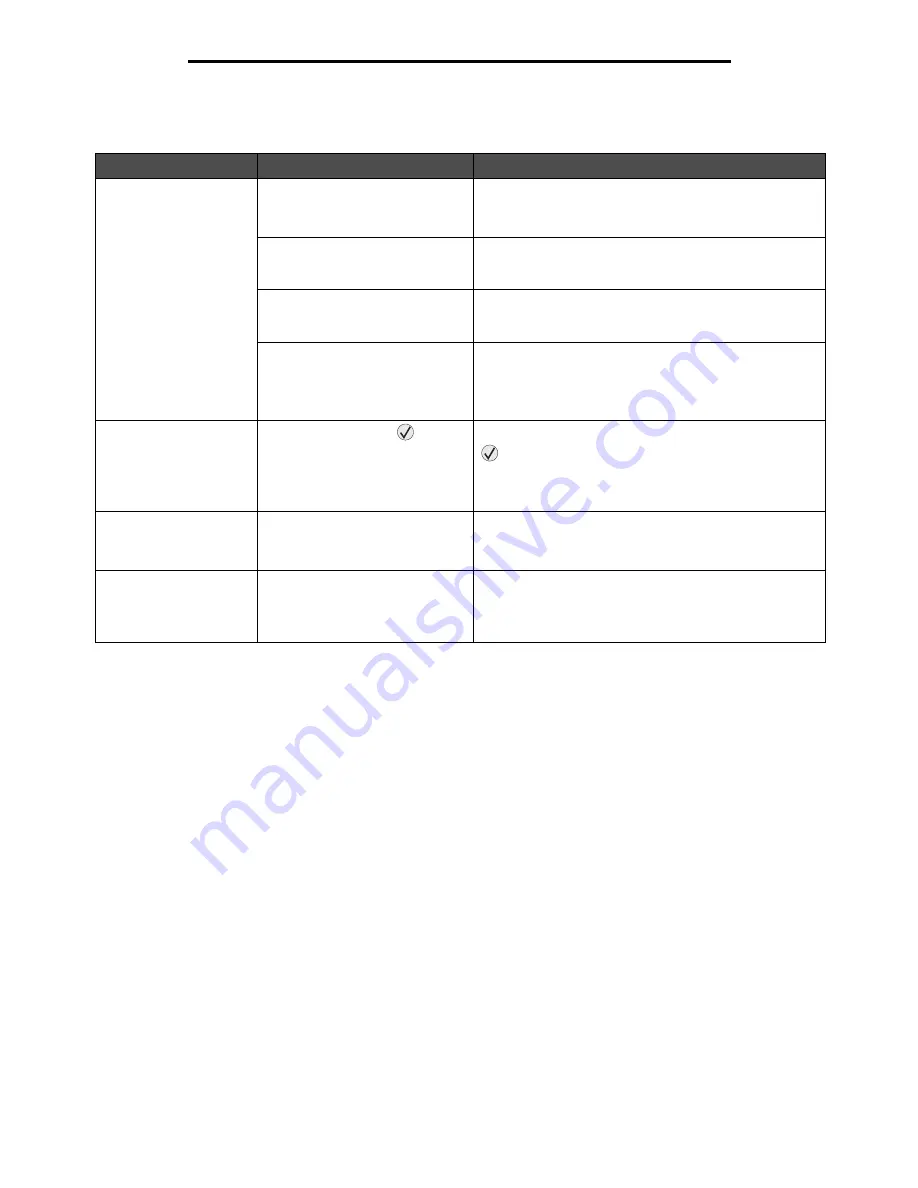
Solving paper feed problems

99

Troubleshooting

Solving paper feed problems

Symptom

Cause

Solution

Paper frequently jams. 

You are using paper that does not 
meet the printer specifications.

Use recommended paper and other specialty media.

See Avoiding jams on page 48 for information that can 
help prevent jams from occurring.

You have loaded too much paper 
or too many envelopes.

Make sure the stack of paper you load does not exceed 
the maximum stack height indicated in the tray or on the 
multipurpose feeder.

Guides in the selected tray are not 
set to the appropriate position for 
the size paper loaded.

Move the guides in the tray to the correct position.

The paper has absorbed moisture 
due to high humidity.

Load paper from a fresh package.

Store paper in its original wrapper until you load it.

See Storing print media on page 47 for more 
information.

The

 Paper Jam 

message remains after 
you remove the jammed 
paper. 

You have not pressed 

 or have 

not cleared the entire paper path.

Clear paper from the entire paper path, and then press 

.

See Clearing printer jams on page 75 for more 
information.

The page that jammed 
does not reprint after you 
clear the jam. 

Jam Recovery in the Setup menu 
is set to Off.

Set Jam Recovery to Auto or On.

See the Menus and Messages Guide for more 
information.

Blank pages feed into 
the output bin. 

An incorrect media type is loaded 
in the tray being printed from.

Load the correct type media for your print job, or change 
the Paper Type to match the type of media loaded.

See the Menus and Messages Guide for more 
information.

Summary of Contents for 1585 (MT 4539)

Page 1: ...Infoprint 1585 MT 4539 User s Guide S510 4133 00 ...

Page 2: ......

Page 3: ...Infoprint 1585 MT 4539 User s Guide S510 4133 00 ...

Page 4: ...under this agreement are commercial computer software and documentation developed exclusively at private expense Trademarks MarkVision is a trademark of Lexmark International Inc registered in the United States and or other countries Drag N Print and PrintCryption are trademarks of Lexmark International Inc PCL is a registered trademark of the Hewlett Packard Company PCL is Hewlett Packard Company...

Page 5: ...ng the printer system board 26 Installing a printer memory card 28 Installing a flash memory or firmware card 29 Installing an option card 30 Installing a hard disk 32 Replacing the access panel 34 Chapter 5 Understanding paper and specialty media guidelines 35 Supported print media 35 Selecting print media 42 Storing print media 47 Avoiding jams 48 Chapter 6 Printing 49 Loading standard or option...

Page 6: ...learing jams 73 Identifying jams 73 Access doors and trays 74 Understanding jam messages 75 Clearing printer jams 75 Clearing staple jams 92 Chapter 9 Troubleshooting 94 Calling for service 94 Checking an unresponsive printer 94 Printing multiple language PDFs 95 Solving printing problems 95 Solving option problems 97 Solving paper feed problems 99 Solving print quality problems 100 Chapter 10 Adm...

Page 7: ...5 Contents Index 116 ...

Page 8: ...damage your product hardware or software Printer overview CAUTION Do not set up this product or make any electrical or cabling connections such as the power cord or telephone during a lightning storm CAUTION The printer weighs 49 kg 108 lb and requires at least two people to lift it safely Basic model The following illustration shows a printer with its base features Standard output bin Operator pa...

Page 9: ...d with an asterisk are options Tray 5 2000 sheet high capacity feeder Finisher Duplex unit Tray 3 and Tray 4 500 sheet trays or 2000 sheet dual input trays Tray 1 and Tray 2 500 sheet trays Operator panel Multipurpose feeder Exit 2 used in conjunction with duplex unit and finisher Bridge unit assembly used in conjunction with finisher ...

Page 10: ...s Universal Setup Bin Setup Reports Menu Settings Page Device Statistics Network Setup Page Network x Setup Page Profiles List Print Quick Ref NetWare Setup Page Print Fonts Print Directory Settings Setup Menu Finishing Menu Quality Menu Utilities Menu PDF Menu PostScript Menu PCL Emul Menu HTML Menu Image Menu Security Max Invalid PIN Job Expiration Network Ports TCP IP IPv6 Standard Network Netw...

Page 11: ... the Stop button to stop the mechanical operation of the printer After pressing Stop the message Stopping appears When the printer has stopped the status line in the operator panel will show Stopped and a list of options will appear Navigation buttons The Up or Down buttons are used to move up and down lists When navigating through a list using the Up or Down button the cursor moves one line at a ...

Page 12: ...ote The pound sign is not used Display The display shows messages and graphics describing the current state of the printer and indicating possible printer problems you must resolve The top line of the display is the header line If applicable it will contain the graphic indicating the Back button can be used It will also display the current status and the Supplies Warnings status If multiple warnin...

Page 13: ...include a printer driver that is compatible with the printer Note Installing a custom driver will not replace the system driver A separate printer object will be created and appear in the Printers folder Use the drivers CD that shipped with the printer to install the custom printer driver and obtain enhanced printer features and functionality Using Windows Server 2003 Windows 2000 Windows XP Windo...

Page 14: ...n the printer The Plug and Play screen appears and a printer object is created in the printers folder of the computer Using Windows 95 and Windows 98 first edition 1 Turn on the computer 2 Insert the drivers CD If the CD launches automatically click Exit to return to the Add Printer Wizard 3 Click Start Æ Settings Æ Printers and double click Add Printer Note USB support is not available for Window...

Page 15: ... Setting is the setting required for a change Note the following restrictions Maximum baud rate supported is 115 200 Data Bits must be set to 7 or 8 Parity must be set to Even Odd or None Stop Bits must be set to 2 Flow Control recommended protocol setting is Xon Xoff 6 Press repeatedly to return the printer to the Ready state 7 Print a Menu Settings page and verify that the serial parameters are ...

Page 16: ...d to the printer driver The serial parameters in the communications port must match exactly to the serial parameters set in the printer 1 Click Start Æ Settings Æ Control Panel and double click System 2 On the Device Manager tab click to expand the list of available ports 3 Select the communications port assigned to the printer COM1 or COM2 4 Click Properties 5 On the Port Settings tab set the ser...

Page 17: ... Center or Printer Setup Utility 4 Do one of the following If the USB attached printer appears in the Printer List quit Print Center or Printer Setup Utility A queue has been created for the printer If the USB attached printer does not appear in the Printer List make sure the USB cable is properly connected and the printer is turned on After the printer appears in the Printer List quit Print Cente...

Page 18: ... Save 9 Specify a printer name and click Save The printer is now saved as a desktop printer UNIX Linux Local printing is supported on many UNIX and Linux platforms such as Sun Solaris and Red Hat If the drivers CD does not contain any UNIX Linux printer driver packages contact the place where you bought the printer to see if the printer is supported Some printer driver packages are available on th...

Page 19: ...ning a printer IP address If the network is using DHCP an IP address is automatically assigned after connecting the network cable to the printer 1 Look for the address under the TCP IP heading on the network setup page printed in Printing a network setup page 2 Go to Verifying the IP settings and begin with step 2 If the network is not using DHCP then manually assign an IP address to the printer O...

Page 20: ...d install the printer on each network computer Windows In Windows environments network printers can be configured for direct printing or shared printing Both network printing methods require the installation of a printer driver and the creation of a network printer port Supported printer drivers Windows system printer driver Custom printer driver System drivers are built into Windows operating sys...

Page 21: ...ears in the list of available ports d Enter the IP address in the text box Note If the IP address is unknown print a network setup page and look under the TCP IP heading For help see Printing a network setup page and Verifying the IP settings 8 Print a test page to verify printer installation Shared printing using Windows NT 4 0 Windows 2000 Windows XP or Windows Server 2003 Note Install the print...

Page 22: ...r The printer is shared in step 2 Share the printer on the network h Print a test page to verify printer installation 2 Share the printer on the network a Click Start Æ Settings Æ Printers b Select the printer just added c Click File Æ Sharing d Select the Shared as check box and enter a name in the text box e In the Alternate Drivers section select the operating systems of all the network clients...

Page 23: ...zard 3 Click Next 4 Click Network Printer and click Next 5 Enter the printer name or URL if on the Internet or an intranet and click Next If the printer name or URL is unknown leave the text box blank and click Next 6 Select the network printer from the Shared printers list If the printer is not listed enter the path of the printer in the text box The path looks similar to the following server hos...

Page 24: ...complete Step 2 Create a print queue in Print Center or Printer Setup Utility Using AppleTalk Printing Follow these steps to create a print queue using AppleTalk Printing 1 Open Finder click Applications and click Utilities 2 Double click Print Center or Printer Setup Utility 3 Choose Add Printer from the Printers menu 4 Choose AppleTalk from the pop up menu Note Look on the network setup page und...

Page 25: ...ummary window is not correct for the printer delete the printer from the printer list in Print Center or Printer Setup Utility and repeat Step 1 Install a custom PPD file Mac OS 9 x Step 1 Install a custom PPD file 1 Insert the drivers CD a Double click Classic and double click the installer package for the printer Note A PPD file provides detailed information about the capabilities of a printer t...

Page 26: ... is complete If the PPD file displayed in the PostScript Printer Description PPD file portion of the menu is not correct for the printer repeat Step 1 Install a custom PPD file UNIX Linux The printer supports both UNIX and Linux network environments For the latest information about installing a network printer in a UNIX or Linux environment launch the drivers CD and click View Documentation NetWar...

Page 27: ...and connectivity by adding optional cards The instructions in this section help you install any of the following options Memory cards Printer memory Flash memory Firmware cards Bar Code Forms IPDS and SCS TNe PRESCRIBE PrintCryption Other options Printer hard disk External Serial Adapter Tri Port Adapter Infrared Adapter USB Parallel 1284 C interface card Coax Twinax Adapter Internal print servers...

Page 28: ...cess the printer system board to install printer memory flash memory a hard disk or an option card CAUTION Turn the printer off and unplug the power cord before continuing 1 Loosen the screws on the access panel located on the back side of the printer 2 Remove the panel from the printer and set it aside ...

Page 29: ...stem board 27 Installing options Use the illustration to locate the connector for the option you want to install Option card connector Printer memory card connector Flash memory or firmware card connectors Hard disk connector ...

Page 30: ...nector 3 Unpack the memory card Warning Printer memory cards are easily damaged by static electricity Touch something metal such as the printer frame before you touch a memory card Avoid touching the connection points along the edge of the card Save the packaging 4 Align the notches on the bottom of the card with the notches on the connector 5 Push the memory card firmly into the connector until t...

Page 31: ...sh memory and firmware cards are easily damaged by static electricity Touch something metal such as the printer frame before you touch a card 3 Holding the flash memory or firmware card by the locking clips align the plastic pins on the card with the holes on the system board 4 Push the flash memory or firmware card firmly into place and release the locking clips The entire length of the connector...

Page 32: ...rame before you touch a memory card Note You need a small Phillips screwdriver to attach the option card to the system board 1 Remove the system board access panel See Accessing the printer system board 2 Open the system board door 3 Locate the card connector on the system board 4 Remove the screws and the cover plate and save them 5 Unpack the card Save the packaging materials ...

Page 33: ...the connection points on the card with the connector on the system board and push the card firmly into the system board connector 7 Insert the screws saved from the cover plate or the extra screws shipped with the card 8 Tighten the screws to secure the card ...

Page 34: ...cessing the printer system board 2 Remove the mounting plate hard disk ribbon cable and attachment screws from the package 3 Align the ribbon cable connector with the connector pins on the hard disk 4 Attach the ribbon cable to the hard disk 5 Align the screw holes on the mounting plate with the holes in the hard disk 6 Secure the mounting plate to the hard disk with the screws Ribbon cable Hard d...

Page 35: ...ard disk 33 Installing options 7 Press the ribbon cable connector into the connector on the system board 8 Press the three posts on the mounting plate into the holes on the system board The hard disk snaps into place ...

Page 36: ... system board follow these steps to reattach the access panel 1 Align the tabs on the right side of the access panel with the slots on the printer 2 Slide the panel to the right and towards the printer 3 Tighten the screws 4 Plug the printer power cord back into a properly grounded electrical outlet and turn on the printer ...

Page 37: ...t trays and bins Print media sizes Media sizes supported in the finisher Feed characteristics by print media size Print media types Print media weights Media weights supported in the finisher Note If you use a print media size not listed select the next larger size Print media sizes indicates support 500 sheet trays standard and option Multipurpose feeder 2000 sheet dual input trays option 2000 sh...

Page 38: ... Envelope 162 x 229 mm 6 38 x 9 01 in Other Envelope 98 4 x 89 0 mm to 297 0 x 431 8 mm 3 9 x 3 5 in to 11 7 x 17 0 in Print media sizes continued indicates support 500 sheet trays standard and option Multipurpose feeder 2000 sheet dual input trays option 2000 sheet high capacity feeder option Duplex unit option 500 sheet standard output bin 300 sheet second exit output bin 3 Print media size Dime...

Page 39: ... in the finisher Size Bin 1 Bin 2 Standard Offset Staple Punch Standard Offset Staple Punch A3 A4 A5 JIS B4 JIS B5 Letter Legal Executive Folio Statement Tabloid Universal 7 Envelope 10 Envelope DL Envelope C5 Envelope Other Envelope Paper passes to the finisher bin without being stapled or offset ...

Page 40: ...t Portrait Short edge Tabloid Portrait Short edge Universal Portrait3 Short edge 7 Envelope Landscape Long edge 10 Envelope Landscape Long edge DL Envelope Landscape Long edge C5 Envelope Landscape Long edge Other Envelope Portrait Short edge 1 Feed orientation indicates how the printer will place the image on the page not whether the physical page will be short edge or long edge oriented 2 Short ...

Page 41: ...nt media 500 sheet trays Multipurpose feeder 2000 sheet dual input trays 2000 sheet high capacity feeder Duplex unit Standard output bin Second exit output bin Finisher Standard Offset Stapled Hole Punch Paper Card stock Transparencies Paper labels Bond Envelope Letterhead Preprinted Colored paper ...

Page 42: ...ver 176 g m2 65 lb 135 g m2 50 lb Card stock maximum grain short 1 Index Bristol 199 g m2 110 lb 163 g m2 90 lb Tag 203 g m2 125 lb 163 g m2 100 lb Cover 216 g m2 80 lb 176 g m2 65 lb Transparencies Laser printer 138 to 146 g m2 37 to 39 lb bond 138 to 146 g m2 37 to 39 lb bond Labels Paper 180 g m2 48 lb bond 163 g m2 43 lb bond Integrated forms Pressure sensitive area must enter the printer firs...

Page 43: ...bond Card stock maximum grain long Index Bristol 163 g m2 90 lb bond Not recommended Tag 163 g m2 100 lb bond Cover 176 g m2 65 lb bond Card stock maximum grain short Index Bristol 199 g m2 110 lb bond Not recommended Tag 203 g m2 125 lb bond Cover 216 g m2 80 lb bond Transparencies Laser printer 138 to 146 g m2 37 to 39 lb bond Not recommended Integrated forms Pressure sensitive area 140 to 175 g...

Page 44: ... the 2000 sheet high capacity feeder on page 56 Paper characteristics The following paper characteristics affect print quality and reliability It is recommended that these guidelines are followed when evaluating new paper stock Weight The printer can automatically feed paper weights from 60 to 176 g m2 16 to 47 lb bond grain long in the integrated and optional trays and paper weights from 60 to 13...

Page 45: ...are not recommended for use with the printer Chemically treated papers used to make copies without carbon paper also known as carbonless papers carbonless copy paper CCP or no carbon required NCR paper Preprinted papers with chemicals that may contaminate the printer Preprinted papers that can be affected by the temperature in the printer fuser Preprinted papers that require a registration the pre...

Page 46: ...re oxidation set or oil based should meet these requirements latex inks might not When in doubt contact the paper supplier Preprinted papers such as letterhead must be able to withstand temperatures up to 230 C 446 F without melting or releasing hazardous emissions Printing on letterhead Check with the manufacturer or vendor to determine whether the chosen preprinted letterhead is acceptable for l...

Page 47: ...ssions Transparencies can be fed automatically from the multipurpose feeder and the standard 500 sheet trays Tray 1 and Tray 2 See Print media types on page 39 for information about transparency compatibility with output bins Be careful when you handle transparencies Fingerprints on the surface of the transparency cause poor print quality Envelopes You can load up to 10 envelopes in the multipurpo...

Page 48: ...paper When printing on labels Set the Paper Type menu item to Labels in the Paper menu Set the Paper Type from the printer operator panel the printer driver or from MarkVision Professional Do not load labels together with paper or transparencies in the same source mixing media can cause feeding problems Do not use label sheets with a slick backing material Use full label sheets Partial sheets may ...

Page 49: ...heavier than 163 g m2 90 lb Be aware that preprinting perforation and creasing can significantly affect the print quality and cause media handling or jamming problems Avoid using card stock that may release hazardous emissions when heated Do not use preprinted card stock manufactured with chemicals that may contaminate the printer Preprinting introduces semi liquid and volatile components into the...

Page 50: ...mended print media Do not overload the print media sources Make sure the stack height does not exceed the maximum height indicated by the stack line on the labels in the sources Do not load wrinkled creased damp or curled print media Flex fan and straighten print media before you load it If jams do occur with print media try feeding one sheet at a time through the multipurpose feeder Do not use pr...

Page 51: ... or optional 500 sheet trays Your printer has two 500 sheet standard trays You may have also purchased an optional 2x500 sheet drawer which has two additional 500 sheet trays Print media is loaded into all the 500 sheet trays the same way Note The steps for loading the optional 2000 sheet dual input trays and the 2000 sheet high capacity feeder are different than the steps for loading a 500 sheet ...

Page 52: ...ts back and forth to loosen them then fan them Do not fold or crease the print media Straighten the edges on a level surface 5 Load print media in the tray with the print side up For information about loading Letter or A4 size media in the short edge feed position see Loading Letter or A4 size print media in the short edge feed orientation on page 58 Note Make sure the print media is below the max...

Page 53: ...Loading standard or optional 500 sheet trays 51 Printing 6 Squeeze the side guide tab and slide the guide until it lightly rests against the edge of the media 7 Insert the tray ...

Page 54: ...sparencies The multipurpose feeder accepts print media within the following dimensions Width 89 mm 3 5 in to 297 mm 11 7 in Length 98 mm 3 9 in to 432 mm 17 0 in The icons on the multipurpose feeder show you how to load the multipurpose feeder with paper how to turn an envelope for printing and how to load letterhead paper for simplex and duplex printing To load print media Note Do not add or remo...

Page 55: ...r applying excessive force on it 3 Slide the width guides to the outside of the feeder 4 Flex the sheets or envelopes back and forth to loosen them then fan them Do not fold or crease the print media Straighten the edges on a level surface 5 Load the media in the feeder Note Make sure the print media is below the max fill line Overloading may cause jams ...

Page 56: ...o the correct value for the print media you loaded a Press on the operator panel b Press until Paper Menu appears and then press c Press until Paper Size Type appears and then press d Press until MP Feeder Size Type appears and then press e Press until the appears next to the media size you loaded and then press f Press until the media type you loaded appears and then press g Press repeatedly to r...

Page 57: ...he 2000 sheet dual input drawer includes two trays an 850 sheet tray and an 1150 sheet tray Although the trays are different in appearance they both load the same way 1 Pull out the tray 2 Squeeze the front guide tab and slide the guide to the correct position for the size media you are loading ...

Page 58: ...s on a level surface 4 Load print media in the tray with the print side up Note Make sure the print media is below the max fill line on the rear guide Overloading may cause jams 5 Insert the tray into the printer Loading the 2000 sheet high capacity feeder The high capacity feeder can hold 2000 sheets of Letter A4 Executive and JIS B5 paper 75 g m2 20 lb 1 Pull out the tray ...

Page 59: ... back and forth to loosen them then fan them Do not fold or crease the print media Straighten the edges on a level surface 4 Load print media in the tray with the print side down Place pre punched paper with the holes toward the left side of the tray Place letterhead or the top of the page toward the front of the tray 5 Insert the tray into the high capacity feeder ...

Page 60: ... release or until Exit Config Menu appears and then press Activating Menu Changes appears briefly followed by Performing Self Test The printer returns to Ready Setting up trays with different orientations We recommend that you use the custom type settings to differentiate print media of the same size with different orientations For example if you want to have letter size paper loaded into both sta...

Page 61: ...eds print media from the next linked tray tray 4 By linking all five trays you effectively create a single source with a capacity of 4 000 sheets If you load the same size print media in each tray make sure the print media is all the same type in order to link the trays To set the paper type or size 1 Press on the operator panel 2 Press until Paper Menu appears and then press 3 Press until Paper S...

Page 62: ...to configure your output bins see the Menus and Messages Guide Note The bin sequence for linking always starts with the standard bin and proceeds from the bin nearest to the floor to the bin farthest from the floor To link output bins 1 Press on the operator panel 2 Press until Paper Menu appears and then press Output bin Each bin accommodates Illustration of output bin Standard bin 500 sheets 75 ...

Page 63: ... may need to click Properties or Setup from the initial Print box to see all of the available printer settings you can change If you are not familiar with a feature in the printer driver window open the online Help for more information To support all the printer features use the custom printer drivers supplied with your printer You can also use the system drivers built into your operating system T...

Page 64: ...ities are not supported USB devices must use the FAT file system Devices formatted with NTFS or any other file system are not supported You cannot print encrypted files or files without printing permissions To print from a USB flash memory device 1 Make sure the printer is on and Ready or Busy appears 2 Insert a USB flash memory device into the USB Direct interface Note If you insert the memory de...

Page 65: ... job from a Macintosh computer running Mac OS X Canceling a job from the printer operator panel Note For more information about the operator panel see Understanding the printer operator panel on page 9 If the job you want to cancel is printing and Busy appears on the display press until Cancel a job appears and then press The message Canceling Job appears until the job is canceled Canceling a job ...

Page 66: ...ou want to cancel 4 Press Delete Printing the menu settings page You can print a menu settings page to review the default printer settings and to verify printer options are installed correctly 1 Make sure the printer is on and Ready 2 Press on the operator panel 3 Press until Reports appears and then press 4 Press until Menu Settings Page appears and then press Printing Menus Settings appears on t...

Page 67: ...a job to the printer you can specify in the driver that you want the printer to hold the job in memory Once your job is stored in printer memory go to the printer and use the printer operator panel to specify what you want to do with your print job All confidential and held jobs have a user name associated with them To access confidential or held jobs you must first select the type of job confiden...

Page 68: ...lect File Æ Print 2 In the Copies Pages or General pop up menu select Job Routing a When using Mac OS 9 if Job Routing is not a choice on the pop up menu select Plug in Preferences Æ Print Time Filters b Turn down the disclosure triangle to the left of Print Time Filters and select Job Routing c In the pop up menu select Job Routing 3 In the radio group select Confidential Print 4 Enter a User Nam...

Page 69: ...nt job the printer prints one copy and holds the remaining copies you requested in printer memory Use Verify Print to examine the first copy to see if it is satisfactory before printing the remaining copies Once all copies are printed the Verify Print job is automatically deleted from printer memory Reserve Print If you send a Reserve Print job the printer does not print the job immediately It sto...

Page 70: ... Job Routing is not a choice on the pop up menu select Plug in Preferences Æ Print Time Filters b Turn down the disclosure triangle to the left of Print Time Filters and select Job Routing c In the pop up menu select Job Routing 3 In the radio group select the type of held job you want enter a user name and then send your job to the printer Go to the printer when you are ready to retrieve your con...

Page 71: ...ears on the first line of the display 4 Press until Size Sensing appears and then press Tray 1 Sensing appears on the second line of the display 5 Press and release or to select the input option that has A5 Statement or JIS B5 Executive loaded and then press The first line of the display shows the selected input option and the second line shows the current setting 6 Press or to change the setting ...

Page 72: ...Do not expose supplies to Direct sunlight Temperatures above 35 C 95 F High humidity above 80 Salty air Corrosive gases Heavy dust Determining the status of supplies The printer operator panel alerts you once a supply item or maintenance is required You can also view the status of supplies in your printer on the operator panel unless the printer is printing or in a busy state The header or gray ar...

Page 73: ...satisfactorily For information about the toner cartridges available for your printer contact the place where you bought the printer Ordering a photoconductor kit When the 84 PC Life Warning message appears you should order a new photoconductor kit You can print a few hundred pages after the 84 PC Life Warning message appears To order a photoconductor kit contact the place where you bought the prin...

Page 74: ...staples To order this item contact the place where you bought the printer for more information When Staples Low or Staples Empty appears on the operator panel display insert a new staple cartridge in the finisher See the illustrations inside the stapler access door for more information If Staple Alarm is set to Single the printer stops printing and the Load Staples message appears Install a new st...

Page 75: ...ath and then press to clear the message and resume printing The printer prints a new copy of the page that jammed if Jam Recovery is set to On or Auto however the Auto setting does not guarantee the page will print Identifying jams When the printer jams the appropriate jam message appears on the printer operator panel If you select Show Areas on the operator panel you can view one or more images t...

Page 76: ...Access doors and trays 74 Clearing jams Access doors and trays The following illustrations show the areas where jams may occur E A B D C Trays 1 4 F G H K J ...

Page 77: ...nd restack the media and place it into the multipurpose feeder 3 Load the print media 4 Slide the side guide toward the inside of the tray until it lightly rests against the edge of the media 5 Press Message What to do 200 201 and 202 Paper Jam Check Door A Open the side door and remove the jam 203 Paper Jam Check Areas A E Open the side door and the Exit 2 door and remove the jam 230 Paper Jam Ch...

Page 78: ...eas can occur on the incline surface of a tray or across more than one tray To clear these areas 1 Open the tray If necessary remove the tray from the printer 2 Remove the media from the printer tray slot 3 Remove any crumpled paper from the tray 4 Insert the tray into the printer 5 Press ...

Page 79: ...s 77 Clearing jams Clearing the 2000 sheet high capacity feeder Tray 5 1 If necessary close the multipurpose feeder 2 Slide the high capacity feeder away from the printer 3 Raise the top door and lift the jam access cover ...

Page 80: ...Clearing printer jams 78 Clearing jams 4 Remove the jammed paper 5 Close the jam access cover and top door ...

Page 81: ... 79 Clearing jams 6 Slide the feeder firmly against the printer 7 Press 200 201 and 202 Paper Jam Check Door A 1 Open Door A by pushing the release latch and lowering the door CAUTION The inside of the printer might be hot ...

Page 82: ...e immediately when you pull stop pulling Push down and pull the green lever to make it easier to remove the media Make sure all paper fragments are removed 3 Close Door A 4 Press 203 Paper Jam Check Areas A E 1 Open Door A by pushing the release latch and lowering the door CAUTION The inside of the printer might be hot ...

Page 83: ...Clearing printer jams 81 Clearing jams 2 Open Door E by pushing the release latch and lowering the door 3 Pull the print media up 4 Close Door E 5 Close Door A 6 Press ...

Page 84: ...ring jams 230 Paper Jam Check Door A E D 1 Open Door D by the duplex rear door 2 Remove the jammed media 3 Close Door D 4 Open Door A by pushing the release latch and lowering the door CAUTION The inside of the printer might be hot ...

Page 85: ...Clearing printer jams 83 Clearing jams 5 Open Door E by pushing the release latch and lowering the door 6 Pull the print media up 7 Close Door E 8 Close Door A 9 Press ...

Page 86: ...learing jams 231 Paper Jam Check A D 1 Open Door D by the duplex rear door 2 Remove the jammed media 3 Close Door D 4 Open Door A by pushing the release latch and lowering the door CAUTION The inside of the printer might be hot ...

Page 87: ... not move immediately when you pull stop pulling Pull the green lever to make it easier to remove the media Make sure all paper fragments are removed 6 Close Door A 7 Press Clearing Area B 1 If the printer is configured with a 2000 sheet high capacity feeder slide the feeder away from the printer ...

Page 88: ...Clearing printer jams 86 Clearing jams 2 Open Door B 3 Remove the jammed media 4 Close Door B ...

Page 89: ...Clearing printer jams 87 Clearing jams 5 Slide the feeder firmly against the printer 6 Press ...

Page 90: ...Clearing printer jams 88 Clearing jams Clearing Area C 1 If the printer is configured with a 2000 sheet high capacity feeder slide the feeder away from the printer 2 Open Door C ...

Page 91: ...Clearing printer jams 89 Clearing jams 3 Remove the jammed media 4 Close Door C 5 Slide the feeder firmly against the printer 6 Press ...

Page 92: ...aper Jam Check Finisher There are three areas associated with the finisher Follow the appropriate instructions to clear a jam in the finisher Clearing Area F 1 Lift the bridge unit assembly door 2 Remove the jammed media 3 Close the door 4 Press ...

Page 93: ...91 Clearing jams Clearing Area G 1 Open the finisher door 2 Remove the jammed media as indicated on the operator panel 3 Close the door 4 Press Clearing Area H 1 Lift Door H 2 Remove the jammed media 3 Close the door 4 Press ...

Page 94: ... in the stapler This requires removing the staple cartridge holder from the printer 1 Check that the machine stops operations and open Door G front door of the finisher 2 Hold the lever on the staple cartridge holder and move the holder to the right towards you 3 Firmly pull the colored tab to remove the staple cartridge ...

Page 95: ...Look through the clear covering on the bottom of the cartridge holder to make sure no staples are jammed in the entry throat 7 Press down on the staple guard until it snaps securely into place 8 Push the cartridge holder firmly into the stapler until the holder clicks into place 9 Close Door G Priming Stapler appears on the operator panel display Priming ensures the stapler is functioning properly...

Page 96: ...vice call from the location of the printer Checking an unresponsive printer If your printer is not responding first make sure The power cord is plugged into the printer and a properly grounded electrical outlet The electrical outlet is not turned off by any switch or breaker The printer is not plugged into any surge protectors uninterrupted power supplies or extension cords Other electrical equipm...

Page 97: ... memory devices contact the place where you bought the printer Jobs do not print The printer is not ready to receive data Make sure Ready or Power Saver appears on the display before sending a job to print Press to return the printer to the Ready state The specified output bin is full Remove the stack of paper from the output bin and then press The specified tray is empty Load paper in the tray Yo...

Page 98: ...an IEEE 1284 compliant parallel cable The printer is in Hex Trace mode If Ready Hex appears on the display you must exit Hex Trace mode before you can print your job Turn the printer off and back on to exit Hex Trace mode Tray linking does not work Tray linking is not configured properly Make sure both the size and type of media are the same in both trays Make sure the paper guides in the trays ar...

Page 99: ...s the finisher it may not be properly installed Reinstall the finisher Make sure you are using a print media size compatible with your optional output bins See Supported print media on page 35 Flash memory Make sure flash memory is securely connected to the printer system board Hard disk with adapter Make sure the hard disk is securely connected to the printer system board Infrared adapter If infr...

Page 100: ...stack to ensure the print media has been loaded properly Be sure to remove the top and bottom sheets of each ream of paper that is loaded A jam occurs Rubber feed rollers do not turn to advance print media Check the following The power cord is plugged firmly into the back of the 2000 sheet drawer The power cord is plugged into an outlet The outlet has power Consistent misfeeds or jams in the drawe...

Page 101: ...orbed moisture due to high humidity Load paper from a fresh package Store paper in its original wrapper until you load it See Storing print media on page 47 for more information The Paper Jam message remains after you remove the jammed paper You have not pressed or have not cleared the entire paper path Clear paper from the entire paper path and then press See Clearing printer jams on page 75 for ...

Page 102: ...being used Toner smears or print comes off the page If you are printing on an uneven print surface change the Paper Weight and Paper Texture settings in the Paper menu Verify the print media is within the printer specifications See Understanding paper and specialty media guidelines on page 35 for more details If the problem continues turn the printer off and contact the place you bought your print...

Page 103: ...ting is too dark Change the Toner Darkness setting in the Quality menu Change the Brightness setting in the Quality menu Change the Contrast setting in the Quality menu Note Macintosh computer users should make sure the lines per inch lpi setting is not set too high in the software application Characters have jagged or uneven edges Change the Print Resolution setting in the Quality menu to 600 dpi...

Page 104: ...t Gray background prints The Toner Darkness setting may be too dark Change the Toner Darkness setting in the Quality menu Adjust the Brightness to a darker setting Adjust the Contrast to a darker setting The photoconductor kit may be defective Replace the photoconductor kit Some of the print is cut off on the sides top or bottom of the media Move the guides in the tray to the proper positions for ...

Page 105: ...toner 1 10 8 is the default setting Select a lower number to lighten the printed output or save toner Brightness Adjusts the gray value of printed objects 6 6 0 is the default setting Contrast Adjusts the contrast of printed objects 0 5 0 is the default setting Driver option Purpose Values Enhance Fine Lines A selection to enable a print mode preferable for certain files containing fine line detai...

Page 106: ...l menus Since many people could be using the printer an administrator may choose to lock the operator panel menus to keep others from changing menu settings from the operator panel To disable the operator panel menus so that changes cannot be made to the printer default settings 1 Turn the printer off Note Disabling the operator panel menus does not prevent access to Print and Hold functionality 2...

Page 107: ...for different regions When you select a new setting from the operator panel Submitting Selection appears When the Submitting Selection message disappears an asterisk appears next to the setting to identify it as the current user default setting These settings are active until new ones are stored or the factory defaults are restored To restore the original printer factory default settings Warning A...

Page 108: ... you must turn the variable on and then select the variable To disable Power Saver 1 Turn the printer off 2 Press and hold and while turning the printer on 3 Release both buttons when Performing Self Test appears on the display The printer performs its power on sequence and then Config Menu appears on the first line of the display 4 Press until Energy Conserve appears and then press 5 Press until ...

Page 109: ...ents will be lost Continue appears 6 Press until Yes appears and then press The Encrypting Disk progress bar appears 7 When disk encryption has finished click 8 Press until Exit Config Menu appears and then press To disable disk encryption 1 Turn the printer off 2 Press and hold and while turning the printer on 3 Release both buttons when Performing Self Test appears on the display The printer per...

Page 110: ...u can connect to the Embedded Web Server more securely by connecting to the SSL port instead of the default HTTP port The SSL port connection will encrypt all Web server network communications between the PC and the printer To connect to the SSL port Open your Web browser In the address line enter the IP address of the printer you want to configure using the format https ip_address Supporting SNMP...

Page 111: ... Each host must have a public private key pair Validate Peer Certificate is enabled by default requiring each host to have a signed certificate and the authority certificate must be installed Each host must have its identifier in the Subject Alternate Name of the signed certificate Note After a device is configured for IPSec with a host IPSec is required for any IP communication to take place Usin...

Page 112: ...IP address of the printer you want to configure using the format http ip_address 2 Click Configuration 3 Under Other Settings click Network Ports 4 Click Certificate Management To enable and configure 802 1x on the Embedded Web Server after installing the required certificates 1 Open your Web browser In the address line enter the IP address of the printer you want to configure using the format htt...

Page 113: ...e enter the IP address of the printer you want to configure using the format http ip_address 2 Click Configuration 3 Under Other Settings click Security 4 Click Printer Lockout PIN Confidential Print Setup Confidential Print Setup lets you designate a maximum number of PIN entry attempts and set an expiration time for print jobs When a user exceeds a specific number of PIN entry attempts all of th...

Page 114: ...ithout warranty use of the Lexmark modified version is similarly provided without warranty See the warranty disclaimers in the referenced licenses for additional details For source code that is required to be made available with the product see the publications CD in the en OpenSource directory Electronic emission notices Federal Communications Commission FCC compliance information statement This ...

Page 115: ... the accompanying statement is applicable This equipment has undergone EMC registration as a business product It should not be used in a residential area The United Kingdom Telecommunications Act 1984 This apparatus is approved under the approval number NS G 1234 J 100003 for the indirect connections to the public telecommunications systems in the United Kingdom Noise emission levels The following...

Page 116: ... 2 and the EMC requirements of EN 55024 ETSI EN 301 489 1 and ETSI EN 301 489 3 0682 English Hereby Lexmark International Inc declares that this Short Range Device is in compliance with the essential requirements and other relevant provisions of Directive 1999 5 EC Finnish Valmistaja Lexmark International Inc vakuuttaa täten että Short Range Device tyyppinen laite on direktiivin 1999 5 EY oleellis...

Page 117: ...lményeknek és az 1999 5 EC irányelv más vonatkozó ndelkezéseinek Estonian Käesolevaga kinnitab Lexmark International Inc seadme Short Range Device vastavust direktiivi 1999 5 EÜ põhinõuetele ja nimetatud direktiivist tulenevatele teistele asjakohastele sätetele Latvian Ar šo Lexmark International Inc deklare ka Short Range Device atbilst Direktivas 1999 5 EK butiskajam prasibam un citiem ar to sai...

Page 118: ...es 45 F FCC statement 112 Finisher 7 front guide 50 55 G guidelines paper unacceptable 43 print media 42 printing letterhead 44 H held jobs confidential jobs 65 entering a PIN 65 entering user name 65 overview 65 types of 65 I Identifying printers 6 Indicator light 10 integrated forms 40 41 Internet Protocol Security 109 J jams avoiding 48 clearing 75 L labels guidelines 46 letterhead 44 guideline...

Page 119: ...0 Printing 49 problems incorrect characters print 96 job didn t print 95 job prints 96 from wrong tray 96 on wrong paper or specialty media 96 large jobs do not collate 96 operator panel 95 blank 95 displays black diamonds 95 paper feed blank pages in output bin 99 frequent jams 99 jammed page does not reprint 99 Paper Jam message remains after clearing jam 99 print time seems long 96 tray linking...

Page 120: ......

Page 121: ...Satisfied Satisfied Neutral Dissatisfied Very Dissatisfied Accurate h h h h h Complete h h h h h Easy to find h h h h h Easy to understand h h h h h Well organized h h h h h Applicable to your tasks h h h h h Please tell us how we can improve this book Thank you for your responses May we contact you h Yes h No When you send comments to IBM you grant IBM a nonexclusive right to use or distribute yo...

Page 122: ...stems Department H7FE Building 004N PO Box 1900 Boulder CO 80301 9817 _ _ _ _ _ _ _ _ _ _ _ _ _ _ _ _ _ _ _ _ _ _ _ _ _ _ _ _ _ _ _ _ _ _ _ _ _ _ _ _ _ _ _ _ _ _ _ _ _ _ _ _ _ _ _ _ _ _ _ _ _ _ _ _ _ _ _ _ _ _ _ _ _ _ _ _ _ _ _ _ _ _ _ _ _ _ _ _ _ _ _ _ _ _ _ _ _ _ _ _ _ _ _ _ _ _ _ _ _ _ _ _ _ _ _ _ _ _ _ _ _ _ _ _ _ _ _ _ _ _ _ _ _ _ _ _ _ _ _ _ _ _ _ _ _ _ _ _ _ _ _ _ _ _ _ _ _ _ _ _ _ _ _ _ _ ...

Page 123: ......

Page 124: ... Part Number 75P6998 Printed in USA S510 4133 00 1P P N 75P6998 ...

Reviews: