


48
aging enabled, a timer is started once the end-host gets secured. When the timer expires, the switch
starts looking for frames from the end-host, and if such frames are not seen within the next Aging Period,
the end-host is assumed to be disconnected, and the corresponding resources are freed on the switch.
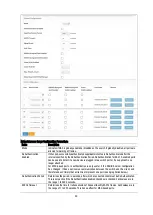
Port
Configuration
The table has one row for each port on the selected switch and a number of columns, which are:
Port: The port number to which the configuration below applies.
Mode: Controls whether Limit Control is enabled on this port. Both this and the Global Mode must be
set to Enabled for Limit Control to be in effect. Notice that other modules may still use the underlying port
security features without enabling Limit Control on a given port.
Limit: The maximum number of MAC addresses that can be secured on this port. This number
cannot exceed 1024. If the limit is exceeded, the corresponding action is taken. The switch is "born"
with a total number of MAC addresses from which all ports draw whenever a new MAC address is
seen on a Port Security-enabled port. Since all ports draw from the same pool, it may happen that a
configured maximum cannot be granted, if the remaining ports have already used all available MAC
addresses.
Action: If Limit is reached, the switch can take one of the following actions:
- None: Do not allow more than Limit MAC addresses on the port, but take no further action.
-Trap: If Limit + 1 MAC addresses is seen on the port, send an SNMP trap. If Aging is disabled,
only one SNMP trap will be sent, but with Aging enabled, new SNMP traps will be sent every time the
limit gets exceeded.
- Shutdown: If Limit + 1 MAC addresses is seen on the port, shut down the port. This implies that all
secured MAC addresses will be removed from the port, and no new address will be learned. Even if the
link is physically disconnected and reconnected on the port (by disconnecting the cable), the port will
remain shut down. There are three ways to re-open port:
1) Boot the switch,
2) Disable and re-enable Limit Control on the Port or the switch,
3) Click the reopen button.
- Trap & Shutdown: If Limit + 1 MAC addresses is seen on the port, both the "Trap" and the "Shutdown"
actions described above will be taken.
State: This column shows the current state of the port as seen from the Limit Control's point of view.
The state takes one of four values:
- Disabled: Limit Control is either globally disabled or disabled on the port.
- Ready: The limit is not yet reached. This can be shown for all actions.
- Limit Reached: Indicates that the limit is reached on this port. This state can only be shown if Action is
set to none or Trap. Shutdown: indicates that the port is shut down by the Limit Control module. This state
can only be shown if Action is set to Shutdown or Trap & Shutdown.
Re-open
Button
If a port is shut down by this module, you may reopen it by clicking this button, which will only be
enabled if this is the case. For other methods, refer to shut down in the Action section.
NOTE: that clicking the reopen button causes the page to refresh, so non-committed changes will be lost.
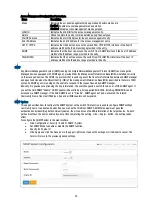
Network Access Server (NAS)
This section describes how to configure the NAS parameters of the switch. The NAS server can be employed to connect
users to a variety of resources including Internet access, conference calls, and, printing documents on shared printers.
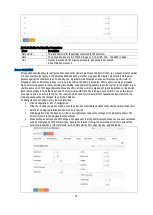
To configure a Network Access Server in the web interface:
Click Configuration / Security / Network / Limit Control.
Select “Enabled” in the Mode of Network Access server configuration.
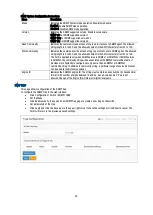
Check Re Authentication Enabled
Set Re Authentication Period (Default is 3600 seconds)
Set EAPOL Timeout (default is 30 Seconds).
Set Aging Period (Default is 300 seconds).
Set Hold Time (Default is 10 seconds).
Checked RADIUS-Assigned QoS Enabled.
Checked RADIUS-Assigned VLAN Enabled.
Checked Guest VLAN Enabled.
Specify Max. Re Authenticated. Count.
Checked Allow Guest VLAN if EAPOL Seen.
Click Apply and click the Save icon in the upper right corner to save the settings or click Reset to cancel. The
Form will return to the previously saved settings.


