background image

2-19

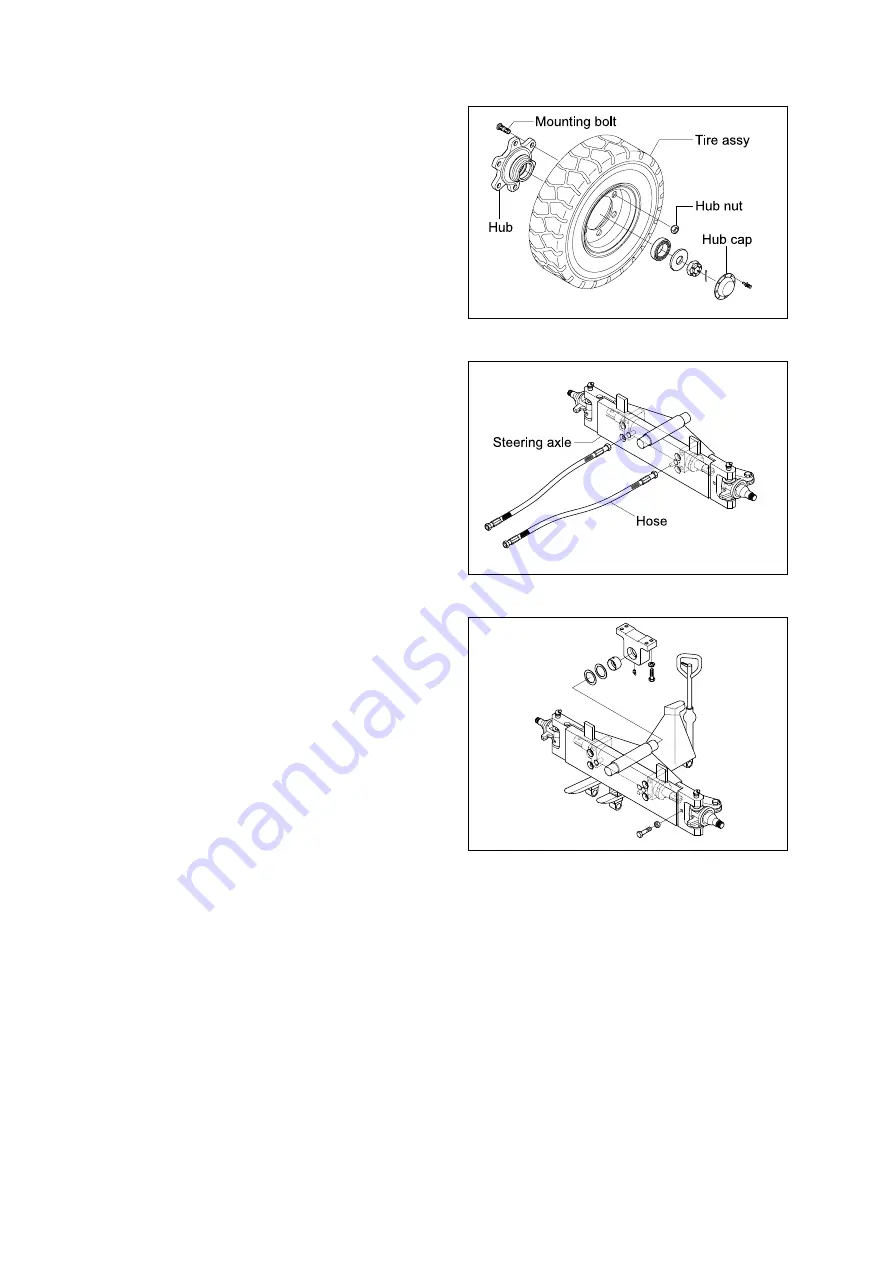
Rear wheel
Remove mounting bolt and hub nut with
socket wrench and then carefully take out
the tire assembly.

(2)

D503RE31

Hose

(3)

D503RE32

Mounting bolt

Put a block under the steering axle,
support on a truck, an raise the frame with
a crane.  Remove the mounting bolts
installing to the frame, and pull out to the
rear.
There are shims between the support and
steering axle to prevent play.

(4)

D503RE33

https://www.forkliftpdfmanuals.com/

Summary of Contents for HDF 50-7S

Page 1: ...uickly access each section of the manual Click on the Bookmarks tab located on the left and click on the plus sign to expand the desired section Alternatively click on the minus sign to contract a section Once a section is expanded you may click on a Section or Group to go directly to that page Another method of quickly accessing each page in the manual is going to the Table of Contents and clicki...

Page 2: ...https www forkliftpdfmanuals com ...

Page 3: ...RAIN SYSTEM This section explains the structure of the transmission as well as control valve and drive axle SECTION 4 BRAKE SYSTEM This section explains the brake piping each component and operation SECTION 5 STEERING SYSTEM This section explains the structure of the steering unit priority valve trail axle as well as steering circuit and operation SECTION 6 HYDRAULIC SYSTEM This section explains t...

Page 4: ...art any work Filing method See the page number on the bottom of the page File the pages in correct order Following examples shows how to read the page number Example 1 2 3 Item number 2 Structure and Function Consecutive page number for each item Additional pages Additional pages are indicated by a hyphen and number after the page number File as in the example 1 2 3 Symbol Item Remarks Special saf...

Page 5: ...the left to convert it to 55mm Carry out the same procedure as above to convert 55mm to 2 165 inches The original value 550mm was divided by 10 so multiply 2 165 inches by 10 Move the decimal point one place to the right to return to the original value This gives 550mm 21 65 inches 1 2 1 2 3 1 2 3 Millimeters to inches 1mm 0 03937 in 0 1 2 3 4 5 6 7 8 9 0 0 039 0 079 0 118 0 157 0 197 0 236 0 276 ...

Page 6: ...4 90 3 543 3 583 3 622 3 661 3 701 3 740 3 780 3 819 3 858 3 898 Kilogram to Pound 1kg 2 2046lb 0 1 2 3 4 5 6 7 8 9 0 2 20 4 41 6 61 8 82 11 02 13 23 15 43 17 64 19 84 10 22 05 24 25 26 46 28 66 30 86 33 07 35 27 37 48 39 68 41 89 20 44 09 46 30 48 50 50 71 51 91 55 12 57 32 59 5 61 73 63 93 30 66 14 68 34 70 55 72 75 74 96 77 16 79 37 81 57 83 78 85 98 40 88 18 90 39 92 59 94 80 97 00 99 21 101 4...

Page 7: ...983 23 247 23 511 90 23 775 24 040 24 304 24 568 24 832 25 096 25 631 25 625 25 889 26 153 Liter to U K Gallon 1 0 21997 U K Gal 0 1 2 3 4 5 6 7 8 9 0 0 220 0 440 0 660 0 880 1 100 1 320 1 540 1 760 1 980 10 2 200 2 420 2 640 2 860 3 080 3 300 3 520 3 740 3 950 4 179 20 4 399 4 619 4 839 5 059 5 279 5 499 5 719 5 939 6 159 6 379 30 6 599 6 819 7 039 7 259 7 479 7 969 7 919 8 139 8 359 8 579 40 8 7...

Page 8: ...3 7 90 651 0 658 2 665 4 672 7 679 9 687 1 694 4 701 6 708 8 716 1 100 723 3 730 5 737 8 745 0 752 2 759 5 766 7 773 9 781 2 788 4 110 795 6 802 9 810 1 817 3 824 6 831 8 839 0 846 3 853 5 860 7 120 868 0 875 2 882 4 889 7 896 9 904 1 911 4 918 6 925 8 933 1 130 940 3 947 5 954 8 962 0 969 2 976 5 983 7 990 9 998 2 10005 4 140 1012 6 1019 9 1027 1 1034 3 1041 5 1048 8 1056 0 1063 2 1070 5 1077 7 1...

Page 9: ...2 1266 90 1280 1294 1309 1323 1337 1351 1365 1380 1394 1408 100 1422 1437 1451 1465 1479 1493 1508 1522 1536 1550 110 1565 1579 1593 1607 1621 1636 1650 1664 1678 1693 120 1707 1721 1735 1749 1764 1778 1792 1806 1821 1835 130 1849 2863 1877 1892 1906 1920 1934 1949 1963 1977 140 1991 2005 2020 2034 2048 2062 2077 2091 2105 2119 150 2134 2148 2162 2176 2190 2205 2219 2233 2247 2262 160 2276 2290 23...

Page 10: ...1 15 5 0 6 7 20 68 0 12 8 55 131 0 32 2 90 194 0 25 6 14 6 8 6 1 21 69 8 13 3 56 132 8 32 8 91 195 8 25 0 13 8 6 5 6 22 71 6 13 9 57 134 6 33 3 92 197 6 24 4 12 10 4 5 0 23 73 4 14 4 58 136 4 33 9 93 199 4 23 9 11 12 2 4 4 24 75 2 15 0 59 138 2 34 4 94 201 2 23 3 10 14 0 3 9 25 77 0 15 6 60 140 0 35 0 95 203 0 22 8 9 15 8 3 3 26 78 8 16 1 61 141 8 35 6 96 204 8 22 2 8 17 6 2 8 27 80 6 16 7 62 143 ...

Page 11: ... and function 4 1 Group 2 Operational checks and troubleshooting 4 11 Group 3 Tests and adjustments 4 14 SECTION 5 STEERING SYSTEM Group 1 Structure and function 5 1 Group 2 Operational checks and troubleshooting 5 11 Group 3 Disassembly and assembly 5 13 SECTION 6 HYDRAULIC SYSTEM Group 1 Structure and function 6 1 Group 2 Operational checks and troubleshooting 6 15 Group 3 Disassembly and assemb...

Page 12: ...SECTION 8 MAST Group 1 Structure 8 1 Group 2 Operational checks and troubleshooting 8 5 Group 3 Adjustment 8 8 Group 4 Removal and installation 8 10 https www forkliftpdfmanuals com ...

Page 13: ... and function 4 1 Group 2 Operational checks and troubleshooting 4 16 Group 3 Tests and adjustments 4 19 SECTION 5 STEERING SYSTEM Group 1 Structure and function 5 1 Group 2 Operational checks and troubleshooting 5 11 Group 3 Disassembly and assembly 5 13 SECTION 6 HYDRAULIC SYSTEM Group 1 Structure and function 6 1 Group 2 Operational checks and troubleshooting 6 15 Group 3 Disassembly and assemb...

Page 14: ...SECTION 8 MAST Group 1 Structure 8 1 Group 2 Operational checks and troubleshooting 8 5 Group 3 Adjustment 8 8 Group 4 Removal and installation 8 10 https www forkliftpdfmanuals com ...

Page 15: ...SECTION 1 GENERAL Group 1 Safety hints 1 1 Group 2 Specifications 1 5 Group 3 Periodic replacement 1 13 https www forkliftpdfmanuals com ...

Page 16: ...t Wear well fitting helmet safety shoes and working clothes When drilling grinding or hammering always wear protective goggles Always do up safety clothes properly so that they do not catch on protruding parts of machines Do not wear oily clothes When checking always release battery plug Flames should never be used instead of lamps Never use a naked flame to check leaks or the level of oil or elec...

Page 17: ... a caution sign in the operator s compartment For example Do not start or Maintenance in progress This will prevent anyone from starting or moving the machine by mistake It is extremely dangerous to try to check the fan belt tension while he engine is running When inspecting the engine is running parts or near such parts always stop the engine first Before checking or servicing accumulator or pipi...

Page 18: ...l instructions to the contrary maintenance should always be carried out with the engine stopped If maintenance is carried out with the engine running there must be two men present one sitting in the operator s seat and the other one performing the maintenance In such a case never touch any moving part Always remember that the hydraulic oil circuit is under pressure When feeding or draining the oil...

Page 19: ...ive metal particles or other foreign materials When removing parts containing O ring gaskets or seals clean the mounting surface and replace with new sealing parts After injecting grease always wipe off the oil grease that was forced out Do not handle electrical equipment while wearing wet places as this can cause electric shock During maintenance do not allow any unauthorized person to stand near...

Page 20: ...MAJOR COMPONENTS 1 Mast 2 Lift chain 3 Lift cylinder 4 Backrest 5 Tilt cylinder 6 Carrige 7 Forks 8 Overhead guard 9 Turn signal lamp 10 Head lamp 11 Operator s seat 12 Bonnet 13 Counterweight 14 Rear wheel 15 Front wheel 16 Rear combination lamp https www forkliftpdfmanuals com ...

Page 21: ...oad center Weight Unloaded Model Unit HDF 50 7S HDF 70 7S Lifting height Free lift Lifting speed Unload Load Lowering speed Unload Load L W T Tilt angle forward backward Max height Min height Travel speed Gradeability Min turning radius Outside 5000 600 8347 3000 140 500 470 450 500 1200 150 60 15 10 4275 2515 33 1 27 9 53 3290 7000 9680 500 450 1200 180 60 32 6 22 2 40 9 3370 Fork Mast Body G H I...

Page 22: ...on UNIT mm in cc cu in ps rpm kgf m rpm U S gal kg lb rpm rpm g ps hr V kW V A V AH mm in SPECIFICATION MITSUBISHI S6S DT 4 cycle in line Vertical OHV Water cooling 6 cylinders in line 1 5 3 6 2 4 In direct injection 94 120 3 7 4 7 4996 305 19 5 88 2200 34 8 1400 17 5 4 6 350 772 2400 50 875 50 180 24 5 0 24 50 12 80 2 10 12 0 4 0 5 ITEM Type Capacity Maximum operating pressure Rated speed Max Min...

Page 23: ...SACH 3 Element 1 stage 2 phase 2 5 1 Full auto Power shift 3 3 Electrical single lever type 1 4 578 2 2 396 3 0 994 1 4 593 2 2 404 3 0 996 Front wheel drive type fixed location Hypoid gear type Double 4 2 8 25 15 14 PR 8 25 15 14 PR Front wheel Duo servo Ratchet internal expanding mechanical type Full hydraulic power steering 75 87 to both right and left angle respectively Travel Parking Type Ste...

Page 24: ...ting bolt nut Front wheel mounting nut Rear wheel mounting nut Counterweight mounting bolt Operator s seat mounting nut Head guard mounting bolt M16 2 0 M10 1 5 M10 1 5 M12 1 75 M10 1 5 M16 2 0 M24 3 0 M18 2 5 M22 1 5 M22 1 5 M30 3 5 M 8 1 25 M12 1 75 7 5 6 9 1 4 6 9 1 4 12 8 3 0 6 9 1 4 7 5 100 15 41 3 6 2 61 2 9 2 61 2 9 2 120 15 2 5 0 5 12 8 3 0 54 50 10 50 10 93 22 50 10 54 723 108 300 45 448 ...

Page 25: ...44 356 482 476 709 615 832 1223 1656 1808 2242 8T 10T Fine thread Bolt size M 8 1 0 M10 1 2 M12 1 25 M14 1 5 M16 1 5 M18 1 5 M20 1 5 M22 1 5 M24 2 0 M30 2 0 M36 3 0 kgf m 2 2 3 4 4 5 6 7 7 8 11 6 13 3 18 1 19 9 26 9 28 6 43 6 40 0 54 0 52 7 71 3 67 9 91 9 137 185 192 260 lbf ft 15 9 24 6 32 5 48 5 56 4 83 9 96 2 131 144 195 207 315 289 391 381 516 491 665 990 1339 1390 1880 kgf m 3 0 4 4 5 9 8 9 1...

Page 26: ...ND HOSE ORFS TYPE 2 3 FITTING 4 Thread size UNF 9 16 18 11 16 16 13 16 16 1 3 16 12 1 7 16 12 1 11 16 12 Width across flat mm 19 22 27 36 41 50 kgfÂm 4 5 9 5 18 21 35 lbfÂft 28 9 36 2 68 7 130 2 151 9 253 2 Thread size PF 1 4 3 8 1 2 3 4 1 1 1 4 Width across flat mm 19 22 27 36 41 50 kgfÂm 4 5 9 5 18 21 35 lbfÂft 28 9 36 2 68 7 130 2 151 9 253 2 https www forkliftpdfmanuals com ...

Page 27: ... point Kind of fluid Ambient temperature C F Engine oil pan Torque converter transmission Axle Hydraulic tank Fuel tank Fitting Greasenipple Brake reservoir tank Radiator Engine oil Hydraulic oil Diesel fuel Hyd oil Grease Antifreeze Water 50 50 17 5 4 6 20 4 5 0 7 0 ton 10 14 0 32 10 50 20 68 30 86 40 104 T M oil 1 Engine oil 2 Gear oil 22 5 7 1 25 6 4 2 12 5 3 3 105 27 7 150 39 6 17 4 5 SAE 30 S...

Page 28: ...ew parts within the prescribed period of replacement Or earlier if trouble is found Note that periodic replacement has nothing to do with guarantee service Description Period of replacement Master cylinder and wheel cylinder caps dust seals Brake hose or tube Brake reservoir tank and tube Power steering hose Stop lamp switch Oil pressure type Fuel hose Rubber parts of power steering Lift chain Hos...

Page 29: ...SECTION 2 REMOVAL INSTALLATION OF UNIT Group 1 Structure 2 1 Group 2 Removal and installation of unit 2 2 https www forkliftpdfmanuals com ...

Page 30: ...Fork 6 Front wheel 7 Drive axle 8 Propeller shaft 9 Hydraulic pump 10 Priority valve 11 Transmission 12 Torque converter 13 Engine 14 Exhaust pipe 15 Steering axle 16 Steering cylinder 17 Rear wheel 18 Radiator 19 Muffler 20 Silencer 21 Air cleaner 22 Overhead guard 23 Seat 24 Steering wheel 25 Control lever 26 Steering unit https www forkliftpdfmanuals com ...

Page 31: ...ainer Hanger bar Bolt D507MS07 HOOK ON TYPE FORKS OPTION Lower the fork carriage until the forks are approximately 25mm 1in from the floor Release fork anchor pins and slide one fork at a time toward the center of the carriage where a notch has been cut in the bottom plate for easy fork removal Remove only one fork at a time On larger forks it may be necessry to use a block of wood 2 Backrest Anch...

Page 32: ...arriage all the way down to the floor Make sure the carriage is level this will prevent any binding when the mast is raised 4 D503MS16 While supporting lift chains remove the split pin and slide out chain anchor pins from the chain anchors of stationary upright D503MS17 Pull the chains out of the sheaves and drape them over the front of the carriage D503MS18 https www forkliftpdfmanuals com ...

Page 33: ...ised Inspect all parts for wear or damage Replace all worn or damaged parts D503MS19 PIPING Remove the bulk hoses and clamps attached to the cylinder Remove the return hose from the down control valve Put blind plugs in the piping immediately after removing hoses This prevents the hydraulic oil from flowing out and also prevents dust and dirt from getting in 5 D503MS20 https www forkliftpdfmanuals...

Page 34: ... Loosen and remove hexagon bolts and nuts securing lift cylinders to outer mast Using an overhead hoist slowly raise the inner mast high enough to clear lift cylinder Using an overhead hoist draw out lift cylinder carefully and put down on the work floor 6 D503MS21 INNER MAST Using an overhead hoist raise the inner mast straight and carefully draw out of outer mast section Be careful the mast not ...

Page 35: ...outer mast and raise it Remove the mounting bolts and pins from drive axle then slowly raise outer mast This operation is carried out under the machine so use a pit or if there is no pit jack up the machine and loosen with an impact wrench 8 9 D503MS23 https www forkliftpdfmanuals com ...

Page 36: ... is to RIGHT install adjustment shim to RIGHT cylinder Shim thickness 1 0mm 0 04in INSTALLATION After assembling mast components tatally without piping connections install mast assembly to the equipment Installation procedure for each of mast component is the reverse of the removal procedure MAST SUPPORT PIN Check the mast support pins for wear then install pins into the mast support bracket and d...

Page 37: ...2 8 Mast Refer to section on mast Page 2 3 1 2 POWER TRAIN ASSEMBLY REMOVAL 1 D503RE04 https www forkliftpdfmanuals com ...

Page 38: ...eel brake assembly 3 Drive axle Parking brake cable Parking brake lever Wheel brake LH Wheel brake RH D507RE05 D507RE06 Drive axle Attach a crane to the tilt cylinder notches on the dashboard and raise the machine Loosen hexagonal bolts connection drive axle to the transmission Put the block under the front axle and support under the drive axle with a truck 4 D503RE07 https www forkliftpdfmanuals ...

Page 39: ...ening the mounting bolts D503RE81 Remove drive axle mount bolts from the frame and then slowly pull out the truck with drive axle to the front D503RE08 Inching linkage Remove the nut clevis pins and self locking pin 5 D507RE09 https www forkliftpdfmanuals com ...

Page 40: ...led on the engine flywheel To rotate the flywheel remove 1 mounting bolt then insert a turning tool in the mounting hole One man must turn the engine fan by hand while the other turns the flywheel 7 D503RE12 Mounting bolts holding to flywheel housing Remove the transmission assembly from the torque converter housing by loosen ing the mounting bolts Remove torque converter housing from the engine f...

Page 41: ... Installation is the reverse order to removal but be careful of the following points Tightening torque of mounting bolt for torque converter housing 4 2 5 0kgf m 30 36lbf ft 1 2 Tightening torque of mounting bolt for drive axle 120kgf m 868lbf ft 2 D503RE16 D503RE14 https www forkliftpdfmanuals com ...

Page 42: ...2 13 Tightening torque of mounting bolt for transmission and propeller shaft 7 2 9 5kgf m 52 69lbf ft 3 D503RE15 https www forkliftpdfmanuals com ...

Page 43: ...he frame then remove the engine assembly REMOVAL Overhead guard Remove the wiring for rear combination lamp working lamp head lamp and flasher lamp on the stay of the overhead guard and then raise it together with the bonnet 1 1 D503RE25 D507RE17 https www forkliftpdfmanuals com ...

Page 44: ...Attach a crane to the engine hook and raise then remove mounting bolts Raise the engine slightly slide towards the radiator then lift up When sliding the engine be careful of the collision engine and radiator 5 INSTALLATION Installation is the reverse order of removal but be careful of the following points Tighten the engine mounting bolts and nuts Tighten the engine mounting bracket bolts Do not ...

Page 45: ...4lbf ft 3 Radiator hoses Distance to insert hose 42mm 1 65in Air cleaner hose Insert the air cleaner hose securely and fit a clamp Distance to insert hose Air cleaner hose 89mm 3 5in Engine end MHI 60mm 2 36in Engine end HMC 64mm 2 5in 4 5 ENGINE 9010 9280 D507RE21 https www forkliftpdfmanuals com ...

Page 46: ... raise the front wheels off the ground then remove the front wheels 1 1 D507RE22 Brake drum assembly 2 D503RE23 D503RE34 INSTALLATION Installation is in the reverse order to removal but be careful of the following points Tightening torque of hub nut for front wheel 61 2kgf m 443lbf ft 2 1 https www forkliftpdfmanuals com ...

Page 47: ...eight with hoist bars and raise it with a crane Remove the mounting bolts raise slightly and move it slowly to rear side Weight of counterweight standard HDF50 7S 1 900kg 4 189lb HDF70 7S 3 150kg 6 945lb 1 1 D507RE30 D503RE35 https www forkliftpdfmanuals com ...

Page 48: ...2 D503RE31 Hose 3 D503RE32 Mounting bolt Put a block under the steering axle support on a truck an raise the frame with a crane Remove the mounting bolts installing to the frame and pull out to the rear There are shims between the support and steering axle to prevent play 4 D503RE33 https www forkliftpdfmanuals com ...

Page 49: ...Engine power is transmitted to the transmission through the torque converter The transmission is a hydraulically engaged three speed forward three speed reverse power shift type transmission The transmission outputs through universal joints to drive axle assembly The power transmitted to front axle drives front wheels 1 POWER TRAIN COMPONENT OVERVIEW https www forkliftpdfmanuals com ...

Page 50: ...D 56 F 60 P1 E 55 B 53 Back pressure valve K 65 9 bar By pass valve 5 5 bar D507PT31 Speed KV K1 KV K2 KV K3 KR K1 KR K2 KR K3 Clutch engaged Y1 Y2 Y3 Y4 Y5 Y6 NFS Follow on slide D Vibration damper B Orifice P1 Not used P2 Proportional valve KR P3 Proportional valve K1 P4 Proportional valve K3 P5 Proportional valve KV P6 Proportional valve K2 Y1 Y6 Pressure regulators 60 55 56 58 53 57 F E D C B ...

Page 51: ... The oil escaping out of the pump wheel enters the turbine wheel and is there inversed in the direction of flow According to the rate of inversion the turbine wheel and with it also the output shaft receive a more or less high reaction moment The stator Reaction member following the turbine has the task to inverse again the oil which is escaping out of the turbine and to delivery it under the suit...

Page 52: ... engine nT n engine nT 0 Machine stopped Function of a hydrodynamic torque converter Schematic view If the turbine speed is reaching about 80 of the pump speed the conversion becomes 1 0 i e the turbine moment becomes equal to that of the pump moment From this point on the converter is working similar to a fluid clutch A stator freewheel serves to improve the efficiency in the upper driving range ...

Page 53: ...ON LAYOUT 1 1 Engine connection 2 Converter 3 Input shaft 4 Transmission pump 5 Input gear 6 Clutch shaft 7 Power take off 8 Clutch shaft KV 9 Clutch shaft KR 10 Clutch shaft K1 11 Output flange 12 Clutch shaft K3 output https www forkliftpdfmanuals com ...

Page 54: ... oil dipstick 8 Gearbox housing Rear section 9 Transmission suspension holes M20 10 Attachment possibility oil level tube with oil dipstick 11 Oil drain plug M38 1 5 12 Power take off 13 Breather 14 Electro hydraulic control 15 Temperature sensor behind the converter 16 Connection to the oil cooler 17 Filter head 18 Connection from the oil cooler 19 Exchange filter 20 Transmission suspension holes...

Page 55: ...mpressed by a piston movable in axial direction which is pressurized by pressure oil A compression spring takes over the pushing bask of the piston thus the release of the plate pack As to the layout of the transmission as well as the specifications of the closed clutches in the single speeds 3 1 KV AN KR K2 K1 K3 AB AN PTO KV KR K1 K3 AB K2 AN Input KV Clutch forward KR Clutch reverse K1 Clutch 1...

Page 56: ...n KV KR K2 K1 K3 AB AN PTO KV AN KR K2 K1 K3 AB AN KV KR K2 K1 K3 AB KV AN KR K2 K1 K3 AB Opinion direction of rotation Transmission diagram 1st speed forward 2nd speed forward 3rd speed forward AN Input KV Clutch forward KR Clutch reverse K1 Clutch 1st speed K2 Clutch 2nd speed PTO Power take off Legend K3 AB Clutch 3rd speed output D503PT33 2 https www forkliftpdfmanuals com ...

Page 57: ... KR K2 K1 K3 AB AN PTO KV AN KR K2 K1 K3 AB AN KV KR K2 K1 K3 AB KV AN K2 K1 Opinion direction of rotation Transmission diagram 1st speed reverse 2nd speed reverse 3rd speed reverse AN Input KV Clutch forward KR Clutch reverse K1 Clutch 1st speed K2 Clutch 2nd speed K3 AB Clutch 3rd speed output PTO Power take off Legend KR K3 AB D507PT34 3 https www forkliftpdfmanuals com ...

Page 58: ...B 2 6 1 4 8 7 Y5 9 4 10 11 SECTION A A SECTION B B D507PT03 1 Pressure reducing valve 9bar 2 Main pressure valve 16 2bar 3 Housing 4 Plug cable harness 5 Cover 6 Valve block 7 Intermediate plate 8 Duct plate 9 Vibration damper 10 Follow on slide 11 Pressure regulator https www forkliftpdfmanuals com ...

Page 59: ... the follow on slides is created by pressure reducing valve The pressure oil 16 2bar is directed via the follow on slide to the respective clutch Due to the direct proportional selection with separated pressure modulation for each clutch the pressure to the clutches which are engaged in the gear change will be controlled In this way a hydraulic intersection of the clutches to be engaged and diseng...

Page 60: ... The oil escaping out of the converter is directed to the oil cooler From the oil cooler the oil is directed to the transmission and there to the lubricating oil circuit so that all lubricating points are supplied with cooled oil In the electrohydraulic control unit are 6 pressure regulators installed https www forkliftpdfmanuals com ...

Page 61: ...ns speeds 1 to 3 are selected by tilting the lever the driving direction Forward F Neutral N Reverse R For the protection from unintended start off a neutral interlock is installed Position N Controller lever blocked in this position Position D Driving 5 R N F D F N R N Gear positions Type plate D507PT12 https www forkliftpdfmanuals com ...

Page 62: ... AD6 N AD4 FORWARD AD5 REVERSE CODING GEAR SELECTOR CONNECTION DIAGRAM SELECTOR K1 RELAY STARTER INTERLOCK K2 RELAY REVERSE LIGHTS A1 TCU Transmission Control Unit F FORWARD D MECANICAL NEUTRAL INTERLOCK N NEUTRAL R REVERSE 1 1st SPEED 2 2nd SPEED 3 3rd SPEED A2 A1 K2 K1 X2 A X1 C B1 B2 B3 V R N X1 A X1 B X1 C X1 D A2 CONTROLLER S4 1 2 S5 1 2 OUTPUT SPEED AD1 AD2 AD3 AD4 AD5 AD6 B1 B2 B3 V R N FOR...

Page 63: ...1 S T O P h f a d b c Left side Central side Right side g 1 2 3 4 5 Bars Left side Central and Right side Spanner Letters STOP a f b c d g h Automatic range up and down shifting Preselected gear For the moment still without function On the two alphanumeric 16 segment display the electric control unit issues the actual state of gear and driving direction Besides a two digit error code will be indic...

Page 64: ... position and again to F to R position a f Cold start phase Transmission in neutral until parking brake is released Machine starts to move after release of parking brake Gear will engage when turbine speed drops Select neutral to get fault code displayed Changes between actual gear direction while driving in neutral only displayed if no fault is detected spanner Changes between actual gear directi...

Page 65: ...or at gear range signal Logical error at direction select signal Short circuit to battery voltage at clutch cutoff input Short circuit to ground or open circuit at clutch cutoff input Short circuit to battery voltage at load sensor input not used Short circuit to ground or open circuit at load sensor input not used Short circuit to battery voltage or open circuit at temperature sensor input Short ...

Page 66: ...rt circuit to battery voltage at converter clutch not used Short circuit to ground at converter clutch not used Open circuit at converter clutch not used Short circuit to battery voltage at clutch K4 Short circuit to ground at clutch K4 Open circuit at clutch K4 Short circuit to battery voltage at clutch KV Short circuit to ground at clutch KV Open circuit at clutch KV Short circuit to battery vol...

Page 67: ...supply for sensors Short circuit to ground at power supply for sensors Low voltage at battery High voltage at battery Error at valve power supply 1 Error at valve power supply 2 Short circuit to battery voltage at speedometer output not used Short circuit to ground or open circuit at speedometer output not used Short circuit to battery voltage at display output not used Short circuit to ground at ...

Page 68: ...e of the driver according to the following criteria Gear determination depending on gear selector position driving speed and load condition Protection from operating error as far as necessary is possible via electronic protect tion programming Protection from over speeds on the base of engine and turbine speed Electronic inching 7 1 https www forkliftpdfmanuals com ...

Page 69: ...ar train 15 Cable to inductive speed engine 16 Cable to inductive transmitter speed turbine 17 Cable to temperature measuring point behind the converter 18 Cable to plug connection on the electrohydraulic control unit 19 Cable to filter contamination switch 20 Cable to speed sensor output 21 Cable from angle sensor inch sensor 22 Transmission 2 3 4 5 6 9 11 14 15 16 17 18 19 20 21 22 D507PT17 http...

Page 70: ...e and important part of the engine power for the output of the hydraulic system is at disposal by the high engine speed Operation is carried out by a separate inching pedal where an angle of rotation sensor is mounted By means of the proportional valve technology the TCU regulates the pressure in the driving direction clutch in such a way that the driving speed is adjusted in accordance with the i...

Page 71: ...NSMISSION MEASURING POINTS AND CONNECTIONS The measurement have to be carried out with hot transmission about 80 95 C 10 34 21 47 57 53 58 55 65 51 54 48 52 56 15 16 49 63 D50TM04 https www forkliftpdfmanuals com ...

Page 72: ...onverter System pressure 16 2 5 bar TRANSMITTERS AND SWITCHES 3 Port 21 34 47 48 54 Size M18x1 5 M18x1 5 M18x1 5 M14x1 5 Description Inductive transmitter n Turbine Speed transmitter n Output Inductive transmitter n Internal speed input Inductive transmitter n Engine Differential pressure switch for pressure filter FLOW RATES 2 Port 15 16 Size 1 5 16 12UN 2B 1 5 16 12UN 2B Description Connection f...

Page 73: ...t 5 37 5 40 5 43t 33 Taper roller bearing 34 Oil seal 35 Input flange assembly 36 Nut 37 Bolt 38 Spring washer 1 OPERATION Both sides of the housing are supported by the frame and the center is mounted on the transmission case through propeller shaft the mast is installed on the front of the drive axle housing The final deceleration and differential device built in the housing guarantee accurate r...

Page 74: ...b 11 O ring 12 C ring 13 Carrier 14 Ring gear 15 Nut 16 Washer 17 bolt 18 Snap ring 19 Sun gear 20 Snap ring 21 Stopper 22 Shaft S 23 Thrust washer 24 Needle bearing 25 Planetary gear 26 Bolt 27 Planetary housing 28 O ring 29 O ring 30 Plug 31 Brake drum 32 Wheel brake assembly LH 33 Wheel brake assembly RH 3 https www forkliftpdfmanuals com ...

Page 75: ...shock from the ground surface to the machine and at the same time they must rotate in contact with the ground to gain the power which drives the machine Various types of tires are available to suit the purpose Therefore it is very important to select the correct tires for the type of work 1 2 B507AX68 https www forkliftpdfmanuals com ...

Page 76: ...gainst unintended turning in DRIVING AND SHIFTING Neutral position Neutral position will be selected via the gear selector After the ignition is switched on the electronics remains in the waiting state By the position NEUTRAL of the gear selector the TCU becomes ready for operation A gear can be engaged Starting The starting of the engine has always to be carried out in the NEUTRAL POSITION of the...

Page 77: ...es in the converter oil as well as overheated brakes will be the consequences to be find out later Neutral position of the selector switch at higher vehicle speed above stepping speed is not admissible Either a suitable gear is to be shifted immediately or vehicle must be stopped at once COLD START At an oil temperature in the shifting circuit 12 C the transmission must be warmed up for some minut...

Page 78: ...toring of the oil temperature behind the converter is additionally on the temperature gauge which is located on the dashboard Operating temperature behind the converter at least 65 C and 100 C in continuous operation a short time increase up to max 120 C is permitted The temperature is measured on the measuring point 63 see schedule of measuring points 3 25 https www forkliftpdfmanuals com ...

Page 79: ...rt mark COLD At operating temperature of the transmission about 80 90 C At engine idling speed Loosen oil dipstick by counterclock rotation remove and clean it Insert oil dipstick slowly into the oil level tube until contact is obtained and pull it out again On the oil dipstick the oil level must be lying in the zone HOT Insert the oil dipstick again and tighten it by clockwise rotation If the oil...

Page 80: ...securely in position and warm up the transmission Shift all controller positions through Check the oil level once more and top up oil once more if necessary On the oil dipstick the oil level must be lying in the zone HOT Insert the oil dipstick again and tighten it by clockwise rotation At the initial filling of the transmission has to be considered that the heat exchanger the pressure filter as w...

Page 81: ...ube with oil dipstick 2 Oil drain plug M38 1 5 3 Attachment possibility oil level tube with oil dipstick converter side 4 Filter head 5 Fine filter MEASURED AT LOW IDLING NEUTRAL HOT HOT COLD Oil dipstick D507PT20 https www forkliftpdfmanuals com ...

Page 82: ...eel Breather Cover the breather when steam cleaning the housing If the breather is not covered water can enter the housing and contaminate the oil Breathers release pressure and vacuum condensation to minimize premature oil and component failure Oil level Check and adjust oil For complete fill procedures for wet side brakes refer to 3 40 wet disc brakes To prevent serious eye injury always wear sa...

Page 83: ... the main housing Drain and discard the oil properly Clean the plug Install the drain plugs in both brake housings and the main housing Apply thread compound and tighten Refer to the torque table Rotate the wheels so that the oil level lines on the wheel ends are parallel to the ground Lower the vehicle Clean the area around the fill level plug Remove the fill level plug from the wheel ends and th...

Page 84: ...aged seats 1 Replace piston seals 2 Correct cause of overheating and replace seals 3 Clean smooth rework or replace affected parts 1 Tighten bleeder screw to 2 0 2 7kgf m 15 20lb ft 2 Tighten inlet fitting to 3 4 4 8kgf m 25 35 lb ft 3 Replace inlet fitting or plug and O ring if used Possible cause Correction Condition Brakes product noise chatter vibration Incorrect axle fluid and or friction mat...

Page 85: ...ll face seal assembly 3 Tighten drain fill or forced cooling plug Replace if damaged 4 Dissemble clean re seal and re assemble brake housing joint 1 Repair hydraulic system so pressure is less than 1 4bar 20psi when brakes released and while machine is operating in any mode 2 Repair or replace piston return spring assembly 3 Check piston seals and seal separator 4 Check piston seals and seal separ...

Page 86: ...soft 1 Inadequate actuation fluid supply to brakes 2 Inadequate pressure to apply brakes 3 Worn or damaged discs 4 Overheated seals and or discs 5 Dirty or contaminated cooling fluid 1 Empty fluid reservoir 2 Damaged hydraulic system 3 Leakage of brake actuation fluid Brakes or brake system not properly bled 1 Replenish fluid in brake system Check for leakage and correct cause 2 Check brakes apply...

Page 87: ...ery voltage or O C at transmi ssion sump temperature sensor input The measured voltage is too low Cable is defective and is contacted to vehicle ground Temperature sensor has an internal defect Connector pin is contacted to vehicle ground TCU shifts transmission to neutral OP mode Transmission shutdown TCU shifts transmission to neutral OP Mode Transmission shutdown No reaction TCU use default tem...

Page 88: ... bad contact Speed sensor has an internal defect Sensor gap has the wrong size S C to battery voltage or O C at turbine speed input TCU measures a voltage higher than 7 00V at speed input pin Cable is defective and is contacted to vehicle battery voltage Cable has no connection to TCU Speed sensor has an internal defect Connector pin is contacted to battery voltage or has no contact OP mode Substi...

Page 89: ...U Speed sensor has an internal defect Connector pin is contacted to battery voltage or has no contact S C to ground at turbine speed input TCU measures a voltage less than 0 45V at speed input pin Cable connector is defective and is contacted to vehicle ground Speed sensor has an internal defect OP mode Substitute clutch control If a failure is existing at output speed TCU shifts to neutral OP mod...

Page 90: ... turbine speed over a threshold and at the next moment the measured speed is zero Cable connector is defective and has bad contact Speed sensor has an internal defect Sensor gap has the wrong size OP mode Substitute clutch control Special mode for gear selection OP mode Substitute clutch control If a failure is existing at turbine speed TCU shifts to neutral OP mode lamp home Special mode for gear...

Page 91: ...f limit Cable connector is defective and has no contact to TCU Regulator has an internal defect Special mode for gear selection OP mode Substitute clutch control If a failure is existing at turbine speed TCU shifts to neutral OP mode lamp home TCU shifts to neutral OP mode Limp home If failure at another clutch is pending TCU shifts to neutral OP mode TCU shutdown TCU shifts to neutral OP mode Lim...

Page 92: ...Cable connector is defective and has contact to another regulator output of the TCU Regulator has an internal defect TCU shifts to neutral OP mode Limp home If failure at another clutch is pending TCU shifts to neutral OP mode TCU shutdown TCU shifts to neutral OP mode Limp home If failure at another clutch is pending TCU shifts to neutral OP mode TCU shutdown TCU shifts to neutral OP mode Limp ho...

Page 93: ...ifts to neutral OP mode Limp home If failure at another clutch is pending TCU shifts to neutral OP mode TCU shutdown TCU shifts to neutral OP mode Limp home If failure at another clutch is pending TCU shifts to neutral OP mode TCU shutdown TCU shifts to neutral OP mode Limp home If failure at another clutch is pending TCU shifts to neutral OP mode TCU shutdown TCU shifts to neutral OP mode Limp ho...

Page 94: ...tact to vehicle ground Backup alarm device has an internal defect Connector pin is contacted to vehicle ground TCU shifts to neutral OP mode Limp home If failure at another clutch is pending TCU shifts to neutral OP mode TCU shutdown TCU shifts to neutral OP mode Limp home If failure at another clutch is pending TCU shifts to neutral OP mode TCU shutdown TCU shifts to neutral OP mode Limp home If ...

Page 95: ... an internal defect Connector pin is contacted to vehicle ground S C to battery voltage at relay starter interlock TCU detected a wrong voltage at the output pin that looks like a S C to battery voltage Cable is defective and has no connection to battery voltage Starter interlock relay has an internal defect Connector pin is contacted to battery voltage No reaction OP mode Normal No reaction OP mo...

Page 96: ...ry voltage O C at park brake solenoid TCU detected a wrong voltage at the output pin that looks like a O C for this output pin Cable is defective and has no connection to TCU Park brake solenoid has an internal defect Connector has no connection to TCU No reaction OP mode Normal No reaction OP mode Normal No reaction Optional Some customers TCU shifts to neutral caused by park brake feed back OP m...

Page 97: ...ong signal at internal speed sensor Wrong signal at output speed sensor Wrong size of the sensor gap Clutch is defective TCU shifts to neutral OP mode Limp home If failure at another clutch is pending TCU shifts to neutral OP mode TCU shutdown TCU shifts to neutral OP mode Limp home If failure at another clutch is pending TCU shifts to neutral OP mode TCU shutdown TCU shifts to neutral OP mode Lim...

Page 98: ...ong size of the sensor gap Clutch is defective Overtemp sump TCU measured a temperature in the oil sump that is over the allowed threshold TCU shifts to neutral OP mode Limp home If failure at another clutch is pending TCU shifts to neutral OP mode TCU shutdown TCU shifts to neutral OP mode Limp home If failure at another clutch is pending TCU shifts to neutral OP mode TCU shutdown No reaction OP ...

Page 99: ...e defect and are contacted to battery voltage Cable or connectors are defect and are contacted to vehicle ground Permanent power supply KL30 missing TCU has an internal defect See fault codes No 21 to 2C See fault codes No 21 to 2C Shift to neutral OP mode TCU shutdown Shift to neutral OP mode TCU shutdown Shift to neutral OP mode TCU shutdown Check cables and connectors to sensors which are suppl...

Page 100: ...2 is off or TCU switched off VPS2 and measured VPS2 is still on Cable or connectors are defect and are contacted to battery voltage Cable or connectors are defect and are contacted to vehicle ground Permanent power supply KL30 missing TCU has an internal defect Shift to neutral OP mode TCU shutdown Check fuse Check cables from gearbox to TCU Check connectors from gearbox to TCU Replace TCU https w...

Page 101: ... battery voltage Display has an internal defect S C to ground at display output TCU sends data to the display and measures always a high voltage level on the connector Cable or connectors are defective and are contacted to battery voltage Display has an internal defect No reaction OP mode Normal No reaction OP mode Normal Check the cable from TCU to the display Check the connectors at the display ...

Page 102: ... the AEB Values is out of limit Clutch adjustment data lost TCU was not able to read correct clutch adjustment parameters Interference during saving data on non volatile memory TCU is brand new No reaction OP mode Normal Transmission stay neutral OP mode TCU shutdown Transmission stay neutral OP mode TCU shutdown Transmission stay neutral OP mode TCU shutdown No reaction Default values 0 for AEB O...

Page 103: ... start the disassembly drain the oil 3 55 GROUP 3 DISASSEMBLY AND ASSEMBLY Removal of the filter By means of the strap wrench separate the filter 1 from the filter head S Strap wrench 5870 105 005 1 Loosen the cap screws 2 and separate the filter head 1 from the transmission housing Remove the O ring S Socket spanner 5873 042 004 1 2 1 D507TM11 D507TM12 D507TM13 https www forkliftpdfmanuals com ...

Page 104: ...nner TX 27 5873 042 002 S Adjusting screw M6 5870 204 063 2 2 1 D507TM14 D507TM15 D507TM16 Remove the complete shift system 1 and the intermrdiate shaft 2 S Adjusting screw M6 5870 204 063 S 2 1 Mark the installation position of the cover 1 to the valve block 2 1 2 D507TM17 1 Loosen the Torx screws 1 S Socket spanner TX 27 5873 042 002 https www forkliftpdfmanuals com ...

Page 105: ...he retaining clamp 1 1 Loosen the cap screws 1 and remove the cover Remove the opposite cover S Socket spanner TX 27 5873 042 002 1 D507TM21 2 3 1 Remove the wiring harness 1 Loosen the cap screws 3 remove the fixing plates and the pressure regul ators 2 S Socket spanner TX 27 5873 042 002 https www forkliftpdfmanuals com ...

Page 106: ...reliminarily housing is spring loaded Following to this loosen the remaining cap screws S Adjusting screws 5870 204 036 S Socket spanner 5873 042 002 1 S S Separate the housing from the valve housing by loosening the adjusting screws equally S Adjusting screws 5870 204 036 D507TM25 1 2 3 Remove the single parts 1 Pressure reducing valve 2 Vibration damper 3 Follow on slide https www forkliftpdfman...

Page 107: ...fixture 5870 350 124 D507TM27 D507TM28 D507TM29 Remove the converter pressure back up valve 1 and differential pressure switch 3 for the filter 2 Do not remove the pressure relief valve 3 1 2 Remove the positioned parts 1 Breather 2 Inductive transmitter n engine 3 Screw plug measuring point after converter 4 Screw plug option for temperature sensor 5 Fixing strap oil filter tube 6 Oil filter tube...

Page 108: ...870 350 124 Loosen the hexagon screw 2 and sepa rate the flexplate 1 from the converter 3 3 2 1 D507TM31 D507TM32 By means of the lifting equipment sepa rate the converter 1 from the transmissi on Loosen the bolted connection 4 and 5 1 Converter 2 Converter bell 3 Pressure oil pump 4 Bolted connection converter bell tran smission housing rear section 5 Bolted connect pressure oil pump tr ansmissio...

Page 109: ... 5870 281 047 1 3 4 5 2 Separate the pressure oil pump 1 from the converter bell S Hammer 5870 280 004 1 D507TM34 D507TM35 D507TM36 Loosen both cap screws and remove the cam disc If running in marks should be found in the pump housing or on the cam disc the complete pump has to be replaced Squeeze out the snap ring 1 and remo ve the single parts 1 Pump housing with rotor 2 Snap ring 3 Saft seal 4 ...

Page 110: ...M40 Unsnap the retaining ring 1 from the power take off and remove the O ring 2 S Set of internal pliers 5870 900 013 2 1 Pull the pump shaft 1 out of the housing bore Unsnap the rectangular ring 2 Press off the ball bearing 3 from the shaft Loosen the bolted connection 4 tran smission housing rear section trans mission housing front section 1 3 4 5 2 https www forkliftpdfmanuals com ...

Page 111: ...rom the suction tube Loosen the cap screws 6 and remove the screen sheet 5 Remove the pipes 4 with O rings 2 1 3 4 6 5 D507TM42 D507TM43 D507TM44 The clutch is to be removed from the transmission housing according to the sequence of numbers as described in the lengend 1 Clutch K3 2 Clutch K1 3 Clutch K2 4 Clutch KR 5 Clutch KV 6 Input shaft S Handle 5870 260 014 K1 K2 KV KR S Eyebolt 5870 204 002 ...

Page 112: ...ence 1 Pipe k3 2 Pipe k1 3 Pipe k2 4 Pipe kR 5 Pipe kV Remove all bearing outer rings see arrows Should contrary to the recommen dations the taper roller bearings of the clutches as well as of the input not be replaced the assignment bearing inner and outer ring has to be kept at least Mark the bearing inner and bearing outer rings to each other accordingly D507TM46 https www forkliftpdfmanuals co...

Page 113: ... KV Remove the stud 1 and unsnap the piston ring 2 2 1 Pull the taper roller bearing inner ring from the shaft S Gripping insert 5873 001 057 S Back off insert 5870 026 100 or S Rapid grip 5873 001 011 S D507TM54 Pull the clutch 1 from the shaft S Two armed puller 5870 970 003 1 4 1 https www forkliftpdfmanuals com ...

Page 114: ...D507TM57 Press the clutch shaft 1 out of the idler 2 S Parting tool 5870 300 028 1 2 S Unsnap the retaining ring 2 from the idler 1 and remove the ball bearing 3 S Set of internal pliers 5870 900 013 1 3 2 D507TM58 2 1 Remove the needle cage 1 from the shaft 2 https www forkliftpdfmanuals com ...

Page 115: ...ring from the shaft S Gripping insert 5873 001 057 S Back off insert 5870 026 100 or S Rapid grip 5873 011 011 S Clutch KR Remove the stud 1 and unsnap the piston ring 2 2 1 D507TM62 2 Pull the taper roller bearing inner ring 2 from the shaft S Gripping insert 5873 001 057 S Bush 5870 026 016 2 https www forkliftpdfmanuals com ...

Page 116: ...r 5870 970 003 1 D507TM63 D507TM64 D507TM65 Unsnap the retaining ring 1 S Set of external pliers 5870 900 015 1 Press the clutch shaft 1 out of the idler 2 S Parting tool 5870 300 028 2 1 S D507TM66 1 Disassemble the idler 1 https www forkliftpdfmanuals com ...

Page 117: ...ng S Set of internal pliers 5870 900 013 2 1 3 D507TM67 D507TM68 D507TM69 Remove the needle cage 1 from the shaft 2 2 1 Shaft 2 and gear 1 cannot be separa ted shrink fit 2 1 D507TM70 2 1 Rotated the shaft 2 by 180 and unsnap the piston ring 1 https www forkliftpdfmanuals com ...

Page 118: ...1 S D507TM71 D507TM72 D507TM73 Clutch K1 Remove the stud 1 and unsnap the piston ring 2 2 1 Pull the taper roller bearing inner ring from the shaft S Gripping insert 5873 001 057 S Back off insert 5870 026 100 or S Rapid grip 5873 011 011 S D507TM74 1 Unsnap the retaining ring 1 S Set of internal pliers 5870 900 013 3 https www forkliftpdfmanuals com ...

Page 119: ...6 D507TM77 Take off idler 1 remove the needle cage 2 and the complete axial bea ring 3 1 2 3 Pull the clutch 1 from the shaft S Two armed puller 5870 970 003 1 D507TM78 1 2 Rotated the shaft 2 by 180 and unsnap the piston ring 1 https www forkliftpdfmanuals com ...

Page 120: ... S D507TM79 D507TM80 D507TM81 Clutch K1 Remove the stud 1 and unsnap the piston ring 2 2 1 Pull the taper roller bearing inner ring from the shaft S Gripping insert 5873 001 057 S Back off insert 5870 026 100 or S Rapid grip 5873 011 011 S D507TM82 1 Ł Unsnap the retaining ring 1 S Set of internal pliers 5870 900 015 4 https www forkliftpdfmanuals com ...

Page 121: ... D507TM85 Take off idler 1 remove the needle cage 2 and the complete axial bea ring 3 1 2 3 Pull the clutch 1 front the shaft S Two armed puller 5870 970 003 1 D507TM86 1 2 Rotated the shaft 2 by 180 and unsnap the piston ring 1 https www forkliftpdfmanuals com ...

Page 122: ...or S Rapid grip 5873 011 011 S D507TM87 D507TM88 D507TM89 Clutch K3 Unsnap the piston ring 1 1 Pull the taper roller bearing inner ring from the shaft S Gripping insert 5873 001 057 S Back off insert 5870 026 100 or S Rapid grip 5873 011 011 S D507TM90 1 Remove the complete axial bearing 1 5 https www forkliftpdfmanuals com ...

Page 123: ...ull the clutch 1 from the shaft S Two armed puller 5870 970 003 1 Rotated the shaft 2 by 180 and unsnap the piston ring 1 1 2 D507TM94 S Pull the taper roller bearing inner ring from the shaft S Gripping insert 5873 001 058 S Back off insert 5870 026 100 or S Rapid grip 5873 011 014 https www forkliftpdfmanuals com ...

Page 124: ...07TM95 D507TM96 D507TM97 Pull the taper roller bearing inner ring from the input gear S Gripping insert 5873 001 058 S Back off insert 5870 026 100 or S Rapid grip 5873 011 014 S Pull the taper roller bearing inner ring from the input gear S Gripping insert 5873 001 058 S Back off insert 5870 026 100 or S Rapid grip 5873 011 011 S 6 https www forkliftpdfmanuals com ...

Page 125: ...clutches and if exceeded a fault message is given in the transmission error display To ensure the shifting quality continuously no repairs are allowed to be made on the clutches KV KR K1 K2 K3 which means that only the complete clutch is allowed to be replaced 1 Clutch KV Press the taper roller bearing inner ring 1 onto the shaft 2 until contact is obtained 1 2 D507TM101 D507TM102 D507TM103 Instal...

Page 126: ...2 3 D507TM104 D507TM105 D507TM106 Press in preassembled idler 1 until contact 1 Fasten the idler 1 by means of retaining ring 2 S Set of external pliers 5870 900 015 1 2 D507TM107 S 1 Heat up the inner diameter of the clutch 1 approx 120 C S Hot air blower 220V 5870 221 500 S Hot air blower 110V 5870 221 501 https www forkliftpdfmanuals com ...

Page 127: ...oller bearing inner ring 1 until contact is obtained 1 Install the piston ring 1 1 D507TM111 1 2 Install the stud 1 Tightening torque MA 1 7kg m Check closing resp opening of the clutch by means of compressed air at the bore 2 Closing resp opening of the clutch must be clearly audible https www forkliftpdfmanuals com ...

Page 128: ...ner diameter of the gear 1 approx 120 C S Hot air blower 220V 5870 221 500 S Hot air blower 110V 5870 221 501 Wear safety gloves 1 D507TM115 1 2 Chamfer Undercool the shaft 2 approx 80 C Mount the gear until contact is obtained Install the chamfer of the gear see arrow showing upwards Observe the radial installation position Wear safety gloves 2 https www forkliftpdfmanuals com ...

Page 129: ...TM117 D507TM118 Mount the needle bearing 1 onto the shaft 2 1 2 Put the ball bearing 2 into the idler 1 until contact is obtained and fasten it by means of retaining ring 3 S Set of internal pliers 5870 900 013 1 2 3 D507TM119 1 Press in the preassembled idler 1 until contact https www forkliftpdfmanuals com ...

Page 130: ...2 Heat up the inner diameter of the clutch 1 approx 120 C S Hot air blower 220V 5870 221 500 S Hot air blower 110V 5870 221 501 1 S Mount the clutch 1 and press it until contact is obtained Wear safety gloves 1 D507TM123 1 Press the taper roller bearing inner ring 1 until contact is obtained https www forkliftpdfmanuals com ...

Page 131: ...kg m Check closing resp opening of the clutch by means of compressed air at the bore 2 Closing resp opening of the clutch must be clearly audible 2 1 Clutch K1 Press the taper roller bearing inner ring 1 onto the shaft until contact 1 D507TM127 1 Install the piston ring 1 3 https www forkliftpdfmanuals com ...

Page 132: ...pprox 120 C S Hot air blower 220V 5870 221 500 S Hot air blower 110V 5870 221 501 1 S Mount the clutch 1 and press it until contact is obtained Wear safety gloves 1 D507TM131 3 2 1 Chamfer Mount the running disc 1 axial cage 2 and axial washer 3 Install chamfer see arrow of the running disc 2 showing towards the axial cage https www forkliftpdfmanuals com ...

Page 133: ...xial washer 1 axial cage 2 and running disc 3 Install chamfer see arrow of the running disc 3 showing towards the axial cage 3 2 1 Chamfer D507TM135 2 1 Fasten the idler 1 and the single parts by means of the retaining ring 2 S Set of external pliers 5870 900 015 https www forkliftpdfmanuals com ...

Page 134: ...ng 1 1 Install the stud 1 Tightening torque MA 1 7kg m Check closing resp opening of the clutch by means of compressed air at the bore 2 Closing resp opening of the clutch must be clearly audible 2 1 D507TM139 1 Clutch K2 Press the taper roller bearing inner ring 1 onto the shaft until contact 4 https www forkliftpdfmanuals com ...

Page 135: ...air blower 220V 5870 221 500 S Hot air blower 110V 5870 221 501 1 S Mount the clutch 1 until contact is obtained Wear safety gloves 1 D507TM143 3 2 1 Chamfer Mount the running disc 1 axial cage 2 and axial washer 3 Install chamfer see arrow of the running disc 2 showing towards the axial cage https www forkliftpdfmanuals com ...

Page 136: ...xial washer 1 axial cage 2 and running disc 3 Install chamfer see arrow of the running disc 3 showing towards the axial cage 3 2 1 Chamfer D507TM147 2 1 Fasten the idler 1 and the single parts by means of the retaining ring 2 S Set of external pliers 5870 900 015 https www forkliftpdfmanuals com ...

Page 137: ...ring 1 1 Install the stud 1 Tightening torque MA 1 7kg m Check closing resp opening of the clutch by means of compressed air the bore 2 Closing resp opening of the clutch must be clearly audible 2 1 D507TM151 1 Clutch K3 Press the taper roller bearing inner ring 1 onto the shaft until contact 5 https www forkliftpdfmanuals com ...

Page 138: ... Wet the contact surface with loctite type No 262 1 Heat up the inner diameter of the clutch 1 approx 120 C S Hot air blower 220V 5870 221 500 S Hot air blower 110V 5870 221 501 1 S D507TM155 1 Mount the clutch 1 until contact is obtained Wear safety gloves https www forkliftpdfmanuals com ...

Page 139: ...howing toward the axial cage 3 2 1 Chamfer D507TM156 D507TM157 D507TM158 Mount the needle cage 1 1 Install the idler 1 1 D507TM159 3 2 1 Chamfer Mount the axial washer 1 axial cage 2 and running disc 3 Install chamfer see arrow of the running disc 3 showing towards the axial cage https www forkliftpdfmanuals com ...

Page 140: ...7TM161 D507TM162 Install the piston ring 1 1 Install the screw plug 1 S Lever riveting tongs 5870 320 016 1 D507TM163 1 Check cosing resp opening of the clutch by means of compressed air at the bore 1 Closing resp opening of the clutch must be clearly audible https www forkliftpdfmanuals com ...

Page 141: ...e taper roller bearing inner ring 1 until contact is obtained 1 Have the snap ring 1 engaged into the annular groove of the turbine wheel shaft 2 2 1 D507TM167 Mount the turbine wheel shaft until the snap ring engages into the recess of the input gear turbine wheel shaft is axially fixed 6 https www forkliftpdfmanuals com ...

Page 142: ...ion housing front section AN Input KV Clutch Forward KR Clutch Reverse K1 Clutch 1st gear K2 Clutch 2nd gear K3 Clutch 3rd gear KV KR K1 K2 AN K3 D507TM171 D507TM172 D507TM173 Transmission housing rear section Put the bearing outer rings with assembly grease into the bearing bores KV KR K1 K2 AN K3 Install the pipe system pressure from the electro hydraulic control to the respective clutch The pip...

Page 143: ... front section as described in the legend 1 Input shaft 2 Clutch KV 3 Clutch KR 4 Clutch K2 5 Clutch K1 6 Clutch K3 S Handle 5870 260 010 K1 K2 KV KR S Eyebolt 5870 204 002 3 2 1 5 6 4 S S Put the pipes and O rings into the bores and grease them 1 D507TM177 1 2 Fasten the screen sheet 1 by means of cap screws 2 Tightening torque M6 8 8 MA 0 97kg m https www forkliftpdfmanuals com ...

Page 144: ...ission housing rear section 1 by means of the lifting equipment to the transmission housing front section 2 until contact is obtained S Eyebolts 2x M20 0636 804 003 S Ring nut M12 0664 462 774 S Lifting chain 5870 281 047 1 2 D507TM181 1 2 3 1 Install both cyl pins 1 centrally to the mounting face By means of cap screws 2 and 3 fasten the transmission housing rear section to the transmission housi...

Page 145: ... D507TM183 D507TM184 Insert the input flange 1 until contact and put in the O ring Fix the input flange 1 by means of washer 2 and hexagon screws 3 Then fix the hexagon screws 3 with the tab washer 4 by means of the mounting tool S Tightening torque M8 8 8 MA 3 5kg m S Mounting tool 5870 057 011 S Handle 5870 260 002 1 3 4 S 2 Press the ball bearing 1 onto the pump shaft 2 until contact is obtaine...

Page 146: ...w shaft 1 Observe the radial installation position S Adjusting screws 5870 204 007 1 Install the converter safety valve 1 until contact S Drive mandrel 5870 705 012 1 S D507TM189 1 Install two adjusting screws and mount the intermediate sheet 1 The intermrdiate sheet has always to be replaced S Adjusting screws 5870 204 007 https www forkliftpdfmanuals com ...

Page 147: ...laced 1 Pump housing with rotor 2 Snap ring 3 Shaft seal 4 Support shim 5 Needle bearing cpl bearing outer ring and needle bearing 6 Ring 1 2 3 4 5 6 Install the following parts into the pump housing 1 6 Ring 5A Bearing outer ring 5B Needle cage 4 Support shim 1 4 5A 6 5B D507TM193 1 2 3 Cautiously put the shaft seal 3 with the sealing lip showing downwards into the pump housing 1 until contact an...

Page 148: ...rews 1 fasten it radially Do not tighten the cap screws just turn then in until contact is obtained and then make approx 1 2 rotation back Observe the installation position of the cam disc Put the O ring 2 into the annular groove and oil it 1 2 Mount the preassembled pressure oil pump 1 and with the cap screws 3pcs first place it equally until contact is obtained Observe the radial installation po...

Page 149: ... the hexagon screws with loctite Type No 262 Tighteningtorque M12 10 9 MA 11 7kg m 1 2 3 D507TM197 1 2 Fasten the converter bell pressure oil pump and stator hollow shaft together by means of cap screws Different bolted connections 1 Bolted connection converter bell tran smission housing rear section Tightening torque M10 8 8 MA 4 7kg m 2 Bolted connect pressure oil pump stator hollow shaft transm...

Page 150: ...erential pressure switch for the pressure filter 1 Compression spring 2 Piston 3 Tappet switch Tightening torque MA 3 1kg m 1 2 3 D507TM203 1 2 3 3 Installation of 1 Inductive transmitter n Engine 2 Screw plug M10x1 0 measuring point pressure after con verter 3 Temperature transmitter M14x1 5 measuring point temperature after converter Tightening torque 1 MA 3 1kg m Tightening torque 2 MA 0 97kg m...

Page 151: ...e oil filler tube Tightening torque 2 M8 8 8 MA 2 4kg m Install the oil drain plug 5 with the O ring Tightening torque MA 14 3kg m Fasten the fixing plate 6 by means of cap screws 7 Tightening torque M10 8 8 MA 4 7kg m 1 7 3 4 6 2 5 D507TM204 1 2 3 4 5 Installation of 1 Inductive transmiter n Internal speed input 2 Inductive transmitter n Turbine 3 Breather Tightening torque 1 and 2 MA 3 1kg m Tig...

Page 152: ...lectro hydraulic control unit Y4 Y5 Y6 Y3 Y2 Y1 A A B Y5 Main pressure valve Pressure reducing valve Housing Wiring harness Housing Cover Valve block Cover Valve block Main pressure valve Pressure reducing valve Wiring harness Pressure regulator Vibration damper Follow on slide Duct plate SECTION A A SECTION B B 16 2 bar 9 bar 16 2 bar 9 bar 4 D507TM211 https www forkliftpdfmanuals com ...

Page 153: ...he figure on the left shows the following single parts 1 Pressure reducing valve 1x piston a compr spring 2 Vibration damper 3x piston a compr spring 3 Follow on slide 3x piston a compr spring 1 2 3 Install the single parts acc to right figure Preload the compression springs of the follow on slides and fasten the piston preliminarily by means of cylindrical pins 5 0mm assembly aid see arrows s S P...

Page 154: ...ing cover by means of cap screws 1 Tightening torque MA 0 56kg m S Torque spanner 5870 203 031 S Reducer 5870 656 056 S Socket spanner TX 27 5873 042 002 1 2 3 Mount the pressure regulators 1 and fasten them by means of fixing plates 2 and cap screws 3 Install the fixing plate with the neck showing downwards Observe radial installation position of the pressure reglators Tightening torque MA 0 56kg...

Page 155: ... preliminarily by means of cylindrical pins S 5 0mm assembly aid see arrows S Install two adjusting screws S Adjusting screws M5 5870 204 036 Assemble flat gasket 1 and housing cover Then place the housing cover by means of adjusting screws equally until contact 1 S Preload the pistons with cap screws and remove the cyl pins assembly aid again Then fasten the housing cover by means of cap screws 1...

Page 156: ...contact Fasten the cover by means of cap screws Tightening torque MA 0 56kg m S Torque spanner 5870 203 031 S Socket spanner TX 27 5873 042 002 1 D507TM226 D507TM227 Fix the wiring harness by means of retaining clamp 1 Install the opposite cover 1 D507TM224 1 Mount the pressure regulators 1 and fasten them by means of fixing plates and cap screws Install the fixing plate with the neck showing down...

Page 157: ...showing upwards to the duct plate Put on the intermediate sheet 1 Screens 2 must show upwards 1 2 D507TM230 D507TM231 Put on the duct plate 1 and tighten it equally with torx screw 2 Tightening torque MA 0 97kg m S Socket spanner TX 27 5873 042 002 1 2 D507TM228 S Install two adjusting screws S Adjusting screws 5870 204 063 https www forkliftpdfmanuals com ...

Page 158: ...screws M6 5870 204 063 1 2 D507TM234 D507TM235 Fasten the electro hyraulic control unit 1 equally by means of Torx screws 2 Tightening torque MA 0 56kg m S Torque spanner 5870 203 031 S Reducer 5870 656 056 S Socket spanner TX 27 5873 042 002 1 2 D507TM232 1 Provide the screw plugs 1 with new O rings and install them Tightening torque MA 0 61kg m https www forkliftpdfmanuals com ...

Page 159: ...2 rotation Prior to initial operation of the transmiss ion make the oil filling in accordance with the operating instructions D507TM236 1 2 Mounting of the filter pressure filter Fasten the filter head 1 with new O rings by means of cap screws 2 to the trans mission housing Tightening torque M8 MA 2 4kg m S Torque spanner 5870 203 034 S Socket spanner TX 40 5870 042 004 2 https www forkliftpdfmanu...

Page 160: ...d drain oil 1 REMOVAL AND DISASSEMBLY OF WHEEL HUB 1 D357DA01 Loosen 4 socket head bolts 2 and a plug 3 from the housing of planetary 2 1 D357DA02 Fit socket head bolt 2 into the 2 tap holes 4 and remove housing of planetary 3 D357DA03 2 3 2 4 4 https www forkliftpdfmanuals com ...

Page 161: ...of planetary 4 D357DA04 Remove 3 pins 6 with a plastic hammer 5 D357DA05 Remove needle bearing 8 planet gear 7 and thrust washer 9 6 D357DA06 Remove sun gear 10 and drive shaft 11 7 D357DA07 5 6 5 6 7 8 9 10 11 https www forkliftpdfmanuals com ...

Page 162: ...ove ring gear 14 and torque plate assembly from the axle tube 9 D357DA09 Remove snap ring from the ring gear 14 and disassemble internal gear carrier 10 D357DA10 Remove bearing cup from the wheel hub by using jig and hammer Shaft seal will be damaged 11 D357DA11 10 11 12 13 14 https www forkliftpdfmanuals com ...

Page 163: ...fting machine D357DA12 1 For the reassembly check rolling resistance and record it Remove backing plate 2 2 2 2 D357DA13 Before removing differential assembly from carrier 3 check the location of cap 4 and mark it for reassembly Remove 4 hexagon bolts 5 and cap 4 3 4 D357DA14 1 3 5 4 2 https www forkliftpdfmanuals com ...

Page 164: ...nd then disassemble ring gear 6 7 D357DA16 Check the mark on the housing and separate the housing from the differential If there is no mark be sure to mark on the housing When reassembling it must be placed at the same position as before 8 D357DA17 Remove thrust washer side gear pinion gear and spider and then place them on the clean bench 9 D357DA18 6 7 8 https www forkliftpdfmanuals com ...

Page 165: ...spacer 13 from pinion shaft Using a bearing puller disassemble inner race of taper roller bearing from the pinion shaft 12 Remove outer race of taper roller bearing and shim from the housing by using a jig and hammer Do not reuse damaged shims 13 ö 80D7AX091 Remove outer race of taper roller bearing from the opposite side 14 80D7AX11 80D7AX10 9 13 12 10 11 https www forkliftpdfmanuals com ...

Page 166: ...shers ÂRasp off the seal contacted surface Adjusting shim of bevel pinion shaft Adjust shim thickness and bevel pinion shaft with following method Measure E E at the housing By the equation X E B T Ü C define the the shim thickness 1 B Mounting dimension of bevel pinion shaft 133 20mm 5 2 in T Height of bearing C Dimension of carved seal on the pinion If there s no carved seal C 0 EX From the hous...

Page 167: ...thickness by following method Dimension Q Distance from bearing outer race surface to spacer surface Dimension S Distance from bearing outer race surface to inner race surface From the below equation define required shim thickness Z Z S Q EX From the bearing S 2 25mm 0 09in From the housing Q 3 15mm 0 12in Required shim thickness Z Z 2 25 3 15 5 40mm 0 21in 3 Â 80D7AX13 2 Q 80D7AX14 S D357DA271 P ...

Page 168: ...aft into the carrier Assemble bearing cone yoke and lock nut Apply loctite 271 or 277 on the thread of pinion and then tighten lock nut ÂTightening torque 45 51kgfÂm 325 369lbfÂft Measure rolling resistance of pinion shaft Adjust shim thickness ÂRolling resistance 0 20 0 41kgfÂm 1 4 2 9lbfÂft Coke lock nut into the pinion shaft slot 2 80D7AX08 https www forkliftpdfmanuals com ...

Page 169: ... bolts 7 to the differential housing Apply loctite 271 or 277 on the thread of bolt ÂTightening torque 5 0 7 5kgfÂm 36 54lbfÂft Assemble differential housing C Check marks on the housing Match two marks at the same position 3 Assemble ring gear by tightening 12 bolts 6 Apply loctite 271 or 277 on the thread of bolt ÂTightening torque 12 5 14 5kgfÂm 90 105lbfÂft 4 D357DA331 D357DA341 2 ö 7 6 https ...

Page 170: ...After complete assembly of bearing measure rotation backlash once more and readjust with a screw if needed Apply loctite 271 to the thread of bearing cap bolt ÂTightening torque 15 0 17 0kgfÂm 108 123lbfÂft Assemble plate with hexagon bolts Apply loctite 271 or 277 to the thread of bolt and then assemble at the tightening torque of 0 80 1 20 kgfÂm 5 8 8 7lbfÂft A Assemble oposite side with the sam...

Page 171: ...ely Apply grease or oil to shaft seal and then assemble it from the direction of outer side of wheel hub Install wheel hub assembly to the tube flange of axle completely Install bearing cone 1 ö 2 D357DA38 D357DA37 Insert shim fix the torque plate and ring gear with snap ring and assemble them to the axle tube Apply loctite 271 or 277 on the tapped side of bolt 12 and tighten at the tightening tor...

Page 172: ...LUID 424 After assembling plate and disk confirm that the tolerance with brake housing surface is 2 1 2 6mm 0 08 0 10in Spindle protrusion is 1 4mm 0 06in and operation stroke of plate 8 and disk 9 assembly is 1 0 1 5mm 0 04 0 06in After tightening the bolt 10 confirm that parking lever 11 stroke is 17 32mm 0 67 1 26in when pulling lever at the operation force of 25kgf m 181lbfÂft ÂIn case that th...

Page 173: ...ushing contacts Apply grease to teeth parts of planetary gear 5 D357DA43 Assemble internal components of planetary carrier in the reverse order to disassembly 6 D357DA44 D357DA45 Install planetary carrier assembly to wheel hub and tighten bolt 2 ÂTightening torque 2 5 4 0kgfÂm 18 1 28 9lbfÂft 7 D357DA46 2 https www forkliftpdfmanuals com ...

Page 174: ...3 126 Assemble wheel hub and tighten plug 1 ÂTightening torque 3 5 6 0kgfÂm 25 3 43 4lbfÂft 8 D357DA47 1 https www forkliftpdfmanuals com ...

Page 175: ... gear and read the dial indicator The runout must not exceed 0 20mm 0 008inch If runout exceeds specification remove the differential and ring gear assembly from the carrier Check the differential parts including the carrier for problems that may cause the ring gear runout to exceed specifications Repair or replace parts Re install the differential and ring gear into the carrier Repeat the preload...

Page 176: ...he ring gear a small amount in both directions against the drive pinion teeth When you adjust backlash move the ring gear ONLY DO NOT move the drive pinion If the backlash reading is within specifi cation continue checking tooth contact patterns Otherwise adjust backlash Refer to step 6 and check following steps 1 4 Backlash is increased by moving the ring gear away from the drive pinion Backlash ...

Page 177: ... of the tooth and centered between the top and bottom of the tooth In used gearsets a good contact pattern fills approximately the full length of the tooth The top of the pattern is near the top of the tooth The location should match the wear pattern on the tooth If the contact patterns require adjustment along the width of tooth top bottom follow steps 4 5 If the contact patterns requires adjustm...

Page 178: ...Low pattern A low contact pattern indicates that the pinion was installed too deep into the carrier To correct move the pinion away from the ring gear by increasing the shim pack between pinion spigot and inner bearing cone 4 5 D507AX61 LOW PATTERN D507AX62 GOOD PATTERN IN OPERATION USED GEARS D507AX63 Decrease shim pack D507AX64 Increase shim pack Move pattern toward bottom Move pattern toward to...

Page 179: ...ase backlash Loosen adjusting ring this side Heel pattern Decrease the gearset backlash within specified range to move contact pattern toward toe and away from heel Toe pattern Increase the gearset back lash within specified range to move contact pattern toward heel and away from toe 6 7 Move pattern toward toe Move pattern toward heel https www forkliftpdfmanuals com ...

Page 180: ...SECTION 4 BRAKE SYSTEM Group 1 Structure and function 4 1 Group 2 Operational checks and troubleshooting 4 17 Group 3 Tests and adjustments 4 20 https www forkliftpdfmanuals com ...

Page 181: ...n the brake equipped with automatic adjusters which constantly adjust the clearance between the shoe and the drum compensation for wear due to the shoe friction and thus keeping the clearance constant 4 1 GROUP 1 STRUCTURE AND FUNCTION SECTION 4 BRAKE SYSTEM 1 OUTLINE Item Type Service brake shoe size Wheel cylinder bore diameter Master cylinder bore diameter 314Ý80mm 12 4Ý3 15in 34 93mm 1 37in 40...

Page 182: ...4 2 3 BRAKE PEDAL AND PIPING STRUCTURE DRY TYPE D507BS03 1 Brake pedal bracket assembly 2 Parking lever assembly 3 Reservoir tank assembly 4 Brake master cylinder 1 https www forkliftpdfmanuals com ...

Page 183: ...4 3 STRUCTURE WET TYPE D507BS40 1 Brake pedal bracket assembly 2 Parking lever assembly 3 Reservoir tank assembly 4 Brake master cylinder 2 https www forkliftpdfmanuals com ...

Page 184: ...TARTER to T M controller Push AEB STARTER over 3 seconds Confirm the status of AEB from the DISPLAY Normal operation shows ST KR KV K1 K2 K3 orderly for 3 5minutes After the successful completion it displays OK With a new controller it may display F6 error code before AEB but after AEB it will disappear In case of abnormal running it may display STOP with the appropriate error code After troublesh...

Page 185: ...l gear shift Adjust the inching sensor linkage so that the regular voltage is supplied to inching sensor when operating the pedal Regular voltage Before pedal operation 1Ü0 1V After pedal operation 3 5Ü0 1V Stop the engine and then just KEY ON Release parking brake keep neutral gear Connect the AEB STARTER to the T M controller Push AEB STARTER over 3 seconds If display shows ăIP Step on the pedal...

Page 186: ... Washer 4 Holder 5 Spring washer 6 Holder bolt 7 Cylinder assembly 8 Air breather 9 Spring washer 10 Cylinder bolt 11 Lever shoe assembly 12 Brake shoe assembly 13 Adjuster assembly 14 Adjuster bolt 15 Lock washer 16 Return spring 17 Return spring 18 Pressure spring 19 Plug 20 Plug 21 Parking cable LH RH 1 https www forkliftpdfmanuals com ...

Page 187: ...o maintain the gap of both brakes high brake efficiency and minimum disproportional braking deviation is acquired Major components are 4 disk plates 3 5 steel plates 2 service piston 4 parking piston 5 parking lever 9 and brake housing 11 Braking force is applied by restricting the driving force from drive shaft 8 and spline collar 7 1 Spindle 2 Steel plate 3 Disk plate 4 Parking piston 5 Service ...

Page 188: ... 9 Main piston 10 Spring 11 Seal 12 Seal 13 Valve plug 14 Seal 15 Closing plug 16 Stop ring 17 Seal 18 Seal 19 Seal 20 Guide plug 21 Seal 22 Spring guide 23 Spring 24 Ball 25 Check valve housing 26 Sliding guide 27 Seal 28 Seal 29 Vent hole fitting 30 Master cylinder housing 31 Push rod 32 Connector 33 Dust cover 34 Plug 35 Spring 36 Ball 37 Relief valve body 38 Spring 39 Washer 40 Nut 41 Adjustin...

Page 189: ...tructions are being provided in chronological Unscrew the 4 screws 43 in order to be able to separate the front housing 3 from the rear housing 30 Then disassemble the check valve and the limiting pressure valve composed of parts 19 34 42 2 1 36 35 19 34 37 38 41 39 40 42 39 3 30 43 29 44 D507BS08 https www forkliftpdfmanuals com ...

Page 190: ...ide cap 20 and then extract rod 31 and spring 8 After the extraction of the rod 31 remove pin 5 and disassemble parts 1 2 6 7 22 25 Remove piston 27 extracting it from the side opposite to the threaded hole 2 3 32 16 16 33 6 7 1 25 24 23 22 2 5 31 18 17 17 21 20 3 28 26 27 26 37 38 41 39 40 42 39 36 35 19 34 29 44 8 D507BS09 https www forkliftpdfmanuals com ...

Page 191: ... Remove the O ring and the lip seal still inside the pump body with the aid of an L iron Remove all of the other gaskets from the disassembled components namely the drive rod 31 the piston 27 Clean all the components thoroughly and check that there is no ribbing inside the piston slide cylinder 27 of the pump body smooth if necessary Lubricate the components either with mineral or with hydraulic o...

Page 192: ...ide down Take the utmost care in assembling the components shown at stage 4 by assembling first of all valve 13 then piston 9 spring 10 and only afterwards the other components 3 ö ö 13 9 A DETAIL A 10 D507BS11 28 26 27 26 4 30 12 11 13 2 31 18 17 17 21 20 15 14 D507BS12 SEAL KIT ZTAX 00077 Use only brake fluid DOT3 in the compensation reservoirs  https www forkliftpdfmanuals com ...

Page 193: ...sing 7 Spring guide 8 Valve 9 Piston 10 Spring 11 Seal 12 Ring 13 Seal 14 Ball 15 Spring 16 Auxiliary piston 17 Ring 18 Seal 19 Booster piston 20 Sliding guide 21 Seal 22 Seal 23 Booster housing 24 Relief valve body 25 Spring 26 Adjustment screw 27 Washer 28 Nut 29 Plug 30 Ball 31 Spring 32 Seal 33 Plug 34 Seal 35 Push rod 36 Stop ring 37 Connector 38 Dust cover D507BS42 https www forkliftpdfmanua...

Page 194: ...onological Unscrew the 4 screws 23 in order to separate the booster from the brake cylinder housing Separate the two parts and remove the components that are inside from 25 to 36 in order to remove spring 26 and ball 27 you should remove seal 28 from piston containing the seal 25 2 1 36 33 32 31 30 28 27 26 25 29 23 34 35 24 D507BS43 https www forkliftpdfmanuals com ...

Page 195: ...piston 50 O ring housing 29 and valve 34 Clean all the components thoroughly and check that there is no ribbing inside the pisiton slide cylinder 50 of the brake cylinder housing Smooth if necessary Lubricate the components particularly the seals by means of proper oil or better with grease suitable for ATE Automatic test equipment braking systems Take great care not to contaminate components oper...

Page 196: ...in any way 3 ö 1 18 17 16 15 14 13 15 10 11 12 22 21 20 19 3 2 1 4 D507BS45 SEAL KIT ZTAX 00040 Use only brake fluid SAE10W in the compensation reservoirs   SEALS REPLACEMENT IN BRAKE CYLINDERS WITH HYDRAULIC BOOSTER All operations must be carried out with the greatest care following the instructions given carefully The disassembly instructions are being provided in chronological order After dis...

Page 197: ...pin and check for rust or wear When assembling coat sliding parts with special brake grease BRAKE DRUM Measure inside diameter of drum and check that it is within 315mm 12 4in Tighten mounting bolt of drum 2 5 4 0kgfÂm 18 29lbfÂft B BACKING PLATE Check visually for deformation or cracks Check particularly for deformation at outside circumference of plate and at mounting bolt Coat mounting bolt wit...

Page 198: ...able travel at low speed and check braking effect of parking brake B BRAKE PIPING Check pipes hoses and joints for damage oil leakage or interference Operate brake pedal and check operating force when pedal in depressed Check also change in operating force and change in position of pedal when pedal is kept depressed 1 1 2 2 1 2 2 1 D35AtA19 B WET TYPE https www forkliftpdfmanuals com ...

Page 199: ...t tire pressure ÂAdjust ÂClean or replace ÂClean ÂRepair by polishing or replace ÂRepair by polishing ÂReplace ÂRepair or replace ÂRepair or replace ÂAdjust ÂRetighten or replace ÂReplace ÂAdjust or replace ÂClean ÂRepair and add oil ÂBleed air ÂClean or replace ÂRepair by polishing or replace ÂReplace ÂRepair or replace ÂClean c cause Remedy Brake trailing ÂPedal has no play ÂBrake shoe poorly sl...

Page 200: ...l valve orifice clogged ÂAdjust ÂBleed air ÂCheck and repair or add oil ÂReplace ÂRepair ÂRepair ÂAdjust ÂReplace ÂClean or replace Brake squeaks ÂLining surface roughened ÂLining worn ÂPoor shoe to lining contact ÂExcessively large friction between shoe and back plate ÂForeign matter on drum sliding surfa ce ÂDrum sliding surface damaged or di storted ÂBrake shoe deformed or poorly insta lled ÂBa...

Page 201: ...rn port clogged ÂHydraulic system clogged ÂWheel bearing out of adjustment ÂAdjust ÂReplace ÂClean ÂClean ÂAdjust or replace Brake chirps ÂBrake trailing ÂPiston fails to return ÂDisk worn ÂDisk surface roughened ÂSee above Brake trailing ÂReplace ÂReplace ÂRepair by polishing or replace Brake squeaks ÂDisk surface roughened ÂDisk worn ÂExcessively large friction between disk plate ÂRepair by poli...

Page 202: ...at 4 points to confirm that brakes are not dragging After adjusting confirm that brake stopping distance is within standard range 2 3 2 AIR BLEEDING OF BRAKE SYSTEM A DRY TYPE Air bleeding should be performed by two persons One rides on truck for depressing and releasing brake pedal the other person is on the ground and removes cap from air vent plug on wheel cylinder Block the front wheel securel...

Page 203: ... air vent plug and immerse other end of tube into a vessel filled with hydraulic oil Loosen air vent plug by turning it 3 4 with a wrench Depress brake pedal to drain oil mixed with air bubbles from plug hole Depress brake pedal until no air bubbles come out of air vent plug hole After completion of air bleeding securely tighten air vent plug Install cap on plug Same way for the opposite side 1 2 ...

Page 204: ...the stopper can be contacted with the pin and then reassemble nut ÂMicro switch stroke when parking brake is applied 2 3mm 0 08 0 1in 1 1 1 2 3 Η Θ Ι Stopper bolt 4 6 5mm Pedal height Idle stroke 122 128mm D507BS04 Lever stroke P cable stroke Knob Parking cable Micro switch Pin D507BS05 INCHING PEDAL Pedal height from floor plate Adjust with stopper bolt ÂPedal height 122 128mm 4 8 5 0in Adjust bo...

Page 205: ...SECTION 5 STEERING SYSTEM Group 1 Structure and function 5 1 Group 2 Operational checks and troubleshooting 5 11 Group 3 Disassembly and assembly 5 13 https www forkliftpdfmanuals com ...

Page 206: ...rce given to the steering wheel enters the steering unit through the steering column The required oil flow is sensed by the function of the control section of the unit and pressurized oil delivered from the hydraulic pump is fed to the steering cylinder The force produced by the steering cylinder moves the knuckle of steering tires through the intermediate link The axle body is unit structure havi...

Page 207: ...UIT 6 4 2 1 10 LS CF EF T M LS P T 13 5MPa L R 14 MCV Brake valve H P D507SE01 1 Hydraulic gear pump 2 Priority valve 4 Steering unit 6 Steering cylinder 10 Suction filter 14 Hydraulic tank https www forkliftpdfmanuals com ...

Page 208: ... operated so control spool G does not move The oil from hydraulic gear pump 1 enters the port P of priority valve 3 and the inlet pressure oil moves the spool D to the left Oil flow into LS port to the hydraulic tank 14 so the pump flow is routed to the main control valve through the EF port https www forkliftpdfmanuals com ...

Page 209: ...ft hand direction At this time the oil discharged from the pump flows into the spool G the steering unit through the spool D of priority valve and flows the gerotor H Oil flow from the gerotor flows back into the spool G where it is directed out the left work port L Oil returned from cylinder returns to hydraulic tank 14 When the above operation is completed the machine turns to the left https www...

Page 210: ...ght hand direction At this time the oil discharged from the pump flows into the spool G the steering unit through the spool D of priority valve and flows the gerotor H Oil flow from the gerotor flows back into the spool G where it is directed out the right work port R Oil returned from cylinder returns to hydraulic tank 14 When the above operation is completed the machine turns to the right https ...

Page 211: ... ring 3 Cap seal 4 Thrust bearing 5 Ball 6 Pin 7 Spacer 8 Center spring 9 Washer 10 O ring 11 O ring 12 Rolled screw 13 Gerotor set 14 Bearing race 15 Bore screw 16 Drive shaft 17 End cap 18 Bushing 19 Plate 20 Cap screw 21 Housing 22 Spool 23 Sleeve 24 Plate spring 25 Relief valve 25 1 Plug 25 2 O ring 25 3 Spring seat 25 4 Spring 25 5 Spool 25 6 Bushing 26 Check valve 26 1 Guide 26 2 Shim 26 3 S...

Page 212: ...essure and the sleeve is caused to run through the drive shaft and cross pin Therefore when the spool is turned the spool turns by the same value in such a manner that it follows the motion of the spool Steering motion can be accomplished when this operation is performed in a continuous state If the hoses of the steering system are incorrectly connected the steering wheel can turn very rapidly whe...

Page 213: ...ing 7 Orifice 8 Orifice 9 End plug 10 O ring 1 OPERATION The oil from the hydraulic gear pump flows to the priority valve The priority valve supplies a flow of oil to the steering system and lift tilt system The steering flow is controlled by the steering unit to operate the steering cylinder The remainder of the oil flow from the pump flows to the main control valve 2 https www forkliftpdfmanuals...

Page 214: ...pecial washer 22 Split pin 23 Grease nipple 24 Hub 25 Hub bolt 26 Taper roller bearing 27 Taper roller bearing 28 Oil seal 29 Special washer 30 Lock nut 31 Split pin 32 Hub cap 33 Steer cylinder assy 34 Adaptor 35 Cover 36 Hexagon bolt 37 Shim 38 Support 39 Bushing 41 Steer cylinder boot 42 Clamp 43 Hub nut 44 Shim 45 Hexagon bolt 46 Hardened washer 1 38 2 41 38 4 7 8 9 10 11 13 12 14 15 16 17 19 ...

Page 215: ... 51 43 75 87 Split pin Bend correctly 67 5 84 5 kgf m 488 611 lbf ft B Hub nut 61 2 kgf m 443 lbf ft D507SE07 Type Structure of knuckle Toe in Camber Caster King pin angle Maxsteeringangleof wheels Inside Outside Tread Unit degree degree degree degree degree mm in Elliott type 0 0 0 0 75 87 51 43 1604 63 1 Center pin support single shaft https www forkliftpdfmanuals com ...

Page 216: ...and measure camber If camber is not within 0 0 5 rear axle is bent Ask assistant to drive machine at minimum turning radius Fit bar and a piece of chalk at outside edge of counterweight to mark line of turning radius If minimum turning radius is not within 100mm 4in of specified value adjust turning angle stopper bolt Min turning radius Outside HDF 50 7S HDF 70 7S 3290mm 130in 3370mm 133in 2 TROUB...

Page 217: ... variable oil flow Flow control valve orifice clogged Clean Insufficient or variable dischar ge pressure Piping Pipe from tank to pipe dented or clogged Repair or replace Steering cylinder head leakage Piston rod Packing foreign materal Piston rod damage Rod seal damage and distortion Chrome gilding damage Replace Grind surface with oil stone Replace Grind Steering cylinder head thread A little bi...

Page 218: ...1 Dust seal 2 Retaining ring 3 Cap seal 4 Thrust bearing 5 Ball 6 Pin 7 Spacer 8 Center spring 9 Washer 10 O ring 11 O ring 12 Rolled screw 13 Gerotor set 14 Bearing race 15 Bore screw 16 Drive shaft 17 End cap 18 Bushing 19 Plate 20 Cap screw 21 Housing 22 Spool 23 Sleeve 24 Plate spring 25 Relief valve 26 Check valve https www forkliftpdfmanuals com ...

Page 219: ...5 14 TOOLS Holding tool 2 1 Assembly tool for O ring and kin ring 2 Assembly tool for lip seal 3 Assembly tool for cardan shaft 4 5 69 1 5 69 2 5 69 3 5 69 4 https www forkliftpdfmanuals com ...

Page 220: ...ing spanner 6 8 and 12mm hexagon socket spanners Plastic hammer Tweezers 6 5 70 1 5 70 2 D353SE23 TIGHTENING TORQUE L Left port R Right port T Tank P Pump 3 Port L R T P Mounting bolt Size 3 4 16UNF 3 4 16UNF 3 4 16UNF 3 4 16UNF M10 1 5 Torque kgf m lbf ft 6 1 0 6 44 4 3 6 1 0 6 44 4 3 6 1 0 6 44 4 3 6 1 0 6 44 4 3 4 0 0 5 29 3 6 https www forkliftpdfmanuals com ...

Page 221: ...t in the holding tool Screw out the screws in the end cover 6 off plus one special screw 4 1 Remove the end cover sideways 2 Lift the gearwheel set With spacer if fitted off the unit Take out the two O rings 3 Remove cardan shaft 4 5 72 1 5 72 2 5 72 3 5 72 4 https www forkliftpdfmanuals com ...

Page 222: ...istributor plate 5 Screw out the threaded bush over the check valve 6 Remove O ring 7 Shake out the check valve ball and suction valve pins and balls 8 5 73 1 5 73 2 5 73 3 D353SE09 https www forkliftpdfmanuals com ...

Page 223: ...e close to one of the slots for the neutral position springs See drawing If the mark is not visible remember to leave a mark of your own on sleeve and spool before the neutral position springs are disassembled Take care to keep the cross pin in the sleeve and spool horizontal The pin can be seen through the open end of the spool Press the spool inwards and the sleeve ring bearing races and thrust ...

Page 224: ...spool 13 Remove dust seal and O ring 14 Disassembling the pressure relief valve Screw out the plug using an 8mm hexagon socket spanner Remove seal washers 15 Carefully press the spool out of the sleeve 12 5 74 4 5 75 1 5 75 2 D353SE10 https www forkliftpdfmanuals com ...

Page 225: ... an 8mm hexagon socket spanner 16 Shake out spring and piston The valve seat is bonded into the housing and cannot be removed 17 The pressure relief valve is now disassem bled 18 D353SE11 D353SE12 D353SE13 https www forkliftpdfmanuals com ...

Page 226: ...lace the slots and holes opposite each other so that parts of the holes in the sleeve are visible through the slots in the spool 5 1 Place the two flat neutral position springs in the slot Place the curved springs between the flat ones and press them into place see assembly pattern 2 Line up the spring set 3 5 76 1 5 76 2 5 76 4 Guide the spool into the sleeve Make sure that spool and sleeve are p...

Page 227: ...rings into place in the sleeve 5 Line up the springs and center them 6 Guide the ring down over the sleeve The ring should be able to rotate free of the springs 7 5 77 2 5 77 3 5 77 4 Fit the cross pin into the spool sleeve 8 5 78 1 https www forkliftpdfmanuals com ...

Page 228: ...rd bearings 1 Outer bearing race 2 Thrust bearing 3 Inner bearing race 4 Spool 5 Sleeve Installation instruction for O ring Turn the steering unit until the bore is horizontal Guide the outer part of the assembly tool into the bore for the spool sleeve 10 5 78 2 5 78 3 5 78 4 https www forkliftpdfmanuals com ...

Page 229: ... 11 Hold the outer part of the assembly tool in the bottom of the steering unit housing and guide the inner part of the tool right to the bottom 12 Press and turn the O ring into position in the housing 13 5 79 1 5 79 2 5 79 3 5 79 4 https www forkliftpdfmanuals com ...

Page 230: ...oil and place it on the assembly tool 15 Guide the assembly tool right to the bottom 16 Draw the inner and outer parts of the assembly tool out of the steering unit bore leaving the guide from the inner part in the bore 14 5 80 1 5 80 2 5 80 3 5 80 4 https www forkliftpdfmanuals com ...

Page 231: ...re is vertical again Put the check valve ball into the hole indicated by the arrow 20 Press and turn the lip seal into place in the housing 17 With a light turning movement guide the spool and sleeve into the bore Fit the spool set holding the cross pin horizontal 18 5 81 1 5 81 2 5 81 3 5 81 4 https www forkliftpdfmanuals com ...

Page 232: ... the bore so that the slot is parallel with the connection flange 24 Screw the threaded bush lightly into the check valve bore The top of the bush must lie just below the surface of the housing 21 Grease the O ring with mineral oil approx viscosity 500 cSt at 20C 22 5 82 1 5 82 2 5 82 3 5 82 4 https www forkliftpdfmanuals com ...

Page 233: ...h holes match the holes in the housing 27 Fit the spacer if any 28 Place the cardan shaft as shown so that it is held in position by the mounting fork 25 Grease the two O rings with mineral oil approx viscosity 500 cSt at 20 C and place them in the two grooves in the gear rim Fit the gearwheel and rim on the cardan shaft 26 5 83 1 5 83 2 5 83 3 5 83 4 https www forkliftpdfmanuals com ...

Page 234: ...rews and the rolled pin Tightening torque 4 0 0 5kgf m 28 9 3 6lbf ft 31 Place the dust seal ring in the housing 32 Place the end cover in position 29 Fit the special screw with washer and place it in the hole shown 30 5 84 1 5 84 2 5 84 3 5 84 4 https www forkliftpdfmanuals com ...

Page 235: ...5 30 Fit the dust seal ring in the housing 33 Press the plastic plugs into the connection ports Do not use a hammer 34 5 85 1 5 85 2 https www forkliftpdfmanuals com ...

Page 236: ...5 31 2 PRIORITY VALVE STRUCTURE D353SE07 1 Body 2 Spool 3 Spring plug 4 End plug 5 Spring 6 O ring 7 Orifice 8 Orifice 9 End plug 10 O ring 1 https www forkliftpdfmanuals com ...

Page 237: ...unding area of valve ports 2 Fix the body 1 in a vise with copper or lead sheets Do not over tighten jaws Loosen plug 3 for LS port 1 2 Remove spring 5 3 Remove spool assy 2 Can t remove the orifice 7 and orifice 8 from spool 2 because the orifices were locked at the spool 4 EF CF LS EF CF LS EF CF LS D353SE14 D353SE15 D353SE16 https www forkliftpdfmanuals com ...

Page 238: ...s and rust Do not wipe dry with cloth or paper towel Replace seals such as O ring with new ones as a rule and coat with grease Fix the body 1 in a vise Insert the spool 2 Secure the spool 2 remain in their correct direction Secure the spool 2 to move smoothly by finger 1 2 EF CF LS D353SE18 Insert the spring 5 into the body 1 3 EF CF LS D353SE19 3 https www forkliftpdfmanuals com ...

Page 239: ...5 34 Install the O ring 6 onto plug 3 4 and install the plug 3 4 into the body 1 Tighten torque 4 5kgf m 32 5lbf ft 4 D353SE20 https www forkliftpdfmanuals com ...

Page 240: ...07SE21 1 Tube assy 2 Rod 3 Piston seal 4 Gland 5 Bushing Specifications Cylinder bore 80mm Outer diameter 94mm Stroke half 150mm Rod diameter 55mm 6 Rod seal 7 Back up ring 8 Dust wiper 9 Snap ring 10 O ring 11 Back up ring 12 O ring 13 Lock washer 14 Pin bushing 1 https www forkliftpdfmanuals com ...

Page 241: ... Check item Remaks Criteria Clearance between piston cylinder tube Clearance between cylinder rod bushing Seals O ring Cylinder rod Cylinder tube Replace piston seal Replace bushing Replace Replace Replace 0 05 0 25 0 002 0 01 0 05 0 18 0 002 0 007 Damage Dents Biting Standard size Repair limit 0 4 0 02 0 3 0 01 mm in ASSEMBLY Install a new piston seal 3 around the groove on the piston Be careful ...

Page 242: ... it is needed to calk again never calk on the same place 6 4 D507SE31 Move the piston rod back and forth several times for the full distance of its stroke This helps to seat the ring and seals before applying full hydraulic pressure to the cylinder Install cylinder into trail axle While idling the engine with the rear wheels off the ground operate the steering wheel left and right alternately Then...

Page 243: ...sher 9 Shim washer 10 Set screw 11 Hexagon nut 12 Gasket 13 Cover 14 With washer bolt 15 Grease nipple 16 Hexagon bolt 17 Hexagon nut 18 Link 19 Inner race bushing 20 Link pin 21 Special washer 22 Split pin 23 Grease nipple 24 Hub 25 Hub bolt 26 Taper roller bearing 27 Taper roller bearing 28 Oil seal 29 Special washer 30 Lock nut 31 Split pin 32 Hub cap 33 Steer cylinder assy 34 Adaptor 35 Cover ...

Page 244: ...aft Replace Adjust shim Replace OD of king pin OD of steering cylinder pin Knuckle A1 A2 D1 D2 D3 OD of pin Vertical play ID of bushing OD of shaft ID of bushing 60 2 4 60 2 4 50 2 0 22 0 9 22 0 9 22 0 9 59 5 2 3 59 5 2 3 49 8 2 0 21 9 0 9 21 9 0 9 0 2 0 008 22 5 0 9 OD Outer diameter ID Inner diameter https www forkliftpdfmanuals com ...

Page 245: ...se same oil seal twice Repeat the same procedure for the other side Moreover when disassembling is completed part the lock nut in the knuckle to protect the threaded portion 2 3 4 5 6 7 1 Hub cap Spilt pin Lock nut Roller bearing Hub Roller bearing Oil seal Knuckle Washer D353SE24 D507SE26 2 4 10 11 13 12 14 15 5 14 12 13 15 4 5 6 22 21 20 D507SE37 Loosen set screw 10 and nut 11 Loosen with washer...

Page 246: ... fixed ring of the bearing is placed in position facing the knuckle 2 Hub Mount oil seal 28 and inner race of tapered roller bearing 26 on the knuckle The bearing should be well greased before assembling Install the outer race of the bearing 27 in the wheel center and assemble to the knuckle Put washer 29 in place tighten with nut 31 and locked with split pin 30 In locking with split pin locate th...

Page 247: ...SECTION 6 HYDRAULIC SYSTEM Group 1 Structure and function 6 1 Group 2 Operational checks and troubleshooting 6 15 Group 3 Disassembly and assembly 6 19 https www forkliftpdfmanuals com ...

Page 248: ... 18 5MPa 15 0MPa 6 12 8 11 7 3 4 13 5 2 1 10 9 14 A4 D507HS01 1 Hydraulic gear pump 2 Priority valve 3 Main control valve 4 Steering unit 5 Brake valve 6 Steering cylinder 7 Tilt cylinder 8 Lift cylinder 9 Suction filter 10 Return filter 11 Down control valve 12 Down safety valve 13 Accumulator 14 Hydraulic tank https www forkliftpdfmanuals com ...

Page 249: ... 1 When the lift control lever is pulled back the spool on the first block is moves to lift position The oil from hydraulic gear pump 1 flows into main control valve 3 and then goes to the large chamber of lift cylinder 8 by pushing the load check valve of the spool The oil from the small chamber of lift cylinder 8 returns to hydraulic oil tank 14 at the same time When this happens the forks go up...

Page 250: ...urn line D507HS03 WHEN THE LIFT CONTROL LEVER IS IN THE LOWER POSITION 2 When the lift control is pushed forward the spool on the first block is moved to lower position The work port B1 and the small chamber and the large chamber are connected to the return passage so the lift will be lowered due to its own weight https www forkliftpdfmanuals com ...

Page 251: ... 3 When the tilt control lever is pushed forward the spool on the second block is moved to tilt forward position The oil from hydraulic gear pump 1 flows into main control valve 3 and then goes to the large chamber of tilt cylinder 7 by pushing the load check valve of the spool The oil at the small chamber of tilt cylinder 7 returns to hydraulic tank 14 at the same time When this happens the mast ...

Page 252: ...ION 4 When the tilt control lever is pulled back the spool on the second block is moved to tilt backward position The oil from hydraulic gear pump 1 flows into main control valve 3 and then goes to the small chamber of tilt cylinder 7 by pushing the load check valve of spool The oil at the large chamber of tilt cylinder 7 returns to hydraulic tank 14 at the same time When this happens the mast til...

Page 253: ... Rear cover 4 Cover 5 Thrust plate 6 Thrust plate 7 Drive gear 8 Driven gear 9 Drive shaft 10 Driven gear 11 Screw 12 Screw 13 Grub screw 14 Washer 15 Washer 16 Seal 17 Seal 18 Parker ring 19 Seal 20 Shaft seal 21 Ring 22 Back up ring 23 Back up ring 24 Sleeve bearing 25 Flange 26 Hub 27 Dowel pin 28 Steel bushing 1 https www forkliftpdfmanuals com ...

Page 254: ...end 21 Spring 22 Spool 23 Main relief valve 24 Spool 25 Piston 26 Spool 27 O ring 28 Inlet housing 29 Spool housing 30 Spool housing 31 Spool housing 32 Outlet housing 33 Poppet 34 Tie rod 35 Tie rod 36 Special nut 37 Inlet section assy 38 Outlet section assy 39 Spool section assy 40 Spool section assy 41 Spool section assy 1 Port name Inlet port Outlet port Gauge port Work port Size 1 5 16 12UNF ...

Page 255: ...l passage is closed The oil supplied from the pump pushes up the load check valve 1 and flow into lift cylinder port B1 The pump pressure reaches proportionally the load of cylinder and fine control finished by shut off of the neutral passage The return oil from cylinder flows into the tank D353HS08 https www forkliftpdfmanuals com ...

Page 256: ... pushed forward the spool moves to the left and the neutral passage is closed The spool moves to the lift lower position opening up the neutral passage to tank and B1 T In lift lower position the fork drops due to its own weight https www forkliftpdfmanuals com ...

Page 257: ...e is closed The oil supplied from the pump pushes up the load check valve 1 and flow into tilt cylinder port A2 The pump pressure reaches proportionally the load of cylinders and fine control finished by closing the neutral passage The return oil from cylinder port B2 flows into the tank through the hole of the tilt lock spool https www forkliftpdfmanuals com ...

Page 258: ...d The oil supplied from the pump pushes up the load check valve 1 and flows into tilt cylinder port B2 The pump pressure reaches proportionally the load of cylinder and fine control finished by shut off of the neutral passage The return oil from cylinder port A2 flows into the tank via the low pressure passage https www forkliftpdfmanuals com ...

Page 259: ... reach the set pressure of the relief unit Procedure Loosen lock nut Set adjusting nut to desired pressure setting If desired pressure setting cannot be achieved add or remove shims as required Tighten lock nut Retest in similar manner as above 4 1 D503HS99 Function As work port relief The relief valve is in communication between the high pressure port HP and low pressure LP Oil is admitted throug...

Page 260: ... This shuts off the oil flow to the area behind relief valve poppet D and causes a low pressure area internally As anti void The anti void unit supplies oil to the high pressure port HP when cavitation has occurred A lower pressure exists in the port HP compared to the low pressure chamber LP The difference between the effective area of diameter A and G causes imbalance of the check valve poppet K...

Page 261: ...5 O ring 16 Spacer 17 O ring 5 TILT CYLINDER 18 1 2 13 14 15 16 17 23 12 11 5 6 3 9 10 19 20 21 7 8 4 22 24 D507HS13 1 Tube assy 2 Rod 3 Gland 4 DU bushing 5 Rod seal 6 Back up ring 7 Dust wiper 8 Snap ring 9 O ring 10 Back up ring 11 Lock washer 12 O ring 13 Piston 14 O ring 15 Piston seal 16 Wear ring 17 Nylon nut 18 Rod eye 19 Hexagon bolt 20 Hexagon nut 21 Spring washer 22 DU bushing 23 Grease...

Page 262: ...for 10 minutes and measure hydraulic drift amount forks move down and amount mast tilts forward ÂH Hydraulic drift Down Downward movement of forks Within 100mm 3 9in Forward Extension of tilt cylinder Within 5Á If the hydraulic drift is more than the specified value replace the control valve or cylinder packing Check that clearance between tilt cylinder bushing and mounting pin is within standard ...

Page 263: ...l flow on pump suction side Relief valve fails to keep specified pressure Poor sealing inside cylinder High hydraulic oil viscosity Mast fails to move smoothly Oil leaks from lift control valve spool Oil leaks from tilt control valve spool Excessive restriction of oil flow pump suction side Gear or bearing in hydraulic pump defective Foreign matter jammed between sp ool and valve body Valve body d...

Page 264: ...tion of line Drain reservoir fill with non foaming oil Replace shaft seal Replace drive shaft and seal Cause Remedy HYDRAULIC GEAR PUMP 2 MAIN RELIEF VALVE A good pressure gauge must be installed in the line which is in communication with the main relief A load must be applied in a manner to reach the set pressure of the main relief unit Then follow these steps Loosen lock nut Set adjusting nut to...

Page 265: ...aged Scores on inner surface of tube Unallowable score on the inner suface of tube Foreign matters in piston seal Excessive clearance between cylinder tube and wear ring Insufficient lubrication of anchor pin or worn bushing and pin Bent tilt cylinder rod Replace packing Smooth rod surface with an oil stone Replace dust seal Replace rod Replace O ring Smooth rod surface with an oil stone Replace c...

Page 266: ... Body 2 Body 3 Rear cover 4 Cover 5 Thrust plate 6 Thrust plate 7 Drive gear 8 Driven gear 9 Drive shaft 10 Driven gear 11 Screw 12 Screw 13 Grub screw 14 Washer 15 Washer 16 Seal 17 Seal 18 Parker ring 19 Seal 20 Shaft seal 21 Ring 22 Back up ring 23 Back up ring 24 Sleeve bearing 25 Flange 26 Hub 27 Dowel pin 28 Steel bushing https www forkliftpdfmanuals com ...

Page 267: ... faces are super finished Take care not to touch these surfaces after oil and solvent Lubrication of moving parts During assembly all running surfaces Bearing and wear plate must be lightly lubricated with a clean oil or aerosol lubricant Tools required for assembly Socket set 1 2 drive Internal snap ring pliers Shaft seal sleeve or clear tape Torque wrench 200lbf ft capacity Plastic hammer Torque...

Page 268: ...l 20 when removing the cover 4 9 11 2 4 20 D507PMP04 1 Remove the cover 4 taking care to keep the cover as straight as possible during removal If cover 4 is stuck tap around the edge with rubber mallet in order to break away from the body 2 Ensure that while removing cover 4 shaft and other components remain position 4 2 D507PMP05 Ease the drive gear 9 up to facilitate removal the thrust plate 6 R...

Page 269: ...nap ring 21 in pre arranged position with proper tool 21 20 Cover D507PMP07 3 1 Front section Fit the parker ring 18 on the pre arrang ed groove of the body 2 Smear clean grease on the parker ring to avoid drifting away of parker ring from the body 2 18 D507PMP08 Locate the seals 17 on the groove pre arranged on the thrust plate 6 Then locate back up ring 23 on the groove pre arranged on the seals...

Page 270: ...tention to the direction of seal opened side should face suction side always 17 23 17 23 6 25 2 D507PMP11 Locate driving gear 9 and driven gear 10 while keeping the gears straight Locate pressure plate 6 17 23 with care for the direction 9 10 D507PMP12 Locate complete cover 4 20 21 while taking care not to give any damage on the shaft seal by edge of shaft And tap around the cover 4 with rubber ma...

Page 271: ...ed on the thrust plates 5 Then locate back up ring 22 on the groove pre arranged on the seals 16 Smear clean grease on the seals 22 16 The front and rear thrust plates and seals and back up rings are same 5 16 22 22 16 D507PMP16 Insert the complete pressure plate 5 22 16 into body while keeping the plate straight Seal side should face to the rear cover 3 opposite side of gears Pay attention to the...

Page 272: ... 8 1 22 16 D507PMP18 Locate hub 26 into rear section 26 Rear section D507PMP19 Tighten the bolts 12 with washer 14 in a crisscross pattern to torque value of 4 6kgf m 33 3lbf ft Check that the pump rotate freely when the drive shaft is turned by hand If not a thrust plate seal may be pinched 12 14 D507PMP20 https www forkliftpdfmanuals com ...

Page 273: ... place O ring into position Place first spool section O ring side up on inlet section position O ring and insert load check poppet Nose down and spring Behind poppet into load check cavity as shown Repeat this procedure for each spool section The load check springs are compressed by the following sections during assembly Position end section on last spool section as shown and hand tighten tie rod ...

Page 274: ...ue the two 11 16 nuts to 48 5lbf ft Final torque the 3 4 nut to 74 8lbf ft Check for proper spool movement 5 Install auxiliary valves and plugs and torque to proper specifications General assembly notes A Lever assemblies can be installed on section before or after complete valve assembly B The load check and spring may be omitter from assembly in certain circuit conditions i e motor spools 6 7406...

Page 275: ...ing 7 Cushion seal 8 Retainning ring 9 Retainning ring 10 Gland 11 Du bushing 12 Rod seal 13 Dust wiper 14 O ring 15 O ring 16 Spacer 17 O ring 1 10 2 11 12 13 3 4 9 5 14 15 6 16 17 8 7 D507HS19 I D O D stroke standard 85 98 1335mm 3 3 3 9 52 6in Rod O D 60mm 2 4in https www forkliftpdfmanuals com ...

Page 276: ...D INSPECTION 2 2 1 ASSEMBLY Soak the piston ring in hydraulic oil at a temperature of 40 to 50 C expand the inside diameter and assemble on the piston Install a piston seal Bend the edge of the guide and rotate it to install the guide completely 3 1 Check item Standard size Remedy Repair limit Clearance between cylinder rod bushing Clearance between piston ring tube 0 05 0 25 0 002 0 01 0 05 0 35 ...

Page 277: ...k washer 12 O ring 13 Piston 14 O ring 15 Piston seal 16 Wear ring 17 Nylon nut 18 Rod eye 19 Hexagon bolt 20 Hexagon nut 21 Spring washer 22 DU bushing 23 Grease nipple 24 O ring 1 22 19 2 21 20 7 3 10 6 13 15 16 17 4 22 8 5 12 9 14 24 18 23 23 23 11 D507HS22 I D O D stroke 110 124 338mm 4 3 4 9 13 3in Rod O D 50mm 2 0in https www forkliftpdfmanuals com ...

Page 278: ...e the cylinder head from cylinder tube When doing this wind tape round the threaded part of the rod and be careful not to damage the dust seal and rod seal inside cylinder head 2 3 1 Check item Standard size Remedy Repair limit Clearance between cylinder rod bushing Clearance between rod head bushing pin 0 072 0 288 0 003 0 011 0 10 0 35 0 004 0 014 0 5 0 020 0 6 0 024 Replace bushing Replace bush...

Page 279: ...LECTRICAL SYSTEM Group 1 Component location 7 1 Group 2 Electrical circuit 7 2 Group 3 Component specification 7 12 Group 4 Connector destination 7 13 Group 5 Troubleshooting 7 15 https www forkliftpdfmanuals com ...

Page 280: ...Detector 5 Flasher unit 6 Relay 5P 7 Beacon switch 8 Work lamp switch 9 Inching switch 10 Auto manual switch 11 Hazard switch 12 Transmission temp gauge 13 Relay 4P 14 Beacon lamp 15 Battery 16 Gear selector 17 Combination switch 18 Work lamp 19 Flasher unit 20 Horn switch 21 Start switch 22 High horn 23 Brake switch 24 Glow relay 25 Master switch 26 License lamp 27 RH combination lamp 28 Back hor...

Page 281: ...7 2 GROUP 2 ELECTRICAL CIRCUIT SECTION 7 ELECTRICAL SYSTEM D507SEL011 1 HDF50 70 7S https www forkliftpdfmanuals com ...

Page 282: ...7 3 2 HDF50 70 7 https www forkliftpdfmanuals com ...

Page 283: ...7 3 MEMORANDUM https www forkliftpdfmanuals com ...

Page 284: ...Start motor CN 45 B Fusible link CN 60 Glow relay CR 24 3 Start relay CR 23 Fusible link CN 95 Alternator CN 74 B CN 3 I conn CS 2 3 Start switch OFF Fuse box CN 36 1 Combi switch CS 11 2 Fuse box CN 36 2 I conn CN 11 1 2 TCU CN 50 1 CHECK POINT 2 Engine OFF Key switch OFF Voltage 10 13V Check point GND Battery GND Fusible link GND Fuse No 1 GND Fuse No 2 GND Start key GND Ground https www forklif...

Page 285: ...2 21 20 19 18 17 16 15 14 13 12 11 10 9 8 7 6 5 4 3 2 1 40 39 38 37 36 35 34 33 32 31 30 29 28 27 26 25 24 FUSE BOX COMBI SW WORK LAMP HEAD LAMP 160 102 103 103 TURN BACK LAMP CONVERT ALTERNATOR 100 103 101 100 1 2 START RY 101 1 2 U 3 G R I B ALTERNATOR M M B START MOTOR MASTER SW BATTERY 12V X 2 38R 38B 38B 10A 12 START RELAY 15A 11 OPTION 10A 10 10A 9 10A 8 STOP TAIL LAMP 10A 7 15A 6 10A 5 OPER...

Page 286: ...key switch is in ON position Start switch ON CS 2 4 Fuse box No 5 3 Gear selector switch CS 15 3 When start key switch is START position Start switch START CS 2 2 Fuse box No 12 Anti restart relay CR 36 1 2 1 1 2 CHECK POINT 2 Engine Running Key switch ON Voltage 10 14 5V Check point GND Battery B GND Fusible link GND Fuse box No 5 12 GND Start key GND Anti restart relay GND Ground https www forkl...

Page 287: ...X WORK LAMP HEAD LAMP 115 103 TURN BACK LAMP CONVERT ALTERNATOR 100 101 100 1 2 START RY 101 1 2 U 3 G R I B ALTERNATOR M M B START MOTOR MASTER SW BATTERY 12V X 2 38R 38B 38B 10A 12 START RELAY 15A 11 OPTION 10A 10 10A 9 10A 8 STOP TAIL LAMP 10A 7 15A 6 10A 5 OPERATING PANEL 10A 4 10A 3 TCU 10A 2 HORN OPT 103 10A 1 TCU B 12 11 1 2 3 4 5 6 7 8 9 10 IG B B 468 423 4 3 2 1 B BR R1 R2 HT OFF ON ST C ...

Page 288: ...tery terminal Charging 1 1 2 CHECK POINT GND Ground Cautions 1 When using an arc welder always disconnect the ground lead from the battery to prevent alternator or battery damage 2 Attach the welding ground clamp as close to the weld area as possible to prevent welding current from damaging the bearings of the alternator 3 Do not disconnect the battery when the engine is running The voltage surge ...

Page 289: ...RELAY 15A 11 OPTION 10A 10 10A 9 10A 8 STOP TAIL LAMP 10A 7 15A 6 10A 5 OPERATING PANEL 10A 4 10A 3 TCU 10A 2 HORN OPT 103 10A 1 TCU B 4 3 2 1 B BR R1 R2 HT OFF ON ST C ACC R W L Br CN 3 CN 95 CR 23 CN 74 CN 45 CS 2 CN 36 START KEY SW 103 2 105 104 141 000 115 CR 36 1 2 4 6 3 2 6 4 1 3 ANTI RESTART RELAY 3 3 141 105 104 OPERATING PANEL CN 56 8 7 6 5 4 3 2 1 114 115 115 114 CN 2 1 CN 48 3 D507EL04 ...

Page 290: ... ON position the glow relay makes the glow plugs operated and the glow lamp of the cluster turned ON Start switch ON CS 2 4 Fuse box NO 5 10 Glow timer CN 62 6 4 I conn CN 2 4 Glow relay ON CR 24 Glow plug operating CN 80 I conn CN 1 2 Operatring panel CN 56 7 Glow lamp ON 1 CHECK POINT 2 Engine Stop Key switch HEAT Voltage 10 13V Check point GND Battery B GND Fusible link GND Glow plug GND Glow r...

Page 291: ...12 START RELAY 15A 11 OPTION GLOW 10A 10 10A 9 10A 8 STOP TAIL LAMP 10A 7 15A 6 10A 5 OPERATING PANEL 10A 4 10A 3 TCU 10A 2 HORN OPT 103 10A 1 TCU B 4 3 2 1 B BR R1 R2 HT OFF ON ST C ACC R W L Br CN 60 CR 24 CN 3 CN 95 CR 23 CN 74 CN 45 CS 2 CN 36 START KEY SW 103 2 1 5 OPERATING PANEL CN 56 CN 48 6 8 7 6 5 4 3 2 1 113 113 CN 2 106 GLOW PLUG CN 80 105 105 113 156 000 1 2 3 4 5 6 GLOW TIMER CN 62 8...

Page 292: ... Switch Beacon Inching Auto manual Switch Start switch Qty 2 1 1 2 2 2 1 3 3 1 1 1 1 1 1 1 1 1 1 1 1 1 1 Specification 12VÝ90AH RC 130min CCA 630A 24V 70W 24V 3W x 2 24V 25 10W Stop Tail 24V 25W Turn 24V 10W Back Up 24V 70W 24V 25 10W 24V 300A 24V 20A 24V 6A 85Ü10CM 21W 21W x 2 3W x 2 12V 2A Input 24V Output 12V 10A 24V 90Ü5dB 60Ü10C M 24V 1 5A 105 115 dB Float indicate Resistance ɮ Tolerance ɮ 24...

Page 293: ...rn Fuse box Start motor Hour meter Transmission control unit Diagnostic Operating panel Detector Indicator Fusible link Glow timer Back buzzer Alternator Fuel shut off solenoid Glow plug Fusible link Gearbox Transmission temperature gauge Converter Start switch Combination switch Combination switch Gear selector switch Gear selector switch Parking switch S814 012001 S814 008001 MG640944 5 S810 004...

Page 294: ...y Back up relay Anti restart relay Illumination relay Fuel sendor Brake switch Water temperature sensor Air cleaner switch Engine oil pressure switch Turbin speed sensor T M temperature sensor Inching sensor Gear train speed sensor Output speed sensor Engine speed sensor Oil filter switch 593757 593757 593757 593757 593757 S814 006100 S814 006100 S822 014000 S810 004201 S810 003702 S810 004201 S81...

Page 295: ...with starting switch left in ON position Caution lamp defective Caution lamp switch defective Replace Replace Faulty wiring Glow plug damaged Check and repair Replace Faulty wiring Insufficient battery voltage Check and repair Recharge battery Insufficient battery voltage Starting motor defective Recharge battery Replace Insufficient battery voltage Recharge battery Faulty wiring Insufficient batt...

Page 296: ...SECTION 8 MAST Group 1 Structure 8 1 Group 2 Operational checks and troubleshooting 8 5 Group 3 Adjustment 8 8 Group 4 Disassembly and assembly 8 10 https www forkliftpdfmanuals com ...

Page 297: ...ift cylinder 5 4 8 9 12 Drive Axle 3 Inner master D507MS01 1 Outer mast 2 Roller bearing 3 Tilt cylinder pin 4 Mast mounting pin 5 Lift chain 6 Anchor bolt 7 Side roller bearing 8 Inner mast 9 Chain sheave bearing 10 Anchor bolt 11 Roller bearing 12 Side roller bearing https www forkliftpdfmanuals com ...

Page 298: ...Middle master 3 13 10 4 9 9 10 10 12 2 11 Free Lift cylinder Inner master 11 3 D507MS011 1 Outer mast 2 Shim 3 Roller bearing 4 Side roller bearing 5 Tilt cylinder pin 6 Mast mounting pin 7 Wear plug 8 Middle mast 9 Sheave 10 Anchor bolt 11 Chain 12 Sheave bracket 13 Inner mast https www forkliftpdfmanuals com ...

Page 299: ... 3 CARRIAGE BACKREST AND FORK HOOK ON TYPE STD Hook on type fork 5 3 4 1 2 Extension fork 6 D507MS03 1 Backrest 2 Carriage 3 Roller 4 Side roller 5 Fork 6 Extension fork 1 https www forkliftpdfmanuals com ...

Page 300: ... SHAFT TYPE OPTION Shaft type fork 6 2 2 3 4 5 Extension fork 7 D507MS02 1 Carriage backrest 2 Hanger bar 3 Fork retaining 4 Roller 5 Side roller 6 Fork 7 Extension fork 2 https www forkliftpdfmanuals com ...

Page 301: ...and check front to rear clearance and left to right clearance between inner mast and fork carriage and between outer mast and inner mast Use these figures to judge if there is any play at roller or rail Front to rear clearance Within 2 0mm 0 08in Left to right clearance Within 2 5mm 0 10in Check that there is an oil groove in bushing at mast support Set mast vertical raise forks about 10cm from gr...

Page 302: ...y Faulty hydraulic equipment Deformed mast assembly Deformed masts or carriage Faulty hydraulic equipment Damaged load and side rollers Unequal chain tension between LH RH sides LH RH mast inclination angles are unequal Mast assembly is twisted when tilted Disassemble repair or replace See troubleshooting hydraulic pump and cylinders in section 6 hydraulic system Disassemble mast and replace damag...

Page 303: ...unevenly Difference in fork tip height 15mm Difference in fork tip width 35mm Fatigue failure may result from the fatigue crack even though the stress to fork is below the static strength of the fork Therefore a daily inspection should be done Crack on the fork heel Crack on the fork weldments If the measured value is below the wear limit replace fork If the measured value exceeds the allowance re...

Page 304: ...rance between the roller side face and mast at the closest position on the opposite side to the following value by adjust bolt Standard clearance A B 0 0 6mm 1 1 2 D503MS04 D503MS05 INNER OUTER MAST ROLLER CLEARANCE ADJUSTMENT Distribute the roller clearance equally to the left and right roller After the adjustment check that the inner mast moves smoothly in the outer mast 3 4 https www forkliftpd...

Page 305: ...rriage to one side to bring the roller into contact with the inner mast and measure the clearance between the roller side face and mast at the closest position on the opposite side to the following value by adjust screw Standard clearance C 0 0 6mm Distribute the roller clearance equally to the left and right roller After the adjustment the carriage should move smoothly along the overall mast leng...

Page 306: ...bove procedure to install load forks 1 2 BACKREST Hook on type Remove bolts securing backrest to fork carriage Lift backrest straight up and remove from carriage Position backrest on carriage and lower in place Install and tighten bolts 1 2 1 2 3 4 SHAFT TYPE Option Lower the fork carriage until the forks are approximately 25mm 1in from the floor Release fork retainer and remove cover Slide one ha...

Page 307: ...split pin of chain anchor with new one 1 1 2 3 4 5 6 SIDE ROLLER Remove carriage as outlined in the carriage removal paragraph Loosen and remove nuts adjust screws and side rollers from carriage side plate Thoroughly clean inspect and replace all worn or damaged parts Reverse the above procedure to assem bly Adjustment Once carriage is properly installed loosen nuts and adjust screws if not alread...

Page 308: ... above procedure to assemble Refer to MAST ROLLER ADJUSTMENT paragraph After completing all necessary steps for load rollers removal use an overhead hoist to remove sling or chain around upper crossmember of the inner mast section Lift inner mast upright straight up and out of outer mast section Replace and reverse above procedure to install Make all necessary measurements and adjustments 8 12 1 1...

Page 309: ...Remove retaining rings securing chain sheaves to sheave support brackets while supporting chains remove chain sheaves and let chains hang free The upper outer and lower middle mast rollers and back up liners are now exposed Using a plier remove load rollers from load bracket Remove side rollers from mast Attach chains or sling to the middle mast section at top crossmember Using an overhead hoist s...

Page 310: ...place all worn or damaged parts Reverse the above to assemble and install Use new split pins in chain anchor pins Rear chain sheave TF mast Raise and securely block carriage and inner mast section Remove the split pin securing the chain anchor pins and discard Remove chains Remove retaining ring securing chain sheaves to sheave support Pry off sheaves with bearings Remove bearing retaining ring fr...

Page 311: ...in Place a sling around carriage front plate and attach to an overhead hoist Lift and secure carriage high enough so that split and chain anchor pins on carriage can be easily be removed Remove chain anchor pins from carriage and drape chains out over carriage Place a wooden block under the carriage and lower the carriage on the block While supporting the chains remove split pins and chain anchor ...

Page 312: ...ed plate edges Oil rusty chains and replace chains with bent or peened components Protruding or turned pins Heavily loaded chains operating with lube generate tremendous friction between pins and plates In extreme cases the frictional torque in the joint can actually turn pins in the press fit outside plates If chain is allowed to operate in this condition the pins slowly work out of the chain cau...

Page 313: ... oil between mating parts to prevent rapid wear Oil must penetrate the chain joint to prevent wear Applying oil to external surfaces will prevent rust but oil must flow into the live bearing surfaces for maximum wear life Frequency of re lube will vary with operating conditions and environment the best estimate of lube period is 200 hours Trucks parked outdoors or trucks in extremely severe servic...

Page 314: ...f chains Prevent chains from jumping off sheaves if they are too loose Adjustment procedure With mast in its fully collapsed and vertical position lower the fork to the floor Adjust the chain length by loosening or tightening nut on the chain anchor After making adjustment on the mast be sure to tighten the nut 3 4 https www forkliftpdfmanuals com ...

Page 315: ...n Pub No Pub No SERVICE MANUAL SERVICE MANUAL Pub No August 2008 August 2008 99616 25000 99616 25000 99616 25000 for HYUNDAI HEAVY INDUSTRIES CO LTD for HYUNDAI HEAVY INDUSTRIES CO LTD https www forkliftpdfmanuals com ...

Page 316: ...https www forkliftpdfmanuals com ...

Page 317: ...o to take necessary measures which involves the disassembly inspection repair and reassembly of the engine and engine parts Read this manual carefully and understand the work procedures fully before disassembling inspecting repairing or reassembling the engine The contents of the manual are based on the engine models that are being produced at the time of publication Due to improvements made there...

Page 318: ...https www forkliftpdfmanuals com ...

Page 319: ... to be conducted during disassembly process are indicated in boxes in the relevant exploded views 3 Maintenance standards required for inspection and repair works are indicated in the appropriate positions in the text They are also collectively indicated in Group 2 the General Contents group 4 Fasteners to be tightened in wet condition or with engine oil applied are identified by Wet placed after ...

Page 320: ...om Dead Center TIR Total Indicated Runout API American Petroleum Institute ASTM American Society for Testing and Materials JIS Japanese Industrial Standards LLC Long Life Coolant MIL Military Specifications and Standards U S A MSDS Material Safety Data Sheet SAE Society of Automotive Engineers U S A Units of measurement Measurements are based on the International System of Units SI and their conve...

Page 321: ...can cause oil mist to ignite and explode Care about fuel oil and exhaust gas leakage If any fuel oil or exhaust gas leakage is found immedi ately take corrective measures to stop it Such leakages if left uncorrected can cause fuel or engine oil to reach hot engine surfaces or hot exhaust gas to contact flammable materials possibly leading to personal injury and or damage to equipment Use explosion...

Page 322: ...rious bodily injuries could result Lockout and tagout Be sure to lockout and tagout before starting inspection and maintenance Lockout and tagout are effective methods of cutting off machines and equipment from energy sources To accomplish the lockout tagout remove the starter switch key set the battery switch to OFF and attach a Do Not Run or similar caution tag to the starter switch The starter ...

Page 323: ...ra ture dropped Do not add coolant immediately after the engine stops Wait until the coolant temperature lowers sufficiently to avoid a risk of burns Never remove heat shields The exhaust system which becomes extremely hot while the engine is operating is provided with various heat shields Do not remove these heat shields If any of these heat shields have been removed owing to un avoidable circums...

Page 324: ...ation manual and handle them carefully Use of any other fuel oil or LLC or improper handling may cause various engine problems and malfunctions Obtain the Material Safety Data Sheets MSDS issued by the fuel oil and LLC suppliers and follow the direc tions in the MSDSs for proper handling Handle LLC long life coolant carefully When handling LLC always wear rubber gloves and protective face mask If ...

Page 325: ...of clean fresh water and seek immediate medical attention If the battery fluid is accidentally swallowed gargle with plenty of water then drink lots of water and seek immediate medical attention When abnormality occurs Stop overheated engine after cooling run Even if the engine comes to overheat do not stop the engine immediately Abrupt stopping of an overheated engine can cause the coolant temper...

Page 326: ...to 10 minutes for warming up Start the work after this operation is completed Warm up operation circulates the lubricant through the engine Therefore individual engine parts are well lu bricated before they are subjected to heavy loads This is very important for longer service life high perfor mance and economical operation Do not conduct warm up operation for a longer time than necessary Prolonge...

Page 327: ...m for each work Always keep in mind to select most appropriate tools for the work to be performed and use them correctly If tools are damaged replace with new tools Avoidance of prolonged time of starter oper ation Do not operate the starter for more than 10 seconds at a time even if the engine does not start Wait for at least 30 seconds before next engine cranking Continuous operation of the star...

Page 328: ...g the warning caution labels use a cloth water and soap Do not use cleaning solvents gasoline or other chemicals to prevent the letters from getting blurred or the adhesion from being weakened Replace damaged or fractured labels with new ones If any engine part on which a warning label is attached is replaced with a new one attach a new identical warning label to the new part Warning labels CAUTIO...

Page 329: ...d repairing piston connecting rod crankshaft and crankcase 6 Reassembly of basic engine Reassembling piston connecting rod crankshaft and crankcase Reassembling timing gear and camshaft Reassembling flywheel Reassembling cylinder head and valve mechanism 7 Fuel system Removing fuel system Disassembling inspecting and reassembling fuel system Installing fuel system 8 Lubrication system Removing lub...

Page 330: ...https www forkliftpdfmanuals com ...

Page 331: ...rication system flow diagram 1 4 2 3 Cooling system flow diagram 1 5 2 4 Inlet and exhaust system flow diagram 1 5 3 Engine serial number location 1 6 4 Main specifications 1 7 5 Tips on disassembling and reassembling 1 10 5 1 Disassembling 1 10 5 2 Reassembling 1 10 https www forkliftpdfmanuals com ...

Page 332: ... valve Magnet valve Stop solenoid Coolant drain plug Water pump Coolant inlet Oil cooler S6S Y3T61HF Front Rear Hanger Oil pan V belt Alternator Thermostat case Coolant outlet Hanger Oil filler Turbocharger Exhaust outlet Starter Oil filler Air inlet Damper Rear plate Oil level gauge S6S Y3T61HF Side PTO Drive gear https www forkliftpdfmanuals com ...

Page 333: ...Relief valve Magnet valve Stop solenoid Coolant drain plug Water pump Coolant inlet Fuel filter Oil cooler S6S Y3T62HF Front Rear Hanger Oil pan V belt Alternator Thermostat case Coolant outlet Hanger Oil filler Turbocharger Exhaust outlet Starter Oil filler Air inlet Damper Rear plate S6S Y3T62HF https www forkliftpdfmanuals com ...

Page 334: ...Fuel filter Fuel inlet Fuel leak off pipe Fuel injection nozzle Fuel injection pump Fuel return pipe Fuel outlet Oil jet Pushrod Tappet Camshaft Idler gear Oil pump Piston Valve mechanism Relief valve Oil filter Oil strainer Oil pan Main gallery Crankshaft Turbocharger Oil cooler Safety valve Side PTO Drive gear S6S Y3T61HF https www forkliftpdfmanuals com ...

Page 335: ...aust system flow diagram Inlet and exhaust system flow diagram Thermostat Water pump Water jacket Cylinder head Bypass hose Cooling inlet Cooling outlet Oil cooler Inlet Inlet Exhaust Exhaust Turbocharger Exhaust manifold Inlet manifold Blow by gas Discharge https www forkliftpdfmanuals com ...

Page 336: ...GENERAL 1 6 3 Engine serial number location The engine serial number is stamped on the right side of cylinder block Engine serial number location Engine serial number https www forkliftpdfmanuals com ...

Page 337: ...29 in 622 mm 24 49 in Height 854 mm 33 62 in 839 mm 33 03 in Dry weight 350 kg 771 6 lb Basic engine Cylinder Type Dry integral with cylinder block Piston ring Number of rings Compression rings 2 Oil ring w expander 1 Valve timing when warm Inlet valve Open BTDC 18 Close ABDC 54 Exhaust valve Open BBDC 66 Close ATDC 22 Starting system Electric Starting aid system Glow plug Side PTO Allowable torqu...

Page 338: ...y valve Opening pressure 1 1 MPa 11 kgf cm 157 psi Oil cooler Type Plate type Oil filter Type Cartridge type paper element Cooling system Cooling method Water cooled forced circulation Coolant capacity engine 8 L 2 11 U S gal Water pump Type Volute type centrifugal pump Speed ratio to crankshaft 1 05 Discharge capacity 160 L 42 27 U S gal min at pump rotation of 3600 min 1 0 075 MPa 0 75 kgf cm 10...

Page 339: ... V 35 A Speed in use to 8000 min 1 Rated generating speed 5000 min 1 Permissible speed 10000 min 1 Speed ratio to crankshaft 1 85 Glow plug Type Electric Rated voltage current 22 V 4 4 A 15 second duration Magnetic valve Stop solenoid Rated voltage 24 V Power consumption 14 W Starting voltage 13 V or below Return voltage 5 V or more Coil resistance 37 Ω Table 1 1 Main specifications 3 3 Engine mod...

Page 340: ...Pay attention to assembling marks Put your marks on the parts if necessary to ensure correct reassembling 5 Carefully check each part for defects during disassembling or cleaning Do not miss symptoms which can not be detected after disassembling or cleaning 6 When lifting or carrying heavy parts exercise utmost caution to ensure safety Pay attention to balance of heavy parts when handling Get help...

Page 341: ... tightening torque 2 9 2 1 1 Basic engine 2 9 2 1 2 Fuel system 2 9 2 1 3 Lubrication system 2 10 2 1 4 Cooling system 2 10 2 1 5 Inlet and exhaust systems 2 10 2 1 6 Electrical system 2 10 2 2 Standard bolt and nut tightening torque 2 11 2 2 1 Metric automobile screw thread 2 11 2 2 2 Metric course screw thread 2 11 2 3 Standard stud tightening torque 2 11 3 Regarding submission of parts for EPA ...

Page 342: ...to 30 C 68 to 86 F Lubricating oil pressure Rotated speed at 1500 min 1 0 3 to 0 5 MPa 3 to 5 kgf cm 43 to 71 psi 0 15 MPa 1 5 kgf cm 21 psi or less Oil temperature at 60 to 70 C 140 to 158 F Idling speed 0 10 MPa 1 0 kgf cm 14 psi or more 0 05 MPa 0 5 kgf cm 7 psi or less Valve timing Inlet open BTDC 18 Values are only for checking valve timing and are different from the actual ones Inlet closes ...

Page 343: ...o 0 024 1 0 0 039 Seat width 1 4 0 055 1 26 to 1 54 0 0496 to 0 0606 1 8 0 071 Valve margin 2 13 0 0839 Refacing permissible up to 1 83 0 0720 Valve spring Free length 48 85 1 9232 47 60 1 8740 Perpendicularity A 1 5 or less B 1 3 0 051 or less Lf 48 85 1 9232 B 1 5 0 059 at the end Set length set load 43 mm 1 69 in 176 to 196 N 18 to 20 kgf 39 to 44 lbf 43 mm 1 69 in 147 N 15 kgf 33 lbf Pushrod R...

Page 344: ...e diameter ø 30 1 18 29 994 to 30 000 1 1809 to 1 1811 Clearance between piston pin 0 000 to 0 016 0 0000 to 0 0006 0 050 0 0020 Clearance between connecting rod bushing 0 020 to 0 091 0 0008 to 0 0036 0 120 0 0047 Connecting rod Bushing inside diameter ø 30 1 18 30 020 to 30 045 1 1819 to 1 1829 Bend and twist 0 05 100 0 0020 3 94 or less 0 15 0 0059 Clearance between crankpin and connect ing rod...

Page 345: ...ar backlash 0 05 to 0 15 0 0020 to 0 0059 0 25 0 0098 Replace gear Crankshaft Crank journal outside diameter ø 78 3 07 77 955 to 77 970 3 0691 to 3 0697 77 850 3 0650 Repair 77 100 3 0354 Replace Crankpin outside diameter ø 58 2 28 57 955 to 57 970 2 2817 to 2 2823 57 800 2 2756 Distance between centers of journal and crankpin 60 2 36 59 96 to 60 04 2 3606 to 2 3638 Parallelism between journal and...

Page 346: ...il temperature 20 C 68 F Replace the noz zle tip if the spray pattern is still bad after washing in clean fuel oil Nozzle valve seat oil sealing Seat shall hold a test pressure lower than valve opening pressure by 2 MPa 20 kgf cm 285 psi for 10 seconds Wash in clean fuel oil or replace nozzle tip Table 2 4 Maintenance service data table Lubrication system Unit mm in Inspection point Nominal Standa...

Page 347: ...lve starts opening 76 5 1 5 C 170 3 5 F Temperature at which valve lift is 9 0 35 minimum 90 1 5 C 194 2 7 F Table 2 6 Maintenance service data table Inlet and exhaust system Unit mm in Inspection point Nominal Standard Limit Remark Distortion of exhaust manifold 0 2 0 008 or less Repair by grinding or replace Axial clearance of cartridge assembly 0 057 to 0 103 0 0022 to 0 0041 https www forklift...

Page 348: ... Rotational speed 3300 min 1 or more Load charac teristics Voltage 9 V Armature current 1400 A or less Torque 88 26 N m 9 0 kgf m 65 lbf ft or more Alternator Regulator adjusting voltage alternator 5000 min 1 load at 5 A or lower 28 5 0 5 V Resistance between slip rings 9 0 to 10 4 Ω at 20 C 68 F Brush spring tension 5 8 to 7 0 N 590 to 710 gf 1 3 to 1 6 lbf 3 2 N 330 gf 0 7 lbf Brush length 21 5 ...

Page 349: ...Timing gear case cover 8 1 25 18 5 1 5 1 85 0 15 13 4 1 1 Crankshaft pulley 30 1 5 490 10 50 1 362 7 2 Idler thrust plate 10 1 25 34 5 3 5 0 5 25 3 6 Rear plate 10 1 25 56 5 9 5 7 0 6 41 2 4 3 Rocker adjusting nut 8 1 25 20 2 2 0 2 14 5 1 4 Table 2 9 Tightening torque table Fuel system Description Threads Dia Pitch mm Torque Remark N m kgf m lbf ft Fuel injection nozzle engine 20 1 5 58 8 5 9 6 0 ...

Page 350: ... 0 4 28 9 2 9 Water pump mounting bolt 8 1 25 9 8 1 1 0 1 7 2 0 7 8 1 25 18 1 3 4 1 85 0 35 13 4 2 5 Water pump plug R3 8 32 4 2 3 3 0 2 23 9 1 4 Table 2 12 Tightening torque table Inlet and exhaust systems Description Threads Dia Pitch mm Torque Remark N m kgf m lbf ft Exhaust manifold 8 1 25 18 1 3 4 1 85 0 35 13 4 2 5 Turbo oil feed eye bolt 10 1 25 16 2 2 5 1 65 0 25 11 9 1 8 Clamp 4 0 5 0 41 ...

Page 351: ...n 4T 7T 10 9 N m kgf m lbf ft N m kgf m lbf ft N m kgf m lbf ft M6 1 0 10 0 39 3 9 0 4 2 9 8 8 0 9 6 5 12 7 1 3 9 4 M8 1 25 12 0 47 11 8 1 2 8 7 18 1 9 13 30 3 1 22 M10 1 25 14 0 55 21 1 2 15 16 35 3 6 26 60 6 1 44 M12 1 25 17 0 67 35 3 3 6 26 64 6 5 47 108 11 0 80 4 7 10 Table 2 15 Metric course screw thread Threads Dia Pitch mm Width across flats mm in Strength classification 7T 10 9 N m kgf m l...

Page 352: ... components will void the warranty and could be in violation of the EPA regulations The fuel injection pump is an emission control device Components inside the pump are specifically cali brated to meet the engine emissions requirements and should never be disassembled or rebuilt If the pump fails to operate replace the assembly with an OEM replace part The following parts have been submitted in ac...

Page 353: ...3 1 SERVICE TOOLS 1 Special tool 3 2 https www forkliftpdfmanuals com ...

Page 354: ... psi Gauge adapter 30691 21100 Engine compression pressure measuring Socket 58309 73100 Engine turning Valve spring pusher 30691 04500 Valve spring removal installation Valve guide remover 32A91 00300 Valve guide removal Valve sheet insert caulking tool Inlet 36791 00200 Exhaust 34491 03020 Valve seat installation Stem seal installer 32A91 10200 Stem seal installation https www forkliftpdfmanuals ...

Page 355: ...mshaft bushing removal installation Idler bushing installer 30091 07300 Idler bushing removal installation Idler shaft puller MH061077 Idler shaft removal Piston ring pliers 31391 12900 Piston ring removal installation Connecting rod bushing puller 32A91 00500 Connecting rod bushing removal installation Table 3 1 Special tool list 2 3 Tool name Part No Shape Use https www forkliftpdfmanuals com ...

Page 356: ...ion of crankshaft rear side Piston installer 34491 00200 Piston installation Oil pump bushing installer 32A91 00400 Oil pump bushing installation Ring pliers 49160 90101 Snap ring removal installation Table 3 1 Special tool list 3 3 Tool name Part No Shape Use https www forkliftpdfmanuals com ...

Page 357: ...4 1 DETERMINATION OF OVERHAUL 1 Determining overhaul timing 4 2 2 Testing compression pressure 4 3 https www forkliftpdfmanuals com ...

Page 358: ...sed output power 2 Increased fuel consumption 3 Increased engine oil consumption 4 Increased blow by gas through the breather due to worn cylinder liners and piston rings Visually check the blow by amount 5 Increased gas leakage due to poor seating of inlet and exhaust valves 6 Difficulty in starting 7 Increased noise from engine parts 8 Abnormal exhaust color after warm up operation The engine ca...

Page 359: ...ats etc Pressure will drop gradually by the wear of these parts e Turn off the solenoid valve to stop fuel injection 1 Remove the glow plug from the cylinder head where the compression pressure is to be measured 2 Attach the compression gauge adapter to the glow plug mount and connect compression gauge 3 Crank the engine with the starter then read the compression gauge indication while the engine ...

Page 360: ...https www forkliftpdfmanuals com ...

Page 361: ...klash 5 10 3 5 Measuring idler gear and camshaft gear end play 5 11 3 6 Removing fuel injection pump 5 11 3 7 Removing oil pan 5 11 3 8 Removing oil strainer 5 11 3 9 Removing oil pump gear 5 12 3 10 Removing idler gear 5 12 3 11 Removing PTO drive gear 5 12 3 12 Removing camshaft 5 12 3 13 Separating camshaft gear 5 13 3 14 Installing camshaft gear and thrust plate5 13 3 15 Removing front plate 5...

Page 362: ...ap 18 Valve IN 5 Rocker shaft bracket 12 Push rod 19 Valve EX 6 Snap ring 13 Cylinder head bolt 20 Valve stem seal 7 Rocker arm IN 14 Cylinder head 21 Cylinder head gasket 1 2 3 4 5 6 7 8 9 10 11 12 13 14 15 16 17 18 19 20 21 Replace Replace Replace Fatigue damage Damaged threads worn rod contact surface Wear Wear Worn valve cap contact surface clogged oil holes Uneven wear on stems and faces dama...

Page 363: ...haft Note a Be sure to arrange the parts of rocker shaft assembly in the order of disassembly Reassemble the rocker shaft assembly in the reverse order of disassembly by making sure of the original combination of rocker arm and shaft assembly so that the same clearance between the rocker shaft and arms is restored when reassembling b Do not remove the rocker bushing if it is not faulty and its ins...

Page 364: ...the cylinder head Note If there is a cylinder head problem check the bolts for tightness with a torque wrench before removing the cylinder head bolts Removing cylinder head assembly 1 5 Removing valve and valve spring Using a valve spring pusher compress the valve spring evenly and remove the valve cotters Note If valves are reusable mark each valve seat and the mating valve for identifying their ...

Page 365: ...wheel Disassembling and inspecting flywheel Disassembling sequence 1 Flywheel 2 Rear plate 3 Oil seal 4 Gasket 1 2 3 4 Replace Crack abnormality of knock hole Damaged threads Lip wear damage or aging Crack knock hole defect gear damage https www forkliftpdfmanuals com ...

Page 366: ...the flywheel 3 Screw a guide bolt into the threaded hole of the bolt that has been removed 4 Remove remaining bolts from the flywheel 5 Hold the flywheel firmly with both hands and while moving it back and forth pull it out straight Note The ring gear is shrink fitted to the flywheel Do not remove the ring gear unless it is defective Locking the flywheel Removing flywheel 2 2 Removing rear plate C...

Page 367: ...gged oil hole Crack abnormality of knock hole Crack abnormality of knock hole Worn belt groove Flaking uneven contact damage key groove defect abnormal wear bushings Flaking uneven contact damage key groove defect abnormal wear bushings Replace 1 Damper 8 Oil pan 15 PTO drive gear bearing 2 Crankshaft pulley 9 Oil strainer 16 Camshaft 3 Bearing case 10 Oil pump gear 17 Camshaft gear 4 Bearing case...

Page 368: ...l hole Crack abnormality of knock hole Crack abnormality of knock hole Worn belt groove Flaking uneven contact damage key groove defect abnormal wear bushings Flaking uneven contact damage key groove defect abnormal wear bushings S6S Y3T62HF 1 Damper 6 Oil pan 11 Camshaft 2 Crankshaft pulley 7 Oil strainer 12 Camshaft gear 3 Cover 8 Oil pump gear 13 Thrust plate 4 Timing gear case 9 Thrust plate 1...

Page 369: ...crankshaft Stick a bar across the guide bolts to prevent the crankshaft from turning 2 Remove the crankshaft pulley and damper Removing damper Removing crankshaft pulley 3 2 Removing cover Unscrew the cover mounting bolts and remove the cover Removing cover Removing cover 回り止めをする Front Rear Guide bolt M12 1 25mm Prevent crankshaft from rotating Crankshaft pulley Cover S6S Y3T62HF Cover Bearing cas...

Page 370: ...of the timing gears by using one of the following two methods measure the gear play with the dial gauge plunger applied to a tooth flank on the pitch circle at a right angle to the tooth axis or measure the clearance between gears by inserting a feeler gauge between the gears at the tooth to tooth contacting area Replace the faulty gear pair if the limit is exceeded Note With the injection pump ge...

Page 371: ...3 7 Removing oil pan CAUTION Do not insert a chisel or screwdriver between the oil pan and crankcase to remove the oil pan as it could deform the oil pan flange 1 Turn the engine upside down 2 Remove bolts from the oil pan 3 To remove oil pan tap flange corners of the oil pan with a plastic hammer Removing oil pan 3 8 Removing oil strainer 1 Remove the oil strainer mounting bolts 2 Remove the oil ...

Page 372: ...gear Removing idler gear 3 11 Removing PTO drive gear Remove the PTO drive gear tapping lightly with plastic hammer Removing PTO drive gear 3 12 Removing camshaft CAUTION Be careful not to damage the cams of camshaft and the bushings 1 Reverse the crankcase 2 Remove the thrust plate bolt 3 Remove the camshaft from the crankcase 4 Remove the tappet Removing camshaft Oil pump gear Idler gear S6S Y3T...

Page 373: ... 2 Heat the camshaft gear with a gear heater to a temperature of about 150 C 302 F 3 Press fit the camshaft gear with press Installing camshaft gear and thrust plate 3 15 Removing front plate 1 Remove the front plate bolts 2 Remove the front plate from the crankcase Note If it is difficult to remove the front plate lightly tap it with a plastic hammer Removing front plate 3 16 Removing oil pump 1 ...

Page 374: ...l 20 Crankcase 7 Snap ring 14 Thrust plate 21 Crank gear 20 19 18 21 17 16 15 14 14 14 13 12 11 10 9 8 7 6 5 4 3 2 1 Scratches on inside and outside surfaces seizing flaking Damaged threads Damaged threads Cracks Flaking uneven contact Scratches cracks dent clogged oil holes wear Wear Wear Wear damage Fatigue Wear clogged oil holes Cracks clogged oil holes Serration for cracks wear Surface scratch...

Page 375: ... sure to remove carbon deposits from the upper part of the cylinder liner before removing the piston as it could cause damage to the piston and piston ring Remove carbon deposits from the upper part of cylinder liner using a carbon remover Note Be careful not to damage the inner surface of the cylinder liner Removing carbon deposits from the upper part of cylinder liner 4 3 Pulling out piston 1 Tu...

Page 376: ...from the connecting rod Note a Do not tap the piston pin directly with a mallet b If the piston is stubborn heat the piston with a piston heater or in hot water Removing piston pin 4 6 Removing main bearing cap 1 Unscrew the main bearing cap bolts 2 Remove the main bearing cap Note a Be careful not to damage the main bearings b Mark the bearings with their cylinder numbers Removing main bearing ca...

Page 377: ...ions are restored when reassembling Note a When raising the crankshaft do not allow wire or chain to come into contact with the crankshaft To avoid damage to the crankshaft when raising use a cloth belt or pad b Mark the bearings with their cylinder numbers 4 8 Removing tappet Remove the tappets using a magnet Note Be sure to arrange the removed tappets for reassembling to the same tappet hole Rem...

Page 378: ...https www forkliftpdfmanuals com ...

Page 379: ...arance between tappet and tappet guide hole 6 14 3 11 Inspecting tappet 6 14 3 11 1 Contact surface of camshaft 6 14 3 11 2 Contact surface of push rod 6 14 3 12 Inspecting V belt groove wear 6 15 3 13 Inspecting damper 6 15 4 Inspecting and repairing piston connecting rod crankshaft and crankcase 6 16 4 1 Measuring crankcase top surface distortion 6 16 4 2 Measuring cylinder inside diameter 6 17 ...

Page 380: ...ve stem outside diameter Measuring valve guide inside diameter Item Nominal Standard Limit Rocker bushing inside diameter ø 19 mm 0 75 in 19 010 to 19 030 mm 0 7484 to 0 7492 in Rocker shaft outside diameter ø 19 mm 0 75 in 18 980 to 19 000 mm 0 7472 to 0 7480 in Clearance between rocker bushing and shaft 0 010 to 0 050 mm 0 0004 to 0 0020 in 0 070 mm 0 0028 in Measuring direction Measuring direct...

Page 381: ...1 To remove valve guides use a valve guide remover 2 To press fit valve guides use a valve guide installer 3 Check contacts between valves and valve seats after replacing valve guides Pulling out valve guide Press fitting valve guide Valve guide remover P N 32A91 00300 Valve guide installer P N 32A91 00100 13 9 to 14 1 mm 0 547 to 0 555 in Press https www forkliftpdfmanuals com ...

Page 382: ...ve face If the valve face is significantly worn out reface the valve face using a valve refacer Note a Grind the valve face using the valve refacer at the specified angle b Secure the valve margin width equal to or greater than the limit If the dimensions after refacing does not meet the specified values replace the valve with a new one Refacing valve face Item Nominal Standard Limit Valve seat Va...

Page 383: ...erting it between the cutter and valve seat 2 Lap the valve in the valve seat Note a Valve seat refacing should be kept to an absolute minimum b If the valve seat width exceeds the limit due to wear or refacing replace the valve seat with a new one c If the valve sinkage exceeds the limit after refacing replace the valve seat with a new one Refacing valve seat Valve seat cutter https www forkliftp...

Page 384: ...lve seat outside diameter to make sure the interference meets the specified value 3 Cool the valve seat at least for four minutes in liquid nitrogen before fitting it into the cylinder head that is kept at room temperature 4 Fit the cold valve seat into the cylinder head using a insert caulking tool Replacing valve seat Valve seat fitting bore Driving in valve seat Valve seat Weld Stud Shaft 8 0 1...

Page 385: ...alve with engine oil then lap the valve again 5 Check valve to seat contact Coating valve with lapping Lapping valve and valve seat 1 9 Measuring perpendicularity and free length of valve spring Measure the perpendicularity and free length of the valve spring If the measured free length and or perpendicularity exceed the limit replace the valve spring with a new one If the measured set length and ...

Page 386: ...If the measurement exceeds the limit grind the bottom face using a surface grinder Note Do not grind the surfaces more than 0 2 mm 0 008 in in total cylinder head bottom surface plus crankcase top surface Measuring distortion of the bottom surface of the cylinder head 1 11 Measuring push rod runout Measure the runout of each push rod Replace if the limit is exceeded Measuring push rod runout Item ...

Page 387: ...ow plug hole and tap the combustion jet inner face perimeter lightly to pull out the combustion jet 2 When installing the combustion jet align the positioning hole and jet nozzle with the center of cylinder press fit by tapping with plastic hammer Removing combustion jet Press fitting combustion jet Round rod Combustion jet Combustion jet Jet nozzle https www forkliftpdfmanuals com ...

Page 388: ...tooth or worn teeth and if defects are found replace the ring gear 2 4 Replacing ring gear 2 4 1 Removing ring gear 1 Heat the ring gear evenly using an acetylene torch or other appropriate heat source 2 With a rod placed on the periphery of ring gear tap the rod with a hammer evenly around the ring gear and remove the ring gear 2 4 2 Installing ring gear 1 Heat the ring gear evenly up to approx 1...

Page 389: ...eler gauge or dial gauge measure the end play of idler gear and camshaft gear If the measured value exceeds the limit replace the thrust plate with a new one Measuring idler gear and camshaft gear end play 3 3 Measuring cam lift Measure the minor and major axes of cam to determine cam lobe lift If the lift is less than the limit replace the camshaft with a new one Measuring cam lift Item Standard ...

Page 390: ...nal outside diameter 3 6 Measuring camshaft bushing inside diame ter With the camshaft bushings installed in the crankcase measure the inside diameters using a cylinder gauge If the limit is exceeded replace the bushing with a new one Measuring camshaft bushing inside diameter Item Standard Limit Remark Camshaft runout 0 04 mm 0 0016 in or less 0 10 mm 0 0039 in TIR Item Standard Limit Camshaft jo...

Page 391: ...he oil gallery Installing camshaft bushing 3 8 Measuring idler bushing inside diameter and idler shaft outside diameter Measure the idler bushing inside diameter and idler shaft outside diameter and calculate the clearance between them If the measured value exceeds the limit locate the defective part and replace it Measuring idler bushing inside diameter and idler shaft outside diameter Rod Camsha...

Page 392: ...ed Contact surface of camshaft 3 11 2 Contact surface of push rod 1 Apply a lead free coloring paste on the push rods and check the contact surface 2 Check that the push rod contacts the tappet concentrically If it does replace the tappet and push rod with new one Contact surface of push rod Item Nominal Standard Interference between shaft and crankcase hole ø 35 mm 1 38 in 0 035T to 0 076T mm 0 0...

Page 393: ...n the end plate silicone oil leakage and discoloration and separation of coating due to thermal effect If any defect is found replace the damper with a new one 2 With the damper installed on the engine measure the face and radial runouts of the damper in the following manner Attach the dial gauge plunger on the outer circumference of the damper to measure the radial runout or on the end face near ...

Page 394: ...ve Apply a straight edge to the top surface of the crankcase and measure its distortion using a feeler gauge If the distortion exceeds the limit grind the crankcase using a surface grinder Note Do not overgrind the cylinder head as the piston protrusion deviates from the standard value Note Do not grind the surfaces more than 0 2 mm 0 0079 in in total cylinder head bottom surface plus crankcase to...

Page 395: ... an oversize diameter that ensures complete roundness when the cylinder is re bored to the maximum All cylinders must be re bored to the same oversize diameter if one cylinder is re bored 5 If the cylinder has a slight wear and is reused after replacing only the piston rings remove the steps in worn portion in the upper part of the cylinder using a ridge reamer Hone it as necessary Measuring cylin...

Page 396: ...lace all the rings as a set Note Use a piston to push the piston ring squarely into the gauge or the sleeve Measuring piston ring end gap Item Nominal Standard Limit Piston outside diameter at piston skirt STD ø 94 mm 3 70 in 93 955 to 93 985 mm 3 6990 to 3 7002 in 93 770 mm 3 6917 in 0 25 mm 0 0098 in OS 94 205 to 94 235 mm 3 7089 to 3 7100 in 94 020 mm 3 7016 in 0 50 mm 0 0197 in OS 94 455 to 94...

Page 397: ... replace the piston with a new one Measuring clearance between piston ring groove and piston ring 4 6 Measuring piston pin bore diameter and piston pin outside diameter Measure the piston pin bore diameter and piston pin outside diameter Replace if the limit is exceeded Measuring piston pin bore diameter and piston pin outside diameter Item Standard Limit Clearance between piston ring groove No 1 ...

Page 398: ...rts involved 1 Bring the piston to top dead center 2 Apply the dial gauge plunger to the top surface of the crankcase and zero the dial gauge 3 Measure the protrusion at four points on the piston head and calculate the mean value Note Subtract the mean value from the thickness of the gasket compressed by tightening the cylinder head and the clearance between the piston top and cylinder head will b...

Page 399: ...ze bearing is used grind the crankpin to the specified undersize Measuring connecting rod bearing inside diameter Measuring crankpin diameter 4 9 Measuring clearance between connecting rod bushing and piston pin Measure the inside diameter of the connecting rod bushing and the outside diameter of the piston pin Replace if the limit is exceeded Measuring connecting rod bushing inside diameter Item ...

Page 400: ...ecting rod with a new one 2 In general a connecting rod aligner is used to check bend and twist Note Before checking bend tighten the connecting rod cap to the specified torque 3 To inspect the connecting rod with the piston installed turn the piston upside down and place it on a surface plate Insert a round bar having the same diameter as the crankpin into the big end bore and measure the height ...

Page 401: ...ded replace the connecting rod with a new one Measuring connecting rod end play 4 14 Weight difference of connecting rod assembly in one engine When replacing a connecting rod be sure to check the weight rank of the connecting rod All the connecting rods must be of the same weight rank in an engine Weight difference in connecting rod assembly Flaking Scratches Fusion Item Standard Limit Connecting...

Page 402: ...s below the limit grind the journal to fit the undersize bearing If the measurement value is below the service limit replace the crankshaft with a new one Measuring crankpin diameter Item Nominal Standard Limit Outside diameter ø 78 mm 3 07 in 77 955 to 77 970 mm 3 0691 to 3 0697 in 77 850 mm 3 0650 in Repair 77 100 mm 3 0354 in Replace Roundness 0 01 mm 0 0004 in or less 0 03 mm 0 0012 in Cylindr...

Page 403: ...onsiderably re harden the crankshaft and check for flaws by means of magnetic particle inspection Ensure that the surface finish accuracy of the crankpins and journals is kept within the standard even after the correction by grinding Finished dimension of fillet R Item Undersize Finished size Crank journal 0 25 mm 0 0098 in 77 705 to 77 720 mm 3 0592 to 3 0598 in 0 50 mm 0 0197 in 77 455 to 77 470...

Page 404: ...measure the crankshaft runout at the center journal using a dial gauge If the runout deviates from the standard only slightly grind the crankshaft to repair If the runout exceeds the standard considerably straighten the crankshaft using a press If the limit is exceeded replace the crankshaft If the crankshaft has been repaired by grinding or pressing inspect the crankshaft for cracks and other har...

Page 405: ... 2 Press fit the gear fully in alignment with the key Installing crankshaft gear 4 21 Inspecting oil seal contact surface Inspect the oil seal contact surface located on the crankshaft rear part If the crankshaft wears due to the oil seal replace the oil seal and the oil seal sleeve with new spare parts Inspecting oil seal contact surface 1 Crankshaft gear Puller P N MH061326 Aligning position Key...

Page 406: ... seal sleeve CAUTION When making a cut in the sleeve be very careful not to damage the crankshaft with the chisel Make a cut at three locations on the periphery of the oil seal sleeve to reduce its tension To do so hold a chisel against the sleeve periphery in the radial direction and strike it with a hammer When the sleeve is loosened remove the sleeve If the sleeve can not be removed by the abov...

Page 407: ...alculate the clearance between the inside diameter of the main bearing and outside diameter of the crank journal 6 Replace the main bearing if the clearance exceeds the limit 7 Measure the clearance between the main bearing cap and the crank journal again Use the undersize bearing if the limit is exceeded 8 If an undersize bearing is used grind the crank journal to the specified undersize Measurin...

Page 408: ...https www forkliftpdfmanuals com ...

Page 409: ...mp 7 11 2 9 Inspecting and adjusting timing gear after installation 7 11 2 9 1 Inspecting backlash and end play 7 11 2 10 Installing front oil seal 7 12 2 11 Installing timing gear case 7 12 2 12 Installing oil strainer 7 12 2 13 Installing oil pan 7 13 2 14 Installing cover 7 14 2 15 Installing crankshaft pulley and damper 7 14 3 Reassembling flywheel 7 15 3 1 Installing oil seal 7 15 3 2 Install...

Page 410: ...y on the crankshaft 2 Make sure that the main bearing upper shells that are installed in the crankcase bores have their inner periphery the surface comes into contact with the journal lubricated with an even coat of fresh engine oil 3 Wash the crankshaft thoroughly with cleaning oil and dry it completely by blowing compressed air Then apply an even coat of fresh engine oil to the crankshaft journa...

Page 411: ...n bolts Installing main bearing cap 1 6 Inserting side seal 1 Apply a sealant to the outer periphery of new side seals 2 With the round section of the side seals facing outward press them partway into the front and rear caps using hands 3 When the side seals are installed partway into caps use a tool with a flat surface to install completely taking care not to bend the seal Note Make sure that the...

Page 412: ...own in the illustration Note The pistons and piston pins are assembled to each other in clearance fit However the piston pins are more easily inserted into the pistons if the pistons are warmed up with a heater or in hot water 2 Using ring pliers install the snap ring Check the snap ring for its tension and make sure the ring fits snugly in the groove Note Install all the snap rings so that their ...

Page 413: ... a ring expander 2 Install the oil ring with its end gap 180 away from the joint of the coil spring as shown in the illustration Piston piston ring orientation Reassembling oil ring 1 11 Preparation for installing pistons 1 Lay the engine on its side 2 Clean the cylinder inner surface and the crank pin with a cloth and apply engine oil Cleaning cylinder inner surface and applying engine oil Top ma...

Page 414: ...ot forcefully insert the piston as it may cause damage to the piston rings and crank pin 1 Apply engine oil to the circumference of the piston and piston rings 2 Orient the ring end gaps diagonally opposite each other avoiding the piston pin direction and its right angle direction 3 Turn the crankshaft to bring the crank pin of the cylinder to bottom dead center 4 Orient the front mark on the top ...

Page 415: ...same side as the match mark on the connecting rod 2 Tighten the connecting rod cap nuts evenly and progressively to the specified torque 3 Inspect end play of the connecting rod If end play is small loosen and retighten the cap nuts Installing connecting rod cap 54 5 N m 5 5 0 5 kgf m 39 8 3 6 lbf ft https www forkliftpdfmanuals com ...

Page 416: ...an the gasket mounting surface 2 Apply sealant to the gasket to prevent it from falling 3 With aligning to the dowel pin install the gasket and the front plate 4 Secure the front plate with mounting bolts 5 Cut the gasket protruding from crankcase bottom side with cutter Installing front plate 1 Installing front plate 2 Oil pump O ring 11 3 1 5 N m 1 15 0 15 kgf m 8 3 1 1 lbf ft Front plate Gasket...

Page 417: ... and cams 2 Slowly insert the camshaft assembly 3 Tighten the thrust plate bolt to the specified torque 4 Make sure that the camshaft rotates lightly Move the camshaft gear back and forth and make sure there is end play Installing camshaft 2 5 Installing PTO drive gear 1 Press fit the bearing into the PTO drive gear 2 Install the PTO drive gear with bearing to the bearing case 3 Install the PTO ge...

Page 418: ...ate to the idler gear and tighten the mounting bolt to the specified torque Installing idler gear Timing gear train Timing gear train 34 5 N m 3 5 0 5 kgf m 25 3 6 lbf ft Idler gear 3 2 2 3 3 2 1 1 1 Camshaft gear Crankshaft gear Idler gear Injection pump gear Oil pump gear S6S Y3T62HF Injection pump gear Camshaft gear Idler gear Crankshaft gear Oil pump gear Drive gear S6S Y3T61HF 3 2 2 3 3 2 1 1...

Page 419: ...el injection pump mounting bolts evenly Installing fuel injection pump 2 9 Inspecting and adjusting timing gear after installation Be sure to inspect and adjust the timing gear when the timing gear has been reassembled 2 9 1 Inspecting backlash and end play After installing the timing gears be sure to inspect and adjust the backlash and end play between gears Measuring idler gear end play Measurin...

Page 420: ...eal lip 3 Install the timing gear case and tighten the bolts 4 Cut the gasket protruding from crankcase bottom side with cutter Installing timing gear case Installing front plate 2 12 Installing oil strainer Install a new O ring to the oil strainer and install the oil strainer to the crankcase Installing oil strainer Installer Gasket 18 5 1 5 N m 1 85 0 15 kgf m 13 4 1 1 lbf ft Timing gear case S6...

Page 421: ...the oil pan flange periphery and spread it 3 Install the oil pan to the crankcase within five minutes of applying the liquid gasket 4 Tighten the mounting bolts to the specified torque Liquid gasket application position Cutting end of sealant tube Installing oil pan Apply ThreeBond 1207C to all around oil pan flange periphery Cut here 11 3 1 5 N m 1 15 0 15 kgf m 8 3 1 1 lbf ft Oil pan Bolt https ...

Page 422: ... rear end of the crankshaft Place a bar across the two guide bolts so that the crankshaft does not turn 2 Install the crankshaft pulley and tighten the nuts to the specified torque 3 Install the damper to the crankshaft pulley Installing crankshaft pulley Installing damper Cover S6S Y3T62HF Cover Bearing case S6S Y3T61HF Front Rear Guide bolt M12 1 25mm Prevent crankshaft from rotating Crankshaft ...

Page 423: ... with new ones Installing rear plate 3 3 Installing flywheel CAUTION The person who holds the pulley must be very careful to assure safety by communicating with the person who is installing the flywheel 1 One person must firmly hold the pulley with a wrench to prevent the crankshaft from turning 2 Screw the guide bolt into the rear end of the crankshaft 3 Align the bolt hole of flywheel with the g...

Page 424: ...alve guide 1 Apply engine oil to the lip of new valve stem seal 2 Push the shoulder of the valve stem seal and fit the valve stem steal into the valve guide 3 Insert the valve stem seal into the valve guide using the valve stem seal installer Installing valve stem seal 4 3 Installing valve and valve spring 1 Install the valve spring and retainer on the valve guide Install the valve cotter using a ...

Page 425: ...e top surface with guide Note a Be careful not to displace the cylinder head gasket when installing b Do not lift up cylinder head by one person Use crane or lift up by two persons Installing cylinder head assembly 4 6 Tightening cylinder head bolts In the numerical order as shown in the illustration tighten cylinder head bolts progressively to the specified torque Tightening order of cylinder hea...

Page 426: ...led as it was the clearance becomes different and it may result in a defect such as increased wear 3 After reassembling make sure the rocker arm move freely Reassembling rocker shaft assembly 4 9 Installing rocker shaft assembly 1 Install the valve caps to the valve heads 2 Tighten the long bolts of the rocker bracket to the specified torque 3 Tighten the short bolts of the rocker bracket Installi...

Page 427: ... center when determined stop rotating the crankshaft 3 With aligning the 0 mark on the timing plate draw the line to the damper outside periphery 4 Install the valve spring valve retainer valve cotter valve cap and rocker arm to the No 1 cylinder inlet side Determining top dead center of No 1 cylinder compression stroke 1 Determining top dead center of No 1 cylinder compression stroke 2 4 11 Adjus...

Page 428: ...https www forkliftpdfmanuals com ...

Page 429: ...cting fuel injection nozzle 8 7 2 4 Inspecting and adjusting fuel injection valve opening pressure 8 8 2 5 Inspecting fuel spray pattern of fuel injection nozzle 8 8 2 6 Cleaning and inspecting nozzle tip 8 9 2 7 Reassembling fuel injection nozzle 8 10 2 8 Inspecting and cleaning gauze filter of distribute type fuel injection pump 8 11 3 Installing fuel system 8 12 3 1 Installing fuel injection pu...

Page 430: ...ngs on the injection pump nozzle inlet connector and injection pipe to prevent dust from entering the fuel system 1 1 Removing fuel filter Removing fuel filter Removing sequence 1 2 3 1 Fuel hose 2 Fuel filter 3 Fuel filter bracket https www forkliftpdfmanuals com ...

Page 431: ...quence 1 Fuel return pipe 6 No 5 fuel injection pipe 2 No 1 fuel injection pipe 7 No 6 fuel injection pipe 3 No 2 fuel injection pipe 8 Fuel leak off pipe 4 No 3 fuel injection pipe 9 Fuel injection nozzle 5 No 4 fuel injection pipe 1 2 3 4 5 6 7 8 9 Replace https www forkliftpdfmanuals com ...

Page 432: ...FUEL SYSTEM 8 4 1 3 Removing fuel injection pump Removing fuel injection pump Removing sequence 1 Bracket 2 Fuel injection pump 3 Bracket 1 3 2 Replace https www forkliftpdfmanuals com ...

Page 433: ...tem 2 1 Disassembling and inspecting fuel filter Disassembling and inspecting fuel filter Disassembling sequence 1 Level sensor 2 Filter element 3 Body 1 2 3 Crack and damaged threads Clogged cracks Replace Every 500 hrs Replace Replace https www forkliftpdfmanuals com ...

Page 434: ... make sure that the gasket is properly seated on the groove WARNING Do not use the filter of which case has dents as it may be damaged during operation and cause fuel leakage that becomes fire hazard 9 Install the fuel filter element to the filter body CAUTION Be careful not to dent or damage the fuel filter case 10 Using new O ring install the level sensor to the fuel filter element 11 After comp...

Page 435: ...fuel injection nozzle Disassembling sequence 1 Nozzle retaining nut 4 Pressure pin 7 Nozzle holder 2 Nozzle tip assembly 5 Pressure spring 8 Gasket 3 Distance piece 6 Washer 4 5 6 7 8 1 2 3 Settling breakage Wear damage Carbon deposit nozzle hole clogging Wear Replace https www forkliftpdfmanuals com ...

Page 436: ...0 004 in results in a change in the fuel injection pressure by 1 0 MPa 10kgf cm 142 psi There are ten different sizes of shims available 1 25 to 1 70 mm 0 0492 to 0 0669 in to obtain proper pressure Inspecting fuel injection nozzle with nozzle tester 2 5 Inspecting fuel spray pattern of fuel injec tion nozzle 1 When adjusting the nozzle opening pressure using the nozzle tester check for nozzle hol...

Page 437: ...do not change the combination of the valve and body 3 Tighten the nozzle tip tightening retainer nut to the specified torque 4 If the spray pattern is still faulty after cleaning and adjusting change the nozzle tip with a new one Note New nozzle tips are coated with vaseline to prevent from rusting Wash it off in a clean diesel oil before installation Replacing fuel injection nozzle tip Cleaning n...

Page 438: ... SYSTEM 8 10 2 7 Reassembling fuel injection nozzle Reassembling fuel injection nozzle 36 8 2 5 N m 3 75 0 25 kgf m 27 1 1 8 lbf ft 58 8 5 9 N m 6 0 6 kgf m 43 4 4 3 lbf ft https www forkliftpdfmanuals com ...

Page 439: ...jection pump and remove the fuel hose and fuel pipe 3 Remove the spring with a tweezer 4 Remove the gauze filter with a tweezer Note When removing the gauze filter be careful not to damage the metal mesh of the gauze filter 5 Remove the dirt and dust from the gauze filter cleaning with compressed air or diesel fuel When damage is found or when the gauze filter is still dirty after cleaning replace...

Page 440: ...FUEL SYSTEM 8 12 3 Installing fuel system 3 1 Installing fuel injection pump Installing fuel injection pump Replace https www forkliftpdfmanuals com ...

Page 441: ...on pipe Installing fuel injection pipe 58 8 5 9 N m 6 0 6 kgf m 43 4 4 3 lbf ft 22 6 1 9 N m 2 3 0 2 kgf m 16 6 1 4 lbf ft 19 6 1 9 N m 2 0 2 kgf m 14 5 1 4 lbf ft 29 4 2 9 N m 3 0 3 kgf m 21 7 2 2 lbf ft Replace https www forkliftpdfmanuals com ...

Page 442: ...FUEL SYSTEM 8 14 3 3 Installing fuel filter Installing fuel filter https www forkliftpdfmanuals com ...

Page 443: ... and pump case 9 6 2 2 3 Measuring clearance between outer rotor and pump case 9 6 2 2 4 Measuring clearance between main shaft and pump case 9 7 2 2 5 Measuring clearance between main shaft and bushing 9 7 2 2 6 Installing oil pump bushing 9 7 2 3 Reassembling oil pump 9 8 2 4 Disassembling and inspecting oil cooler 9 9 2 5 Inspecting oil filter 9 10 2 6 Inspecting relief valve 9 11 2 7 Inspectin...

Page 444: ...STEM 9 2 1 Removing lubrication system 1 1 Removing oil filter and relief valve Removing oil filter and relief valve Removing sequence 1 Oil filter 2 Relief valve 2 1 Replace Replace https www forkliftpdfmanuals com ...

Page 445: ...LUBRICATION SYSTEM 9 3 1 2 Removing oil cooler Removing oil cooler Removing sequence 1 Oil cooler assembly 2 Oil cooler gasket 1 2 Replace Replace Replace https www forkliftpdfmanuals com ...

Page 446: ... 9 4 1 3 Removing oil pump oil pan and oil strainer Removing oil pump oil pan and oil strainer Removing sequence 1 Oil pump 2 Oil pan 3 Oil strainer 4 Safety valve 1 2 3 4 Replace Replace https www forkliftpdfmanuals com ...

Page 447: ...ng inspecting and reassembling lubrication system 2 1 Disassembling and inspecting oil pump Disassembling oil pump Disassembling sequence 1 O ring 2 Shaft assembly 3 Outer rotor 4 Pump case 1 2 3 4 Replace https www forkliftpdfmanuals com ...

Page 448: ...tor and pump case 2 2 3 Measuring clearance between outer rotor and pump case Measure the clearance between the outer rotor and the pump case If measured value exceeds the limit replace the oil pump with new one Measuring clearance between outer rotor and pump case Item Standard Limit Clearance between outer rotor and inner rotor 0 13 to 0 15 mm 0 0051 to 0 0059 in 0 20 mm 0 0079 in Feeler gauge I...

Page 449: ...ng CAUTION Install the oil pump bushing in the crankcase so that it is even with the front face of the crankcase Install the oil pump bushing by using the oil pump bushing installer Installing oil pump bushing Item Standard Limit Main shaft outside diameter between case 15 985 to 16 000 mm 0 6293 to 0 6299 in Clearance between main shaft and pump case 0 032 to 0 074 mm 0 0013 to 0 0029 in 0 150 mm...

Page 450: ...LUBRICATION SYSTEM 9 8 2 3 Reassembling oil pump Reassembling oil pump Flush Flush https www forkliftpdfmanuals com ...

Page 451: ... Disassembling and inspecting oil cooler Disassembling and inspecting oil cooler Disassembling sequence 1 Oil cooler case 2 Oil cooler element 1 2 Crack deformation Replace Clogging crack Replace https www forkliftpdfmanuals com ...

Page 452: ...LUBRICATION SYSTEM 9 10 2 5 Inspecting oil filter Inspecting oil filter Apply engine oil to the gasket when installing Clogged cracks Replace Every 500 hrs https www forkliftpdfmanuals com ...

Page 453: ...heck the safety valve and its seat for contact Check the spring for fatigue and damage If faulty or damaged replace the part 2 Measure the safety valve opening pressure If the pressure does not fall within the standard range replace the spring with a new one Inspecting safety valve Item Standard Relief valve opening pressure 0 35 0 05 MPa 3 5 0 5 kgf cm 49 8 7 1 psi 49 4 9 N m 5 0 5 kgf m 36 2 3 6...

Page 454: ...system 3 1 Installing oil pump oil pan and oil strainer Installing oil pump oil pan and oil strainer 69 5 N m 7 0 5 kgf m 50 6 3 6 lbf ft 11 3 1 5 N m 1 15 0 15 kgf m 8 3 1 1 lbf ft 78 5 N m 8 0 5 kgf m 57 9 3 6 lbf ft https www forkliftpdfmanuals com ...

Page 455: ...LUBRICATION SYSTEM 9 13 3 2 Installing oil cooler Installing oil cooler Replace Replace Replace https www forkliftpdfmanuals com ...

Page 456: ...LUBRICATION SYSTEM 9 14 3 3 Installing oil filter and relief valve Installing oil filter and relief valve 49 4 9 N m 5 0 5 kgf m 36 2 3 6 lbf ft Replace Replace https www forkliftpdfmanuals com ...

Page 457: ...ng inspecting and reassembling cooling system 10 4 2 1 Disassembling and inspecting thermostat 10 4 2 2 Inspecting thermostat 10 5 2 3 Disassembling water pump 10 6 2 4 Inspecting water pump 10 6 3 Installing cooling system 10 7 3 1 Installing water pump water pump pulley and V belt 10 7 3 2 Installing thermostat 10 8 https www forkliftpdfmanuals com ...

Page 458: ...Removing cooling system 1 1 Removing thermostat Removing thermostat Removing sequence 1 Hose 2 Thermostat assembly 3 Gasket 1 2 3 Replace Crack water leakage damage Crack deterioration damage https www forkliftpdfmanuals com ...

Page 459: ...lt Removing water pump water pump pulley and V belt Removing sequence 1 V belt 3 Water pump assembly 5 Water pump spacer 2 Water pump pulley 4 Gasket 6 Gasket Crack extension wear damage Crack deformation damage Replace Replace 1 2 3 4 5 6 https www forkliftpdfmanuals com ...

Page 460: ...ing and reassembling cooling system 2 1 Disassembling and inspecting thermostat Disassembling thermostat Disassembling sequence 1 Cover assembly 3 Gasket 5 Thermostat case 2 Gasket 4 Thermostat 1 2 3 4 5 Replace https www forkliftpdfmanuals com ...

Page 461: ... If the temperatures are not within the standard range replace the thermostat Note a Stir the water in the container with a stick to ensure uniform temperature distribution b Before installing the thermostat be sure to check the valve opening temperature stamped on the thermostat valve side face Inspecting thermostat Item Standard Temperature at which valve starts opening 76 5 1 5 C 170 3 5 F Temp...

Page 462: ...pump Check to make sure that the impeller and shaft of water pump rotate smoothly without noise and irregularities If faulty replace the assembly 1 Water pump cover 2 Gasket 3 Water pump 1 2 3 Crack water leakage damage impeller and shaft rotation Replace Crack water leakage deformation https www forkliftpdfmanuals com ...

Page 463: ... of oper ation Depending on the operating condition inspecting and adjusting interval may shorten Crack extension wear damage Crack deformation damage Replace Replace Water pump and crankcase fixing bolts 5 18 1 3 4 N m 1 85 0 35 kgf m 13 4 2 5 lbf ft Water pump and water pump cover fixing bolts 3 9 8 1 N m 1 0 1 kgf m 7 2 0 7 lbf ft 32 4 2 N m 3 3 0 2 kgf m 23 9 1 4 lbf ft https www forkliftpdfma...

Page 464: ...LING SYSTEM 10 8 3 2 Installing thermostat Installing thermostat 18 1 1 5 N m 1 85 0 15 kgf m 13 4 1 1 lbf ft Replace Crack deterioration damage Crack water leakage damage https www forkliftpdfmanuals com ...

Page 465: ...ing and inspecting turbocharger 11 6 2 2 1 Removing turbine housing 11 7 2 2 2 Removing compressor cover 11 7 2 2 3 Installing O ring 11 7 2 2 4 Installing compressor cover 11 8 2 2 5 Installing snap ring 11 8 2 3 Cleaning 11 9 2 3 1 Measuring axial clearance of cartridge assembly 11 9 2 3 2 Reassembling turbocharger 11 10 3 Installing turbocharger inlet and exhaust systems 11 12 3 1 Installing ex...

Page 466: ...2 1 Removing turbocharger inlet and exhaust systems 1 1 Removing turbocharger Removing turbocharger Removing sequence 1 2 3 4 Replace Replace Replace 1 Oil pipe 2 Oil pipe 3 Air hose 4 Turbocharger https www forkliftpdfmanuals com ...

Page 467: ...INLET AND EXHAUST SYSTEMS 11 3 1 2 Removing inlet manifold Removing inlet manifold Removing sequence 2 1 Replace Replace 1 Air inlet elbow 2 Inlet manifold https www forkliftpdfmanuals com ...

Page 468: ...INLET AND EXHAUST SYSTEMS 11 4 1 3 Removing exhaust manifold Removing exhaust manifold Removing sequence 1 Replace 1 Exhaust manifold https www forkliftpdfmanuals com ...

Page 469: ...fold distortion 1 Check the flange for crack 2 Check the flange surface for distortion If the distortion exceeds the standard retouch the surface or replace it Measuring distortion on exhaust manifold Item Standard Exhaust manifold distortion 0 2 mm 0 008 in or less Straight edge Thickness gauge https www forkliftpdfmanuals com ...

Page 470: ...l during disassembly and assembly since vanes can eas ily bend when dropped or hit 1 Coupling assembly 4 Compressor cover 2 Turbine housing 5 O ring 3 Snap ring 6 Cartridge assembly 1 2 3 4 5 6 Replace Contact between compressor wheels and cover Vane distortion or damage Contact between turbine wheels and housing cracks or distortion Distortion of flange on turbine side https www forkliftpdfmanual...

Page 471: ...ssor wheel against the cover 1 Lay the compressor cover flat on the table as shown Using the ring pliers remove the snap ring 2 Using a plastic hammer lightly tap around on the compressor cover and remove the cover Remove the O ring from the housing Note The positional relationship between the compressor cover and the cartridge assembly is very important Therefore before disassembling mark the com...

Page 472: ...oth ends of the snap ring using a screwdriver and a hammer to insert the ring se curely into the groove on the bearing housing c Make sure the screwdriver does not hit the bearing housing when driving the snap ring with the screw driver and the hammer With the tapered face facing up install the snap ring in the compressor cover using the pliers Installing snap ring Compressor cover Ring pliers P N...

Page 473: ...he inside and outside surfaces Cleaning turbocharger Blow compressed air onto 4 Remove deposits using a plastic scraper or a bristle brush After removing deposits soak the components in a nonflammable solvent and apply compressed air again Removing carbon deposits thoroughly 2 3 1 Measuring axial clearance of cartridge assembly Set a dial indicator on the end of compressor wheel shaft as shown Mov...

Page 474: ...ling O ring b Replace the compressor cartridge assembly if its vanes are distorted or cracked Minor distortion or minor scratches on one piece of the vane may not require replacement of cartridge assembly however do not attempt to re shape a distorted vane 8 3 0 5 N m 0 85 0 05 kgf m 6 1 0 4 lbf ft Replace https www forkliftpdfmanuals com ...

Page 475: ... disassembly Installing turbine housing 2 3 4 Installing coupling assembly Apply Molykote grease or equivalent to threads of the coupling assembly nut and tighten the nut to the specified torque Installing coupling assembly Turbine housing Cartridge assembly Coupling assembly 8 3 0 5 N m 0 85 0 05 kgf m 6 1 0 4 lbf ft https www forkliftpdfmanuals com ...

Page 476: ...UST SYSTEMS 11 12 3 Installing turbocharger inlet and exhaust systems 3 1 Installing exhaust manifold Installing exhaust manifold Replace 18 1 3 4 N m 1 85 0 35 kgf ft 13 4 2 5 lbf ft https www forkliftpdfmanuals com ...

Page 477: ...INLET AND EXHAUST SYSTEMS 11 13 3 2 Installing inlet manifold Installing inlet manifold Replace Replace https www forkliftpdfmanuals com ...

Page 478: ...3 Installing turbocharger Installing turbocharger Replace Replace Replace 16 2 2 5 N m 1 65 0 25 kgf m 11 9 1 8 lbf ft 4 0 5 N m 0 41 0 05 kgf m 3 0 0 37 lbf ft 4 0 5 N m 0 41 0 05 kgf m 3 0 0 37 lbf ft https www forkliftpdfmanuals com ...

Page 479: ...2 Inspecting gears of starter 12 14 2 3 13 Inspecting magnetic switch 12 15 2 3 14 Inspecting starter relay 12 15 2 4 Reassembling starter 12 16 2 4 1 Installing gear shaft 12 16 2 5 Disassembling and inspecting alternator12 17 2 5 1 Separating front bracket from stator 12 17 2 5 2 Removing field coil 12 18 2 5 3 Removing pulley 12 18 2 5 4 Removing rear bearing 12 18 2 5 5 Removing front bearing ...

Page 480: ...ELECTRICAL SYSTEM 12 2 1 Removing electrical system 1 1 Removing starter Removing starter Removing sequence 1 Starter 1 https www forkliftpdfmanuals com ...

Page 481: ...egative 2 Do not use any high voltage tester such as megger 3 Do not disconnect lead wire from B terminal of the alternator while the engine is running 4 Battery voltage is constantly applied to B terminal of the alternator Do not ground at this terminal 5 Do not short circuit or ground at L terminal For a built in IC regulator type 6 When a steam cleaner is used do not allow the steam directly co...

Page 482: ...ELECTRICAL SYSTEM 12 4 1 3 Removing alternator Removing alternator Removing sequence 1 Alternator 2 Adjusting plate 3 Bracket 3 1 2 S6S Y3T61HF https www forkliftpdfmanuals com ...

Page 483: ...ELECTRICAL SYSTEM 12 5 Removing alternator Removing sequence 1 Alternator 2 Adjusting plate 3 Bracket 3 1 2 S6S Y3T62HF https www forkliftpdfmanuals com ...

Page 484: ...ELECTRICAL SYSTEM 12 6 1 4 Removing glow plug Removing glow plug Removing sequence 2 1 1 Connection plate 2 Glow plug https www forkliftpdfmanuals com ...

Page 485: ...ration The magnetic switch is normal if the pinion springs out when the switch is turned ON Pull in test 3 Holding test Connect the starter to the circuit as shown in the illustration Pull out the pinion fully by hand The magnetic switch is normal if the pinion does not return when it is released Holding test 4 Return test Connect the starter to the circuit as shown in the illustration Pull out th...

Page 486: ...dition the pinion pops out when the switch is turned ON and the starter rotates at more than the specified rotation speed If the terminal voltage current or rotation speed does not meet the standard disassemble inspect and repair the starter Test at no load Item Standard Starter model name M008T60373 Nominal output 24 V 5 kW No load characteristics Terminal voltage 23 V Current 85 A or less Rotati...

Page 487: ...r 10 Internal gear 16 Ball bearing 5 Yoke assembly 11 Gear shaft 17 Oil seal 6 Armature 12 Gear 18 Front bracket 1 3 4 5 6 7 8 9 10 11 12 12 13 14 15 16 17 2 18 Replace Replace Wear Overrunning clutch function Open circuit short Open circuit short Wear damage Wear damage Wear damage Wear damage Replace Replace Brush dust accumulation local wear rust deterioration insulation Damage wear open circui...

Page 488: ...ature and the pinion 3 Place an appropriate tube on the pinion stopper Tap the tube with a hammer to drop the pinion stopper to the clutch side This will expose the stopper ring 4 Remove the stopper ring with pliers and remove the pinion Note Do not reuse the stopper ring for reassembly Connection to move the pinion forward Removing pinion SW1 SW2 Battery 24V Disconnect lead wire with terminal whi...

Page 489: ...5 Removing armature and yoke 1 Remove the armature and the yoke 2 Remove the packing from the internal gear 3 Remove the packing and plate on the lever support 4 Remove the ball from the internal gear 5 Remove the planetary gears Disassembling starter 1 Disassembling starter 2 2 2 6 Removing overrunning clutch Pull out the internal gear gear shaft overrunning clutch and lever as an assembly from t...

Page 490: ...und replace the brush holder assembly Check the brush holders for looseness Checking brush holder for grounding 2 3 4 Measuring commutator radial runout 1 Inspect the commutator surface If the surface is rough polish it using a 400 to 600 grit sandpaper 2 Measure the commutator radial runout with a dial gauge If the measured value exceeds the limit replace the armature with a new one Measuring com...

Page 491: ... plate and make it contact with the armature coil as shown in the illustration In this condition rotate the armature slowly by hand If the short circuit exists on the coil the iron plate is attracted to the coil If coil is not defective the iron plate is not attracted Inspecting armature coil for short circuit 2 Check that there is no continuity between the commutator and the shaft core If any con...

Page 492: ...ld coil 2 3 9 Inspecting rear bracket Replace the rear bracket if the bearing is worn 2 3 10 Inspecting overrunning clutch operation CAUTION Do not clean the overrunning clutch in wash oil since grease is applied inside Make sure that when attempting to turn the overrunning clutch it locks in one direction and rotates smoothly in the opposite direction Inspecting overrunning clutch 2 3 11 Inspecti...

Page 493: ...inuity between terminal B and terminal M If continuity is found the contactor is welded closed Inspecting magnetic switch 2 3 14 Inspecting starter relay 1 Open circuit of coil Check continuity between terminal SW and terminal L If continuity is not found replace the starter relay 2 Adhension of contactor Check for no continuity between terminal S and terminal B If continuity is found the contacto...

Page 494: ...ever to the overrunning clutch 2 Fit the internal gear into the gear shaft 3 Put the gear shaft into the overrunning clutch Installing gear shaft 10 8 1 N m 1 1 0 1 kgf m 8 0 7 lbf ft Apply grease Apply grease Apply grease Gear shaft Internal gear Overrunning clutch Planetary gear https www forkliftpdfmanuals com ...

Page 495: ... as it can dam age the stator 1 Remove the through bolts 2 With two flat head screwdrivers inserted between the front bracket and stator pry them apart Separating front bracket from stator 1 Pulley with fan 4 Coil 7 Regulator assembly 2 Front bracket assembly 5 Stator coil 8 Rectifier assembly 3 Rotor assembly 6 Rear bracket 1 2 3 4 5 8 6 7 Crack damage Crack damage Rotation Rotation Short or open...

Page 496: ...e coil forc ibly 1 Unscrew the screw A 2 Unscrew the screw B 3 Remove the field coil Removing field coil 2 5 3 Removing pulley CAUTION When setting the rotor in a vise be sure to hold the base of the rotor claw Do not hold the rotor claw as it causes damage to the claw 1 Apply a cloth to the rotor and set it in a vise 2 Remove the pulley nut and then pull out the pulley Removing pulley 2 5 4 Remov...

Page 497: ...solder the joint of the stator and remove the stator from the rectifier Removing stator 2 5 7 Removing regulator assembly Remove the screws of the regulator assembly and then remove the regulator assembly Removing regulator assembly and rectifier assembly 2 5 8 Removing rectifier assembly 1 Remove the screw and nut from the rectifier 2 Remove the rectifier assembly Front bracket Front bearing Stat...

Page 498: ...ween lead wires and core 2 6 2 Inspecting rectifier Check that diodes in a rectifier function properly To check measure both negative and positive resistance alternately twice If both infinite negative and infinite positive resistances are observed the diode is open circuited If measured value is close to 0Ω the diode is short circuited In either case replace the rectifier with a new one Note Use ...

Page 499: ...suring field coil Measure resistance between the terminals of the field coil If the measured value deviates from the standard value replace the field coil with a new one Measuring field coil Field coil https www forkliftpdfmanuals com ...

Page 500: ...ling rectifier assembly and regulator assembly Install the rectifier assembly and regulator assembly on the rear bracket Installing rectifier assembly and regulator assembly 147 15 N m 15 1 5 kgf m 108 4 11 1 lbf ft Rear bracket Rectifier Regulator assembly https www forkliftpdfmanuals com ...

Page 501: ...racket and secure the bearing retainer with a screw Installing front bearing 2 7 4 Installing rear bearing Press fit the rear bearing to the rotor Installing rear bearing 2 7 5 Installing pulley 1 Insert the rotor into the front bracket Apply a cloth to the rotor and set it in a vise 2 Install the spacer and pulley and secure the pulley with a nut Installing pulley Stator Lead wire Rectifier Front...

Page 502: ...continuity between the terminal and body If there is no continuity or if the resistance is high replace the glow plug 2 8 2 Heating test of glow plug Connect the wiring to the terminal and ground the body If the glow plug heats red it is normal Continuity test of glow plug Stator Rear bracket Front bracket Item Standard Resistance value 1 0 Ω Item Standard Rated voltage Armature current 22 V 4 4 0...

Page 503: ...ecting magnetic valve stop solenoid operation Check visually for rubber strips of the tip of the armature and damages Also check the armature moves smoothly by rotating with a hand Inspecting magnetic valve operation 2 10 Installing magnetic valve stop solenoid Install the magnetic valve assembly to the distributor with the specified torque Installing magnetic valve Item Standard Resistance value ...

Page 504: ...YSTEM 12 26 3 Installing electrical system 3 1 Installing glow plug Installing glow plug 1 25 0 25 N m 0 13 0 03 kgf m 0 94 0 2 lbf ft 17 5 2 5 N m 1 75 0 25 kgf m 12 7 1 81 lbf ft https www forkliftpdfmanuals com ...

Page 505: ...ELECTRICAL SYSTEM 12 27 3 2 Installing alternator Installing alternator S6S Y3T61HF https www forkliftpdfmanuals com ...

Page 506: ...ELECTRICAL SYSTEM 12 28 Installing alternator S6S Y3T62HF https www forkliftpdfmanuals com ...

Page 507: ...ELECTRICAL SYSTEM 12 29 3 3 Installing starter Installing starter https www forkliftpdfmanuals com ...

Page 508: ...https www forkliftpdfmanuals com ...

Page 509: ...t tension 13 7 1 6 Inspecting V belt 13 7 1 7 Adjusting V belt tension 13 7 2 Break in operation 13 8 2 1 Starting up 13 8 2 2 Inspecting engine condition after starting up 13 8 2 3 Break in operation time 13 8 2 4 Inspection and adjustment after break in operation 13 8 3 Performance test JIS standard 13 9 3 1 Engine equipment condition 13 9 3 2 Test items and purposes 13 9 3 2 1 Operation load te...

Page 510: ...the inlet valve nor the exhaust valve is not lifted off its seat by the push rod 3 Insert a thickness gauge between the rocker arm and valve cap to inspect the clearance Turning engine Determining top dead center of No 1 cylinder compression stroke 1 1 2 Adjusting valve clearance 1 Insert the feeler gauge of the specified thickness between the rocker arm and valve cap then adjust the clearance by ...

Page 511: ...ual feed pump repeatedly approx 7 times to feed the fuel 3 Tighten the drain plug securely after draining the water 4 Bleed the fuel system of air after bleeding the fuel system of water Draining fuel filter 1 Draining fuel filter 2 1 3 Bleeding fuel system WARNING Completely wipe off any spilled fuel from the air vent plug with a cloth and be sure to tighten the air vent plug after air bleeding F...

Page 512: ...ing gear case cover 2 Attach the turning socket to the pulley nut and turn the crankshaft in the normal direction clockwise as viewed from the front end Turning engine 3 Stop turning the crankshaft when the marks of the fuel injection pump gear and idler gear are aligned Match mark of gears Match mark of gears Gear case cover 0 4 0 Turning socket P N 58309 73100 3 2 2 3 3 2 1 1 1 Fuel injection pu...

Page 513: ...r ranty be voided New parts may be updated due to improvement Fuel and exhaust system repairs should only be con ducted by an authorized Mitsubishi forklift truck dealer Tampering or adjusting the fuel system components will void the warranty and could be in violation of the EPA regulations The fuel injection pump is an emission control device Components inside the pump are specifically cali brate...

Page 514: ...p 10 After aligning the timing marks of the fuel injection pump gear and the idler gear install the fuel injection pump to the front plate Match mark of gears Match mark of gears 11 Install the gear case cover Installing gear case cover B A 3 2 2 3 3 2 1 1 1 Fuel injection pump gear Oil pump gear Crankshaft gear Camshaft gear Idler gear S6S Y3T62HF 3 2 2 3 3 2 11 1 Injection pump gear Camshaft gea...

Page 515: ...tion or damage If any abnormality is found replace the V belt with a new one 2 Inspect V belt tension deflection When pressing the V belt strongly at the center of its span the deflection should be 12 mm 0 47 in Force on the V belt Approx 98 N 10 kgf 22 lbf If the deflection of V belt is not within the standard adjust the V belt tension 1 7 Adjusting V belt tension 1 Loosen all retaining bolts of ...

Page 516: ...he engine investigate the cause and take appropriate measures 1 The oil pressure must be within the specified value 2 The coolant temperature must be within the specified value 3 The engine must be free from any leakages such as oil coolant fuel and gas air Pay special attention to oil leakage from the fitting face of turbocharger lube oil pipe 4 Check for an abnormal noise 5 Check for the color o...

Page 517: ...2 Continuous load test Operate the engine continuously for 10 hours at 90 load continuous load application of nominal net brake power while the engine speed is maintained at revolutions corresponding to the nominal brake power In this test evaluate the fuel consumption rate and operating condition and confirm that the engine is capable of continuous operation 3 2 3 Low idle test Conduct this test ...

Page 518: ...ne factor Range of correction equation use The range of correction factor is as follows 0 9 1 1 Natural aspiration engine and engine with mechanically driven air charger Turbocharged engine without air cooler or with air to air cooler Turbocharged engine with air to liquid cooler 0 7 0 7 1 2 298 0 7 0 7 99 298 Calculation of correction factor Calculation of engine factor 0 036 1 14 Corrected fuel ...

Reviews: