


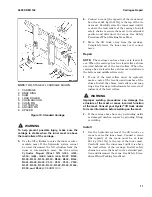


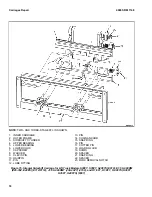

A.
EARLIER MODELS
B.
LATER MODELS
1. FORKS
2. CARRIAGE
3. LOAD BACKREST EXTENSION
4. FORK REMOVAL NOTCH
5. LATCH PIN ASSEMBLY
6. LEVER
7. WASHER
8. SPRING
9. PIN
10. KNOB
Figure 5. Carriage and Forks
REMOVE, LIFT TRUCKS
MANUFACTURED AFTER AUGUST, 2012
AND EQUIPPED WITH FORK
POSITIONER
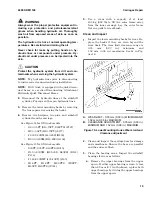
WARNING
DO NOT try to remove a fork without a lifting de-
vice. Each hook fork for these lift trucks can
weigh 45 to 115 kg (99 to 254 lb).
CAUTION
Remove fork latch pins if adding a fork positioner
attachment. Damage to forks and other carriage
components can occur if fork latch pins are not
removed prior to using attachment.
NOTE:
Forks are to be replaced in sets, not indi-
vidually, by trained personnel only.
NOTE:
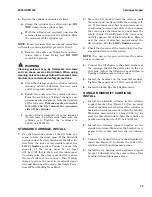
Before removing forks, make a notation of
the hole position of the fork carrier blocks and re-
tainer capscrews on the fork carrier. See Figure 6.
1.
Lower forks onto blocks for support. See Fig-
ure 3.
2.
Remove retainer capscrews and fork carrier
blocks from fork carriers. See Figure 6.
3.
Attach a lifting device to forks. Slide forks off
carriers.
4.
Move carriage away from fork or use a lifting
device to move fork away from carriage.
Fork Replacement
4000 SRM 1148
6


