background image

Pg 5.28  

S22/23H

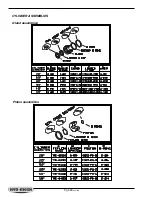
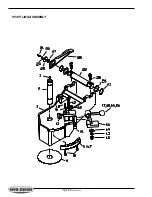
CYLINDER ASSEMBLIES

Piston assemblies

Gland assemblies

Summary of Contents for S-23H

Page 1: ...I N B A N D S A W T E C H N O L O G Y OPERATIONS MAINTENANCE M A N UA L ...

Page 2: ...ximizing the power and versatility of your new HYD MECH band saw please take the time to familiarize yourself and your employees with the correct operation and maintenance procedures as outlined in this manual We sincerely appreciate the confidence you have demonstrated in purchasing our product and look forward to building a long and mutually beneficial relationship Thank you HYD MECH GROUP LIMIT...

Page 3: ...THIS PAGE INTENTIONALLY LEFT BLANK ...

Page 4: ...8 GUIDE ARM POSITIONING 9 COOLANT FLOW 9 SECTION 3 MAINTENANCE and TROUBLESHOOTING BLADE CHANGING PROCEDURE 11 BLADE TRACKING ADJUSTMENT 12 BLADE GUIDE ADJUSTMENT 13 BLADE BRUSH ADJUSTMENT 13 ANGLE BRAKE ADJUSTMENT and PROCEDURE 14 DRIVE BELT REPLACEMENT 14 HEAD DOWN LIMIT SWITCH 14 LUBRICATION 15 TROUBLE SHOOTING GUIDE 16 SERVICE RECORD NOTES 17 SECTION 4 ELECTRICAL SYSTEM CONTROL PANEL COMPONENT...

Page 5: ...ADE BRUSH ASSEMBLY 36 COUNTER BALANCE SPRINGASSEMBLY 37 PIVOT LINK ASSEMBLY 38 FRONT VISE ASSEMBLY 40 HYDRAULIC POWER PACK 41 COOLANT GROUP 42 DOORS and COVERS 43 SECTION 7 OPTIONAL ASSEMBLIES WORK STOP 45 OVER HEAD BUNDLING 46 BLADE BREAKAGE 47 WORK LAMP ASSEMBLY 47 30O MITRE CUTTING 48 SECTION 8 SPECIFICATIONS SPECIFICATION LIST 49 LAYOUT DRAWINGS 50 SECTION 9 WARRANTY WARRANTY 53 ...

Page 6: ...SECTION 1 INSTALLATION SECTION 1 INSTALLATION ...

Page 7: ...SECTION 1 INSTALLATION ...

Page 8: ... IN A CLEAN AND TIDY CONDITION TO AVOID OBSTACLES OPERATORS COULD TRIP OVER THE S 23 SHOULD ONLY BE OPERATED ACCORDING TO THE SPECIFICATIONS OF THE SAW AVOID UNSAFE USAGE PRACTICES IF AT ANY TIME THE SAW DOES NOT APPEAR TO BE OPERATING PROPERLY IT SHOULD BE STOPPED IMMEDIATELY AND REPAIRED OPERATOR THE SAW SHOULD NEVER BE OPERATED UNLESS ALL GUARDS AND DOORS ARE IN PLACE AND CLOSED OPERATOR KEEP A...

Page 9: ...he corners of the saw Undo the bolts that hold the saw to the pallet Retain these bolts to use for levelling The larger diameter hole is used for retaining during shipping and for use with concrete floor anchors The smaller diameter threaded holes at each corner are used for levelling the saw properly REMOVING THE SAW FROM SHIPPING SKID Lift the right drive side of the saw as shown with a lift tru...

Page 10: ...l the saw Adjust the level with the levelling bolts supplied Consideration should be given to the flow of the coolant as it returns to the coolant trough at the vise end of the saw Levelling to give a small incline towards this area helps to ensure the coolant supply returns to the container Coolant Return Shown with tank removed Wash Down Coolant Coolant Coolant Coolant Coolant The power pack wit...

Page 11: ...e the electrical connections As supplied your new S 20 is set to run on three phase voltage The supply voltage of the machine is displayed on the Serial Plate and the Voltage Label Connection from the Main supply is made to L1 L2 L3 and Ground as shown below Supply conductors should be rated for the current supplied and should be protected by time delay fusing rated for the amperage stated on the ...

Page 12: ...SECTION 2 OPERATING INSTRUCTIONS SECTION 2 OPERATING INSTRUCTIONS ...

Page 13: ...SECTION 2 OPERATING INSTRUCTIONS ...

Page 14: ...e functions with the exception of the coolant if the selector switch is in the WASH position BLADE SWITCH This selector switch starts and stops the saw blade The blade will not start with the Head in the down position COOLANT SWITCH OFF No coolant flow ON Coolant flow when blade is running WASH Constant flow HEAD CONTROLS UP The head will rise as long as the lever is pushed up HOLD The head will s...

Page 15: ... cutting 2 Generous coolant application is essential with almost all materials A high quality and well mixed coolant will dramatically extend blade life and will increase cutting rate and surface finish On those few materials where coolant is undesirable a slight coolant flow or periodic oiling of the blade is necessary to prevent the blade from being scored by the carbide guides 3 The stock being...

Page 16: ...ing rates and good blade life For cutting narrow or thin wall structural materials a fine blade with many teeth per inch T P I is recommended For wide materials a blade with a coarse pitch should be used See the sketch below for the blade pitch changes fordiffering effective material widths It is impractical to change the blade to the proper pitch every time a different width of material is cut an...

Page 17: ...sition the Head in the fully down position is moved until the frame meets the 90O stop bolt which is located in the coolant tray at the drive end of the head BLADE SPEED ADJUSTMENT Blade speed can be adjusted infinitely between 75 to 350 SFM Surface Feet Minute 23 to 106 m min Adjustment should be made only when the blade is running Clockwise rotation of the knob increases blade speed while counte...

Page 18: ...is required for blade lubrication to prevent blade scoring by the carbide pads as the blade moves through them GUIDE ARM POSITIONING The S 23 guide arms are adjustable to accommodate varying material widths The guide arms should be adjusted as close to the material width as possible while still allowing the material to pass between them This process of matching the guide arm spacing to the materia...

Page 19: ...THIS PAGE INTENTIONALLY LEFT BLANK ...

Page 20: ...SECTION 3 MAINTENANCE AND TROUBLE SHOOTING SECTION 3 MAINTENANCE AND TROUBLE SHOOTING ...

Page 21: ...SECTION 3 MAINTENANCE AND TROUBLE SHOOTING ...

Page 22: ...the top of the head the saw blade runs in a protective channel as shown below Grip the blade at each end of this channel and twist the blade teeth down past the channel and slide the blade forward Let the blade rest on the out feed table then slide the blade down and out of the carbide guides SECTION 3 MAINTENANCE and TROUBLESHOOTING BladeTensioner CarbideTension Handle Blade R Blade R Blade R Bla...

Page 23: ... on the drive wheel tracking photo below The blade teeth should protrude from 185 to 200 from the face of the blade wheels If the tracking requires adjustment follow the instructions below BLADETRACKING ADJUSTMENT 10 First inspect the blade wheels for wear or damage and repair as required Blade tracking adjustment should always begin at the wheel where the tracking is farthest out of specification...

Page 24: ...r guide arm or the roll pin on the drive guide arm Turn the set screw clock wise with a 3 16 allen key until tight and then loosen 1 8 of a turn and tighten the hex nut This should put just enough pressure on the blade to permit you to push the blade down approximately 1 8 Idler guide arm carbide locking handle in the locked position Drive wheel tracking bolt assemblies BLADE BRUSH ADJUSTMENT The ...

Page 25: ...s a long life grooved belt It should last for many of hours of operation and should rarely require replacement See the BLADE DRIVE ASSEMBLY drawing on Pg 6 2 HEAD DOWN LIMIT SWITCH The Head down limit switch operates to cut power to the blade motor and the coolant pump motor when the Head has descended to the bottom of its travel The Head is adjusted so that the blade will descend slightly past th...

Page 26: ...n to prevent wear and seizure as shown on this page and page NO NO NO NO NOTE TE TE TE TE Hy Hy Hy Hy Hyd Mec d Mec d Mec d Mec d Mech r h r h r h r h recommends Monthly lubrica ecommends Monthly lubrica ecommends Monthly lubrica ecommends Monthly lubrica ecommends Monthly lubrication tion tion tion tion Idler Way 2 Grease fittings plus shaft and bearing assembly Swivel Pivot pin fitting under dom...

Page 27: ...cking needs adjustment Wheel is worn or in poor condition More tension needed Excessive feed rate reduce Blade pitch incorrect Carbide guides overtightened Blade speed too fast More blade tension needed Guide arms too far apart Feed rate too slow increase Carbide guides worn or loose adjust or replace NOTE New blades tend to vibrate until they are broken in Excessive blade tension reduce Excessive...

Page 28: ...Pg 3 17 S23H SERVICE RECORD NOTES DATE SERVICED BY COMMENTS ...

Page 29: ...THIS PAGE INTENTIONALLY LEFT BLANK ...

Page 30: ...SECTION 4 ELECTRICAL SYSTEM SECTION 4 ELECTRICAL SYSTEM ...

Page 31: ...SECTION 4 ELECTRICAL SYSTEM ...

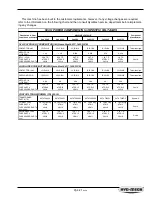
Page 32: ... switches the power to the motor and the overload provides protection from excessive current draw The contactor overload is set to automatic at the factory and provides quick reset if the overload trips All of the switches that the operator uses to operate the saw are run with 120 Volts A C This control system is fed 120 Volts from a transformer that steps down the line voltage to 120 Volts The co...

Page 33: ...Pg 4 20 S23H ELECTRICAL COMPONENTS LISTS 0 12 3 4 4 5 6 7 8 76 6 9 2 9 9 61 1 7 1 7 6 7 5 1 7 61 7 9 1 A B A 4 14 4 4 4 14 4 5 4 7 14 4 7 4 C C 6 C1 C ...

Page 34: ... 1 61 61 1 1 0 9 9 3 9 1 D 9 7 1 D 61 7 1 7 6 61 7 1 7 6 1 7 1 7 1 7 1 7 61 7 1 7 6 1 7 1 7 1 0 3 7 7 7 7 7 7 17 0 3 7 7 7 7 7 7 9 1 0 6 3 51 1 1 51 1 61 0 9 9 3 9 1 D 9 7 1 D 1 7 1 7 1 7 1 7 61 7 1 7 6 61 7 1 7 6 61 7 1 7 6 61 7 1 7 6 1 9 1 D 0 3 2 7 2 7 2 7 2 7 2 7 2 76 7 1 E 9 9 1 D 9 7 1 D 0 9 9 3 61 9 1 1 6 1 9 1 1 1 9 1 1 1 9 1 1 1 9 1 1 1 9 1 1 71 E 9 9 1 D 9 7 1 D 0 9 3 61 7 1 7 6 61 7 1 7...

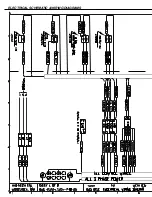
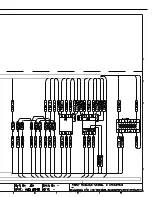
Page 35: ...ELECTRICAL SCHEMATIC WIRING DIAGRAMS ...

Page 36: ......

Page 37: ...ELECTRICAL SCHEMATIC WIRING DIAGRAMS ...

Page 38: ......

Page 39: ...THIS PAGE INTENTIONALLY LEFT BLANK ...

Page 40: ...SECTION 5 HYDRAULIC SYSTEM SECTION 5 HYDRAULIC SYSTEM ...

Page 41: ...SECTION 5 HYDRAULIC SYSTEM ...

Page 42: ...ic oil and all machine functions have been tested at the factory to ensure proper operation upon initial start up The head and vise cylinders are the same as used in the A P model machines Panel mounted hydraulic control valve assembly S22H 621 00 Door Mounted Hydraulic Assembly Accumualator assembly AC 1 00 with limit switch attached XCK P121 1 4 Horse power motor 145TC Frame MPI Micro Powerpack ...

Page 43: ...Pg 5 28 S22 23H CYLINDER ASSEMBLIES Piston assemblies Gland assemblies ...

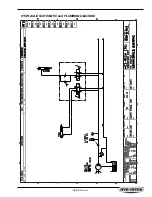
Page 44: ...Pg 5 29 S22 23H HYDRAULIC SCHEMATIC and PLUMBING DIAGRAM ...

Page 45: ...Pg 5 30 S22 23H ...

Page 46: ...SECTION 6 MECHANICAL ASSEMBLIES SECTION 6 MECHANICAL ASSEMBLIES ...

Page 47: ...SECTION 6 MECHANICAL ASSEMBLIES ...

Page 48: ...Pg 6 31 S23H 2001a GUIDE ARM CARBIDE ASSEMBLIES SECTION 6 MECHANICAL ASSEMBLIES ...

Page 49: ...Pg 6 32 S23H 2001a BLADE DRIVE ASSEMBLY ...

Page 50: ... counter clockwise Hold the assembly so that the speed clock decal faces you Rotate the assembly until 75 suface feet per minute on the decal is positioned at the 12 O clock position Hold the cup of the speed adjustor assembly with one hand while rotating the body of the speed adjustor Assembly until the needle alignes with 75 surface feet per minute at the 12 O clock position The assembly is now ...

Page 51: ...Pg 6 34 S23H 2001a HM4A GEAR BOX ASSEMBLY ...

Page 52: ...Pg 6 35 S23H 2001a IDLERWHEEL ASSEMBLY 01 2345 1 345 1 6 7809 849 59 9 3 01 1 ...

Page 53: ...Pg 6 36 S23H 2001a BLADE BRUSH ASSEMBLY ...

Page 54: ...Pg 6 37 S23H 2001a COUNTER BALANCE SPRINGASSEMBLY ...

Page 55: ...Pg 6 38 S23H 2001a PIVOT LINK ASSEMBLY ...

Page 56: ...Pg 6 39 S23H 2001a 0 1 Pivot link parts list ...

Page 57: ...Pg 6 40 S23H 2001a FRONTVISE ASSEMBLY ...

Page 58: ...Pg 6 41 S23H 2001a HYDRAULIC POWER PACK ...

Page 59: ... x 17 8 N4MCB4 1 4 MNPT 1 4 HOSE BARB 3049 40 NEEDLE VALVE attached to idler guide arm 738 44 SWIVEL 1 4 FNPT 1 4 BARB 101 B 1 4 FNPTTEE attached to fence TO IDLER GUIDE ARM TO OUTFEED FENCE PVC CHK 426 B6 B6 E CHECKVALVE RVH 6 3 8 HOSE x 1 BPCROSS 04 1 4 FNPT BMI CROSS RVH 6 3 8 HOSE x 8 8 5 RVH 6 3 8 HOSE x 4 125 6B 3 8 BARB 1 4 MNPT 590 06 12 3 8 BARB 3 4 8 MALE N6MCB4 3 pcs 3 8 BARB 1 4 MNPT ...

Page 60: ...3 S23H 2001a DOORS and COVERS Idler wheel door S23 32 00 Drive wheel door S23 33 00 Lower blade gaurd S22 41 01D with 1 4 20 x 3 4 thumb screw hex nut Blade tension handle S22 42 00 Control box lid S22H 72 01 ...

Page 61: ...THIS PAGE INTENTIONALLY LEFT BLANK ...

Page 62: ...SECTION 7 OPTIONAL ASSEMBLIES SECTION 7 OPTIONAL ASSEMBLIES ...

Page 63: ...SECTION 7 OPTIONAL ASSEMBLIES ...

Page 64: ...Pg 7 45 S23H SECTION 7 OPTIONAL ASSEMBLIES WORK STOP ...

Page 65: ...ation of the Overhead Bundling a The material should be loaded into the machines vises and advanced to a position where a trim cut can be performed b Close the Fixed Vise until the Overhead Bundling Arm is slightly 1 32 to 1 64 above the material to be cut c Close the ball valve located on the Fixed Overhead Bundling cylinder to lock the position of the Overhead Bundling Arm and then operate as no...

Page 66: ...Pg 7 47 S23H WORK LAMP ASSEMBLY WORK LAMP 0618 3 AS MS3 MOUNTING STUD WITH HEX NUT TOOTHWASHER BLADE BREAKAGE Standard on CE machines XCKL 115H7 LIMIT SWITCH BLADETENSIONER ASSEMBLY ...

Page 67: ...Pg 7 48 S23H 30O MITRE CUTTING ...

Page 68: ...SECTION 8 SPECIFICATIONS SECTION 8 SPECIFICATIONS ...

Page 69: ...SECTION 8 SPECIFICATIONS ...

Page 70: ...uding teeth thickness 042 Blade speed 75 to 400 Surface Feet Minute Variable Blade guides Carbide Blade wheel diameter 19 Motors 5 Horsepower Variable Speed Blade Drive 1 4 Horsepower Hydraulic Hydraulic Micro Powerpack gear pump Coolant pump 3 5 Gallons Per Minute Coolant reservoir 6 Gallons Table height 31 High Maximum Workload 5000 pounds Machine weight 2000 pounds Overall Dimensions 93 Wide x ...

Page 71: ...Pg 8 50 S23H LAYOUT DRAWINGS ...

Page 72: ...Pg 8 51 S23H ...

Page 73: ...THIS PAGE INTENTIONALLY LEFT BLANK ...

Page 74: ...SECTION 9 WARRANTY SECTION 9 WARRANTY ...

Page 75: ...SECTION 9 WARRANTY ...

Page 76: ...ms used in the manufacture of the S 23H but not originally manufactured by Hyd Mech are subject to the original manufacturer s warranty Hyd Mech will provide such assistance and information as is necessary and available to facilitate the user s claim to such other manufacturer Liability or obligation on the part of Hyd Mech for damages whether general special or for negligence and expressly includ...

Page 77: ...NCE MANUAL Through its twinned distribution channel of authorized dealers and factory representatives HYD MECH services a worldwide network of customers from its two state of the art manufacturing facilities in Houston Texas USA and Woodstock Ontario Canada Check out the full range of Rock Solid Sawing Solutions at www hydmech com HYD MECH GROUP LIMITED HYD MECH CORPORATION P O Box 1030 1079 Parki...

Reviews: