


OI (Part 2): Steely, HA, Startrailer
Version 2019/01
29
Positioning
1
2
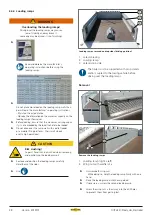
Loading ramps positioned
1. Loading ramp lug
2. Slot between chassis and loading platform
►
►
Unlock the rear drop-side locks.
►
►
Carefully fold down the rear drop side.
►
►
Grip a loading ramp with both hands.
►
►
Insert the lug of the loading ramp into the slot
between the chassis and the loading platform.
Setting the track width
1
2
Setting the track width
1. Individual loading ramps (for two-wheeled vehicles)
2. Double loading ramp (for four-wheeled vehicles)
►
►
Adjust the loading ramps to the track width
of the vehicle to be loaded.
►
►
Ensure that they are at right angles to the trailer
(at a 90° angle) - not skew or lopsided.
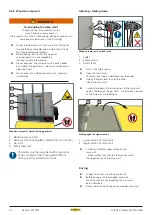
Driving
Positioning the vehicle to be loaded
►
►
Support the trailer using the prop stands.
►
►
Remove the lateral bracing if necessary.
►
►
Open / close the motorcycle stand if necessary.
►
►
Slowly and carefully drive over the loading ramp(s)
and slowly push the vehicle to be loaded upwards
in a controlled manner.
►
►
Ensure that the vehicle to be loaded is facing the
loading ramps and the track is centred.
Stowing / securing
1
2
3
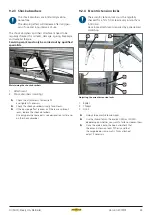
Loading ramps secured
1. Loading ramp
2. Wing nut with 2 washers
3. Lateral bracing (centred)
►
►
Unscrew the wing nuts from the
drill holes.
►
►
Position the loading ramp along the lateral
drop side, centring the position so that both
drill holes are aligned with the holes.
►
►
Fasten the loading ramp, using the wing nuts
and washers.
►
►
Lock the rear drop side.
►
►
Push the prop stands up and secure them.
►
►
Where applicable, insert the lateral bracing into the holes
in the rail, aligning it.
- The lateral bracing supports the centre of
the flat cover. Any water / load accumulating on the flat
cover may cause it to sag and damage it.


