16
LP-171 Rev. 3.3.15
1. The water supply should be shut off while connecting the heater. A manual control valve must be placed on the inlet connection to
the heater. Unions can be used on both the hot and cold water lines for future servicing and disconnection of the unit.
2. Purge the water line to remove all debris and air. Debris will damage the water heater.
3. If the heater is to be used as a potable water source, it must not be connected to a system that was previously used for non-potable
purposes.
4. Ensure that the water filter on the heater is clean and installed.
5. New plumbing typically has contamination in the lines. Please flush the system before connection.
The heater control module uses temperature sensors to provide both high limit protection and modulating temperature control. The
control module also provides low water protection by sensing the water pressure. Some codes/jurisdictions may require additional
external controls.
B. RELIEF VALVE
The relief valve must comply with the standard for
Relief Valves and Automatic Gas Shutoff Devices for Hot Water Supply Systems
(ANSI Z21.22)
and/or the standard
Temperature, Pressure, Temperature and Pressure Relief Valves and Vacuum Relief Valves,
CAN1-4.4
, as well as all local codes.
In addition, the relief valve must be rated to the maximum BTU/hr rating of the heater.
The
American National Standard (ANSI Z21.10.3) / Canadian Standard (CSA 4.3)
do not require a combination temperature and
pressure relief valve for this heater. However, a combination temperature and pressure relief valve may be required by local codes.
Connect discharge piping to safe disposal location. See the following guidelines.
To avoid water damage or scalding due to relief valve operation:
Discharge line must be connected to relief valve outlet and run to a safe place of disposal. Terminate the discharge line in a
manner that will prevent possibility of severe burns or property damage should the relief valve discharge.
Discharge line must be as short as possible and the same size as the valve discharge connection throughout its entire length.
Discharge line must pitch downward from the valve and terminate at least 6” above the floor drain, making discharge clearly
visible.
The discharge line shall terminate plain, not threaded, with a material serviceable for temperatures of 375
o
F or greater.
Do not pipe discharge to any location where freezing could occur.
No shutoff valve may be installed between the relief valve and heater or in the discharge line. Do not plug or place any
obstruction in the discharge line.
Test the operation of the relief valve after filling and pressurizing the system by lifting the lever. Make sure the valve
discharges freely. If the valve fails to operate correctly, immediately replace with a new properly rated relief valve.
Test relief v
alve at least once annually to ensure the waterway is clear. If valve does not operate, turn the heater “off”
and call
a plumber immediately.
Take care whenever operating relief valve to avoid scalding injury or property damage.
For heaters installed with only a pressure relief valve, the separate storage vessel must have a temperature and pressure
relief valve installed. This relief valve shall comply with
Relief Valves for Hot Water Supply Systems, ANSI Z21.22 / CSA4.4.
FAILURE TO COMPLY WITH THE ABOVE GUIDELINES COULD RESULT IN FAILURE OF RELIEF VALVE OPERATION,
RESULTING IN POSSIBILITY OF SUBSTANTIAL PROPERTY DAMAGE, SEVERE PERSONAL INJURY, OR DEATH.
Hot water outlet pipes can be hot to touch. Insulation must be used for hot water pipes below 36” to protect children against injuries due
to scalds.
NOTE:
If a relief valve discharges periodically, this may
be due to thermal expansion in a closed water supply
system.
DO NOT PLUG THE RELIEF VALVE.
An
expansion tank may be required.
APPROXIMATE TIME / TEMPERATURE RELATIONSHIPS IN SCALDS
120
o
F
More than 5 minutes
125
o
F
1 ½ to 2 minutes
130
o
F
About 30 seconds
135
o
F
About 10 seconds
140
o
F
Less than 5 seconds
145
o
F
Less than 3 seconds
150
o
F
About 1 ½ seconds
155
o
F
About 1 second
Table 2
Summary of Contents for MC120
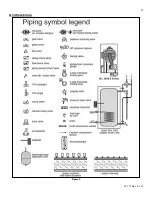
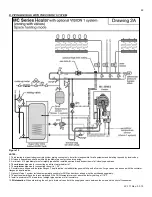
Page 21: ...21 LP 171 Rev 3 3 15 M PIPING DETAILS Figure 5 ...
Page 53: ...53 LP 171 Rev 3 3 15 Figure 30 ...
Page 71: ...71 LP 171 Rev 3 3 15 Figure 34 ...
Page 72: ...72 LP 171 Rev 3 3 15 Figure 35 ...
Page 73: ...73 LP 171 Rev 3 3 15 Figure 36 ...
Page 76: ...76 LP 171 Rev 3 3 15 ...
Page 77: ...77 LP 171 Rev 3 3 15 ...

