background image

System battery replacement

System battery replacement

If the server no longer automatically displays the correct date and time, then replace the battery that provides power to the real-time

clock. Under normal use, battery life is 5–10 years.

System battery replacement

188

Summary of Contents for ProLiant DL20 Gen10 Plus

Page 1: ...HPE ProLiant DL20 Gen10 Plus Server User Guide Part Number 30 D3180B96 002 Published May 2022 Edition 2 ...

Page 2: ...ware Valid license from Hewlett Packard Enterprise required for possession use or copying Consistent with FAR 12 211 and 12 212 Commercial Computer Software Computer Software Documentation and Technical Data for Commercial Items are licensed to the U S Government under vendor s standard commercial license Links to third party websites take you outside the Hewlett Packard Enterprise website Hewlett...

Page 3: ...PE NS204i p NVMe OS Boot Device components 1 12 HPE NS204i p NVMe OS Boot Device LED definitions 1 13 Fan numbering 1 14 Fan mode behavior 1 15 Trusted Platform Module 2 0 1 15 1 Trusted Platform Module 2 0 guidelines 1 15 2 BitLocker recovery key password retention guidelines 2 Operations 2 1 Remove the front bezel 2 2 Power up the server 2 3 Power down the server 2 4 Remove the server from the r...

Page 4: ...pply 4 5 Transceiver option 4 5 1 Transceiver warnings and cautions 4 5 2 Installing a transceiver 4 6 Drive options 4 6 1 Drive installation guidelines 4 6 2 Installing a non hot plug LFF SATA drive 4 6 3 Installing a hot plug LFF SFF SAS SATA or NVMe drive 4 7 Installing the two bay SFF drive cage option 4 8 Optical drive option 4 8 1 Installing an optical drive in the LFF drive chassis 4 8 2 In...

Page 5: ...rage cabling 5 3 1 2 LFF non hot plug drive cabling 5 3 2 2 LFF hot plug drive cabling 5 3 3 4 SFF hot plug drive cabling 5 3 4 4 2 SFF hot plug drive cabling 5 3 5 4 2 SFF hot plug drive with tri mode controller cabling 5 3 6 Energy pack cabling 5 3 7 Storage controller backup power cabling 5 4 Optical drive cabling 5 5 M 2 SATA SSD add in card cabling 5 6 M 2 SSD pass through card cabling 5 7 Fa...

Page 6: ...upply 92 efficiency 10 3 2 ATX 290 W Platinum Non hot plug Power Supply 94 efficiency 10 3 3 HPE 500 W Flex Slot Platinum Hot plug Low Halogen Power Supply 94 efficiency 10 3 4 HPE 800 W Flex Slot 48 VDC Hot plug Low Halogen Power Supply 11 Websites 12 Support and other resources 12 1 Accessing Hewlett Packard Enterprise Support 12 2 Accessing updates 12 3 Customer self repair 12 4 Remote support ...

Page 7: ...Component identification This chapter describes the external and internal server features and components Component identification 7 ...

Page 8: ...fault iLO account information The 2 LFF non hot plug drive cage supports SATA drives LFF hot plug drive model Item Description 1 Optical drive optional 2 Serial number iLO information pull tab 3 iLO service port 4 USB 3 2 Gen1 port 5 2 LFF hot plug drives The serial number iLO information pull tab is double sided One side shows the server serial number and the customer asset tag label The other si...

Page 9: ...a bay supports the optical drive cage or the 2 SFF drive cage option The 2 SFF drive cage supports SAS SATA or U 3 NVMe drives The serial number iLO information pull tab is double sided One side shows the server serial number and the customer asset tag label The other side shows the default iLO account information The 4 SFF drive bays support SAS or SATA drives 1 2 3 4 1 2 3 4 Front panel componen...

Page 10: ... following iLO web interface Remote console iLO RESTful API CLI Hewlett Packard Enterprise recommends the HPE USB to Ethernet Adapter part number Q7Y55A When you use the iLO Service Port Actions are logged in the iLO event log The server UID flashes to indicate the Service Port status You can also retrieve the Service Port status by using a REST client and the iLO RESTful API You cannot use the Se...

Page 11: ... Activated Flashing blue 1 flash per second Remote management or firmware upgrade in progress 4 flashes per second iLO manual reboot sequence initiated 8 flashes per second iLO manual reboot sequence in progress Off Deactivated When all LEDs flash simultaneously a power fault has occurred For more information see Front panel LED power fault codes If the health LED indicates a degraded or critical ...

Page 12: ...ID LED is used to locate a particular server when it is deployed in a dense rack with other equipment Activating the UID LED helps an on site technician to quickly identify a server for maintenance tasks Server UID LED 12 ...

Page 13: ...are iLO reboot Data loss or NVRAM corruption might occur during a hardware iLO reboot Prerequisites An external monitor is connected In the iLO web interface the Show Server Health on External Monitor feature is enabled on the Access Settings page Procedure 1 Press and release the UID button The Server Health Summary screen is displayed on the external monitor For more information see the iLO trou...

Page 14: ...avior System board 1 flash Processor 2 flashes Memory 3 flashes Riser board PCIe slots 4 flashes FlexibleLOM 5 flashes Storage controller 6 flashes System board PCIe slots 7 flashes Power backplane 8 flashes Storage backplane 9 flashes Power supply 10 flashes PCIe expansion cards installed in riser board 11 flashes Chassis 12 flashes GPU card 13 flashes Front panel LED power fault codes 14 ...

Page 15: ...or Slot 2 PCIe4 x16 16 8 4 1 3 Serial port optional 4 Non hot plug power supply 5 Flexible Slot power supply 1 hot plug 6 Flexible Slot power supply 2 hot plug optional 7 USB 3 2 Gen1 ports 8 NIC port 2 1 GbE 9 NIC port 1 iLO shared port 1 GbE 10 Video port 11 iLO dedicated network port Rear panel components 15 ...

Page 16: ... reboot sequence in progress Off Deactivated 2 Power supply Solid green The power supply is operating normally Off One or more of the following conditions exists Power is unavailable Power supply failure Power supply is in standby mode Power supply error 3 NIC iLO status Solid green Linked to network Flashing green Network active Off No network activity 4 NIC iLO link Solid green Network link Off ...

Page 17: ...ller backup power connector for slot 1 7 Fan connector 2 8 Fan connector 1 9 Chassis intrusion detection switch connector 10 Power supply connector 11 2 SFF drive sideband connector 12 System battery 13 Energy pack connector 14 Power supply sideband connector 15 Flexible Slot power supply sideband connector 16 Drive and optical drive power connector 17 SATA port 2 18 Mini SAS port 1 System board c...

Page 18: ...SD signal connector 22 Storage controller backup power connector for slot 2 23 Type a modular storage controller slot AROC 24 Internal USB 3 2 Gen1 port Item Description All SATA ports support 6Gb s transfer rate 1 1 System board components 18 ...

Page 19: ...eserved S8 Reserved S9 Reserved S10 Reserved S11 Reserved S12 Reserved To access the redundant ROM set S1 S5 and S6 to On When the system maintenance switch position 6 is set to the On position the system is prepared to restore all configuration settings to their manufacturing defaults When the system maintenance switch position 6 is set to the On position and Secure Boot is enabled some configura...

Page 20: ...DIMM slot location The arrow points to the front of the server DIMM slot location 20 ...

Page 21: ...DR4 SmartMemory QuickSpecs on the Hewlett Packard Enterprise website https www hpe com support DDR4SmartMemoryQS Item Description Example 1 Capacity 8 GB 16 GB 32 GB 64 GB 128 GB 256 GB 2 Rank 1R Single rank 2R Dual rank 4R Quad rank 8R Octal rank 3 Data width on DRAM x4 4 bit x8 8 bit 4 Memory generation PC4 DDR4 5 Maximum memory speed 3200 MT s 6 CAS latency AA CAS 22 22 22 AA CAS 26 22 22 for 3...

Page 22: ...ough the Mini SAS port 2 LFF hot plug drive bay numbering In the 2 LFF hot plug drive configuration All drives belong to the same box 1 SAS or SATA drives are supported Onboard connection for the Intel VROC SATA RAID support is through the Mini SAS port 4 2 SFF hot plug drive bay numbering In the 4 2 SFF hot plug drive configuration Drives are assigned to optional box 1 orange and default box 2 gr...

Page 23: ...redictive failure alert has been received for this drive The drive has also been identified by a management application Flashing amber A predictive failure alert has been received for this drive Replace the drive as soon as possible 2 Online Activity Solid green The drive is online and has no activity Flashing green 1 flash per second The drive is doing one of the following Rebuilding or performin...

Page 24: ...Off The drive is not configured by a RAID controller or is a spare drive Item LED Status Definition HPE Basic Drive LED definitions 24 ...

Page 25: ...nology is under constant development For the latest information see the PCI SIG website 2 Physical connector link width PCIe devices communicate through a logical connection called an interconnect or link At the physical level a link is composed of one or more lanes The number of lanes is written with an x prefix with x16 being the largest size in common use x1 x2 x4 x8 x16 3 Negotiable link width...

Page 26: ...e4 x8 4 1 25 W Half height half length low profile 2 PCIe4 x16 16 8 4 1 75 W Full height half length Two slot PCIe4 x8 x8 riser Slot number Slot type Slot power Supported form factors 1 PCIe4 x8 8 4 1 25 W Half height half length low profile 2 PCIe4 x16 8 4 1 75 W Full height half length Riser board components 26 ...

Page 27: ...ass through card option supports both SATA and NVMe SSDs in 2280 and 22110 form factors Item Description 1 M 2 SSD slot 1 2 2280 standoff 3 22110 standoff 4 SlimSAS port 5 Power connector 6 Retaining latch 7 M 2 SSD slot 2 M 2 SSD pass through card components 27 ...

Page 28: ...NS204i p NVMe OS Boot Devicecomponents Item Description 1 Drive bay 1 2 Drive bay 2 3 Thermal interface pad with removable liner 4 M 2 drive retaining latches HPE NS204i p NVMe OS Boot Device components 28 ...

Page 29: ... NVMe OS Boot DeviceLED definitions Item Description Fault LED status 1 Bay 1 LED Off Normal Flashing 1Hz Drive predictive failure Amber Drive failure 2 Bay 2 LED HPE NS204i p NVMe OS Boot Device LED definitions 29 ...

Page 30: ...Fan numbering Fan numbering 30 ...

Page 31: ...havior The server supports nonredundant fan mode If a fan fails or is missing the following behaviors are exhibited The health LED flashes red The operating system performs a graceful shutdown Fan mode behavior 31 ...

Page 32: ... embedded on the server system board The TPM 2 0 is supported with specific operating system support such as Microsoft Windows Server 2012 R2 and later For more information about operating system support see the product QuickSpecs on the Hewlett Packard Enterprise website https www hpe com info qs For more information about Microsoft Windows BitLocker Drive Encryption feature see the Microsoft web...

Page 33: ... licenses must be obtained if applicable When the embedded TPM is enabled In UEFI boot mode the Trusted Platform Module operates in TPM 2 0 mode In legacy boot mode the Trusted Platform Module operation is not supported Use the UEFI System Utilities to configure the TPM From the System Utilities screen select System Configuration BIOS Platform Configuration RBSU Server Security Trusted Platform Mo...

Page 34: ...rd is required to enter Recovery Mode after BitLocker detects a possible compromise of system integrity To help ensure maximum security observe the following guidelines when retaining the recovery key password Always store the recovery key password in multiple locations Always store copies of the recovery key password away from the server Do not save the recovery key password on an encrypted drive...

Page 35: ...s carried out prior to and after installing or removing a hardware option or performing a server maintenance or troubleshooting procedure Before performing these hardware operations review Rack warnings and cautions Server warnings and cautions Operations 35 ...

Page 36: ...e the front bezel only if you need to access the front panel components Procedure 1 If installed remove the Kensington security lock For more information see the lock documentation 2 Press the bezel release latch callout 1 and then pivot the bezel open callout 2 3 Release the right side of the bezel from the front panel Remove the front bezel 36 ...

Page 37: ...Power up the server To power up the server use one of the following methods Press the Power On Standby button Use the virtual power button through iLO 5 Power up the server 37 ...

Page 38: ...before the server enters standby mode Press and hold the Power On Standby button for more than 4 seconds to force the server to enter standby mode This method forces the server to enter standby mode without properly exiting applications and the OS If an application stops responding you can use this method to force a shutdown Use a virtual power button selection through iLO 5 This method initiates ...

Page 39: ...ewdriver available Procedure 1 If physically powering down a server with the front bezel installed remove the front bezel 2 Power down the server 3 Remove all power a Disconnect each power cord from the power source b Disconnect each power cord from the server 4 Disconnect all peripheral cables from the server 5 Extend the server from the rack do one of the following WARNING To reduce the risk of ...

Page 40: ...rail release latches are engaged callout 3 6 Remove the server from the rack a Press and hold the protruding surface of the server rail release latches callout 1 b Pull the server from the rack callout 2 7 Place the server on a flat level work surface Remove the server from the rack 40 ...

Page 41: ...d to thermal damage Prerequisites Before you perform this procedure make sure that you have a T 15 Torx screwdriver available Procedure 1 If physically powering down a server with the front bezel installed remove the front bezel 2 Power down the server 3 Remove all power a Disconnect each power cord from the power source b Disconnect each power cord from the server 4 Disconnect all peripheral cabl...

Page 42: ...hysically powering down a server with the front bezel installed remove the front bezel 2 Power down the server 3 Remove all power a Disconnect each power cord from the power source b Disconnect each power cord from the server 4 Disconnect all peripheral cables from the server 5 Remove the server from the rack 6 Place the server on a flat level work surface 7 Remove the access panel 8 Remove the pr...

Page 43: ...nstall the processor air baffle The air baffle part P48355 B21 is required when a processor that has a TDP 95 W is installed Procedure Install the processor air baffle Install the processor air baffle 43 ...

Page 44: ...2 Power down the server 3 Remove all power a Disconnect each power cord from the power source b Disconnect each power cord from the server 4 Disconnect all peripheral cables from the server 5 Remove the server from the rack 6 Place the server on a flat level work surface 7 Remove the access panel 8 If an expansion card with internal cables is installed on the riser disconnect the cables from the c...

Page 45: ...emoved reinstall these components 2 Install the riser cage a Align the notches on the riser cage with the spools on the rear panel callout 1 b Carefully press the riser down on its system board connector callout 2 Make sure that the riser board is firmly seated Install the riser cage 45 ...

Page 46: ...anel latch open insert the guide pin on the chassis through the hole on the access panel latch 2 Close the access panel latch The access panel slides to a closed position 3 Lock the access panel latch 4 Perform the post installation or maintenance steps required by the procedure that necessitates the removal of the access panel Install the access panel 46 ...

Page 47: ...s A fully populated server is heavy Hewlett Packard Enterprise recommends removing the external chassis components before installing the server into a rack Before you perform this procedure make sure that you have a T 25 Torx screwdriver available Procedure 1 Install the server into the rack a Insert the sliding rails into the rack mounting rails callout 1 b Slide the server into the rack until th...

Page 48: ... latches callout 1 and then tighten the shipping screws callout 2 3 Connect all peripheral cables to the server 4 Connect the power cords a Connect each power cord to the server b Connect each power cord to the power source Install the server into the rack 48 ...

Page 49: ...Setup This chapter describes the initial setup procedure for the server As well as general operational requirements and safety reminders Setup 49 ...

Page 50: ...pending on your technical expertise and the complexity of the product for the initial system installation select one of the following options Ordering the HPE Installation Service Setting up the server Initial system installation 50 ...

Page 51: ...ation Service provides the following benefits Installation by an HPE authorized technical specialist Verification prior to installation that all service prerequisites are met Delivery of the service at a mutually scheduled time convenient to your organization Allows your IT resources to stay focused on their core tasks and priorities Full coverage during the warranty period for products that requi...

Page 52: ...OS environment the Intel VROC package allows RAID management though the UEFI System Utilities Ensure you set the server boot mode to UEFI Mode default If needed obtain the Intel VROC downloads driver GUI specific for your system OS from the Hewlett Packard Enterprise Support Center website https www hpe com support hpesc Read the operational requirements for the server Read the safety and complian...

Page 53: ... a static IP address is assigned use that IP address The default login credentials are on the serial number iLO information pull tab on the front panel c Enter the iLO login name and password and then click Log In d In the navigation tree click the Remote Console Media link and then launch a remote console 6 Perform the following steps a Configure the initial server setup b Set up the storage c De...

Page 54: ...20 Gen10 Plus Server be sure to observe the following general operational requirements Space and airflow requirements Temperature requirements Power requirements Electrical grounding requirements For server specific environmental requirements see Environmental specifications Operational requirements 54 ...

Page 55: ...onent the gaps between the components cause changes in airflow through the rack and across the servers Cover all gaps with blanking panels to maintain proper airflow CAUTION Always use blanking panels to fill empty vertical spaces in the rack This arrangement ensures proper airflow Using a rack without blanking panels results in improper cooling that can lead to thermal damage The 9000 and 10000 S...

Page 56: ...A for most server products is 35 C 95 F The temperature in the room where the rack is located must not exceed 35 C 95 F CAUTION To reduce the risk of damage to the equipment when installing third party options Do not permit optional equipment to impede airflow around the server or to increase the internal rack temperature beyond the maximum allowable limits Do not exceed the manufacturer s TMRA Te...

Page 57: ... to the product rating label or the user documentation supplied with that option WARNING To reduce the risk of personal injury fire or damage to the equipment do not overload the AC supply branch circuit that provides power to the rack Consult the electrical authority having jurisdiction over wiring and installation requirements of your facility CAUTION Protect the server from power fluctuations a...

Page 58: ...ectrotechnical Commission IEC Code 364 parts 1 through 7 Furthermore you must be sure that all power distribution devices used in the installation such as branch wiring and receptacles are listed or certified grounding type devices Because of the high ground leakage currents associated with multiple servers connected to the same power source Hewlett Packard Enterprise recommends the use of a PDU t...

Page 59: ...xtended from the rack WARNING To reduce the risk of personal injury or damage to the equipment be sure that The rack has anti tip measures in place Such measures include floor bolting anti tip feet ballast or a combination as specified by the rack manufacturer and applicable codes The leveling jacks feet are extended to the floor The full weight of the rack rests on the leveling jacks feet The sta...

Page 60: ...Be sure sufficient clearance exists for cabling installation and removal of the server and movement of the rack doors Rack warnings and cautions 60 ...

Page 61: ...xpose the energy pack to temperatures higher than 60 C 140 F After power is disconnected battery voltage might still be present for 1s to 160s CAUTION Protect the server from power fluctuations and temporary interruptions with a regulating UPS This device protects the hardware from damage caused by power surges and voltage spikes and keeps the server in operation during a power failure CAUTION To ...

Page 62: ...nsitive component or assembly Use one or more of the following methods when handling or installing electrostatic sensitive parts Use a wrist strap connected by a ground cord to a grounded workstation or computer chassis Wrist straps are flexible straps with a minimum of 1 megohm 10 percent resistance in the ground cords To provide proper ground wear the strap snug against the skin Use heel straps ...

Page 63: ...Packard Enterprise recommends installing only HPE validated hardware options To see the list of validated options for this server see the product QuickSpecs on the HPE ProLiant DL20 Gen10 Plus Server website https www hpe com servers dl20 gen10 plus To view the warranty for your server and supported options see Warranty information Hardware options installation 63 ...

Page 64: ...r before beginning any installation procedure Improper grounding can cause electrostatic discharge Install any hardware options before initializing the server If multiple options are being installed read the installation instructions for all the hardware options to identify similar steps and streamline the installation process If the hardware option installation involves internal cabling review th...

Page 65: ...Rack rail option 1 Installing the rack rail option 2 Installing the rack rail hook and loop strap Rack rail option 65 ...

Page 66: ...re you perform this procedure make sure that you have the following items available T 15 Torx screwdriver Small slotted screwdriver This tool is required only if you plan to install the server in a threaded hole rack Procedure 1 Attach the sliding rails to the server a Insert the spools on the sides of the server through the notches on the rails b Slide the rail towards the rear panel to lock it i...

Page 67: ...ils in a round hole or square hole rack insert the pins on the mounting flanges into the rack column holes 5 To install the mounting rails in a threaded hole rack do the following a Remove the pins and washers from the mounting rails Retain all pins and washers for future use Installing the rack rail option 67 ...

Page 68: ...ion the holes on the mounting flanges against the threaded holes on the rack column callout 1 c Install the rack mounting screws callout 2 6 Install the server into the rack Installing the rack rail option 68 ...

Page 69: ...wlett Packard Enterprise recommends removing the external chassis components before installing the server into a rack Before you perform this procedure make sure that you have a T 25 Torx screwdriver available Procedure 1 Install the server into the rack a Insert the sliding rails into the rack mounting rails callout 1 b Slide the server into the rack until the chassis ears are engaged with the ra...

Page 70: ...rds are secured properly Two people are needed for this procedure one to slide the server in and out of the rack and the other to observe the peripheral cables and power cords a Fully extend the server out of the rack b Make sure that there is enough slack in the cables and cords secured in the hook and loop strap for a full extension of the rack rails Make sure that there is no cable binding or c...

Page 71: ...callout 1 and then tighten the shipping screws callout 2 5 Connect the power cords a Connect each power cord to the server b Connect each power cord to the power source 6 Power up the server This installation is complete Installing the rack rail hook and loop strap 71 ...

Page 72: ...ront bezel to the right chassis ear 2 Press and hold the front bezel release latch 3 Close the front bezel 4 Install the Kensington security lock For more information see the lock documentation The installation is complete Installing the front bezel option 72 ...

Page 73: ...wer supply options Depending on the installed options and the regional location where the server was purchased the server can be configured with one of the supported power supplies Power supply options 73 ...

Page 74: ...n on the hot plug power supply and calculators to determine server power consumption in various system configurations see the Hewlett Packard Enterprise Power Advisor website https www hpe com info poweradvisor online Hot plug power supply calculations 74 ...

Page 75: ...n to the plug electrical outlet and the point where the cord extends from the server WARNING To reduce the risk of injury from electric shock hazards do not open power supplies Refer all maintenance upgrades and servicing to qualified personnel CAUTION Mixing different types of power supplies in the same server might Limit or disable some power supply features including support for power redundanc...

Page 76: ...he DC supply circuit to the earthing conductor at the equipment If this connection is made all the following must be met This equipment must be connected directly to the DC supply system earthing electrode conductor or to a bonding jumper from an earthing terminal bar or bus to which the DC supply system earthing electrode conductor is connected This equipment must be located in the same immediate...

Page 77: ...bay 2 remove the power supply blank Retain the blank for future use 2 Immediately slide the power supply into the bay until it clicks into place 3 Connect the power cord to the power supply 4 Secure the power cord in the strain relief strap attached to the power supply handle a Unwrap the strain relief strap from the power supply handle CAUTION Avoid tight bend radii to prevent damaging the intern...

Page 78: ... the power cords a Connect each power cord to the server b Connect each power cord to the power source 6 Make sure that the power supply LED is green The installation is complete Installing an AC power supply 78 ...

Page 79: ... be implemented to ensure product reliability The power cord connection must be made in consultation with a licensed electrician and be compliant with local code If you are replacing the factory installed ground lug use the KST RNB5 5 crimp terminal ring or equivalent Use an M5 0 80 x 8 screw to attach the ground lug to the power supply Before installing a power supply option review the following ...

Page 80: ...3 Remove the terminal block connector 4 Loosen the screws on the terminal block connector Installing a DC power supply 80 ...

Page 81: ...hten to 1 47 N m 13 lb in of torque The ground wire must be connected before the 48 V wire and the return wire 6 Insert the 48 V wire into the left side of the terminal block connector and then tighten the screw to 1 3 N m 10 lb in of torque Installing a DC power supply 81 ...

Page 82: ...sert the return wire into the right side of the connector and then tighten the screw to 1 3 N m 10 lb in of torque 8 Install the terminal block connector in the power supply Installing a DC power supply 82 ...

Page 83: ...nal wires of a power cord or a server cable Never bend power cords and server cables tight enough to cause a crease in the sheathing b Secure the power cord wires and cables with the strain relief strap Roll the extra length of the strap around the power supply handle 10 If you are installing a power supply in the power supply bay 2 remove the power supply blank Retain the blank for future use Ins...

Page 84: ...the PDU breaker is in the off position and then connect the power cord to the 48 V DC power source or PDU 13 Turn on the 48 V power source or switch the PDU breaker to the on position to supply 48 V to the power supply 14 Make sure that the power supply LED is green The installation is complete Installing a DC power supply 84 ...

Page 85: ...Transceiver option Transceivers serve as the connection between the adapter and the network cable for maintaining high speed performance Transceiver option 85 ...

Page 86: ...port CAUTION Supported transceivers can be hot swapped removed and installed while the server is powered on However to prevent potential damage to the transceiver or the fiber optic cable disconnect the cable from the transceiver before hot swapping it CAUTION Do not remove and install transceivers more often than is necessary Doing so can shorten the useful life of the transceiver IMPORTANT When ...

Page 87: ... If the transceiver does not fit easily into the port you might have positioned it incorrectly Reverse the orientation of the transceiver and insert it again 2 Remove the dust plug or protective cover from the transceiver 3 Connect a compatible LAN segment cable to the transceiver 4 Make sure that the NIC link LED on the port is solid green For more information on the port LED behavior see the doc...

Page 88: ... SATA drives Hot plug LFF SAS or SATA drives Hot plug SFF SAS SATA or U 3 NVMe drives The embedded Intel Virtual RAID on CPU Intel VROC supports software RAID for direct attached SATA drives Install an HPE type a modular AROC or type p PCIe plug in storage controller option to support hardware RAID Drive options 88 ...

Page 89: ...a drive or a drive blank installed If only one drive is used install it in the bay with the lowest drive number For drive numbering see Drive bay numbering This server does not support mixed drive types in the same drive box All drives grouped into the same drive array must meet the following criteria All drives must be either all hard drives or all solid state drives All drives must be of the sam...

Page 90: ...Torx screwdriver Phillips No 1 screwdriver Procedure 1 If physically powering down a server with the front bezel installed remove the front bezel 2 Power down the server 3 Remove all power a Disconnect each power cord from the power source b Disconnect each power cord from the server 4 Disconnect all peripheral cables from the server 5 Remove the server from the rack 6 Place the server on a flat l...

Page 91: ...11 Install the non hot plug drive 12 Install the non hot plug drive cage Installing a non hot plug LFF SATA drive 91 ...

Page 92: ...the server 17 Connect the power cords a Connect each power cord to the server b Connect each power cord to the power source 18 Power up the server 19 If removed install the front bezel 20 To configure drive arrays see the relevant storage controller guide This installation is complete Installing a non hot plug LFF SATA drive 92 ...

Page 93: ...observe antistatic precautions CAUTION To prevent improper cooling and thermal damage do not operate the server unless all bays are populated with either a component or a blank Procedure 1 If installed remove the front bezel 2 Remove the drive blank Retain the blank for future use LFF drive blank SFF drive blank 3 Prepare the drive LFF drive SFF drive Installing a hot plug LFF SFF SAS SATA or NVMe...

Page 94: ...ermine the status of the drive from the drive LED definitions 6 If removed install the front bezel 7 To configure drive arrays see the relevant controller guide This installation is complete Installing a hot plug LFF SFF SAS SATA or NVMe drive 94 ...

Page 95: ... procedure make sure that you have a T 10 Torx screwdriver available Procedure 1 If installed remove the front bezel 2 Power down the server 3 Remove all power a Disconnect each power cord from the power source b Disconnect each power cord from the server 4 Disconnect all peripheral cables from the server 5 Remove the server from the rack 6 Place the server on a flat level work surface 7 Remove th...

Page 96: ...ccess panel 12 Install the server into the rack 13 Connect all peripheral cables to the server 14 Connect the power cords a Connect each power cord to the server b Connect each power cord to the power source 15 Power up the server 16 Install the drives 17 If removed install the front bezel This installation is complete Installing the two bay SFF drive cage option 96 ...

Page 97: ...e option Install a slim type SATA optical drive to read write data on optical discs Installing an optical drive in the LFF drive chassis Installing an optical drive in the SFF drive chassis Optical drive option 97 ...

Page 98: ...sure that you have the following items available T 10 Torx screwdriver Phillips No 1 screwdriver Procedure 1 If installed remove the front bezel 2 Power down the server 3 Remove all power a Disconnect each power cord from the power source b Disconnect each power cord from the server 4 Disconnect all peripheral cables from the server 5 Remove the server from the rack 6 Place the server on a flat le...

Page 99: ...he rack 14 Connect all peripheral cables to the server 15 Connect the power cords a Connect each power cord to the server b Connect each power cord to the power source 16 Power up the server 17 If removed install the front bezel This installation is complete Installing an optical drive in the LFF drive chassis 99 ...

Page 100: ...Installing an optical drive in the LFF drive chassis 100 ...

Page 101: ...er T 15 Torx screwdriver Phillips No 1 screwdriver Procedure 1 If removed install the front bezel 2 Power down the server 3 Remove all power a Disconnect each power cord from the power source b Disconnect each power cord from the server 4 Disconnect all peripheral cables from the server 5 Remove the server from the rack 6 Place the server on a flat level work surface 7 Remove the access panel 8 Re...

Page 102: ...9 Remove the optical drive blank Retain the blank for future use 10 Install the optical drive bracket Installing an optical drive in the SFF drive chassis 102 ...

Page 103: ...11 Install the optical drive in the optical drive cage 12 Install the optical drive cage in the media bay Installing an optical drive in the SFF drive chassis 103 ...

Page 104: ...ect all peripheral cables to the server 17 Connect the power cords a Connect each power cord to the server b Connect each power cord to the power source 18 Power up the server 19 If removed install the front bezel This installation is complete Installing an optical drive in the SFF drive chassis 104 ...

Page 105: ...Memory option The server has four DIMM slots supporting DDR4 UDIMM with ECC Non ECC UDIMM is not supported The arrow points to the front of the server Memory option 105 ...

Page 106: ...population information see Server Memory Population Rules for HPE ProLiant Gen10 Plus Servers with Intel Xeon E 2300 Processors on the Hewlett Packard Enterprise website https www hpe com docs server memory DIMM population information 106 ...

Page 107: ...ttom of the DIMM Never wrap your fingers around a DIMM Never bend or flex the DIMM When installing a DIMM observe the following To align and seat the DIMM use two fingers to hold the DIMM along the side edges To seat the DIMM use two fingers to apply gentle pressure along the top of the DIMM For more information see the Hewlett Packard Enterprise website https www hpe com support DIMM 20070214 CN ...

Page 108: ...at level work surface 7 Remove the access panel 8 Install the DIMM a Open the DIMM slot latches callout 1 b Align the notch on the bottom edge of the DIMM with the keyed surface of the DIMM slot and then fully press the DIMM into the slot until the latches snap back into place callout 2 The DIMM slots are structured to ensure proper installation If you try to insert a DIMM but it does not fit easi...

Page 109: ...nfigure the memory settings a From the boot screen press F9 to access UEFI System Utilities b From the System Utilities screen select System Utilities System Configuration BIOS Platform Configuration RBSU Memory Options This installation is complete Installing a DIMM 109 ...

Page 110: ...rts two dual slot PCIe riser options PCIe4 x8 x8 riser Supports standard expansion options PCIe4 x16 x4 riser Supports high power expansion options For more information on the riser slots see Riser board components PCIe riser option 110 ...

Page 111: ...r 4 Disconnect all peripheral cables from the server 5 Remove the server from the rack 6 Place the server on a flat level work surface 7 Remove the access panel 8 Install the planned expansion option in the riser slot 9 Install the riser cage a Align the notches on the riser cage with the spools on the rear panel callout 1 b Carefully press the riser down on its system board connector callout 2 Ma...

Page 112: ...b Connect each power cord to the power source 14 Power up the server 15 If removed install the front bezel This installation is complete Installing a riser option 112 ...

Page 113: ...C Provides software RAID support for direct attached SATA drives HPE type a modular AROC or type p PCIe plug in storage controller option Supports hardware RAID for SATA and SAS drives For more information on drive array and storage controller configuration see the relevant controller guide Storage controller options 113 ...

Page 114: ... that users are logged off and that all tasks are completed on the server CAUTION In systems that use external data storage be sure that the server is the first unit to be powered down and the last to be powered back up Taking this precaution ensures that the system does not erroneously mark the drives as failed when the server is powered up 2 If server firmware is not the latest revision update t...

Page 115: ...wer a Disconnect each power cord from the power source b Disconnect each power cord from the server 4 Disconnect all peripheral cables from the server 5 Remove the server from the rack 6 Place the server on a flat level work surface 7 Remove the access panel 8 Remove the riser cage 9 Install the type a modular storage controller a Insert the alignment pins on the side of the energy pack holder thr...

Page 116: ...Connect the power cords a Connect each power cord to the server b Connect each power cord to the power source 16 Power up the server 17 If removed install the front bezel 18 To configure the controller see the relevant controller guide This installation is complete Installing a type a modular controller option 116 ...

Page 117: ...controller cable option T 10 Torx screwdriver Phillips No 1 screwdriver This tool is required only if you plan to replace the default bracket on the storage controller Procedure 1 If physically powering down a server with the front bezel installed remove the front bezel 2 Power down the server 3 Remove all power a Disconnect each power cord from the power source b Disconnect each power cord from t...

Page 118: ...file bracket on the storage controller c Open the riser slot bracket callouts 1 and 2 and remove the slot blank callout 3 Retain the slot blank and the screw for future use Installing a type p plug in controller option 118 ...

Page 119: ...orage controller in the riser slot 2 do the following a Remove the riser slot screw callout 1 and slot blank callout 2 Retain the slot blank and the screw for future use b Install the storage controller Make sure that the controller is seated firmly in the slot Installing a type p plug in controller option 119 ...

Page 120: ...lid state drives 13 Install the riser cage 14 Cable the controller 15 Install the access panel 16 Install the server into the rack 17 Connect all peripheral cables to the server 18 Connect the power cords a Connect each power cord to the server b Connect each power cord to the power source 19 Power up the server 20 If removed install the front bezel 21 To configure the controller see the relevant ...

Page 121: ...Gen10 Plus User Guide Linux edition at https www hpe com support IntelVROC Gen10Plus Linux UG HPE storage controller HPE Smart Array SR type a and type p Gen10 controller HPE Smart Array SR Gen10 Configuration Guide at https www hpe com support SSC config HPE SR type a and type p Gen10 Plus controllers HPE SR Gen10 Plus Controller User Guide at https www hpe com info SR Gen10Plus UG HPE MR type a ...

Page 122: ...ource options to back up write cache content on the controllers in case of an unplanned server power outage Once installed the status of the energy pack displays in HPE iLO For more information see the iLO user guide on the Hewlett Packard Enterprise website https www hpe com support ilo docs Energy pack options 122 ...

Page 123: ...ries Gen10 Plus controllers This server supports the 12 W HPE Smart Storage Battery with the 230 mm cable A single 12 W battery can support up to three devices After the battery is installed it might take up to two hours to charge Controller features requiring backup power are not re enabled until the battery is capable of supporting the backup power HPE Smart Storage Battery 123 ...

Page 124: ... Storage Battery backup 150 seconds maximum support The Smart Storage Battery provides a sufficient duration to transfer the cached data from DDR memory to flash memory where the data remains indefinitely or until a controller retrieves the data For more information see the QuickSpecs document for the Smart Storage Battery Energy pack specifications 124 ...

Page 125: ...ce b Disconnect each power cord from the server 4 Disconnect all peripheral cables from the server 5 Remove the server from the rack 6 Place the server on a flat level work surface 7 Remove the access panel 8 Install the energy pack a Insert the energy pack in the holder callout 1 Make sure that the energy pack is locked in the holder b Route the energy pack cable across the midwall cable channel ...

Page 126: ...Connect each power cord to the server b Connect each power cord to the power source 14 Power up the server 15 If removed install the front bezel This installation is complete Installing an energy pack 126 ...

Page 127: ... type p storage controller Ethernet adapter HDR InfiniBand adapter Fibre channel host bus adapter FC HBA Accelerator workload computational or graphics accelerator For more information on the expansion options validated for this server see the server QuickSpecs on the Hewlett Packard Enterprise website https www hpe com servers dl20 gen10 plus Expansion card options 127 ...

Page 128: ... network adapter with a full height bracket in the riser slot 2 Type p storage controller option Due to the cable length install a storage controller with internal cabling connection in the riser slot 2 Install a storage controller with external cabling in either riser slot 1 or 2 Populate the riser slot 1 first Accelerator A Flexible Slot power supply is required for accelerator installation PCIe...

Page 129: ... Procedure 1 If physically powering down a server with the front bezel installed remove the front bezel 2 Power down the server 3 Remove all power a Disconnect each power cord from the power source b Disconnect each power cord from the server 4 Disconnect all peripheral cables from the server 5 Remove the server from the rack 6 Place the server on a flat level work surface 7 Remove the access pane...

Page 130: ...the low profile bracket on the expansion card c Open the riser slot bracket callouts 1 and 2 and remove the slot blank callout 3 Retain the slot blank and the screw for future use Installing an expansion card 130 ...

Page 131: ...stall an expansion card in the riser slot 2 do the following a Remove the riser slot screw callout 1 and slot blank callout 2 Retain the slot blank and the screw for future use b Install the expansion card Make sure that the expansion card is seated firmly in the slot Installing an expansion card 131 ...

Page 132: ...ships with the option 15 Install the access panel 16 Install the server into the rack 17 Connect all peripheral cables to the server 18 Connect the power cords a Connect each power cord to the server b Connect each power cord to the power source 19 Power up the server 20 If removed install the front bezel This installation is complete Installing an expansion card 132 ...

Page 133: ... SSD options In this server M 2 SSD support is provided through the following options HPE NS204i p Gen10 Plus Boot Device option M 2 SATA SSD enablement option M 2 SSD pass through card M 2 SSD options 133 ...

Page 134: ...alled CAUTION A discharge of static electricity from a finger or other conductor might damage system boards or other static sensitive devices To prevent damage observe antistatic precautions Prerequisites Before beginning installation make sure that the server is updated with the latest operating system firmware and drivers Before you perform this procedure make sure that you have the following it...

Page 135: ...rd from the server 8 Disconnect all peripheral cables from the server 9 Remove the server from the rack 10 Place the server on a flat level work surface 11 Remove the access panel 12 Remove the riser cage 13 To install the boot device in the riser slot 1 do the following a If installed remove the full height bracket from the boot device Retain the bracket and screws for future use Installing the H...

Page 136: ...2 and remove the slot blank callout 3 Retain the slot blank and the screw for future use d Install the boot device Make sure that the boot device is seated firmly in the slot 14 To install the boot device in the riser slot 2 do the following Installing the HPE NS204i p NVMe OS Boot Device option 136 ...

Page 137: ... to the server b Connect each power cord to the power source 20 Power up the server 21 If removed install the front bezel Deploying an operating system 22 Deploy a supported operating system to the boot device drive For more information see the server QuickSpecs on the Hewlett Packard Enterprise website https www hpe com servers dl20 gen10 plus After the OS installation completes the system automa...

Page 138: ...rver Use the P45468 B21 M 2 SATA cable option Before you perform this procedure make sure that you have the following items available T 15 Torx screwdriver Phillips No 1 screwdriver This tool is required only if The M 2 SSD is not preinstalled on the add in card Replace the default bracket on the add in card Procedure Installing the drives onto the M 2 SATA add in card 1 Insert the SSD into the M ...

Page 139: ...flat level work surface 11 Remove the access panel 12 Remove the riser cage 13 To install the add in card in the riser slot 1 do the following a If installed remove the full height bracket from the add in card Retain the bracket and screws for future use b Install the low profile bracket on the add in card Installing the M 2 SATA SSD enablement option 139 ...

Page 140: ...e that the add in card is seated firmly in the slot 14 To install the add in card in the riser slot 2 do the following a Remove the riser slot screw callout 1 and slot blank callout 2 Retain the slot blank and the screw for future use b Install the add in card Make sure that the add in card is seated firmly in the slot Installing the M 2 SATA SSD enablement option 140 ...

Page 141: ...heral cables to the server 20 Connect the power cords a Connect each power cord to the server b Connect each power cord to the power source 21 Power up the server 22 If removed install the front bezel 23 To configure the M 2 SSDs see the OS specific Intel VROC guide This installation is complete Installing the M 2 SATA SSD enablement option 141 ...

Page 142: ...uctor might damage system boards or other static sensitive devices To prevent damage observe antistatic precautions Prerequisites Before you perform this procedure make sure that you have the following items available Phillips No 1 screwdriver 1 4 slotted screwdriver Procedure Install the drives onto the M 2 SSD pass through card 1 If you are installing M 2 2280 SSD on the pass through card slot 1...

Page 143: ...ss through card 6 If physically powering down a server with the front bezel installed remove the front bezel 7 Power down the server 8 Remove all power a Disconnect each power cord from the power source b Disconnect each power cord from the server 9 Disconnect all peripheral cables from the server 10 Remove the server from the rack 11 Place the server on a flat level work surface 12 Remove the acc...

Page 144: ...e notch on the card bracket callout 1 b Slide the pass through card assembly towards the rear panel callout 2 c Close the retaining latch callout 3 15 Install the M 2 SSD air baffle 16 Connect the M 2 SSD pass through card cables 17 If removed install the riser cage 18 Install the access panel 19 Install the server into the rack 20 Connect all peripheral cables to the server Installing the M 2 SSD...

Page 145: ...server b Connect each power cord to the power source 22 Power up the server 23 If removed install the front bezel 24 To configure the M 2 SSDs see the OS specific Intel VROC guide This installation is complete Installing the M 2 SSD pass through card option 145 ...

Page 146: ...ed Management Log IML whenever the access panel is physically opened or removed An alert is also sent to the BIOS whenever a chassis intrusion is detected The chassis intrusion detection occurs as long as the server is plugged in regardless of whether the server is powered on or off Chassis intrusion detection switch option 146 ...

Page 147: ...e system board 14 pin power supply cable Drive Mini SAS cable power Y cable and sideband SATA fan out cable 9 Connect the chassis intrusion detection switch cable 10 Install the chassis intrusion detection switch a Insert the alignment pins on the DIMM guard through the holes on the switch callout 1 b Route the rest of cable on the DIMM guard callout 2 11 Reconnect all following cables to system b...

Page 148: ...etection setting in the UEFI System Utilities is automatically enabled after installing the chassis intrusion detection switch To view a log of intrusion events use the iLO web interface to access the IML or the iLO event log For more information see the iLO user guide on the Hewlett Packard Enterprise website https www hpe com support ilo docs Installing the chassis intrusion detection switch 148...

Page 149: ...option Install the serial port option to enable communication to physical serial devices You can also use the serial connection to remotely access the system BIOS and view POST error messages Serial port option 149 ...

Page 150: ...prying tool Procedure 1 If physically powering down a server with the front bezel installed remove the front bezel 2 Power down the server 3 Remove all power a Disconnect each power cord from the power source b Disconnect each power cord from the server 4 Disconnect all peripheral cables from the server 5 Remove the server from the rack 6 Place the server on a flat level work surface 7 Remove the ...

Page 151: ...7 Power up the server 18 If removed install the front bezel 19 To configure the serial port setting a From the boot screen press F9 to access the UEFI System Utilities b From the System Utilities screen select System Configuration BIOS Platform Configuration RBSU System Options Serial Port Options Embedded Serial Port c Select a setting d Press F12 key to save your selection e Click Yes Save Chang...

Page 152: ...Internal USB device option The server has an internal USB 3 2 Gen1 port to install a USB device that can be used as a flash boot media or for data backup redundancy Internal USB device option 152 ...

Page 153: ... rack 6 Place the server on a flat level work surface 7 Remove the access panel 8 Locate the internal USB port 9 Remove the riser cage 10 Plug in the USB device into the USB port 11 Install the riser cage 12 Install the access panel 13 Install the server into the rack 14 Connect all peripheral cables to the server 15 Connect the power cords a Connect each power cord to the server b Connect each po...

Page 154: ...Cabling This chapter includes cabling guidelines and diagrams for internal component cabling Cabling 154 ...

Page 155: ...fy the length of the cable Use the internal cable management features to properly route and secure the cables When routing cables be sure that the cables are not in a position where they can be pinched or crimped Avoid tight bend radii to prevent damaging the internal wires of a power cord or a server cable Never bend power cords and server cables tight enough to cause a crease in the sheathing Ma...

Page 156: ...Remove cables that are no longer being used Retaining them inside the system can restrict airflow If you intend to use the removed cables later label and store them for future use Cabling guidelines 156 ...

Page 157: ...t cable clip 2 DIMM guard 3 Midwall cable channel 4 Metal tab This DIMM guard is for securing Chassis intrusion detection switch cable Power supply cable This tab is for securing the ATX non hot plug power supply cables 1 2 1 2 Internal cabling management 157 ...

Page 158: ...rive cabling 2 LFF hot plug drive cabling 4 SFF hot plug drive cabling 4 2 SFF hot plug drive cabling 4 2 SFF hot plug drive with tri mode controller cabling Energy pack cabling Storage controller backup power cabling Storage cabling 158 ...

Page 159: ...e configuration uses a single multiconnector cable for the drive power and Mini SAS connections This cable also has an extension connector for optical drive power Color Description Orange Mini SAS cable Blue Drive power cable 2 LFF non hot plug drive cabling 159 ...

Page 160: ...ription Orange Mini SAS cable Blue Drive power Y cable The P2 connector gray in the illustration of this cable connects to the optical drive power SATA Y cable 2 LFF drive Type a controller cabling Color Description Orange Mini SAS cable 1 1 2 LFF hot plug drive cabling 160 ...

Page 161: ...e connects to the optical drive power SATA Y cable 2 LFF drive Type p controller cabling Color Description Orange Mini SAS cable Blue Drive power Y cable The P2 connector gray in the illustration of this cable connects to the optical drive power SATA Y cable 1 1 1 1 2 LFF hot plug drive cabling 161 ...

Page 162: ... Mini SAS cable Blue Drive power Y cable The P2 connector gray in the illustration of this cable connects to the optical drive power SATA Y cable 4 SFF drive Type a controller cabling Color Description Orange Mini SAS cable Blue Drive power Y cable 1 1 1 4 SFF hot plug drive cabling 162 ...

Page 163: ...ical drive power SATA Y cable 4 SFF drive Type p controller cabling Color Description Orange Mini SAS cable Blue Drive power Y cable The P2 connector gray in the illustration of this cable connects to the optical drive power SATA Y cable 1 1 1 4 SFF hot plug drive cabling 163 ...

Page 164: ... cable Blue 4 SFF drive power Y cable Gold 2 SFF drive sideband SATA fan out cable Pink 2 SFF drive power cable The P2 connector gray in the illustration of this cable connects to the optical drive power SATA Y cable 4 2 SFF drive Type a controller cabling Color Description 1 1 4 2 SFF hot plug drive cabling 164 ...

Page 165: ...this cable connects to the optical drive power SATA Y cable 4 2 SFF drive Type p controller cabling Color Description Orange 4 SFF drive Mini SAS cable Blue 4 SFF drive power Y cable Gold 2 SFF drive Mini SAS cable Pink 2 SFF drive power cable The P2 connector gray in the illustration of this cable connects to the optical drive power SATA Y cable 1 1 1 1 4 2 SFF hot plug drive cabling 165 ...

Page 166: ...e SlimSAS cable Blue 4 SFF drive power Y cable Gold 2 SFF drive SlimSAS cable Pink 2 SFF drive power cable The P2 connector gray in the illustration of this cable connects to the optical drive power SATA Y cable 4 2 SFF drive Onboard SATA with tri mode type p controller cabling Color Description 1 1 4 2 SFF hot plug drive with tri mode controller cabling 166 ...

Page 167: ...ptical drive power SATA Y cable 4 2 SFF drive Tri mode type a controller cabling Color Description Orange 4 2 SFF drive SlimSAS Y cable Blue 4 SFF drive power Y cable Pink 2 SFF drive power cable The P2 connector gray in the illustration of this cable connects to the optical drive power SATA Y cable 4 2 SFF drive Tri mode type p controller cabling 1 1 1 1 4 2 SFF hot plug drive with tri mode contr...

Page 168: ...e 4 SFF drive power Y cable Gold 2 SFF drive SlimSAS cable Pink 2 SFF drive power cable The P2 connector gray in the illustration of this cable connects to the optical drive power SATA Y cable 1 1 4 2 SFF hot plug drive with tri mode controller cabling 168 ...

Page 169: ...Energy pack cabling Energy pack cabling 169 ...

Page 170: ...lot where the controller is installed The location of the storage controller backup power connector on the controller Use the following diagrams for reference only Storage controller backup power cabling from the riser slot 1 Storage controller backup power cabling from the riser slot 2 Storage controller backup power cabling 170 ...

Page 171: ... Color Description Orange Optical drive SATA power Y cable Blue 2 LFF non hot plug drive power Y cable Optical drive cabling in the LFF hot plug drive configuration Color Description Orange Optical drive SATA power Y cable Blue 2 LFF hot plug drive power Y cable Optical drive cabling 171 ...

Page 172: ...Optical drive cabling in the SFF hot plug drive configuration Color Description Orange Optical drive SATA power Y cable Blue 4 SFF drive power Y cable Optical drive cabling 172 ...

Page 173: ...ling from the riser slot 1 Color Description Orange M 2 SATA SSD 1 cable Blue M 2 SATA SSD 2 cable M 2 SATA SSD add in card cabling from the riser slot 2 Color Description Orange M 2 SATA SSD 1 cable Blue M 2 SATA SSD 2 cable M 2 SATA SSD add in card cabling 173 ...

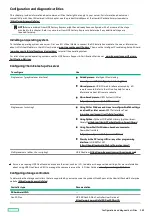
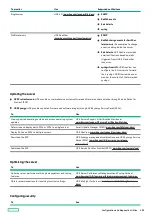
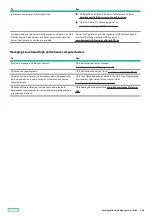
Page 174: ...M 2 SATA SSD add in card cabling 174 ...

Page 175: ...M 2 SSD pass through card cabling Color Description Orange M 2 SSD SlimSAS cable Blue M 2 SSD power sideband cable M 2 SSD pass through card cabling 175 ...

Page 176: ...Fan cabling Color Description Orange Fan 1 cable Blue Fan 2 cable Gold Fan 3 cable Fan cabling 176 ...

Page 177: ...Chassis intrusion detection switch cabling Chassis intrusion detection switch cabling 177 ...

Page 178: ...Serial port cabling Serial port cabling 178 ...

Page 179: ...ling Color Description Orange 14 pin power supply cable Blue ATX power supply sideband cable Flexible Slot power supply cabling Color Description Orange 14 pin power supply cable Blue Flexible Slot power supply sideband Y cable Power supply cabling 179 ...

Page 180: ...Power supply cabling 180 ...

Page 181: ...Manual process HPE iLO web interface accessed by iLO remote console Refer to the iLO online help for more information about iLO remote console Menu based process UEFI System Utilities https www hpe com info UEFI manual Single server scripting Using CLI for Windows and Linux to configure Redfish settings on a Gen10 or later server RESTful Interface Tool www hpe com support restfulinterface docs Usi...

Page 182: ...etwork controllers are plug and play For installation instructions see the server user guide the documentation included with the controller or on the Hewlett Packard Enterprise Support Center website https www hpe com support hpesc see Controller Type Documentation OPC NIC 3 0 Network adapter HPE OCP NIC 3 0 Adapter Installation Instructions at www hpe com support OCP3 NIC Installation PCIe Networ...

Page 183: ...gy Service Packs SSPs To Use View supported operating systems and access operating system updates HPE Servers Support Certification Matrices at www hpe com support Servers Certification Matrices Determine and deploy which SSPs or SPPs to a single server Smart Update Manager SUM www hpe com info sum docs Deploy SSPs and SPPs to multiple servers HPE OneView www hpe com support oneview docs Download ...

Page 184: ...d high performance compute clusters To Use Provision manage and monitor clusters HPE Performance Cluster Manager www hpe com support hpcm_manuals Optimize your applications HPE Performance Analysis Tools www hpe com info perftools Optimize software library for low latency and high bandwidth both on node and off node for point to point and collective communications HPE Cray Message Passing Toolkit ...

Page 185: ...Troubleshooting NMI functionality Troubleshooting resources Troubleshooting 185 ...

Page 186: ...ng systems device drivers and applications Many crashes freeze a system and the only available action for administrators is to cycle the system power Resetting the system erases any information that could support problem analysis but the NMI feature preserves that information by performing a memory dump before a hard reset To force the OS to initiate the NMI handler and generate a crash dump log t...

Page 187: ...tware maintenance Error Message Guide for HPE ProLiant Gen10 Plus servers and HPE Synergy provides a list of error messages and information to assist with interpreting and resolving error messages Integrated Management Log Messages and Troubleshooting Guide for HPE ProLiant Gen10 and Gen10 Plus servers and HPE Synergy provides IML messages and associated troubleshooting information to resolve crit...

Page 188: ...cement If the server no longer automatically displays the correct date and time then replace the battery that provides power to the real time clock Under normal use battery life is 5 10 years System battery replacement 188 ...

Page 189: ...sk of the fire and burns exists To reduce the risk of personal injury Do not attempt to recharge the battery Do not expose the battery to temperatures higher than 60 C 140 F Do not expose the battery to extremely low air pressure as it might lead to explosion or leakage of flammable liquid or gas Do not disassemble crush puncture short external contacts or dispose the battery in fire or water Syst...

Page 190: ...erver 5 Remove the server from the rack 6 Place the server on a flat level work surface 7 Remove the access panel 8 Locate the battery on the system board 9 Disconnect the system cables blocking access to the system battery 10 Remove the system battery a Use a small flat bladed nonconductive tool to press the battery latch callout 1 b Remove the system battery from the socket callout 2 11 Install ...

Page 191: ...nect the power cords a Connect each power cord to the server b Connect each power cord to the power source 17 Power up the server 18 If removed install the front bezel 19 Properly dispose of the old battery For more information about proper battery disposal contact an authorized reseller or an authorized service provider Removing and replacing the system battery 191 ...

Page 192: ...Safety warranty and regulatory information Regulatory information Warranty information Safety warranty and regulatory information 192 ...

Page 193: ... about the chemical substances in our products as needed to comply with legal requirements such as REACH Regulation EC No 1907 2006 of the European Parliament and the Council A chemical information report for this product can be found at https www hpe com info reach For Hewlett Packard Enterprise product environmental and safety information and compliance data including RoHS and REACH see https ww...

Page 194: ...лика Казахстан 050040 г Алматы Бостандыкский район проспект Аль Фараби 77 7 Телефон факс 7 727 355 35 50 Local representative information Kazakh Russia ЖШС Хьюлетт Паккард Энтерпрайз Ресей Федерациясы 125171 Мәскеу Ленинград тас жолы 16A блок 3 Телефон 7 499 403 4248 Факс 7 499 403 4677 Kazakhstan ЖШС Хьюлетт Паккард К Қазақстан Республикасы 050040 Алматы к Бостандык ауданы Әл Фараби даңғ ылы 77 7...

Page 195: ...Turkey RoHS material content declaration Türkiye Cumhuriyeti AEEE Yönetmeliğine Uygundur Turkey RoHS material content declaration 195 ...

Page 196: ...Ukraine RoHS material content declaration Ukraine RoHS material content declaration 196 ...

Page 197: ...ervers and Options https www hpe com support ProLiantServers Warranties HPE Enterprise and Cloudline Servers https www hpe com support EnterpriseServers Warranties HPE Storage Products https www hpe com support Storage Warranties HPE Networking Products https www hpe com support Networking Warranties Warranty information 197 ...

Page 198: ...Specifications This chapter lists the technical specifications for the server including Environmental specifications Mechanical specifications Power supply specifications Specifications 198 ...

Page 199: ...direct sustained sunlight Maximum rate of change is 20 C hr 36 F hr The upper limit and rate of change may be limited by the type and number of options installed System performance during standard operating support might be reduced if operating above 30 C 86 F Extended ambient operating support For approved hardware configurations the supported system inlet range is extended to be 5 to 10 C 41 to ...

Page 200: ...fications Specification Value Dimensions Height 4 32 cm 1 70 in Depth 38 22 cm 15 05 in Width 43 46 cm 17 11 in Weight approximate values Minimum 6 00 kg 13 23 lb Maximum 10 00 kg 22 05 lb Mechanical specifications 200 ...

Page 201: ...plies ATX 290 W Non hot plug Power Supply 92 efficiency ATX 290 W Platinum Non hot plug Power Supply 94 efficiency HPE 500 W Flex Slot Platinum Hot plug Low Halogen Power Supply 94 efficiency HPE 800 W Flex Slot 48 VDC Hot plug Low Halogen Power Supply For detailed power supply specifications see the QuickSpecs on the Hewlett Packard Enterprise website Power supply specifications 201 ...

Page 202: ...y 50 Hz to 60 Hz Rated input current 5 5 A Maximum rated input power 331 W at 115 VAC 330 W at 230 VAC Efficiency No less than 88 at 100 load No less than 92 at 50 load No less than 88 at 20 load Power supply output Rated steady state power 290 W Maximum peak power 366 W Rated output power 290 W ATX 290 W Non hot plug Power Supply 92 efficiency 202 ...

Page 203: ...t 230 VAC Efficiency At 230 VAC 50 Hz No less than 91 at 100 load No less than 94 at 50 load No less than 90 at 20 load No less than 80 at 10 load At 115 VAC 60 Hz No less than 87 6 at 100 load No less than 89 7 at 50 load No less than 87 2 at 20 load No less than 80 8 at 10 load Power supply output Rated steady state power 290 W Maximum peak power 366 W Rated output power 290 W ATX 290 W Platinum...

Page 204: ...y Maximum rated input power 580 W at 100 VAC 560 W at 200 VAC 558 W at 240 VDC for China only BTUs per hour 1999 at 100 VAC 1912 at 200 VAC 1904 at 240 VDC for China only Power supply output Rated steady state power 500 W at 100 VAC to 127 VAC input 500 W at 100 VAC to 240 VAC input 500 W at 240 VDC input for China only Maximum peak power 500 W at 100 VAC to 127 VAC input 500 W at 100 VAC to 240 V...

Page 205: ... or equivalent isolation device The branch circuit overcurrent protection must be rated 27 A CAUTION This equipment is designed to permit the connection of the earthed conductor of the DC supply circuit to the earthing conductor at the equipment If this connection is made all of the following must be met This equipment must be connected directly to the DC supply system earthing electrode conductor...

Page 206: ... white papers and analyst reports https www hpe com storage whitepapers For additional websites see Support and other resources Product websites HPE ProLiant DL20 Gen10 Plus Server product page https www hpe com servers dl20 gen10 plus HPE ProLiant DL20 Gen10 Plus Server user documents https www hpe com info dl20gen10plus docs Websites 206 ...

Page 207: ...Support and other resources Accessing Hewlett Packard Enterprise Support Accessing updates Customer self repair Remote support Documentation feedback Support and other resources 207 ...

Page 208: ...Hewlett Packard Enterprise Support Center website https www hpe com support hpesc Information to collect Technical support registration number if applicable Product name model or version and serial number Operating system name and version Firmware version Error messages Product specific reports and logs Add on products or components Third party products or components Accessing Hewlett Packard Ente...

Page 209: ...E Software Center https www hpe com software hpesoftwarecenter To subscribe to eNewsletters and alerts https www hpe com support e updates To view and update your entitlements and to link your contracts and warranties with your profile go to the Hewlett Packard Enterprise Support Center More Information on Access to Support Materials page https www hpe com support AccessToSupportMaterials IMPORTAN...

Page 210: ... be replaced it will be shipped directly to you so that you can install it at your convenience Some parts do not qualify for CSR Your Hewlett Packard Enterprise authorized service provider will determine whether a repair can be accomplished by CSR For more information about CSR contact your local service provider Customer self repair 210 ...

Page 211: ...tiates a fast and accurate resolution based on the service level of your product Hewlett Packard Enterprise strongly recommends that you register your device for remote support If your product includes additional remote support details use search to locate that information HPE Get Connected https www hpe com services getconnected HPE Pointnext Tech Care https www hpe com services techcare HPE Comp...

Page 212: ...lp us improve the documentation use the Feedback button and icons located at the bottom of an opened document on the Hewlett Packard Enterprise Support Center portal https www hpe com support hpesc to send any errors suggestions or comments All document information is captured by the process Documentation feedback 212 ...

Reviews: