background image

Diagnostic Tools 

Table 3-1:  Diagnostic Tools 

continued


Tool 

Description 

How to run the tool 

SmartStart 

SmartStart software is the intelligent 

way to set up the HP server. The 

SmartStart CD includes the 
ROMPaq Utility, driver updates, and 

assistance installing operating 

systems. 

Use the information provided in the 

Server Setup and Management 

pack. 

Survey Utility 

Survey Utility gathers critical 

hardware and software information 

on servers running Microsoft® 
Windows NT®, Novell NetWare, 

SCO OpenServer, or SCO Unixware 
operating systems. 

If a significant change occurs 

between data-gathering intervals, 
the Survey Utility marks the previous 

information and overwrites the 

survey text files to reflect the latest 
changes in the configuration.  

Install the Survey Utility from the 

SmartStart CD, the Integration 

Maintenance Utility, or the 
Management CD. 

Integrated Management Log (IML) 

The IML is a log of system events 

such as system failures or nonfatal 

error conditions. View events in the 
IML from within: 

• 

Insight Manager 7 

• 

Survey Utility 

• 

Operating-system-specific IML 
utilities 

The IML requires operating system 

management drivers. Refer to the 

SmartStart CD for instructions on 
installing the appropriate drivers. 

ROM-Based Setup Utility (RBSU) 

RBSU configures the hardware 

installed in or connected to the 
server. Specifically, it can: 

• 

Store configuration information 
in nonvolatile memory 

• 

Manage memory installation, 
processor upgrades, network 
interface cards and mass 
storage devices 

• 

Assist in installing an operating 
system 

• 

Configure ports and IRQs, if 
required 

Run RBSU by pressing the 

F9

 key 

during POST. 

continued 

HP ProLiant ML570 Generation 2 Server Maintenance and Service Guide 

3-3


Summary of Contents for ProLiant ML570 Generation 2

Page 1: ...HP ProLiant ML570 Generation 2 Server Maintenance and Service Guide January 2004 Fifth Edition Part Number 223958 005 ...

Page 2: ...l not be liable for technical or editorial errors or omissions contained herein The information in this document is provided as is without warranty of any kind and is subject to change without notice The warranties for HP products are set forth in the express limited warranty statements accompanying such products Nothing herein should be construed as constituting an additional warranty HP ProLiant...

Page 3: ...siderations 2 1 Electrostatic Discharge 2 1 Symbols on Equipment 2 2 Accessing Server Components 2 4 Extending the Server from the Rack 2 5 Opening the Hot Plug Door 2 6 Removing the Front Bezel Door Tower Model Only 2 8 Removing the Rack Bezel Rack Model Only 2 9 Removing the Access Panel 2 9 Opening the System Tray 2 10 Memory 2 11 Parts of the Memory Board 2 12 Memory Board LEDs and Icons 2 13 ...

Page 4: ... Air Baffle 2 56 CD ROM Drive 2 57 Diskette Drive 2 58 Removable Media Devices 2 59 Internal Two Bay Hot Plug SCSI Drive Cage Fans Optional 2 60 Drive Cage Backplane 2 61 Drive Fan Cable and Cable Bracket 2 63 Front Panel LED Assembly 2 64 Miscellaneous Mechanical Parts 2 65 Locking Casters 2 66 Power Supply Blank 2 67 SCSI Hard Drive Blank 2 67 Removable Media Blank 2 68 Cable Routing Diagrams 2 ...

Page 5: ...t Plug Hard Drive LEDs 4 19 System LEDs and Internal Health LED Status Combinations 4 21 System Board Switches 4 22 System Maintenance Switch 4 23 Non Maskable Interrupt Switch 4 24 System Configuration Settings 4 24 Chapter 5 Troubleshooting When the Server Does Not Start 5 1 Diagnostic Steps 5 3 Problems After Initial Boot 5 8 ROMPaq Disaster Recovery 5 10 Other Information Resources 5 11 Chapte...

Page 6: ......

Page 7: ...ir Because of the complexity of the individual boards and subassemblies no one should attempt to make repairs at the component level or to make modifications to any printed wiring board Improper repairs can create a safety hazard WARNING To reduce the risk of personal injury from electric shock and hazardous energy levels do not exceed the level of repairs specified in these procedures Because of ...

Page 8: ...and Installation Guide Service Quick Reference Guide Service training guides Service advisories and bulletins QuickFind information services Insight Manager software HP Servers Troubleshooting Guide Integrated Management Log The server includes an integrated nonvolatile management log that contains fault and management information The contents of the Integrated Management Log IML can be viewed wit...

Page 9: ...he illustrated parts breakdown and spare parts lists for the HP ProLiant ML570 Generation 2 server Refer to Table 1 1 Table 1 2 and Table 1 3 for the names of referenced spare parts HP ProLiant ML570 Generation 2 Server Maintenance and Service Guide 1 1 ...

Page 10: ...ated Parts Catalog Chassis Components Exploded View Figure 1 1 Exploded view of the ProLiant ML570 Generation 2 server chassis components 1 2 HP ProLiant ML570 Generation 2 Server Maintenance and Service Guide ...

Page 11: ...Locking casters 296227 001 2 Blanks kit 253071 001 a Removable media bay blank b Power supply blank 3 Tower cover kit 309619 001 a Access panel Hood labels b Tower cover c Front bezel door 4 Rack bezel kit 249150 001 Rack bezel Handles 5 Hard drive blank 122759 001 Not shown HP ProLiant ML570 Generation 2 Server Maintenance and Service Guide 1 3 ...

Page 12: ...rated Parts Catalog System Components Exploded View Figure 1 2 Exploded view of the ProLiant ML570 Generation 2 server system components 1 4 HP ProLiant ML570 Generation 2 Server Maintenance and Service Guide ...

Page 13: ...power cable bracket 249147 001 3 Drive fan air baffle 178195 001 4 Processor and I O fans hot plug 127 mm 5 in 122225 001 5 Fan basket 161658 001 Backplanes 6 SCSI backplane 263035 001 7 Power backplane 233962 001 Mass Storage Devices 8 IDE CD ROM drive 48X 288894 001 9 Diskette drive 233409 001 10 Fan bracket kit 159321 001 a Processor fan bracket b I O fan bracket Not shown HP ProLiant ML570 Gen...

Page 14: ... Parts Catalog System Tray Components Exploded View Figure 1 3 Exploded view of the ProLiant ML570 Generation 2 server system tray components 1 6 HP ProLiant ML570 Generation 2 Server Maintenance and Service Guide ...

Page 15: ...P 352311 001 Processor 2 5 GHz Xeon MP 327840 001 Processor 2 7 GHz 2M Xeon MP 352312 001 Processor 2 8 GHz Xeon MP 327841 001 Processor 3 0 GHz 4M Xeon MP 352313 001 Memory DIMMs 5 256 MB PC1600 DDR ECC SDRAM DIMM 249674 001 512 MB PC1600 DDR ECC SDRAM DIMM 249675 001 1 GB PC1600 DDR ECC SDRAM DIMM 249676 001 2 GB PC1600 DDR ECC SDRAM DIMM 265791 001 6 System board kit 233958 001 a System board b...

Page 16: ...lish 311059 031 German 311059 041 French 311059 051 Italian 311059 061 Spanish 311059 071 Danish 311059 081 Norwegian 311059 091 Swedish 311059 101 Canadian French 311059 121 Portuguese 311059 131 Turkish 311059 141 Greek 311059 151 Arab 311059 171 Belgium 311059 181 Hungarian 311059 211 Czech 311059 221 Slovakian 311059 231 Polish 311059 241 Russian 311059 251 Japanese 311059 291 Dutch 311059 331...

Page 17: ...159319 001 Drive fan cable 158465 001 CD ROM diskette drive cable 158469 001 SCSI drive cable 158470 001 LVD cable 158471 001 Signal Cable Kit 180305 001 CD ROM data cable 158473 002 34 Pin data cable 158472 002 Diskette drive data cables 158474 001 SCSI data cable 2 drop 157855 001 ML570 Cable Kit 249146 001 SCSI data cable blue 166298 024 SCSI data cable yellow 166298 025 Internal to external SC...

Page 18: ...drive 15 000 rpm 1 inch 233350 001 36 4 GB hot plug Wide Ultra3 hard drive 10 000 rpm 1 inch 177986 001 36 4 GB hot plug Ultra320 hard drive 10 000 rpm 1 inch 289041 001 36 4 GB hot plug Ultra320 hard drive 15 000 rpm 1 inch 289241 001 72 8 GB hot plug Wide Ultra3 hard drive 10 000 rpm 1 inch 233349 001 72 8 GB hot plug Ultra320 hard drive 10 000 rpm 1 inch 289042 001 72 8 GB hot plug Ultra320 har...

Page 19: ...s or microcircuitry Proper packaging and grounding techniques are necessary precautions to prevent damage To prevent electrostatic damage Transport products in static safe containers such as conductive tubes bags or boxes Keep electrostatic sensitive parts in their containers until they arrive at static free stations Cover workstations with approved static dissipating material Use a wrist strap co...

Page 20: ...the risk of injury from electrical shock hazards do not open this enclosure Any RJ 45 receptacle marked with these symbols indicates a network interface connection WARNING To reduce the risk of electric shock fire or damage to the equipment do not plug telephone or telecommunications connectors into this receptacle Rack Warnings and Cautions WARNING To reduce the risk of personal injury or damage ...

Page 21: ...sonal injury from hot surfaces allow the hot plug drives and the internal system components to cool before touching WARNING To reduce the risk of electric shock or damage to the equipment Do not disable the AC power cord grounding plug The grounding plug is an important safety feature Plug the power cord into a grounded earthed electrical outlet that is easily accessible at all times Unplug the po...

Page 22: ...in operation during a power failure CAUTION Do not operate the server for extended periods without the access panel Operating the server without the access panel results in improper airflow and improper cooling that can lead to thermal damage CAUTION Reinstall each hard drive into the specific slot from which it was removed Mixing the hard drives adversely affects the system drive configuration Ac...

Page 23: ...es and sliding the component into or out of the rack The sliding rails could pinch your fingertips 2 Extend the server until the server rail release latches engage 2 Figure 2 1 Extending the server from the rack To slide the server back into the rack after performing the maintenance procedure 1 Press the server rail release latches 2 Slide the server fully into the rack 3 Secure the server by tigh...

Page 24: ... Server from the Rack in this chapter 2 Locate the hot plug door key The key is located inside the front bezel door on the tower model servers 1 or in a bag attached to the rear handle on the rack model servers 2 Fig 2 2 Locating the hot plug door and front bezel door keys 2 6 HP ProLiant ML570 Generation 2 Server Maintenance and Service Guide ...

Page 25: ...s on the hot plug door 1 4 Slide the hot plug door latches open 2 5 Open the hot plug door 3 Figure 2 3 Opening the hot plug door Reverse steps 3 through 5 to close the hot plug door HP ProLiant ML570 Generation 2 Server Maintenance and Service Guide 2 7 ...

Page 26: ...mponents To remove the front bezel door 1 Unlock the front bezel door Figure 2 4 Unlocking the front bezel door 2 Swing open the front bezel door fully 3 Lift the front bezel door and pull the door away from the chassis hinges Figure 2 5 Removing the front bezel door tower model only Reverse steps 1 through 3 to replace the front bezel door 2 8 HP ProLiant ML570 Generation 2 Server Maintenance and...

Page 27: ...model only Reverse steps 1 and 2 to replace the rack bezel Removing the Access Panel To remove the access panel 1 Open the front bezel door tower model only and lay the server on its side with the access panel facing upward Refer to Removing the Front Bezel Door Tower Model Only in this chapter 2 Extend the server from the rack rack model only Refer to Extending the Server from the Rack in this ch...

Page 28: ...next to the two thumbscrews 2 5 Slide the access panel toward the back of the server and lift it away from the chassis 3 Figure 2 7 Removing the access panel Reverse steps 1 through 5 to replace the access panel Opening the System Tray To open the system tray 1 Remove the access panel Refer to Removing the Access Panel in this chapter 2 10 HP ProLiant ML570 Generation 2 Server Maintenance and Serv...

Page 29: ...approximately the depth of the drives before sliding the system tray from the back of the chassis Figure 2 8 Opening the system tray Memory This section provides the following information about the memory components and procedures for hot plug and non hot plug removal and replacement of memory in the server Parts of the memory board Memory board LEDs and icons DIMM installation requirements Removi...

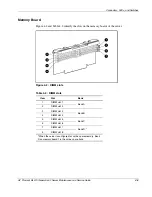
Page 30: ...M slot 1 bank A populated 2 DIMM slot 2 bank A populated 3 DIMM slot 3 bank B 4 DIMM slot 4 bank B 5 DIMM slot 5 bank C 6 DIMM slot 6 bank C 7 DIMM slot 7 bank D 8 DIMM slot 8 bank D 9 LEDs 10 Locking switch 11 Release latches 12 Ejector levers When the server is configured for online spare memory Bank D on memory board 1 is the online spare bank 2 12 HP ProLiant ML570 Generation 2 Server Maintena...

Page 31: ...Off Memory board is offline Green Memory board is online Flashing green Memory board is busy 1 Memory Status Amber Memory error has occurred on this memory board Off DIMM is not installed Green DIMM is installed Amber Memory error has occurred on this DIMM 8 DIMM 1 8 status Flashing amber Configuration error has occurred 1 4 7 8 All LEDs Flashing amber Memory board is in use relock it immediately ...

Page 32: ... Status Amber Memory error has occurred and system has failed over to the online spare bank Off Bank is not configured as an online spare bank Green Bank is configured as an online spare bank 7 Online Spare text Flashing green Failure has occurred and online spare bank is active Off DIMM is not installed Green DIMM is installed Amber Memory error has occurred on this DIMM 8 DIMM 1 8 Status Flashin...

Page 33: ...configured for mirrored memory Green Single board mirrored memory is functioning properly 3 Mirroring Status Amber Memory error has occurred and system has failed over to the mirrored bank s Off DIMM is not installed Green DIMM is installed Amber Memory error has occurred on this DIMM 8 DIMM 1 8 status Flashing amber Configuration error has occurred 1 4 7 8 All LEDs Flashing amber Memory board is ...

Page 34: ...ry board memory board is not ready for removal 4 Ready to Hot Plug Green Okay to remove memory board Off DIMM is not installed Green DIMM is installed Amber Memory error has occurred on this DIMM 8 DIMM 1 8 status Flashing amber Configuration error has occurred 1 4 7 8 All LEDs Flashing amber Memory board is in use relock it immediately Table 2 6 Memory Board Icons Item Description Status 5 Lock M...

Page 35: ... additional DIMMs IMPORTANT Follow all DIMM configuration requirements carefully If the DIMMs are not configured properly you receive an error message during POST The server supports three types of optional Advanced Memory Protection Online spare memory Single board mirrored memory Hot plug mirrored memory Each type includes Advanced ECC protection Additional Requirements for Online Spare Memory T...

Page 36: ...rresponding banks for instance bank A on the memory board in slot 1 and bank A on the memory board in slot 2 must be populated with DIMMs of the same capacity Removing a Memory Board CAUTION Electrostatic discharge can damage electronic components Make sure you are properly grounded before beginning any installation procedure To remove a memory board 1 If the server is not configured for hot plug ...

Page 37: ... flash amber Proceeding to remove the memory board after the audible and visible alarms causes system failure CAUTION To prevent system failure do not remove the memory board from the server until the memory status LED stops blinking 4 Press the release latches inward firmly 2 disengaging the board from the server Do not squeeze the latches 5 Lift the ejector levers up 3 6 Pull the memory board up...

Page 38: ...e memory board Refer to Removing a Memory Board in this chapter 2 Place the memory board on a level surface 3 Open the DIMM slot latches 1 and remove the DIMM from the DIMM slot 2 Figure 2 12 Removing a DIMM 2 20 HP ProLiant ML570 Generation 2 Server Maintenance and Service Guide ...

Page 39: ...onfiguration requirements carefully If the DIMMs are not configured properly you will receive an error message during POST and the DIMM LEDs will blink amber 3 Align the keyed portion of the bottom edge of the DIMM with the tab in the DIMM slot IMPORTANT The bottom edge of the DIMM is designed so that it fits into the DIMM slot only one way 4 Press the DIMM firmly into the slot 1 5 Push the latche...

Page 40: ...LED which flashes green while data are copied from one memory board to the other This process may take up to a minute to complete When the copying process is complete the other LEDs reilluminate as described in Table 2 7 CAUTION Do not remove the memory board while the memory status LED is flashing When the memory status LED is flashing the memory board is transferring data Removing the memory boa...

Page 41: ... Green Green Green DIMMs 1 8 if populated Green Green Green Green Online Spare Status Off Green Off Off Mirroring Status Off Off Green Green Online Spare Text Off Green Off Off Ready to Hot Plug Off Off Off Green If two memory boards are installed the online spare text is only illuminated for the memory board in slot 1 NOTE When the server is configured for online spare memory Bank D is the online...

Page 42: ...d in this chapter 4 Test the DIMMs a Power on the server b Press the F9 key to enter RBSU c Select Advanced Options d Change POST Speed Up to disable e Press any key to return to the RBSU main menu f Select System Options g Select Advanced Memory Protection h Select the desired memory mode i Press the Esc key twice to go back to the main RBSU menu j Press the F10 key to exit RBSU The server reboot...

Page 43: ...his chapter Hot Plug Power Supplies CAUTION Do not hot remove a power supply without a redundant power supply in place CAUTION Hot plug power supplies for the ProLiant ML570 Generation 2 server are keyed to make sure that only 600 W hot plug power supplies can be installed in the server The handles on 600 W power supplies are carbon black to distinguish them from other power supplies which are opa...

Page 44: ...it releases from the server 2 6 Slide the hot plug power supply from the chassis 3 Figure 2 16 Removing a hot plug power supply CAUTION A power supply or power supply blank must always be installed in each power supply bay for proper system cooling If a power supply bay is left open thermal damage may occur Reverse steps 1 through 6 to replace a hot plug power supply 2 26 HP ProLiant ML570 Generat...

Page 45: ...se of overheating To remove a hot plug processor or I O fan 1 Remove the front bezel door tower model only and lay the server on its side with the access panel facing upward Refer to Removing the Front Bezel Door Tower Model Only in this chapter 2 Extend the server from the rack rack model only Refer to Extending the Server from the Rack in this chapter 3 Remove the access panel Refer to Removing ...

Page 46: ...chapter 3 Remove the access panel Refer to Removing the Access Panel in this chapter 4 Open the system tray Refer to Opening the System Tray in this chapter 5 Loosen the thumbscrew located at the top of the fan 1 6 Lift the hot plug drive fan out of the chassis 2 CAUTION Hot plug drive fans are located below all server cabling Be careful not to unplug or loosen cables when accessing hot plug drive...

Page 47: ...move the rear processor air baffle by loosening the two thumbscrews that secure it to the system tray 1 4 Lift the air baffle up and out of the server 2 Figure 2 19 Removing the rear processor air baffle Reverse steps 1 through 4 to replace the rear processor air baffle Front Processor Air Baffle To remove the front processor air baffle 1 Remove the front bezel door tower model only and lay the se...

Page 48: ...is case drives are mirrored in pairs More than one drive can fail and be replaced as long as the drive or drives they are mirroring are online Do not remove a degraded drive if any member of an array is missing previously removed and not yet replaced Do not remove a degraded drive if any member of an array is being rebuilt unless the drive being rebuilt has been configured as an online spare The o...

Page 49: ...rive 1 Open the front bezel door tower model only Refer to Removing the Front Bezel Door Tower Model Only in this chapter CAUTION Remove or replace a hard drive only when the drive failure LED is amber Data loss can occur if a drive is removed when the drive online LED is green Refer to Hot Plug Drive LEDs in Chapter 4 for more information CAUTION Remove or replace only one hard drive at a time Th...

Page 50: ...o turn off power to the slot Use either the PCI X Hot Plug button on the server or the operating system s PCI X Hot Plug Utility to control the PCI X Hot Plug slots The PCI X Hot Plug button and the PCI X Hot Plug Utility enable you to power up or power down a PCI X Hot Plug expansion slot The PCI X Hot Plug button enables direct access at each hot plug expansion slot PCI Hot Plug software support...

Page 51: ... recommended for the Remote Insight Lights Out Edition II PCI X Hot Plug expansion slots are accessible through the hot plug door To remove an expansion board from a PCI X Hot Plug slot 1 Extend the server from the rack rack model only Refer to Extending the Server from the Rack in this chapter 2 Open the hot plug door Refer to Opening the Hot Plug Door in this chapter HP ProLiant ML570 Generation...

Page 52: ...Plug slot status CAUTION To prevent data loss do not open an expansion slot latch when the power LED for the slot is on 4 When the power LED for the slot is off remove cables to the selected expansion board 5 Push the tab on the expansion slot latch 2 6 Swing the latch back to unlock the expansion board 3 Figure 2 23 Pushing the PCI X Hot Plug button and releasing the expansion slot latch 2 34 HP ...

Page 53: ...cing the expansion board review the following information Balancing is the paired arrangement of expansion boards for optimal performance based on the bus architecture of the expansion slots Properly balancing the expansion boards across buses can improve performance To balance expansion boards populate slots across different buses before populating two slots on the same bus HP ProLiant ML570 Gene...

Page 54: ... Edition II due to internal cabling requirements The operating system detects the PCI devices in the slots in this order 1 2 3 4 5 6 7 For more information about PCI bus architecture and numbering refer to the white paper PCI Bus Numbering in a Windows NT Environment at www hp com servers proliant manage Reverse steps 1 through 9 to replace the expansion board Preparing the Server for Non Hot Plug...

Page 55: ...wn the server 1 Remove the front bezel door tower model only Refer to Removing the Front Bezel Door Tower Model Only in this chapter 2 Press the Power On Standby button Figure 2 25 Pressing the Power On Standby button 3 Be sure that the front panel power LED indicator is amber and that the fans are off 4 Disconnect all AC power cords from the server 5 Disconnect all external peripheral devices fro...

Page 56: ...ve local occupational health and safety requirements and guidelines for manual material handling WARNING Before lifting the server remove all hot plug power supplies to reduce weight WARNING The server is very heavy up to 66 kg 146 lb To reduce the risk of personal injury or damage to the equipment Remove all hot plug power supplies to reduce the weight of the server before lifting it Observe loca...

Page 57: ... the back of the server 1 3 Slide the cable management arm bracket up and remove it from the server 2 Figure 2 27 Removing the cable management arm 4 Loosen the front panel thumbscrews and pull the server out of the front of the rack until it stops in the extended position 5 Press the release latches Figure 2 28 Pressing the release latches HP ProLiant ML570 Generation 2 Server Maintenance and Ser...

Page 58: ...ug component you must first power down the server The following non hot plug procedures are described in this section System Battery Processor Power Modules PPMs Processors Expansion Boards Hot Plug Expansion Board Basket PCI Backplane System Tray Power Backplane Fan Basket Processor Fan Bracket with Cable Drive Air Baffle CD ROM Drive Diskette Drive Removable Media Devices 2 40 HP ProLiant ML570 ...

Page 59: ...assemble crush puncture short external contacts or dispose of in fire or water Replace only with the HP spare designated for this server CAUTION Do not dispose of batteries battery packs and accumulators with the general household waste To forward them to recycling or proper disposal use the public collection system or return them to either HP or the nearest HP authorized service provider To remov...

Page 60: ...tem board 5 Press the battery release lever away from the battery 1 6 Lift the battery on the lever side and pull it out of the holder 2 Figure 2 31 Removing the battery from the system board Reverse steps 1 through 6 to replace the battery 2 42 HP ProLiant ML570 Generation 2 Server Maintenance and Service Guide ...

Page 61: ...cing upward Refer to Removing the Front Bezel Door Tower Model Only in this chapter 3 Remove the access panel Refer to Removing the Access Panel in this chapter 4 Remove the rear and front processor air baffles Refer to Processor Air Baffles in this chapter 5 Loosen the thumbscrew on the processor retaining bracket 1 6 Lift the processor retaining bracket upward 2 Figure 2 32 Lifting the processor...

Page 62: ...g procedure Refer to Preparing the Server for Non Hot Plug Procedures in this chapter 2 Remove the front bezel door tower model only and lay the server on its side with the access panel facing upward Refer to Removing the Front Bezel Door Tower Model Only in this chapter 3 Remove the access panel Refer to Removing the Access Panel in this chapter 4 Remove the rear and front processor air baffles R...

Page 63: ...s chapter 8 Move the processor locking lever to the unlocked position 3 Figure 2 34 Lifting the processor retaining bracket and the processor locking lever 9 Lift the processor heatsink assembly straight up from its socket Figure 2 35 Removing the processor heatsink assembly Reverse steps 1 through 9 to replace a processor HP ProLiant ML570 Generation 2 Server Maintenance and Service Guide 2 45 ...

Page 64: ...oard 1 Prepare the server for a non hot plug procedure Refer to Preparing the Server for Non Hot Plug Procedures in this chapter 2 Remove the front bezel door tower model only and lay the server on its side with the access panel facing upward Refer to Removing the Front Bezel Door Tower Model Only in this chapter 3 Remove the access panel Refer to Removing the Access Panel in this chapter 4 Discon...

Page 65: ...rocedure Refer to Preparing the Server for Non Hot Plug Procedures in this chapter 2 Remove the front bezel door tower model only and lay the server on its side with the access panel facing upward Refer to Removing the Front Bezel Door Tower Model Only in this chapter 3 Remove the access panel Refer to Removing the Access Panel in this chapter 4 Remove cables to all PCI X Hot Plug expansion boards...

Page 66: ...e 2 38 Removing the hot plug expansion board basket Reverse steps 1 through 9 to replace the hot plug expansion board basket PCI Backplane To remove the PCI backplane 1 Prepare the server for a non hot plug procedure Refer to Preparing the Server for Non Hot Plug Procedures in this chapter 2 Remove the front bezel door tower model only and lay the server on its side with the access panel facing up...

Page 67: ... slot cover Refer to the PCI and PCI X Hot Plug Expansion Boards section in this chapter 7 Remove the expansion slot latch a Press upward on the bottom of the clear plastic latch from the outside of the chassis 1 b Pull the latch away from the inner wall of the chassis 2 Figure 2 40 Removing an expansion slot latch 8 Repeat steps 6 and 7 for each remaining expansion slot HP ProLiant ML570 Generati...

Page 68: ... pin completely from the rivet and set aside c Remove the rivet Figure 2 41 Removing the PCI backplane rivets IMPORTANT Do not discard the rivets or pins 10 Open the system tray Refer to the Opening the System Tray section in this chapter 11 Lift the PCI backplane up and out of the server Figure 2 42 Removing the PCI backplane 2 50 HP ProLiant ML570 Generation 2 Server Maintenance and Service Guid...

Page 69: ... the front bezel door tower model only and lay the server on its side with the access panel facing upward Refer to Removing the Front Bezel Door Tower Model Only in this chapter 3 Remove the access panel Refer to Removing the Access Panel in this chapter 4 Remove the processor air baffles Refer to Processor Air Baffles in this chapter 5 Remove the memory boards Refer to Removing a Memory Board in ...

Page 70: ...ctive surface 14 Be sure that the system switch settings on the system tray you are installing match those on the system tray you are removing Refer to System Board Switches in Chapter 4 Connectors LEDs and Switches 15 Transfer all memory boards expansion boards PPMs and processors onto the new system board Refer to the appropriate sections in this chapter regarding the removal of these components...

Page 71: ...ess Panel in this chapter 4 Open the system tray Refer to Opening the System Tray in this chapter 5 Disconnect all cables from the power backplane Refer to Cable Routing Diagrams in this chapter 6 Loosen the two Torx T 15 thumbscrews 1 7 Slide the power backplane toward the rear of the server and lift from the chassis 2 Figure 2 44 Removing the power backplane CAUTION To avoid damaging the cable w...

Page 72: ...non hot plug procedure Refer to Preparing the Server for Non Hot Plug Procedures in this chapter 2 Remove the front bezel door tower model only and lay the server on its side with the access panel facing upward Refer to Removing the Front Bezel Door Tower Model Only in this chapter 3 Extend the server from the rack rack model only Refer to Extending the Server from the Rack in this chapter 4 Remov...

Page 73: ... this chapter 4 Remove the hot plug fans Refer to Hot Plug Fans Processor and I O in this chapter 5 Remove the fan basket Refer to Fan Basket in this chapter 6 Open the system tray Refer to Opening the System Tray in this chapter 7 Disconnect the processor fan bracket power cable from the system board 8 Remove the four Torx T 15 screws securing the processor fan bracket to the chassis 1 9 Slide th...

Page 74: ...he hot plug fans Refer to Hot Plug Fans Processor and I O in this chapter 5 Remove both fan baskets Refer to Fan Basket in this chapter 6 Open the system tray Refer to Opening the System Tray in this chapter NOTE To facilitate removal of the drive air baffle you may wish to remove the two outer hot plug drive fans Refer to Hot Plug Fans Drive in this chapter 7 Loosen the thumbscrews on the drive a...

Page 75: ...and I O in this chapter 5 Remove the fan basket Refer to Fan Basket in this chapter 6 Remove the processor fan bracket Refer to Processor Fan Bracket in this chapter 7 Open the system tray Refer to Opening the System Tray in this chapter 8 Disconnect the power and signal cables from the CD ROM drive Refer to Diskette and CD ROM Drive Cables in this chapter 9 Loosen the thumbscrew located near the ...

Page 76: ...to Removing the Access Panel in this chapter 4 Remove the hot plug processor fan Refer to Hot Plug Fans Processor and I O in this chapter 5 Remove the hot plug processor fan basket Refer to Fan Basket in this chapter 6 Disconnect the power and signal cables from the diskette drive Refer to Diskette and CD ROM Drive Cables in this chapter 7 Loosen the thumbscrew on the side of the diskette drive 1 ...

Page 77: ...e plastic locking lever on the outside of the removable media area to release the media device 1 6 Pull the media device from the removable media area 2 CAUTION Always populate removable media bays with either a hard drive or blank Proper airflow can only be maintained when the bays are populated Unpopulated media bays can lead to improper cooling and thermal damage Figure 2 50 Removing a media de...

Page 78: ...he removable media device 5 Remove the removable media device from the removable media area Refer to Removable Media Devices in this chapter CAUTION Always populate media bays with either a hard drive or blank Proper airflow can only be maintained when the bays are populated Unpopulated media bays can lead to improper cooling and thermal damage 6 Lift the clip holding the fans to the back of the d...

Page 79: ...g Procedures in this chapter 2 Remove the front bezel door tower model only Refer to Removing the Front Bezel Door Tower Model Only in this chapter 3 Remove rack bezel rack model only Refer to Removing the Rack Bezel Rack Model Only in this chapter 4 Remove all drives from the drive cage to be replaced Refer to SCSI Hard Drives in this chapter CAUTION Hard drives must be reinserted in the same loc...

Page 80: ...emove the two Torx T 15 screws that hold the drive cage backplane to the drive cage 1 15 Lift the backplane upward then outward to release it from the drive cage 2 Figure 2 53 Removing the drive cage backplane Reverse steps 1 through 15 to replace the hard drive cage or cover the opening with a drive cage blank to maintain proper cooling 2 62 HP ProLiant ML570 Generation 2 Server Maintenance and S...

Page 81: ...essor and I O in this chapter 5 Remove the fan baskets Refer to Fan Basket in this chapter 6 Remove the hot plug drive fans Refer to Hot Plug Fans Drive in this chapter 7 Remove the drive air baffle Refer to Drive Air Baffle in this chapter 8 Remove the drive cage Refer to Drive Cage Backplane in this chapter 9 Remove the Torx T 10 screw holding the drive fan cable bracket in place 1 and lift the ...

Page 82: ... panel Refer to Removing the Access Panel in this chapter 5 Remove the hot plug fans Refer to Hot Plug Fans Processor and I O in this chapter 6 Remove the fan basket Refer to Fan Basket in this chapter 7 Unscrew and move aside the processor fan bracket It is not necessary to disconnect cables or remove this component completely for this procedure Refer to Processor Fan Bracket in this chapter 8 Di...

Page 83: ...ssembly all the way out of the front of the bezel 2 Figure 2 56 Removing the front panel LED assembly Reverse steps 1 through 11 to replace the front panel LED and cable assembly Miscellaneous Mechanical Parts Several mechanical components can be removed without powering down the server Locking casters Power supply blank SCSI hard drive blank Removable media blank HP ProLiant ML570 Generation 2 Se...

Page 84: ...r Non Hot Plug Procedures in this chapter 2 Place the server on its side and remove the three Torx T 15 screws securing each caster to the chassis 3 Pull the locking casters away from the server Figure 2 57 Removing the locking casters Reverse steps 1 through 3 to replace the locking casters 2 66 HP ProLiant ML570 Generation 2 Server Maintenance and Service Guide ...

Page 85: ...pply blank 1 Remove the two Torx T 15 screws securing the hot plug power supply blank to the chassis 1 2 Pull the power supply blank up and away from the chassis 2 Figure 2 58 Removing the power supply blank Reverse steps 1 and 2 to replace a power supply blank SCSI Hard Drive Blank To remove a drive blank 1 Open the front bezel door tower model only Refer to Removing the Front Bezel Door Tower Mo...

Page 86: ...k Reverse steps 1 through 3 to replace a drive blank Removable Media Blank To remove a removable media blank 1 Remove the front bezel door tower model only Refer to Removing the Front Bezel Door Tower Model Only in this chapter 2 Remove the access panel Refer to Removing the Access Panel in this chapter 2 68 HP ProLiant ML570 Generation 2 Server Maintenance and Service Guide ...

Page 87: ...emovable media area 2 Figure 2 60 Removing a removable media blank from the removable media area Reverse steps 1 through 4 to install a removable media blank Cable Routing Diagrams CAUTION When routing cables always make sure that the cables are not in a position in which they can be pinched or crimped HP ProLiant ML570 Generation 2 Server Maintenance and Service Guide 2 69 ...

Page 88: ...nt Procedures System Board Power Cables Figure 2 61 System board power cable routing Drive Fan Power Cables Figure 2 62 Drive fan power cable routing 2 70 HP ProLiant ML570 Generation 2 Server Maintenance and Service Guide ...

Page 89: ...le 2 10 Diskette and CD ROM Drive Cable Routing Item Description 1 Power cable for both diskette and CD ROM drives 2 Data cable for CD ROM drive 3 Data cable for diskette drive SCSI Backplane Power Cables Figure 2 64 SCSI backplane power cable routing HP ProLiant ML570 Generation 2 Server Maintenance and Service Guide 2 71 ...

Page 90: ...ting Item Description 1 SCSI A blue 2 SCSI B yellow Figure 2 66 Internal to external SCSI cable routing NOTE The internal to external SCSI cable ships unconnected If you want to connect it you must disconnect one of the drive cages 2 72 HP ProLiant ML570 Generation 2 Server Maintenance and Service Guide ...

Page 91: ... Server SCSI devices in the removable media bay Signal Server Power Server IDE devices in the removable media bay Signal Option kit Power Server DVD drive in the CD ROM bay Signal Option kit Power Option kit Remote Insight lights Out Edition II Signal Option kit Front panel LED assembly Power Server External storage devices Signal Option kit or option cable kits External SCSI Signal Server HP ProL...

Page 92: ...3 Select Serial Number The following warning is displayed WARNING WARNING WARNING The serial number is loaded into the system during the manufacturing process and should NOT be modified This option should ONLY be used by qualified service personnel This value should always match the serial number sticker located on the chassis Press the Enter key to clear the warning 4 Enter the serial number and ...

Page 93: ...ter is an overview of software and firmware diagnostic tools that are available for configuring monitoring and managing HP ProLiant ML570 Generation 2 servers HP ProLiant ML570 Generation 2 Server Maintenance and Service Guide 3 1 ...

Page 94: ...esets the server and tries to restart the operating system Run RBSU and set ASR 2 to enable this tool Diagnostics Utility Diagnostics Utility tests and verifies operation of HP hardware If the utility finds a hardware failure it isolates the replaceable part if possible Access Diagnostics Utility when POST detects a system configuration error For a complete list of POST error messages refer to the...

Page 95: ...tall the Survey Utility from the SmartStart CD the Integration Maintenance Utility or the Management CD Integrated Management Log IML The IML is a log of system events such as system failures or nonfatal error conditions View events in the IML from within Insight Manager 7 Survey Utility Operating system specific IML utilities The IML requires operating system management drivers Refer to the Smart...

Page 96: ...vailable ROM revisions and controller firmware Run this utility from the SmartStart CD included with the server SmartStart Diskette Builder The SmartStart Diskette Builder is a utility that uses data stored on the SmartStart CD to create support diskettes You can create support diskettes for specific configuration needs or for software that cannot be used directly from the SmartStart CD Run the di...

Page 97: ...tors internal and external LEDs and system board switches Connectors The figures and tables in this chapter show connector locations on the system board memory board and rear panel of an HP ProLiant ML570 Generation 2 server HP ProLiant ML570 Generation 2 Server Maintenance and Service Guide 4 1 ...

Page 98: ...em Board Connectors Item Connector 1 Secondary IDE non bootable 2 Remote management 30 pin 3 Remote management 16 pin 4 I O fans 5 System power 6 SCSI A blue 7 SCSI B yellow 8 Power backplane signal 9 Primary IDE bootable orange 10 Diskette drive purple 11 Processor fans 12 System power 13 PCI backplane 4 2 HP ProLiant ML570 Generation 2 Server Maintenance and Service Guide ...

Page 99: ...le 4 2 DIMM slots Item Slot Bank 1 DIMM slot 1 2 DIMM slot 2 Bank A 3 DIMM slot 3 4 DIMM slot 4 Bank B 5 DIMM slot 5 6 DIMM slot 6 Bank C 7 DIMM slot 7 8 DIMM slot 8 Bank D When the server is configured for online spare memory Bank D on memory board 1 is the online spare bank HP ProLiant ML570 Generation 2 Server Maintenance and Service Guide 4 3 ...

Page 100: ...ower supply 1 2 Mouse connector 11 Hot plug power supply 2 3 Serial connector A 12 Torx T 15 tool 4 Parallel connector 13 Unit ID switch and LED 5 Embedded NIC connector RJ 45 14 USB connectors 6 Release latch 15 Video connector 7 VHDCI SCSI connector 16 Serial connector B 8 PCI X Hot Plug expansion slots 17 Hot plug power supply bay 3 redundant 9 PCI X non hot plug expansion slots 4 4 HP ProLiant...

Page 101: ...stem board Memory board PCI X Hot Plug Expansion slot speed Hot plug power supply Hot plug fan Embedded NIC connector RJ 45 activity Rear Unit Identification UID LED Hot plug hard drive Information at the end of this section discusses the interactions between external and system board LEDs in troubleshooting or assessing system status HP ProLiant ML570 Generation 2 Server Maintenance and Service G...

Page 102: ...re Off System is off 3 External health power supply LED Green Normal system on Amber Redundant power supply failure Red Critical power supply failure Off System is off 4 Embedded NIC activity LED Green Network link Blinking Network link with activity Off No network connection 5 Power On Standby button and LED Amber System is off auxiliary power present Green System is on Off Server has no A C powe...

Page 103: ...LED Description State 1 PPM 1 2 Processor 1 3 PPM 2 4 Processor 2 Amber Processor or PPM failed Off Normal 5 Thermal warning Amber Thermal event Off Normal 6 Memory board interlock LED Amber Memory boards interlock failed Off Normal 7 Processor 3 8 PPM 3 9 Processor 4 10 PPM 4 Amber Processor or PPM failed Off Normal HP ProLiant ML570 Generation 2 Server Maintenance and Service Guide 4 7 ...

Page 104: ...s offline Green Memory board is online Flashing green Memory board is busy 1 Memory Status Amber Memory error has occurred on this memory board Off DIMM is not installed Green DIMM is installed Amber Memory error has occurred on this DIMM 8 DIMM 1 8 status Flashing amber Configuration error has occurred 1 4 7 8 All LEDs Flashing amber Memory board is in use relock it immediately 4 8 HP ProLiant ML...

Page 105: ...tatus Amber Memory error has occurred and system has failed over to the online spare bank Off Bank is not configured as an online spare bank Green Bank is configured as an online spare bank 7 Online Spare text Flashing green Failure has occurred and online spare bank is active Off DIMM is not installed Green DIMM is installed Amber Memory error has occurred on this DIMM 8 DIMM 1 8 status Flashing ...

Page 106: ...figured for mirrored memory Green Single board mirrored memory is functioning properly 3 Mirroring status Amber Memory error has occurred and system has failed over to the mirrored bank s Off DIMM is not installed Green DIMM is installed Amber Memory error has occurred on this DIMM 8 DIMM 1 8 status Flashing amber Configuration error has occurred 1 4 7 8 All LEDs Flashing amber Memory board is in ...

Page 107: ...board is not ready for removal 4 Ready to Hot Plug Green Okay to remove memory board Off DIMM is not installed Green DIMM is installed Amber Memory error has occurred on this DIMM 8 DIMM 1 8 status Flashing amber Configuration error has occurred 1 4 7 8 All LEDs Flashing amber Memory board is in use relock it immediately Table 4 10 Memory Board Icons Item Description Status 5 Lock Memory board is ...

Page 108: ...de the server after removing the access panel Figure 4 7 and Table 4 11 identify PCI X Hot Plug LEDs Figure 4 7 Internal and External PCI X Hot Plug LEDs Table 4 11 Internal and External PCI X Hot Plug LEDs Item Description 1 Power LED green 2 Fault LED amber 3 PCI X Hot Plug button 4 12 HP ProLiant ML570 Generation 2 Server Maintenance and Service Guide ...

Page 109: ...not open the expansion slot latch Power Fault Flashing On or Off No The power slot is being turned off or on which may take several minutes Do not open the expansion slot latch Press the PCI X Hot Plug button to cancel the operation Power Fault Off On Yes Power to this slot is turned off but this slot needs attention A problem may exist with the slot expansion board or driver Power Fault Off Off Y...

Page 110: ...pansion boards of different speeds are installed on the same bus the server sets the bus speed to the slower PCI board Figure 4 8 and Table 4 13 identify the speed for each PCI slot and to help ensure optimal performance Figure 4 8 Expansion slot speed LEDs Table 4 13 Expansion Slot Speed LEDs LED Slot Speed 1 33 MHz PCI 2 66 MHz PCI 3 66 MHz PCI X 4 100 MHz PCI X 4 14 HP ProLiant ML570 Generation...

Page 111: ... rack configuration Table 4 14 Power Supply LEDs Power Supply Condition 1 Power LED Green 2 Fault LED Amber No AC power to any power supply Off Off No AC power to a particular power supply Off On AC power present system in standby mode Blinking Off Power supply on and working properly On Off Power supply current limit exceeded On Blinking HP ProLiant ML570 Generation 2 Server Maintenance and Servi...

Page 112: ... processor fan 3 Standard I O fan 4 Optional redundant I O fan 5 Drive fan 6 Drive fan 7 Drive fan Green The fan is operating normally Amber The fan has failed Off The fan is not installed has no power or is not properly seated NOTE The hot plug rear processor air baffle and fan assembly LED is not shown It also indicates operational status as described in Table 4 15 4 16 HP ProLiant ML570 Generat...

Page 113: ...11 and Table 4 16 identify the LED locations and status Figure 4 11 Embedded NIC connector activity LEDs Table 4 16 Embedded NIC Connector Activity LEDs LED Description State 1 Activity On or flashing Network activity Off No network activity 2 Link On Linked to network Off No network link HP ProLiant ML570 Generation 2 Server Maintenance and Service Guide 4 17 ...

Page 114: ... a visual reference for locating an individual server in a rack of servers The rear UID contains an integrated button to activate or deactivate the LED Figure 4 12 Rear UID and button tower model The rear UID indicates the following states Blue The button is activated Blue flashing The system is being monitored remotely Off The button is deactivated NOTE You can activate and deactivate the UID fro...

Page 115: ...rray Figure 4 13 and Tables 4 17 and 4 18 identify LED locations and analyze the status of each hot plug hard drive CAUTION Read the HP Servers Troubleshooting Guide before removing a hard drive Figure 4 13 Hot plug hard drive LEDs Table 4 17 Hot Plug Hard Drive LEDs LED Description State 1 Drive activity On Drive activity Off No drive activity 2 Online status Flashing Online activity Off No onlin...

Page 116: ...troller The drive is not configured as part of an array Or If this drive is part of an array a powered on controller is not accessing the drive Or The drive is configured as an online spare Off Off On OK to replace the drive online The drive has failed and has been placed offline Off On Off OK to replace the drive online if a predictive failure alert is received refer to System LEDs and Internal H...

Page 117: ...ED Color Status Red Processor has failed Required processor is not installed in socket ROM detects a failed processor during POST Processor failure amber Amber Processor is in pre failure condition PPM failure amber Red PPM has failed PPM is not installed but the corresponding processor is installed Red DIMM has experienced a multi bit error DIMM failure amber Amber DIMM has reached single bit cor...

Page 118: ... If the system configuration is incorrect the server may not work properly and you may receive error messages on the screen This section discusses the following system board switches System maintenance Non maskable interrupt NMI Figure 4 14 System board switches Table 4 20 System Board Switches Switch Switch Type 1 System maintenance switch SW4 2 NMI switch SW3 4 22 HP ProLiant ML570 Generation 2 ...

Page 119: ...ing from diskette is controlled by RBSU 4 Enable diskette boot On Booting from diskette is enabled and RBSU setting is overridden Off System passwords work normally 5 Clear system passwords On System passwords will be erased Off No function is available 6 Invalidate non volatile RAM NVRAM and CMOS On ROM treats system configuration as invalid 7 Reserved 8 Reserved Note To access redundant ROM set ...

Page 120: ...repared to erase all system configuration settings from both CMOS and NVRAM For additional information about locating the switch and switch settings refer to System Maintenance Switch in this chapter The default setting for all positions is off IMPORTANT Clearing CMOS and or NVRAM deletes your configuration information Refer to the HP ProLiant ML570 Generation 2 Server Setup and Installation Guide...

Page 121: ...ontaining hazardous energy circuits For troubleshooting information beyond the scope of this guide both general and specific to HP ProLiant ML570 Generation 2 servers refer to Table 5 8 When the Server Does Not Start This section provides systematic instructions on what to try and where to go for help for the most common problems encountered during initial POST The server must complete this test e...

Page 122: ...ormal power up sequence to be sure that the system meets the minimal hardware requirements and is powered up during normal operations a The power button LED turns from standby amber to on green b The fans start up 8 Check the monitor for the following messages that verify the system meets the minimal hardware requirements and is powered up during normal operations a HP ProLiant logo b BIOS informa...

Page 123: ...ources of information Table 5 1 Diagnostic Steps Question Action Question 1 Is the system power button LED off If no continue to question 2 If yes refer to Table 5 2 Question 2 Is the system power button LED illuminated green If yes continue to question 3 If no refer to Table 5 3 Question 3 Is the external health LED illuminated green If yes continue to question 4 If no refer to Table 5 4 Question...

Page 124: ...ection exists between the front panel LED assembly and the power backplane Be sure that the system power and power supply signal cables are connected to the system board and power backplane Yes it is off The front panel LED assembly has failed Be sure that the front panel LED assembly cable is connected to the power backplane Refer to the HP Servers Troubleshooting Guide for further options No If ...

Page 125: ...tions refer to Chapter 4 Connectors LEDs and Switches For cabling configurations refer to the HP ProLiant ML570 Generation 2 Server Setup and Installation Guide Table 5 4 Is the External Health LED Green Answer Possible Reasons Possible Solutions No it is amber One power supply has failed power supply redundancy is lost Be sure that each installed power supply is securely connected to an AC power ...

Page 126: ...A processor is an unsupported type Processor voltage requirements are mismatched Processor does not have an associated PPM installed A PPM has failed A DIMM has experienced a multi bit error DIMM pairs have mismatched DIMMs DIMMs are missing DIMMs are an unsupported type A required fan has failed A thermal event has occurred Use internal component failure LEDs to identify Missing components Failed...

Page 127: ...er 4 Connectors LEDs and Switches for the correct switch setting Are there any audible indicators such as a series of beeps A series of beeps is the audible signal indicating the presence of a POST error message Refer to the HP Servers Troubleshooting Guide for a complete description of each beep sequence and the corresponding error messages No The system ROM and redundant ROM may be corrupted If ...

Page 128: ...able or power cable not connected to CD ROM drive Check the IDE signal cable between the system board and CD ROM to ensure proper connection Check the power supply connection between the CD ROM drive and the power backplane Insufficient memory is available A rare insufficient memory message may display the first time SmartStart is booted on certain unconfigured systems Cold boot the machine with t...

Page 129: ...un RBSU and check the OS Selection menu Problem was encountered with the hardware you have added to the system Refer to the documentation provided with the hardware Refer to the HP ProLiant ML570 Generation 2 Server Setup and Installation Guide to identify correct SCSI bus cabling configuration for the unit Server cannot load operating system Problem was encountered with hardware added to a new co...

Page 130: ...s Troubleshooting Guide for complete instructions on disaster recovery To perform ROMPaq disaster recovery 1 Power down the server 2 Set system maintenance switches 1 4 5 and 6 to the on position For the location of these switches refer to Chapter 4 Connectors LEDs and Switches 3 Power up the server After the system powers on it repeatedly emits two long beeps 4 Power down the server again If nece...

Page 131: ...includes general hardware and software troubleshooting information for all HP ProLiant servers a complete list of error messages along with explanations of probable causes and a list of remedial measures This guide resides on the Documentation CD that ships with the server To be sure that you have the most up to date copy of the HP Servers Troubleshooting Guide document visit www hp com Other onli...

Page 132: ... 100 to 127 VAC 200 to 240 VAC Rated input frequency 47 to 63 Hz Rated input current 11 2 A for 100 to 127 VAC 5 2 A for 200 to 240 VAC Rated input power 1099 W for 100 to 127 VAC 1066 W for 200 to 240 VAC BTUs per hour 3478 BTU hr 100 to 127 VAC 3637 BTU hr 200 to 240 VAC Power supply output each power supply Rated steady state power 600 W Maximum peak power 600 W Temperature range Operating 10 t...

Page 133: ...ecycling 2 41 access panel 2 4 removing 2 41 drive cage 2 31 replacing 2 42 media bays 2 59 bezels power supply bays 2 67 front door part number 1 3 aligning front door removing 2 8 memory boards 2 22 front door replacing 2 8 processor heatsink assembly 2 46 rack mount part number 1 3 Array Diagnostics Utility ADU rack mount removing 2 9 access 3 2 rack mount replacing 2 9 description 3 2 BIOS cau...

Page 134: ... 2 60 data cables part number 1 9 front panel LED assembly power 2 64 data loss caution 2 34 5 8 hard drive fans 2 70 detection order expansion slots 2 36 LVD part number 1 9 Diagnostics utility ML570 kit 1 9 access 3 2 power kit 1 9 description 3 2 processor fan bracket power 2 55 DIMMs routing 2 70 bank location 2 12 SCSI 1 9 installing 2 21 SCSI backplane power 2 71 online spare bank configurat...

Page 135: ...er 1 3 replacing 2 28 removing 2 8 DVD drive replacing 2 8 connector 4 2 front panel LED assembly part number 1 10 removing 2 64 replacing 2 65 E front panel thumbscrews 2 5 2 38 front panel LEDs See also LEDs ejector levers front processor air baffle memory board 2 12 2 19 part number 1 7 processor See processor locking lever removing 2 29 processor lifting 2 45 replacing 2 30 electrostatic sensi...

Page 136: ...ing 2 33 front panel 4 6 replacing 2 35 front unit identification 4 6 I O expansion slots illustrated 2 32 internal health 4 6 I O fan bracket memory board 2 12 4 8 part number 1 5 NIC link activity 4 6 I O fan connectors 4 2 overview 4 5 I O fans PCI X 4 12 4 13 4 14 part number 1 5 Power On Standby 4 6 removing 2 27 power supplies hot plug 4 15 replacing 2 27 rear unit identification UID 4 18 ID...

Page 137: ... problem diagnosis 5 9 caution 2 26 2 67 problem diagnosis 5 7 part number 1 3 when to clear 5 7 removing 2 67 replacing 2 67 O power supply connectors 4 4 powering up normal sequence 5 2 online spare memory installation requirements 2 17 PPMs See processor power modules PPMs online status LED 4 19 processor fan bracket operating specifications 6 1 removing 2 55 operating systems installation prob...

Page 138: ...ase latches pressing 2 5 Remote Insight Lights Out Edition II slot recommendation 2 33 Server Setup and Management pack 3 3 single board mirrored memory installation requirements 2 18 remote management connectors 4 2 removable media blank SmartStart part number 1 3 diagnosing installation failure 5 8 5 9 removing 2 68 installation problems 5 8 replacing 2 69 memory problems 5 8 removable media dev...

Page 139: ...2 5 9 removing 2 27 steps to take 5 2 5 9 replacing 2 27 system power LED 5 4 5 5 system fan basket video problems 5 7 part number 1 5 removing 2 54 U replacing 2 54 unit identification UID LED and button 4 4 4 18 system maintenance switch SW4 4 22 4 23 unit identification switch LEDs 4 6 system tray USB devices connectors 4 4 caution 2 52 utilities locking latch 4 4 Automatic Server Recovery 2 AS...

Reviews: