


8Ć59
Troubleshooting
C4699Ć90000
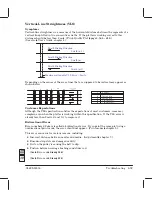
VerticalĆline straightness is a measure of the horizontal distance between the segments of a
vertical line plotted in two consecutive swaths. If the plotter is working correctly, this
distance should be less than 2 mils. (PrintĆQuality Plot
'
page 8Ć56
3. - VLS
.)
(See also
'
User's Guide, chapter 4.)
Swath Printing Direction
Maximum allowable VLS Error = 2 mils.
Swath (n–1)
Swath (n)
Swath (n+1)
Swath Printing Direction
Swath Printing Direction
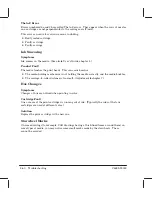
Depending on the causes of the error, lines that are supposed to be vertical may appear as
shown below:
Combined error
Swath
W
idth
Swath
W
idth
Swath
W
idth
Swath
W
idth
Carriage Swath
Direction
1
2
3a
3b
4a
4b
1
No error
2
Bidirectional error
3a
Theta–Z error
3b
Theta–Z error
4a
Combined error
4b
Although the VLS specification satisfies the expectations of most customers, some may
complain even when the plotter is working within this specification. If the VLS error is
already less than 2 mils, do not try to improve it.
Error numbered 2 above is called a bidirectional error. If you print the same plot using a
unidirectional print mode, the error should not appear. (Print modes
'
chapter 5.)
This error can occur for various reasons, including:
D
Incorrect distance between nozzles and media. (Adjustment
'
chapter 7.)
D
EncoderĆstrip slots are damaged or dirty.
D
Dirt on the pulley is causing the belt to slip.
D
Friction between carriage bushings and slider rod:
(See
'
Error code
Steady 346
.)
(See
'
Error code
Steady 234
.)
Summary of Contents for Designjet 230
Page 1: ... ...
Page 3: ... ...
Page 13: ... ...
Page 18: ... ...
Page 19: ... ...
Page 22: ... ...
Page 23: ... ...
Page 25: ... ...
Page 28: ... ...
Page 29: ...3Ć7 Installation and Configuration C4699Ć90000 E A0Ćsize plotters only 32Kg 71 lb ...
Page 31: ... 2 1 ...
Page 32: ... ...
Page 33: ... ...
Page 39: ... ...
Page 43: ... ...
Page 59: ... ...
Page 63: ... ...
Page 64: ... Ensure that the cartridge caps are clean the wipers straight and the openings clear ...
Page 66: ... 2 1 ...
Page 69: ... ...
Page 73: ... Clip ...
Page 76: ... 5 5 mm Torx 15 ...
Page 78: ... Torx 15 Leave loose 5 5 mm Tighten slightly Torx 15 Tighten slightly ...
Page 81: ... Torx 20 ...
Page 93: ... Trailing cable under tabs ...
Page 96: ... ...
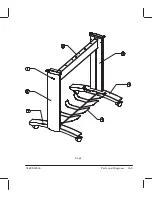
Page 103: ... the left and right sideĆplates or the lift mechanism will not work ...
Page 109: ... ...
Page 121: ... GO NO GO ...
Page 135: ... ...
Page 137: ... Flashing Can be On or Off Off On ...
Page 168: ... ...
Page 196: ... ...
Page 197: ... ...
Page 202: ... ...
Page 203: ... ...
Page 207: ... ...
Page 209: ...10Ć7 Parts and Diagrams C4699Ć90000 Top and Back Covers Electronics Trailing Cable ...
Page 211: ... ...
Page 213: ... ...
Page 215: ...10Ć13 Parts and Diagrams C4699Ć90000 CarriageĆAxis Right End ...
Page 217: ... ...
Page 219: ... ...
Page 221: ... ...
Page 223: ... ...
Page 225: ... ...
Page 227: ... ...
Page 233: ... ...
Page 242: ......
Page 243: ... ...
Page 249: ... ...


