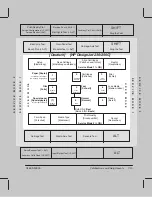
SHIFT
Accuracy
Calib. Print
7Ć9
Calibrations and Adjustments
C4699Ć90000
"
Under normal environmental conditions and on HP inkjet polyester D/A1Ćsize media, plot
a drawing that contains two X" marks nominally positioned 500 mm (19.69 in.) apart.
Measure the distance between the centers of the X" marks on the plot.
Accuracy calibration is needed if this distance is not 500 mm (19.69 in)
1 mm (0.04 in).
If the measured accuracy, media thickness, or environmental conditions vary greatly from
the factory standards, recalibrate the plotter by continuing with the following procedure.
"
Read
Before Performing the Accuracy Calibration
above.
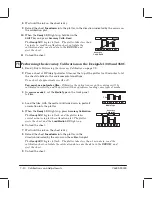
Place a sheet of HP inkjet polyester film over the top of the plotter for 10 minutes to let
the sheet stabilize to the environmental conditions.
Use a sheetof approximate size A1 or D.
You must use polyester film.
Otherwise the optical sensor on the carriage will be
calibrated incorrectly, and the plotter will have problems loading some types of media.
In
!
, set the
Media Type
on the front panel
to
Film
.
Load the film, with the matte (dull) side down, in portrait
orientation into the plotter.
When the
Ready
LED lights up, holddown the
SHIFT
key andpress
Accuracy Calib. Print.
The
Ready
LED begins to flash and the plotter plots a
calibration plot. The plotter ejects the sheet, and the
Load Media
LED lights up.
Unloadthe sheet.
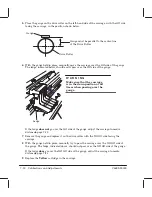
Cut the blank endoff the film by cutting along the long dashedline on the plot; the cut
must be very straight.
Cut along this line
Film
Media Type
Summary of Contents for Designjet 230
Page 1: ... ...
Page 3: ... ...
Page 13: ... ...
Page 18: ... ...
Page 19: ... ...
Page 22: ... ...
Page 23: ... ...
Page 25: ... ...
Page 28: ... ...
Page 29: ...3Ć7 Installation and Configuration C4699Ć90000 E A0Ćsize plotters only 32Kg 71 lb ...
Page 31: ... 2 1 ...
Page 32: ... ...
Page 33: ... ...
Page 39: ... ...
Page 43: ... ...
Page 59: ... ...
Page 63: ... ...
Page 64: ... Ensure that the cartridge caps are clean the wipers straight and the openings clear ...
Page 66: ... 2 1 ...
Page 69: ... ...
Page 73: ... Clip ...
Page 76: ... 5 5 mm Torx 15 ...
Page 78: ... Torx 15 Leave loose 5 5 mm Tighten slightly Torx 15 Tighten slightly ...
Page 81: ... Torx 20 ...
Page 93: ... Trailing cable under tabs ...
Page 96: ... ...
Page 103: ... the left and right sideĆplates or the lift mechanism will not work ...
Page 109: ... ...
Page 121: ... GO NO GO ...
Page 135: ... ...
Page 137: ... Flashing Can be On or Off Off On ...
Page 168: ... ...
Page 196: ... ...
Page 197: ... ...
Page 202: ... ...
Page 203: ... ...
Page 207: ... ...
Page 209: ...10Ć7 Parts and Diagrams C4699Ć90000 Top and Back Covers Electronics Trailing Cable ...
Page 211: ... ...
Page 213: ... ...
Page 215: ...10Ć13 Parts and Diagrams C4699Ć90000 CarriageĆAxis Right End ...
Page 217: ... ...
Page 219: ... ...
Page 221: ... ...
Page 223: ... ...
Page 225: ... ...
Page 227: ... ...
Page 233: ... ...
Page 242: ......
Page 243: ... ...
Page 249: ... ...


