1
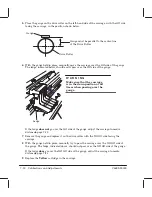
Carriage
Axis
2
3
8
4
5
6
(7)
9
Carriage
Sensor
Flex
Circuit
Media
Axis
Front-
Panel Key
Cover
Sensor
Media
Sensor
Bail
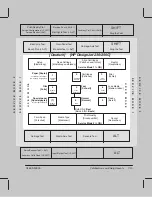
S E R V I C E M O D E 2
S E R V I C E M O D E 2
S E R V I C E M O D E 1
S E R V I C E M O D E 1
Bail Cycle Test
Bench Run (+ ALT)
Front-Panel Test
Modular Test (+ ALT)
Carriage-Axis Test
SHIFT
Stop the Test
Sensors Test
ALT
Electrical Test (+ SHIFT)
Bail Cycle Test (+ ALT)
SHIFT
Stop the Test
Servo/Encoder Test (+ ALT)
Accuracy Calib Read (+ SHIFT)
Input/Output Test (+ SHIFT)
ALT
U S E R M O D E
U S E R M O D E
Align Cartridges
[Alinear Cartuchos]
Service Mode 1 (+ ON)
Cartridges
Special paper
Paper
Film
or vellum or translucent
Error
Load Media
Ready
Fast
[Rápido]
Normal
[Normal]
Setup
[Configurar]
Read Settings
[Leer Configuración]
Replot
[Reimprimir]
Form Feed
[Avanzar Hoja]
Media Type
[Tipo Hoja]
Print Quality
[Calidad de Impresión]
Service Mode 2 (+ ON)
Cancel
[Cancelar]
Both ON = Best
[Papel]
[o vellum o translúcido]
[Película]
for color [para color]
[Papel especial]
[Cartuchos]
[Cargar Hoja]
[Listo]
[Ambos encendidos = Óptima]
[Error]
[Español]
Print-Quality Plot
Service Configuration (+ SHIFT)
Service Monitor (+ALT)
Accuracy Cal. Print (+Shift)
Carriage Test
Media-Axis Test
[HP DesignJet 230/250C]
Summary of Contents for Designjet 230
Page 1: ... ...
Page 3: ... ...
Page 13: ... ...
Page 18: ... ...
Page 19: ... ...
Page 22: ... ...
Page 23: ... ...
Page 25: ... ...
Page 28: ... ...
Page 29: ...3Ć7 Installation and Configuration C4699Ć90000 E A0Ćsize plotters only 32Kg 71 lb ...
Page 31: ... 2 1 ...
Page 32: ... ...
Page 33: ... ...
Page 39: ... ...
Page 43: ... ...
Page 59: ... ...
Page 63: ... ...
Page 64: ... Ensure that the cartridge caps are clean the wipers straight and the openings clear ...
Page 66: ... 2 1 ...
Page 69: ... ...
Page 73: ... Clip ...
Page 76: ... 5 5 mm Torx 15 ...
Page 78: ... Torx 15 Leave loose 5 5 mm Tighten slightly Torx 15 Tighten slightly ...
Page 81: ... Torx 20 ...
Page 93: ... Trailing cable under tabs ...
Page 96: ... ...
Page 103: ... the left and right sideĆplates or the lift mechanism will not work ...
Page 109: ... ...
Page 121: ... GO NO GO ...
Page 135: ... ...
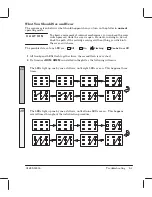
Page 137: ... Flashing Can be On or Off Off On ...
Page 168: ... ...
Page 196: ... ...
Page 197: ... ...
Page 202: ... ...
Page 203: ... ...
Page 207: ... ...
Page 209: ...10Ć7 Parts and Diagrams C4699Ć90000 Top and Back Covers Electronics Trailing Cable ...
Page 211: ... ...
Page 213: ... ...
Page 215: ...10Ć13 Parts and Diagrams C4699Ć90000 CarriageĆAxis Right End ...
Page 217: ... ...
Page 219: ... ...
Page 221: ... ...
Page 223: ... ...
Page 225: ... ...
Page 227: ... ...
Page 233: ... ...
Page 242: ......
Page 243: ... ...
Page 249: ... ...


