


7Ć11
Calibrations and Adjustments
C4699Ć90000
Adjusting the CarriageĆtoĆMedia Distance
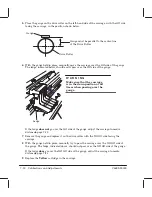
It is very important that the distance between the carriage and the media is within certain
limits. If the distance between the cartridge nozzles and the media is
, ink smears
on the media. If the distance is
, unwanted spray appears around the ink dots, and
vertical lines are not straight. (A big distance may also prevent the carriage from actuating
the bail lever.)
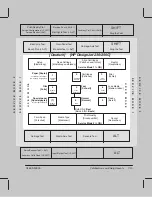
Whenever you remove the Drive Roller or the Cartridge Carriage, take care to reinstall them
correctly. Incorrect installation may result in the carriage being too close or too far from the
media. For the correct installation procedure
Chapter 6.
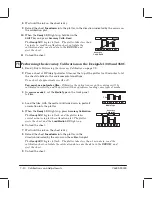
A
Gauge
(included with the carriage assembly) has been produced to check the
carriageĆtoĆmedia distance to make sure it is within the tolerances allowed. Use this gauge to
check the carriageĆtoĆmedia distance as follows:
Open the top cover.
Move the carriage out of the service station.
Remove the
cartridge from the carriage.
Check the gauge to determine the
GO
and
NO GO
sides:
NO
GO
GO
Summary of Contents for Designjet 230
Page 1: ... ...
Page 3: ... ...
Page 13: ... ...
Page 18: ... ...
Page 19: ... ...
Page 22: ... ...
Page 23: ... ...
Page 25: ... ...
Page 28: ... ...
Page 29: ...3Ć7 Installation and Configuration C4699Ć90000 E A0Ćsize plotters only 32Kg 71 lb ...
Page 31: ... 2 1 ...
Page 32: ... ...
Page 33: ... ...
Page 39: ... ...
Page 43: ... ...
Page 59: ... ...
Page 63: ... ...
Page 64: ... Ensure that the cartridge caps are clean the wipers straight and the openings clear ...
Page 66: ... 2 1 ...
Page 69: ... ...
Page 73: ... Clip ...
Page 76: ... 5 5 mm Torx 15 ...
Page 78: ... Torx 15 Leave loose 5 5 mm Tighten slightly Torx 15 Tighten slightly ...
Page 81: ... Torx 20 ...
Page 93: ... Trailing cable under tabs ...
Page 96: ... ...
Page 103: ... the left and right sideĆplates or the lift mechanism will not work ...
Page 109: ... ...
Page 121: ... GO NO GO ...
Page 135: ... ...
Page 137: ... Flashing Can be On or Off Off On ...
Page 168: ... ...
Page 196: ... ...
Page 197: ... ...
Page 202: ... ...
Page 203: ... ...
Page 207: ... ...
Page 209: ...10Ć7 Parts and Diagrams C4699Ć90000 Top and Back Covers Electronics Trailing Cable ...
Page 211: ... ...
Page 213: ... ...
Page 215: ...10Ć13 Parts and Diagrams C4699Ć90000 CarriageĆAxis Right End ...
Page 217: ... ...
Page 219: ... ...
Page 221: ... ...
Page 223: ... ...
Page 225: ... ...
Page 227: ... ...
Page 233: ... ...
Page 242: ......
Page 243: ... ...
Page 249: ... ...


