background image

98

Getting Started

HP 81110/04A Quick Start

Getting Started

Examples

Press 

|MODE/TRG|

 softkey to enter Operating/Trigger mode menu. 

Select 

Pattern of

 with 

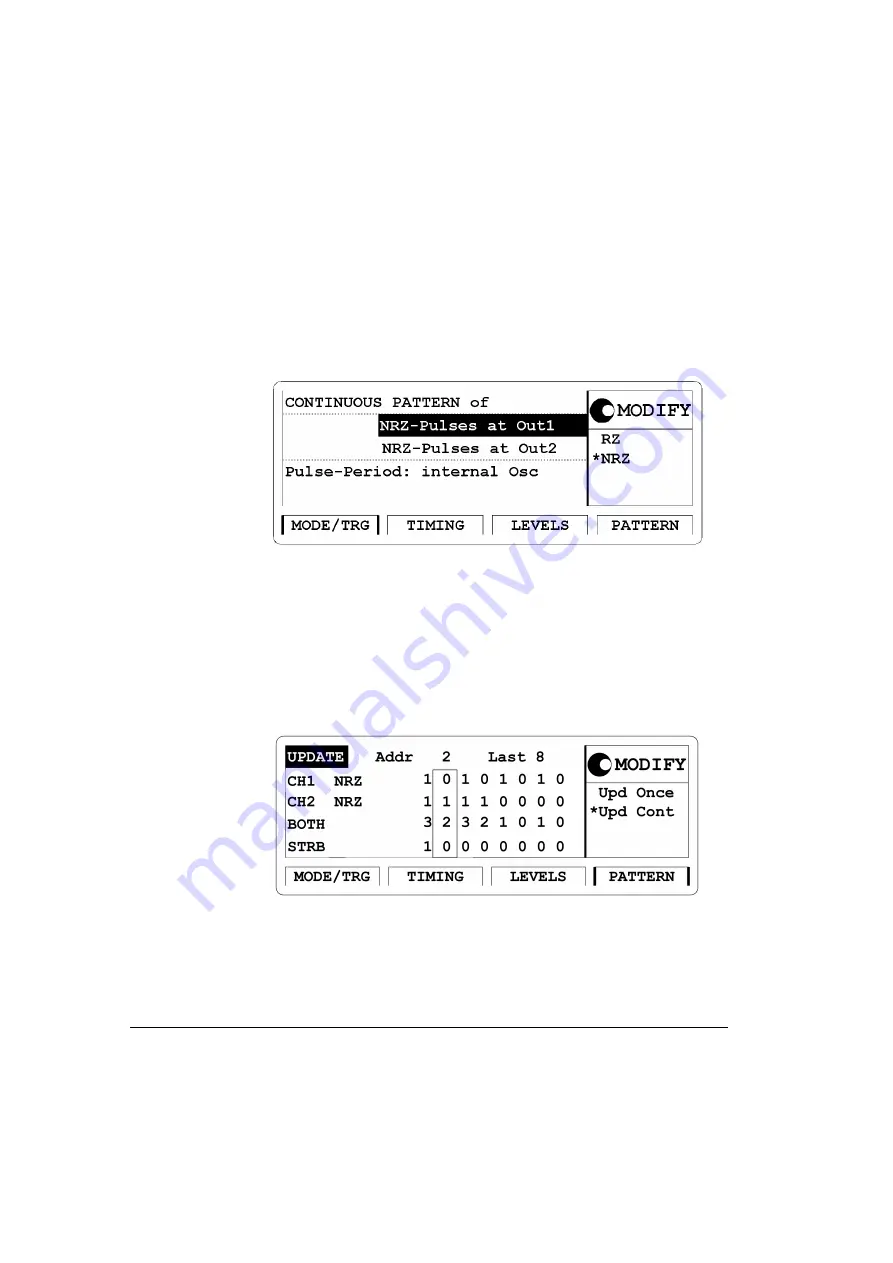
NRZ-PULSES at OUT 1 & OUT 2

.

Figure 48

 Current MODE/TRG Screen

Press the 

|PATTERN|

 softkey to enter the Pattern menu. Enter 

8

 for 

Last

. Move to CH1 and select Clock÷N, press ENTER key twice to 

get a pattern for clock division by 2. Move to CH2 and select 
Clock÷N, press ENTER key. Press 8 and ENTER key, to get a pattern 
for clock division by 8. 

Figure 49

 Current PATTERN Screen

Summary of Contents for 81104A

Page 1: ...HP 81110A 165 330 MHz HP 81104A 80 MHz Pulse Pattern Generators Quick Start Guide ...

Page 2: ...Front Panel Display and Softkeys ...

Page 3: ...Quick Start Guide HP 81110A 165 330 MHz HP 81104A 80 MHz Pulse Pattern Generators HP Part No 81110 91010 Printed in Germany June 1998 Edition 1 0 E0698 ...

Page 4: ...t Packard s round trip travel expenses For products returned to Hewlett Packard for warranty service the Buyer shall prepay shipping charges to Hewlett Packard and Hewlett Packard shall pay shipping charges to return the product to the Buyer However the Buyer shall pay all shipping charges duties and taxes for products returned to Hewlett Packard from another country Hewlett Packard warrants that ...

Page 5: ...ntial damages whether based on contract tort or any other legal theory Assistance Product maintenance agreements and other customer assistance agree ments are available for Hewlett Packard products For any assistance contact your nearest Hewlett Packard Sales Office Certification Hewlett Packard Company certifies that this product met its published specifications at the time of shipment Hewlett Pa...

Page 6: ...is valid for HP 81104A and HP 81110A Where required the differences are explicitly mentioned Possible configura tions are Output Module for HP 81104A Mainframe Output Modules for HP 81110A Mainframe As standard the instruments are equipped with one output channel so some of the described features will not be available Module Description Max Quantity HP 81105A 10V max 80 MHz Output Channel 2 Module...

Page 7: ...ew of the instrument features the user interface and the fun damental pulse parameters Getting Started A set of examples designed to demonstrate how to quickly set up a signal User Interface Insight Please refer to the Reference Guide p n 81110 91011 Programming Reference Please refer to the Reference Guide p n 81110 91011 Specifications Please refer to the Reference Guide p n 81110 91011 ...

Page 8: ...10 About this book HP 81110 04A Quick Start About this book ...

Page 9: ...f Contents 11 Chapter 1 Installation Safety Requirements Initial Inspection 16 Standard Deliverables 17 Options and Accessories 18 Options 18 Handle Accessory 19 Rack Mounting Accessories 19 Power Requirements 20 Replacing the Fuse 21 Power Cable 22 Ventilation Requirements 23 Thermal Protection 23 Overheating Detection 23 Fan Failure 23 Battery 24 Battery Replacement 25 Operating Environment 26 ...

Page 10: ...Information 30 Chapter 2 Introduction Overview of this Chapter 34 General Information 35 Benchtop Testing 35 Automated Testing 35 Upgrade Capability 36 User Interface Concept 37 The Display 37 The Controls 38 Numerical Data Entry 38 Parameter Selection and Modification 38 Quick Access of Menus and Parameters 40 Additional Functions 40 Select Step Size 40 Overprogramming 41 Display Modes 41 Screen ...

Page 11: ...odes 47 Trigger and Strobe Output 48 Setting Timing Parameter Formats and Values 49 Setting Level Parameter Formats and Values 51 Internal Error Check 52 Editing Pattern 54 Setting Limits 57 Thresholds and Trigger Levels 59 Reading Storing on Memory Card 60 Changing Configuration 62 Output Output 1 and Output 2 Parameter Grouping 64 An Overview of the Front and Rear Panel 66 Inputs and Outputs 67 ...

Page 12: ... 2 Setting up a Pulse Signal 79 Device Command List for the Pulse Signal 84 3 Setting Up a Serial Data Stream Signal 86 Device Command List for the Data Stream Signal 89 4 Setting Up an Edge displacement Signal 91 Device Command List for the Edge displacement Signal 95 5 Setting Up a Dual Clock Signals 97 Device Command List for the Dual Clock Signal 101 6 Setting Up a Burst Signal 103 Device Comm...

Page 13: ...HP 81110 04A User s Guide Installation Safety Requirements 15 Chapter 1 1 Installation Safety Requirements ...

Page 14: ... electrically WARNING To avoid hazardous electric shock do not perform electrical tests when there are signs of shipping damage to any part of the instrument s outer covers or panels If the contents are incomplete or there is mechanical damage or if the instrument does not work as expected within its specifications notify the nearest Hewlett Packard office please request the latest performance tes...

Page 15: ...tion Standard Deliverables 1 The instrument either an HP 81110A or an HP 81104A Mainframe with one or two channels installed 2 This Quick Start Guide and a Reference Guide 3 A power cord Figure 1 The Standard Deliverables LWKHU 3 RU 3 7KLV 4XLFN 6WDUW XLGH 3RZHU RUG 7KLV LJXUH VKRZV DQ 3 DQG WKH 5HIHUHQFH XLGH ...

Page 16: ... Connectors Option UN2 All inputs and outputs are at the rear panel Second Channel HP 81105A 10V 80 MHz for mainframe HP 81104A HP 81111A 10V 165 MHz or HP 81112A 3 8V 330 MHz for mainframe HP 81110A 1 MB SRAM Memory Card Option UFH HP part numer 0950 3880 Figure 2 Standard Instrument s Rear Panel Figure 3 Rear Panel Connectors when Option UN2 is installed ...

Page 17: ...llation Safety Requirements Initial Inspection Handle Accessory Front Handle Kit HP part number 5063 9226 Rack Mounting Accessories Rack Mount Kit HP part number 5063 9212 Rack Mount and Front Handle Kit HP part number 5063 9219 Rack Slide Kit HP part number 1494 0059 ...

Page 18: ... that the power cord is easily identifiable and can quickly be reached by the operator The following symbol is close to the Standby switch on the front panel of the instrument Figure 4 The Standby Switch Symbol The instrument can operate from any single phase AC power source supplying 100 240 V in the frequency range from 50 to 60 Hz or 100 120 V at 400 Hz The maximum power consumption is 300 VA w...

Page 19: ...s Power Requirements Replacing the Fuse 1 Remove the power cord 2 Unscrew the fuse cap at the rear of the instrument beside the power inlet socket Figure 5 Fuse Holder at Rear Panel 3 Replace the fuse with the equivalent part see Table 1 on page 20 4 Refit the fuse cap Fuse Holder and Fuse Cap ...

Page 20: ...e wire power cable see Figure 6 on page 22 for the part numbers of the power cables available When connected to an appropriate AC power receptacle this cable grounds the instrument cab inet WARNING To avoid the possibility of injury or death the precautionary Warnings given on the inside front cover of the manual must be followed before the instrument is switched on Figure 6 Power Cables Plug Iden...

Page 21: ...uits to automati cally switch off the instrument NOTE Do not cover the ventilation holes Thermal Protection Overheating Detection The instrument monitors its internal temperature If the temperature exceeds approximately 80 C the power supply is switched off The instrument will switch on again if the temperature falls below approxi mately 77 C Fan Failure If a fan is broken or prevented from operat...

Page 22: ...e for information on battery recycling In the USA and Canada call 1 800 333 1917 The battery is replaceable Replacement should only be carried out by qualified service personnel NOTE There is a danger of explosion if the battery is incorrectly replaced The battery must be replaced with the same or equivalent battery type A Lithium CR2477 N type battery The HP replacement part number is 1420 0557 T...

Page 23: ...assis there is a cover secured with one screw Remove this cover 6 Now the battery can be removed from the battery holder It is recommended to bush the battery on the top and to pull the battery on the bottom with one finger for easier removal 7 Fit the new battery in the holder take care to not short current the battery on the chassis 8 Fit the cover again and secure it with the screw to the chass...

Page 24: ... excessive moisture Protect the instrument from humidity and temperature changes which could cause condensation within the instrument Do not operate the instrument in the presence of flammable gases fumes or powders Operation of any electrical instrument in such an environment constitutes a definite safety hazard Storage Temperature 40 C to 70 C Operating Temperature 0 C to 55 C Humidity 95 R H at...

Page 25: ...n Safety Requirements Cleaning Recommendation Cleaning Recommendation WARNING To prevent electrical shock disconnect the instrument from mains before cleaning Use a dry cloth or one slightly dampened with water to clean external case parts Do not attempt to clean internally ...

Page 26: ...coustic Noise Emission For ambient temperatures up to 30 C under normal operation and at the typical operator position LpA 52 dBA Measured in accordance with ISO 7779 EN 27779 Geräuschemissionswerte Bei einer Umgebungstemperatur bis 30 C LpA 52 dBA am Arbeitsplatz normaler Betrieb Angabe ist das Ergebnis einer Typprüfung nach ISO 7779 EN 27779 ...

Page 27: ...V m 80 AM ENV 50204 1995 Radiated Immunity 3V m 50 Dty EN 61000 4 4 1995 Fast Transients Bursts 0 5kV 1kV EN 61000 4 5 1995 Surges 1 kVdiff 2 KV com mode EN 61000 4 6 1995 Conducted Immunity EN 61000 4 8 1993 Power freq mang field 3A m 50 Hz IEC 1000 4 11 1994 Voltage Dips and Interruptions Supplementary Information The product herewith complies with the requirements of the Low Voltage Directive 7...

Page 28: ...aprotective earth contact Do not negate the protective action by using an extension power cord without a protective grounding con ductor Grounding one conductor of a two conductor outlet is not suffi cient protection Service instructions are for trained service personnel To avoid danger ous electric shock do not perform any service unless qualified to do so Do not attempt internal service or adjus...

Page 29: ...fer to the instruction manual in order to protect against damage to the instrument Protected conductor symbol WARNING The Warning symbol calls attention to a procedure practice or the like which if not correctly performed or adhered to could result in personal injury or loss of life Do not proceed beyond a Warning symbol until the indicated conditions are fully understood and met CAUTION The Cauti...

Page 30: ...32 Installation Safety Requirements HP 81110 04A User s Guide Installation Safety Requirements Safety Information ...

Page 31: ...HP 81110 04A Quick Start Introduction 33 Chapter 2 2Introduction ...

Page 32: ...s and Parameters on page 40 Special function keys are described in the section Special Function Keys on page 43 More in depth information regarding the Pulse generation capabilities details on Output Channel options and the optional memory card can be found in Screens Overview on page 45 A look at all connectors on the front panel and the rear panel is available in the section An Overview of the F...

Page 33: ... knob allow fast and simple operation The HP 81110A is equipped with the familiar User Interface from the HP 8110A providing no learning curve for those already familiar with the predeces sor product The User Interface is designed to reduce minimize the time invested in getting familiar with the instrument After familiarization the instrument supports quick set ups of signals This leaves the user ...

Page 34: ...pgrade Capability It is possible to upgrade the instruments with a second channel if only one channel was originally ordered There are two output channels avail able for the HP 81110A The second channel that is installed must be the same as channel one NOTE Do not mix the output channels for the HP 81110A Table 1 Mainframe Output Module Combinations Mainframe Module Description HP 81104A HP 81105A...

Page 35: ...ght setting the modes and parameters as required for your signal If this signal is a simple clock or pulse signal it is not necessary to invoke the PATTERN screen Images of the front panel are available for the HP 81110A and HP 81104A on the fold out covers at the front and rear of this guide respectively The Display Figure 7 Display and Softkey Front Panel Section The display contains three diffe...

Page 36: ...isplay is controlled by the Cursor Keys Figure 8 Front Panel Controls Numerical Data Entry Numerical data is entered by the Data Entry keys and validated either by a Unit key or the key Parameter Selection and Modification The Modify knob can be used in the Modify area of the display Modes can be selected and changed in the Modify Area or parameter values can ...

Page 37: ...rface Concept be varied to display an immediate change at the output When is displayed select a mode a parameter for mat or modify the parameter value and validate the value with a unit key When is displayed make the selection and press the key to start a function ...

Page 38: ... the Special Function keys For example it is possible to quickly access the pulse width parameter of output 2 by pressing the instrument then asks for the channel so press if two channels are installed The entry field is positioned on the output 2 width parameter editing field Select Step Size The or moves the cur sor to a different digit in the MODIFY area so it is possible to change step size fo...

Page 39: ... have the outputs switched on when overprogramming to have the internal error check sytem activated which warnsyou about impossible settings Display Modes In the following figure the results of pressing a softkey are displayed In this case it is possible to toggle between textual and graphical screens The toggle mode is available for the TIMING LEVELS and PAT TERN softkeys It is possible to altern...

Page 40: ...n Menus The Softkeys allow access to the screen menus and can toggle between screens where applicable Figure 10 Screen Menus of a dual channel instrument Additional screen menus can be accessed by pressing the softkey leading to the following screen selection area Figure 11 Additional Screen Menus ...

Page 41: ...ey can be used when in remote control the front panel controls are locked Press the key to unlock the front panel con trols Help Function Key The key provides access to the instruments on line help or in Warning or Error state access to Warning Error Report Screen Store Recall Function Key The key can be used to store recall from 1 to 9 individual settings in the instrument memory ...

Page 42: ...Setting In the internal memory location 0 there is a default setting stored press the keys to reset the instrument to the default setting Manual Trigger Function Key The key can be used in triggered or gated mode to manually trigger the instrument if there is no other source available ...

Page 43: ...ed with one or two output channels It is possible to independently program the timing and level parameters of both channels If two channels are installed it is possible to select either the parameter grouping for TIMING and LEVELS or all timing and level parameters for OUTPUT 1 and OUTPUT 2 To change grouping of the parameter refer to Changing Configuration on page 62 Most parameters can be entere...

Page 44: ... available in pulse mode and the strobe output available in burst and pattern mode it is possible to select between TTL or ECL output levels For how to set thresholds or trigger levels refer to Thresholds and Trigger Levels on page 59 The instrument allows to read and store instrument settings from and to a memory card The reading and storing is done in the MEMCARD menu refer to Reading Storing on...

Page 45: ...pulse stream Pulse Strm PULSES mode Burst signals several pulses and a pause are easily set up in BURST mode Data streams also PRBS s require the Pattern mode You can specify the pulse period source If you have to trigger after an external event then use the startable oscillator internal Osc which starts on the external signal with a fixed latency If you do not have to trigger but need a high accu...

Page 46: ...er and Strobe Output The Trigger Output is always available and marks each pulse period with a 50 duty cycle signal In Ext Width the trigger output width is 5 9 ns for the HP 81104A and 1 5 ns for the HP 81110A Additionally in burst mode the Strobe output is available The Strobe output rises at the start of the first pulse period and falls at the start of the last pulse period Additionally in patt...

Page 47: ...MING softkey In this screen you can set the timing parameters individually for both channels This is except for period frequency which defines the system clock rate for both channels All parameters can be entered in different parameter formats please select from 1 The System Clock Mode Period Frequency 2 Delay Parameter Absolute of Per Phase 3 Width Parameter Width DutyCycle Trail Del 4 Leading Ed...

Page 48: ...LEVELS screen NOTE If only one channel is installed then all signal parameters are grouped in an OUTPUT screen If you prefer the signal parameter grouping for each Output then please refer to Changing Configuration on page 62 Refer also to Output Output 1 and Output 2 Parameter Grouping on page 64 7 Differential Output Status ON OFF Can also be varied in the LEVELS screen NOTE Differential Outputs...

Page 49: ... with the TIMING screen you can enable or disable the outputs All parameters can be entered in different parameter formats e g it is possi ble to enter the levels as current values by changing the unit to ampere Please select from 1 Channel OUTPUT Status ON OFF Can also be varied in the TIMING screen 2 Differential Output Status ON OFF Can also be varied in the TIMING screen NOTE Differential Outp...

Page 50: ...ut channels installed 9 Load Impedance Values 0 1 Ω 1 ΜΩ NOTE If only one channel is installed then all signal parameters are grouped in an OUTPUT screen If you prefer the signal parameter grouping for each Output then please refer to Changing Configuration on page 62 Internal Error Check When the output status is in OFF position the internal error check is switched off and it is possible to set e...

Page 51: ...n 53 Introduction Setting Level Parameter Formats and Values which does not damage your DUT b Switch the output status to ON to get immediately response if you try to pro gram a conflicting parameter combination in LEVELS or TIMING screen ...

Page 52: ...N menu screen by pressing the PATTERN softkey This screen has to be accessed for pattern entry when data streams in Pattern operating mode will be set up NOTE A signal with a number of pulses followed by a pause is what we would call a burst signal Such burst signals are recommended to be set up in the burst mode as this is done more quickly and easier as it would be in the pattern mode Set the pa...

Page 53: ...ow Move the entry field to the bit editing window and enter the pattern The bit editing window automatically moves one location to the right The bit editing window can be moved across the pattern length by varying the Addr Either change the Addr with the knob or by typing in a new address with the Data Entry keys The range is 1 length of pattern max 16384 3 Length of pattern Last shows the last ad...

Page 54: ...ock N PRBS 2n 1 NOTE Most of the block editing functions apply from or at the current Addr of the bit editing window to the Last bit in the pattern For further information on the block editing functions please refer to the HP 81110A HP 81104A Reference Guide p n 81110 91010 Chapter 1 Pattern Screen 5 Data Output Format RZ NRZ Can also be varied in the MODE TRG screen ...

Page 55: ...ur device from being damaged by excessive voltages it is recommended to limit the output of the instrument You can switch the limit feature on or off and set the required limits as either voltages or currents Please select from 1 Limits Status ON OFF 2 High Voltage Limit High V For the 10 V output channels HP 81105A and HP 81111A the range is 19 8V to 20 0V For the 3 8 V output channels HP 81112A ...

Page 56: ...ls HP 81112A the range is 2 00V to 3 70V 4 High Current Limit High A For the 10 V output channels HP 81105A and HP 81111A the range is 792 mA to 800 mA For the 3 8 V output channels HP 81112A the range is 76 0 mA to 152 mA 5 Low Current Limit Low A For the 10 V output channels HP 81105A and HP 81111A the range is 800 mA to 792 mA For the 3 8 V output channels HP 81112A the range is 80 0 mA to 148 ...

Page 57: ...is screen you can set the thresholds for external and clock reference signals and the input impedance For the output trigger and strobe signal specify the output levels either TTL or ECL The available selections are 1 EXT IN Set TTL Set ECL Voltage Voltage Range 10V to 10 V Input Resistance 10kΩ Inp or 50Ω Inp 2 CLK IN Set TTL Set ECL Voltage Voltage Range 10V to 10V Input Resistance 10kΩ Inp or 5...

Page 58: ...n are Store instrument settings to the memory card Recall instrument settings from the memory card Delete files from the memory card Format the memory card If a memory card is plugged in the memory card slot on the front panel you can select 1 Dir Path displayed if there is a plugged in memory card with a directory created on a DOS PC 2 Filename list of the filenames which are present on the plugg...

Page 59: ...Memory Card NOTE the HP 81110A or HP 81104A support only DOS formatted memory cards and you cannot create or delete directories using the HP 81110A or HP 81104A The HP 81110A and HP 81104A support memory cards up to 2 MB SRAM Type The filenames can be up to 8 characters long ...

Page 60: ...trol operation The factory set HP IB address is 10 It is possible to invoke a selftest With the HP 81110A the timing self calibration feature can be started in this window Perform Timing Calibration Apart from the factory calibration of the instruments the timing self calibration allows to calibrate the instrument in respect to the actual ambient temperature When the HP 81110A is switched off and ...

Page 61: ... is either the internal on board reference or a much more stable external reference Please select from 1 HP IB Address Range 1 to 30 2 Perform Option Selftest Timing Calibration HP 81110A only 3 Group Parameters by TIMING LEVELS OUTPUT 1 2 4 PLL Reference Source Internal CLK IN Freq 5 MHz or 10 MHz ...

Page 62: ...n HP 81110 04A Quick Start Introduction Output Output 1 and Output 2 Parameter Grouping Output Output 1 and Output 2 Parameter Grouping Figure 20 OUTPUT 1 Screen of a dual channel instrument Figure 21 OUTPUT 2 Screen ...

Page 63: ... Group Params by OUTPUT 1 2 in the CONFIG screen see Changing Configuration on page 62 the 2 Output Softkey options are available The timing and level parameters are grouped together for each output With the exception of period frequency all parameters can be individually set for each output All parameters can be entered in different formats For the available parameter and format selections please...

Page 64: ...n An Overview of the Front and Rear Panel An Overview of the Front and Rear Panel Figure 23 Front Panel View Figure 24 Rear Panel View with Option UN2 The numbers in the Figures correspond to the numbers in the following list 1 5 4 3 2 7 5 4 3 8 9 10 6 2 ...

Page 65: ...ation refer to Trigger and Strobe Output on page 48 4 STROBE OUT The Strobe output rises at the start of the first pulse period and falls at the start of the last pulse period marking start and end of the burst in Burst mode Bitwise programmable in Pattern mode NRZ data format Not used in Pulses mode For further information refer to Trigger and Strobe Output on page 48 5 EXT INPUT Connect an exter...

Page 66: ...68 Introduction HP 81110 04A Quick Start Introduction An Overview of the Front and Rear Panel 8 Fuse Holder 9 AC Line Socket 10 Serial Number Label ...

Page 67: ...HP 81110 04A Quick Start Getting Started 69 Chapter 3 3Getting Started ...

Page 68: ...e concept and the fundamentals of pulse parameters for User Interface Concept description see page 37 Manual Example Signals Generic Signals 1 How to set up a Clock Signal see page 72 2 How to set up a Pulse Signal see page 79 3 How to set up a Serial Data Stream Signal see page 86 Advanced Signals 4 How to set up an Edge displacement Signal see page 91 5 How to set up a Dual Clock Signal see page...

Page 69: ...q Select the mode or parameter name with the knob Keys to press in the DATA ENTRY area on the front panel MODIFY CURSOR Use the front panel controls DATA ENTRY VOLTage HIGH 3V Full command for pattern 3V high level The upper case letters represent the short form of the command which results in faster programming times RST Common IEE 488 command to reset instrument to default status DISPlay OFF Swi...

Page 70: ...ignal Here a continuous clock signal with 50 MHz frequency with PLL accu racy a duty cycle of 50 3 ns transition times a high level of 2 5 V and low level of 0 V will be set up Figure 25 Clock Signal Diagram 1 Before setting up the signal it is recommended to reset all parameters and modes by pressing ...

Page 71: ... Out1 and then Pulse Period internal PLL Figure 26 Current MODE TRG Screen 3 Press the TIMING softkey to enter the Timing menu Move the Entry Focus to the Output 1 status with the cursor keys Select ON in the Modify area to turn on the Output 1 NOTE The Output channel can be turned on and off in either the LEVELS or TIMING screens or by the following pressing for Output 1 and for Output 2 Repeated...

Page 72: ...Move Entry Focus to the right and enter 50 by typing Move Entry Focus down to enter for the lead ing edge Trailing edge should be the same as leading edge Trail E Lead E Figure 27 Current TIMING Screen NOTE With HP 81110A with HP 81112A 3 8V 330 MHz Output channels installed the transition times can be either 800 ps or 1 6 ns trailing edge is equal to leading edge The minimum transition times for ...

Page 73: ... and Amplitude and select in the MOD IFY area High Low then move Entry Focus to high level entry field and press for high level and move down the Entry Focus to the low level entry field and press Figure 28 Current LEVELS Screen for HP 81104A and HP 81110A with HP 81111A installed Figure 29 Current LEVELS Screen for HP 81110A with HP 81112A in stalled ...

Page 74: ...g Started HP 81110 04A Quick Start Getting Started Examples 5 Here is the signal as displayed on an HP 54810A Infinium oscilloscope Use the generator s TRIGGER OUT to trigger the scope Figure 30 Resulting Signal ...

Page 75: ...it with a similar signal use the same commands and replace 1 by 2 for the second channel where required Reset the instrument to start from a defined default status RST Switch off the automatic display update to increase programming speed DISPlay OFF Internal PLL has to be set as period source ARM SOURce INT2 Set the frequency to 50 MHz the duty cycle to 50 and the leading and trailing edge to 3 ns...

Page 76: ...es PULSe TRANsition2 3NS Set the high level to 2 5 Volts the low level to 0 0 Volts VOLTage1 HIGH 2 5V VOLTage1 LOW 0V Enable the output 1 and the complement output 1 HP 81110A with HP 81112A 3 8V 330 MHz output channel installed only OUTPut1 ON OUTPut1 COMPlement ON ...

Page 77: ...lse signal with 20 ns period a pulse width of 10 ns a leading edge of 3 ns a trailing edge of 5 ns an amplitude of 3 3 V and an offset of 1 65 V high level 3 3 V low level 0 0 V will be set up Figure 31 Pulse Signal Diagram 1 Before setting up the signal it is recommended to reset all parameters and modes by pressing ...

Page 78: ... enter the Timing menu Switch ON the Output Channel 1 Enter a period of 20 ns Enter a pulse width of 10 ns Enter 3 ns for leading edge Select Absolute for trailing edge and enter a value of 5 ns NOTE With HP 81110A with HP 81112A 3 8V 330 MHz Output channels installed the transition times can be either 800 ps or 1 6 ns trailing edge is equal to leading edge The minimum transition times for the HP ...

Page 79: ...les Figure 33 Current TIMING Screen NOTE The Output channel can be turned on and off in either the LEVELS or TIMING screens or by the following pressing for Output 1 and for Output 2 Repeated pressing of the keys toggles the output state from on to off and vise versa ...

Page 80: ...ples 4 Press the LEVELS softkey to enter the Levels menu Enter an offset of 1 65 V and an amplitude of 3 30 V Figure 34 Current LEVELS Screen for HP 81104A and HP 81110A with HP 81111A installed Figure 35 Current LEVELS Screen for HP 81110A with HP 81112A in stalled ...

Page 81: ...4A Quick Start Getting Started 83 Getting Started Examples 5 Here is the figure as displayed on the HP 54810A Infinium oscilloscope Use the generator s TRIGGER OUT to trigger the scope Figure 36 Resulting Display ...

Page 82: ... the same commands and replace 1 by 2 for the second channel where required Reset the instrument to start from a defined default status RST Switch off the automatic display update to increase programming speed DISPlay OFF Pulse stream operating mode is required but as we start from a default status it is not necessary to send a command for setting the instrument into pulse stream operating mode Se...

Page 83: ...lled the transitions can be selected either 800 ps or 1 6 ns Leading and trailing edge are equal Set the amplitude to 3 3 Volts the offset to 1 65 Volts VOLTage1 3 3V VOLTage1 OFFSet 1 65V Enable the output 1 and the complement output 1 HP 81110A with HP 81112A 3 8V 330 MHz output channel installed only OUTPut1 ON OUTPut1 COMPlement ON ...

Page 84: ...ta output for mat at 80 MBit s and ECL output level will be set up The pattern is 111001110011001001010010 1 Before setting up the signal it is recommended to reset all parameters by pressing 2 Press the MODE TRG softkey to enter the Operating Trigger Mode menu Select CONTINUOUS PATTERN of Highlight RZ Pulses at Out 1 and select NRZ Figure 37 Current MODE TRG Screen ...

Page 85: ...this channel The in the output 1 width entry field relate to the NRZ data output format selection Figure 38 Current TIMING Screen for HP 81110A 4 Press the LEVELS softkey to enter the Levels menu Change Offset and Amplitude mode to ECL levels by selecting Set ECL in the Modify Area Figure 39 Current LEVELS Screen NOTE HP 81110A with HP 81112A 3 8V 330 MHz Output channels installed have fixed 50 Ω ...

Page 86: ...001001010010 by pressing the or key respecively When entering the pattern the bit editing window moves automatically one location to the right By turning the knob counterclockwise you can move the bit editing win dow back The actual memory location on which the the bit editing window is pointing is shown by Addr Figure 40 Current PATTERN Screen NOTE To get a stable display of the pattern stream on...

Page 87: ...to program it with a similar signal use the same commands and replace 1 by 2 for the second channel where required Reset the instrument to start from a defined default status RST Switch off the automatic display update to increase programming speed DISPlay OFF Set the instrument to pattern mode and select NRZ data output format for output 1 DIGital PATTern ON DIGital SIGNal1 FORMat NRZ For example...

Page 88: ...y to 80 MHz and output 2 width to 6 25 ns to avoid a parameter conflict FREQuency 80MHZ PULSe WIDTh2 6 25NS Set the output voltage to fixed ECL levels VOLTage1 HIGH 0 85V VOLTage1 LOW 1 8V Enable the output 1 and the complement output 1 HP 81110A with HP 81112A 3 8V 330 MHz output channel installed only OUTPut1 ON OUTPut1 COMPlement ON ...

Page 89: ...e performed by HP 81104A and HP 81110A with HP 81111A 10V 165 MHz Outputs Here a continuous pattern signal with one distorted pulse will be set up The two channels are added with NRZ Non Return to Zero pulses at both outputs high level of 1 V and low level of 0 V and Channel 2 delay of 10 ns The bit frequency is 30 MHz Figure 41 Edge displacement Signal Diagram 1 Before setting up the signal it is...

Page 90: ...Pulses at Out 2 using the MODIFY knob Figure 42 Current MODE TRG Screen 3 Press the PATTERN softkey to enter the Pattern menu Set up the bit pattern as follows Enter 8 for Last Move to bit editing window for CH1 and enter pattern 10100010 for channel 1 Move down to CH2 and select first address by turning the know counterclockwise and enter pattern 00001000 for channel 2 Figure 43 Current PATTERN S...

Page 91: ... 5 Press the TIMING softkey to enter the Timing menu Enter a frequency of 30 MHz and a delay of 10 ns for Output 2 Vary output 2 delay to displace the pulse as required Output 2 has additional 2 5 ns delay in channel addition mode Also the typical tranisiton times are 5 ns So enter transistions of 5 ns for Output 1 to achieve same transition time shape in the added signal NOTE The in the width ent...

Page 92: ...4A Quick Start Getting Started Examples 6 Here is the HP 54810A Infinium Scope display of the distorted and displaced pulse generated by the instrument Use the generator s STROBE OUT to trigger the scope Figure 46 Resulting Signal ...

Page 93: ...of signal can be performed by HP 81104A and HP 81110A with HP 81111A 10V 165 MHz Outputs Reset the instrument to start from a defined default status RST Switch off the automatic display update to increase programming speed DISPlay OFF Set the instrument to pattern mode and select NRZ data output format for output 1 and output 2 DIGital PATTern ON DIGital SIGNal1 FORMat NRZ DIGital SIGNal2 FORMat N...

Page 94: ...me transition time shape as the added second channel see comment in step 5 FREQuency 30MHZ PULSe TRANsition1 5NS PULSe DELay2 10NS Set the output voltage to high level 1 0 Volts and low level to 0 0 Volts for both channels Then select channel addition mode see manual step 4 VOLTage1 HIGH 1V VOLTage1 LOW 0V VOLTage2 HIGH 1V VOLTage2 LOW 0V CHANnel MATH PLUS Enable the output 1 and the output 2 OUTP...

Page 95: ...l of 2 50 V and a low of 0 V Output 1 generates a clock signal that is half of the system clock Output 2 divides the system clock by 8 Figure 47 Dual Clock Signal Diagram NOTE With an additional dual channel instrument multiples of these dual clock signals can be set up following a similar procedure as follows For example with 8 dual channel units up to 16 different clocks can be generated 1 Befor...

Page 96: ...LSES at OUT 1 OUT 2 Figure 48 Current MODE TRG Screen 3 Press the PATTERN softkey to enter the Pattern menu Enter 8 for Last Move to CH1 and select Clock N press ENTER key twice to get a pattern for clock division by 2 Move to CH2 and select Clock N press ENTER key Press 8 and ENTER key to get a pattern for clock division by 8 Figure 49 Current PATTERN Screen ...

Page 97: ... LEVELS Menu to set the appropriate clock output voltages Set high levels of 2 50 V and low levels of 0 0 mV for both outputs Figure 51 Current LEVELS Screen NOTE The TIMING and LEVELS screens for HP 81110A with HP 81112A 3 8V 330 MHz Outputs look different to the screens shown here as this instrument has no channel addition fixed source impedance of 50 Ω assumes 50 Ω load impedance and has differ...

Page 98: ...uick Start Getting Started Examples 6 Here is the HP 54810A Infinium Scope Display of the two different frequency clock signals generated by the instrument Use the generator s STROBE OUT to trigger the scope Figure 52 Resulting Signals ...

Page 99: ...he instrument to start from a defined default status RST Switch off the automatic display update to increase programming speed DISPlay OFF Set the instrument to pattern mode and select NRZ data output format for output 1 and output2 DIGital PATTern ON DIGital SIGNa1l FORMat NRZ DIGital SIGNal2 FORMat NRZ Define a pattern length of 8 bit and program for channel 1 a pattern with clock division by 2 ...

Page 100: ...evel to 0 0 Volts for both channels VOLTage1 HIGH 2 5V VOLTage1 LOW 0V VOLTage2 HIGH 2 5V VOLTage2 LOW 0V Enable the output 1 and the output 2 OUTPut1 ON OUTPut2 ON To enable the complement output 1 and the complement output 2 only HP 81110A with HP 81112A 10V 330 MHz outputs installed the following commands have to be included OUTPut1 COMPlement ON OUTPut2 COMPlement ON ...

Page 101: ...mple two Outputs are required Here burst signals will be set up The burst repetition is 5 µs One signal should have two pulses at the period 500 ns The levels are 2Vpp ampli tude and offset of 0V Figure 53 Burst Signals to Generate 1 Before setting up the signal it is recommended to reset all parameters by pressing ...

Page 102: ...ger the startable internal oscillator The PLL defines the burst repetition the oscillator generates the pulse period Move to CONTINUOUS and select TRIGGERED Move to PULSES and select BURST of Move down and set 5 Single Pulses at Out 1 and Double Pulses at Out 2 Move down and select Trg d by PLL Per and set the burst repetition to 5 000 µs Figure 54 Current MODE TRG Screen ...

Page 103: ... ns and set the trailing edge to TrailE LeadE For Output 2 enter a double pulse delay of 250 ns a width of 100 ns a leading edge of 3 ns and set trailing edge to TrailE LeadE Figure 55 Current TIMING Screen 4 Press the LEVELS softkey to enter the Levels menu Select Separate Outputs For Channel 1 choose an offset of 0 0 mV and an amplitude of 2 00 V For Channel 2 choose an offset of 0 0 mV and an a...

Page 104: ... Started HP 81110 04A Quick Start Getting Started Examples 5 Here are the signals as displayed on the HP 54810A Infinium Oscilloscope Use the generator s STROBE OUT to trigger the scope Figure 57 Resulting Display ...

Page 105: ...rogramming speed DISPlay OFF Set the instrument to burst mode by selecting a burst count of 5 Choose double pulses for output 2 Select triggered mode by selecting PLL as the trigger source and set the burst repetition to 5 µs TRIGger COUNt 5 Set Burst mode with burst count of 5 ARM SOURce INT2 Set Triggered mode with PLL as trigger source ARM PERiod 5US Set burst repetition of 5 µs PULSe DOUBle2 O...

Page 106: ...Nsition2 3NS Set the output amplitude to 2 Volts and the offset to 0 0 Volts for both channels VOLTage 2V VOLTage2 2V Enable the output 1 and the output 2 OUTPut ON OUTPut2 ON To enable the complement output 1 and the complement output 2 only HP 81110A with HP 81112A 3 8V 330MHz Outputs installed the following commands have to be included OUTPut COMPlement ON OUTPut2 COMPlement ON ...

Page 107: ...mmand list 107 set up 103 Burst Signals 45 C Cable 22 Calibration automatic 62 from factory 62 timing 62 Capabilities signal generation 35 Certification met specifications 7 Channel Add 52 Cleaning Recommendation 27 CLK IN 67 Clock Signal command list 77 set up 72 Clock Source 48 Command Language 35 Command List burst signal 107 data stream 89 pulse signal 84 Command list clock signal 77 dual cloc...

Page 108: ...trailing 49 Edge displacement Signal command list 95 set up 91 Edges 49 Edit Pattern 45 Editing Pattern 54 Emission acoustic noise 28 Enter levels 51 numerical data 38 timings 49 Entry Focus 37 38 Environment 26 Environmental Conditions 26 Errors 43 Examples advanced signals 70 generic signals 70 getting started 72 manual 70 program 70 Exceed Specified Values 41 EXT INPUT 67 Ext Signal threshold 4...

Page 109: ...ddress changing 62 I IC Technologies 35 Initial Inspection 16 Inputs frontpanel 67 Inspection 16 Installation of instrument 16 Instructions safety 30 Internal Storage 43 Introduction 34 K Keys additional function 40 Knob 38 L Leading Edge 49 level high 51 low 51 Level Formats fixed 52 variable 52 level Parameters 51 LEVELS screen 51 Levels enter 51 levels 51 Limit Output 45 57 LIMITS screen 57 Lim...

Page 110: ...Modules HP 81104A 8 HP 81110A 8 Output Status 50 51 Output1 67 Output2 67 Outputs frontpanel 67 Overprogramming 41 Overview Frontpanel 66 of Product 34 P Parameter grouping 62 64 step size 40 Parameter Formats timings 49 parameter formats 45 Parameter Grouping 45 Parameters quick access 40 PATTERN screen 54 Pattern enter 45 for Strobe Out 55 immediate output 55 updated once 55 Pattern Mode 47 Peri...

Page 111: ...urce PLL 63 Remote Control 35 unlock 43 Remote Programming 35 Resolution 40 RZ 47 48 56 S Safety instructions 30 Symbols 31 SCPI 35 Screen CONFIG 62 LEVELS 51 LIMITS 57 MEMCARD 60 OUTPUT 65 TIMING 49 TRG LEV 59 Screen Menus 42 additional 42 standard 42 Screens PATTERN only 54 Second Channel 36 second channel 18 Self Calibration timing 62 Selftest invoke 62 Serial Number 68 Setting internal storage...

Page 112: ... on Memcard 60 Strobe pattern entry 55 STROBE OUT 67 Strobe Output 46 Level Setting 46 Switch standby 20 Symbols safety 31 System Clock 49 T Table of Contents 11 textual Display Mode 41 Threshold setting 46 TIMING screen 49 Timing enter 49 Timing Parameters 49 Timing Variations dropout free 35 glitch free 35 Timings 49 Trailing Edge 49 Transitions 49 TRG LEV screen 59 Trigger MANual 44 Trigger Eve...

Page 113: ...HP 81110 04A Quick Start Index 115 Index V Ventilation requirements 23 VFO 47 Volt 51 W Warnings 43 Width 49 ...

Page 114: ...116 Index HP 81110 04 Quick Start Index ...

Page 115: ...Front Panel Controls ...

Page 116: ...Hewlett Packard GmbH Copyright 1998 Edition E0698 Printed in Germany June 1998 BAR CODE to go here 81110 91010 ...

Reviews: