2-22
Removal and Replacement
HP Omnibook 6000/6100
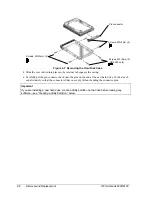
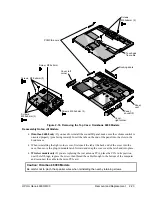
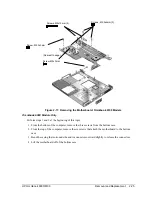
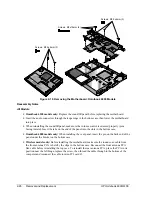
Figure 2-15. Removing the Top Case: Omnibook 6100 Models
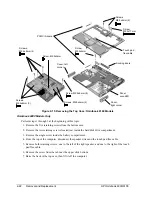
Omnibook 6000 Models Only
Perform steps 1 through 3 at the beginning of this topic.
1.
Remove the five retaining screws from the bottom case.
2.
Remove the two retaining screws located just inside the hard disk drive compartment.
3.
Remove the single screw inside the battery compartment.
4.
From the top of the computer, disconnect the speaker wires and the touch pad flex cable.
5.
Remove both retaining screws: one to the left of the right speaker, and one to the right of the touch
pad flex cable.
6.
Remove the screw from the tab near the upper click buttons.
7.
Raise the back of the top case, then lift it off the computer.
Screws,
M2.5x4mm (2)
PCMCIA doors
Screws,
M2.5x8mm (4)
Screws, M2.5x4mm (2)
Cover,
right corner
Panel,
sound/IR
Cover, left
corner
Screw, M2.5x2mm
Docking doors
Touch pad
flex cable
Screws,
M2.5x6mm (3)
Screw,
M2.5x17mm
Screw, M2.5x6mm (2)
Screw,
M2.5x4mm
Summary of Contents for 6100
Page 1: ... HP Omnibook 6000 6100 Service Manual ...
Page 22: ......
Page 60: ......
Page 94: ...4 2 Replaceable Parts HP Omnibook 6000 6100 Figure 4 1 Exploded View ...
Page 108: ......
Page 113: ......
Page 114: ...Part Number F3257 90025 Printed in U S A 6 01 ...

