
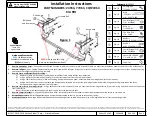


Installation Instructions
2018 Hyundai Elantra
*Note: If rear bumper fascia does not have a lower panel that can be removed see 2019 Hyundai Elantra installation instructions.
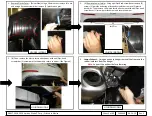
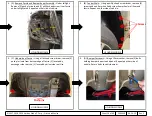
1. Remove Plastic Cover
–
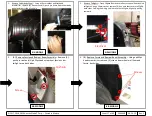
(Driver Side) Using a 10mm socket remove (4) nuts and using a flathead screwdriver remove (3) plastic push pins.
2. Remove Lower Fascia
–
Using a phillips-head screwdriver remove (2) screws (1) per side and using a flathead screwdriver remove (3) plastic push pins. Then
remove the plastic fascia attachment with a phillips-head screwdriver, (1) screw per attachment and return to owner. (See Figure 4)
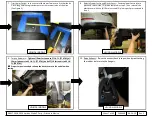
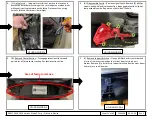
3. Lower Exhaust
–
Using an exhaust hanger removal tool remove the rubber isolators from the hanger.
Note:
Support the exhaust before lowering.
Note:
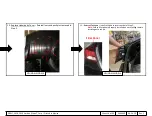
Removal of the heat shield is not required but can be removed to assist with modification. Cut or bend the area around the rearmost stud to make
clearance for the hitch. Make sure to leave the hole in the heat shield so that it may be reattached. If removed modify and reattach. (See figure 5)
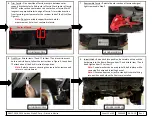
4. Remove Existing Hardware
–
Remove the existing 10mm bolts (2) each side from the bulk head.
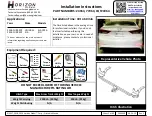
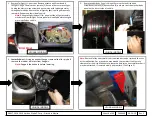
5. Fish Wire
–
Attach items
j
and
k
to item
n
and follow the instructions in Figure 2. Leave item
n
attached until the hitch is raised into position.
Note:
If plastic caps are covering the access hole remove and return to owner.
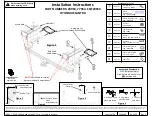
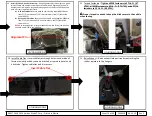
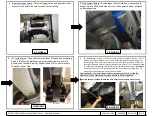
6. Install Hitch
–
Raise hitch into position, be careful not to push the hardware into the frame.
a) USA built models:
Secure hitch to vehicle using supplied 10mm bolts, item
o
(2) per side and 7/16” conical washers, item
l
(teeth side toward hitch).
b) Korean built models:
Secure hitch to vehicle using supplied 8mm bolts, item
p
(2)
per side and 3/8” conical washers, item
q
(teeth side toward
hitch). Then remove item
n
and attach item
l
and
m
to item
j
.
7. Trim Lower Fascia
–
In the center of the lower fascia cut a 3-inch-wide by a 5-inch-long section to give clearance for the receiver tube of the hitch. (See Figure 3)
8. Reinstall Lower Fascia and Plastic Cover
–
Snap the lower fascia into to place and reinsert the (2) screws removed in step 2. Then reinstall the plastic cover with
the (4) 10mm nuts and (3) plastic push pins removed in step 1.
9. Torque Hardware
–
Tighten all 8mm fasteners to 27 Lb-Ft. (37 N*M), all 10mm fasteners to 42 Lb.-Ft. (57 N*M), and all 7/16 fasteners to 50 Lb.-Ft. (68 N*M).
Proper torque is needed to keep the hitch secure to the vehicle when towing.
10. Raise Exhaust
–
Raise the exhaust back into position by reattaching the rubber isolators to the hangers.
Note:
Check hitch frequently, making sure all fasteners and ball are properly tightened. If hitch is removed, plug all holes in trunk pan or other body panels to prevent entry of water and exhaust fumes. A hitch or ball which has been damaged should be removed and replaced. Observe safety
precautions when working beneath a vehicle and wear eye protection. Do not cut access or attachment holes with a torch. This product complies with safety specifications and requirements for connecting devices and towing systems of the state of New York, V.E.S.C. Regulation V-5 and SAE
J684.
©2017, 2018, 2019 Horizon Global™ Corp. –
Printed in Mexico
Sheet 4 of 60
24964NP
06-24-19
Rev. C