background image

 
Dimension Series 


MORLEY-IAS 


User Manual 

Document No.996-148-000-5, Revision: 5 

Page 35 

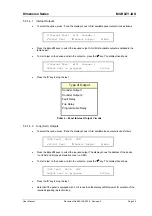
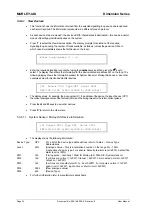
Typical Zone Disablement: 

DISABLED    01/03                  12:19  

DISABLE FULL ZONE          

:back 

R

:more 

 
Typical Output Circuit Disablement: 

DISABLED    01/02                  12:19  

DISABLE FAULT RELAYS       

:back 

R

:more 

 
Typical Device Disablement: 

DISABLED    01/02  Z01 L1 A010 OPT 12:19  

<Point-Location-Txt>       

:back 

R

:more 


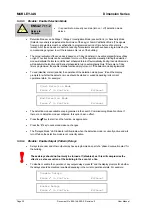
The information shown is the same as presented using the Level 1 disablement views. If there are no 
disablement conditions the following is shown: 


The system has no disablements present 

                                   X:Exit 


 Press 

the 

Ï

 and 

Ð

 keys to view other disablements.  

 Press 

‘X’

 to return to the View menu. 
5.3.6.5 

View Service Information 

 Press 

‘5’

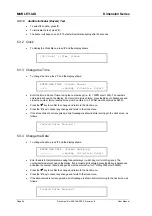
 to select the View Service Information option.  The display shows the date of the next 

scheduled service visit, the reference name of the site and the telephone number of the service 
organisation as follows: 

Next Service Due:09/10/03 

< Panel Name Text  >01234 567890 


 Press 

‘X’

 to return to the View menu. 

5.3.6.6 

View the Alarm Counter 


EN54


9


EN54-2 7.13 

Alarm Counter. 


It is possible to view the alarm counter. 


The counter is incremented every time the panel enters the fire alarm 
condition. The counter cannot be reset. 

 Press 

‘6’

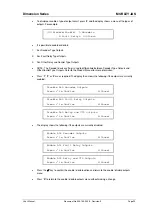
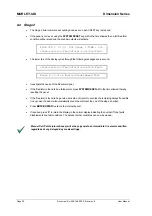
 to select the View Alarm Counter option. The display shows the total number of times that 

the panel has entered the fire alarm condition. For example: 


Current Alarm Count is   88  

                                   X:Exit 


 Press 

‘X’

 to return to the View menu. 

Summary of Contents for MORLEY IAS DX Series

Page 1: ...Document No 996 148 000 5 Issue 05 DX user manual ...

Page 2: ...e Alarms 12 4 2 1 2 Zone Fire Alarms 12 4 2 1 3 Override Delays 13 4 2 2 Fault Conditions 13 4 2 2 1 Panel Faults 13 4 2 2 2 Zone Faults 13 4 2 3 Test Conditions 14 4 2 4 Disablement Conditions 15 4 2 4 1 Panel Disablements 15 4 2 4 2 Zone Disablements 15 4 3 OTHER CONDITIONS BY EVENT DISPLAY OPTION 16 4 3 1 Fire Alarm Conditions 16 4 3 1 1 Zone Fire Alarms 17 4 3 1 2 Panel Fire Alarms 17 4 3 1 3 ...

Page 3: ...isable Enable Output Pattern Delays 30 5 3 5 7 Disable Enable Local Inputs 31 5 3 6 View Mode 31 5 3 6 1 View Devices 32 5 3 6 1 1 System Sensor Morley IAS Device Information 32 5 3 6 1 2 Apollo Device Information 33 5 3 6 1 3 Hochiki Device Information 33 5 3 6 2 View The Event Log 34 5 3 6 3 View Faults 34 5 3 6 4 View Disablements 34 5 3 6 5 View Service Information 35 5 3 6 6 View the Alarm Co...

Page 4: ...ONTROL KEY FUNCTIONS 6 TABLE 2 ALPHANUMERIC AND INTERACTIVE CONTROL KEYS 7 TABLE 3 LED FUNCTIONS 8 TABLE 4 DEVICE TYPE ABBREVIATIONS 20 TABLE 5 USER MENU OPTIONS 22 TABLE 6 PANEL INTERNAL OUTPUT CIRCUITS 25 TABLE 7 VOLTAGE ANALOGUE VALUE READINGS 36 TABLE 8 LOGBOOK REFERENCE DATA 42 TABLE 9 LOGBOOK EVENT DATA 43 ...

Page 5: ...MORLEY IAS Dimension Series Page iv Document No 996 148 000 5 Revision 5 User Manual This page intentionally blank ...

Page 6: ...to install program and maintain the system For use with software version 3 00 or later The DX1 DX2 and DX4 Fire Alarm Control Panels are 1 2 and 4 loop panels for use with analogue addressable devices from the following detector manufacturer ranges S90 1 2 Models The Dimension Series Fire Alarm Control Panels are available in a range of enclosure sizes A printer is available as a factory fit optio...

Page 7: ...15 16 17 18 19 20 21 22 23 24 25 26 27 28 29 30 31 32 33 34 35 36 37 38 39 40 1 2 3 4 5 6 7 8 9 10 E N 5 4 2 1 9 9 7 E N 5 4 4 1 9 9 7 Installer Fit Options A front panel key switch P N 795 083 can be installed in all models This can be used for a Level 2 Access Control b Class Change c Bomb Alert Printer P N 795 085 The following panels are compatible DX1e 40M DX2e 40M DX4e 40L Note Requires a co...

Page 8: ...d 1 2 Fire detection and fire alarm systems Control and indicating equipment EN 54 4 1998 Amd 1 2 Fire detection and fire alarm systems Power supply equipment EN54 EN54 2 13 7 Maximum of 512 sensors manual call points per panel The Dimension Series range of panels has many features that if used inappropriately may contravene the requirements of EN54 Where such a possibility may arise a suitable wa...

Page 9: ... to fire alarm device s 7 8 EN54 9 The power supplies for the Dimension Series of panels comply with the following clauses of EN54 4 DX1 2 4e Power Supply Functions EN54 4 Clause Derive power supply from main power source Derive power supply from a standby battery source Charge and monitor the standby battery source Detect signal power supply faults 5 1 5 2 5 3 5 4 EN54 N A In addition to the func...

Page 10: ...vel 1 At USER LEVEL 3 all front panel controls are functional and full system configuration and programming is possible User Level 3 is reached by entering a password from either Level 1 or Level 2 User Level 3 is intended for use by the system installer maintenance contractor EN54 9 EN54 2 5 1 Viewing Suppressed Information All of the mandatory indications that may not be suppressed during a fire...

Page 11: ...d This is typical for all models except the DX1e 20S 3 1 Control Keys Key Legend Symbol Function Sound Alarms Press to Turn on ALL Sounder Outputs i e evacuate building manually Silence Resound Press to Turn off all activated sounders Press again to re activate the sounders Mute Buzzer Press to silence the internal buzzer Accept Press to accept a Stage 1 Investigation Delay Alarm System Reset Pres...

Page 12: ...disablement and test conditions Press to select and scroll through menu options Follow the on screen prompts 0 9 A Z WORD Numeric keypad for entering numbers May also be used during programming to enter letters of the alphabet and words for text message entry This works in a similar fashion to a mobile telephone keypad No Press to answer No or cancel a display option and return to a previous menu ...

Page 13: ...as been acknowledged and the internal buzzer silenced Correct the condition causing alarm or fault and then perform a manual reset NOTE If an new alarm occurs in any zone or a fault occurs the internal buzzer automatically resounds Sounders Disabled Yellow The sounder outputs have been disabled Refer to Disablement Function Relays Disabled Yellow The relay outputs have been disabled Refer to Disab...

Page 14: ...24hour format as follows Wed 07 05 2003 11 38 59 All devices are inside working limits 3 3 2 Other Conditions 3 3 2 1 Loop Device Faults Fires The alphanumeric display will automatically update to show zonal information about the latest device to enter a fault or fire condition IN FAULT ZONE 1 1 1 X Summary ZONE TEXT Device Details Use the right arrow key to view the individual device point detail...

Page 15: ...e is one fire alarm and one fault condition present EN54 9 EN54 2 5 1 Viewing Suppressed Information All of the mandatory indications that may not be suppressed during a fire alarm condition are shown using Light Emitting LED Indicators Fire Alarms are shown using LED Indicators for each zone It is possible to view all other conditions such as points in fire faults zones in test and disablement co...

Page 16: ...mation one point at a time with no manual intervention required It is important to note that operating the panel in this mode means that the panel does not comply with the EN54 2 clauses highlighted opposite EN54 9 In a fire alarm condition the buzzer will sound continuously It will automatically resound if previously muted for any new fire alarms In a fault condition the buzzer will sound intermi...

Page 17: ...t 11 22AM when the Sound Alarms key was pressed If there is more than one fire alarm indicated use the Ï and Ð keys to view these Note The R more option is not shown if there is only one event the and keys are shown for the first and last entries in the list Press the Í key to return to the previous display 4 2 1 2 Zone Fire Alarms When selected the display shows the first zone with a fire alarm c...

Page 18: ...ions use the navigation keys as follows Press the ÍÏÐÎ keys to select the FAULT option and then press the 9 key The display shows further information on the faults For example TOTAL PANEL FAULTS 3 Panel Events TOTAL ZONES IN FAULT 1 Zone Details This display indicates that there is one zone in fault and that three panel related faults have been registered To view these press the Î key to view the ...

Page 19: ...o the list of zones in fault press the Í key To view the location texts for this device press the Î key The display then shows the Zone Location Text and the Point Location Text 20 character description each for this device For example FAULT 01 02 Z01 L1 S010 OPT 12 19 Zone Location Text Point Location Txt To return to the previous display press the Í key 4 2 3 Test Conditions EN54 9 EN54 2 10 Tes...

Page 20: ... disablements and the first disablement is shown This was a disablement of all sounders bells configured at 12 15PM If there is more than one disablement indicated use the Ï and Ð keys to view these Note The R more option is not shown if there is only one event the and keys are shown for the first and last entries in the list Press the Í key to return to the main display 4 2 4 2 Zone Disablements ...

Page 21: ...ation Txt Each event is displayed for approximately 8 seconds then the next event is displayed After every 2 events an appropriate instruction screen in displayed for approximately 3 seconds for example USE ARROW KEYS TO VIEW MORE EVENTS Ç PREVIOUS EVENT È NEXT EVENT 4 3 1 Fire Alarm Conditions If the control panel initiates an alarm condition the FIRE LED Indicators will be illuminated and if app...

Page 22: ...e shows the Zone Location Text 20 character description and the Point Location Text 20 character description for this device 4 3 1 2 Panel Fire Alarms Example EVACUATE 01 01 11 22 Panel fire alarms are displayed along with other fire alarm conditions as detailed in the section above 4 3 1 3 Override Delays EN54 9 EN54 2 7 11d Override delays at Level 1 The DX1e DX2e and DX4e control panels can be ...

Page 23: ...ess the ÏÐ keys to scroll though the event list manually If no key is pressed for 60 seconds auto scrolling will resume 4 3 2 3 Test Conditions EN54 9 EN54 2 10 Test Condition If zones have been configured to be in a test condition i e weekly walk test the TEST LED is illuminated The alphanumeric display will show details of the zone in test For example WALK TEST 01 12 Z01 03 22 In the example abo...

Page 24: ...09 34 Zone Location Text Point Location Txt In the example above the display shows a description of the event the event number and the total number of events the Zone number Z01 the loop number to which this device is connected L1 the address of this device on the loop A054 the type of device MCP and the time at which the device was disabled 09 34 The bottom line shows the Zone Location Text 20 ch...

Page 25: ...list of the device point abbreviations shown on the alphanumeric display Abbreviation Description CO Carbon Monoxide Detector FLM Flame Detector ION Ionisation Smoke Detector I O Input Output Module LSR Laser Smoke Detector MCP Manual Call Point MLT Multi Criteria Detector MON Monitored Input OPT Optical Smoke Detector RLY Relay SDR Sounder Bell TMP Temperature Detector ZMX Zone Monitor Module Tab...

Page 26: ... display will show the following message for 60 seconds Press the X button to revert immediately to the normal displays The eight character number on the bottom line is a control code and is only relevant to Level 3 use ERROR INCORRECT PASSCODE C8B0E488 Alternatively if the key switch option is fitted and programmed to enable Level 2 access insert the key and turn clockwise to enable Level 2 Contr...

Page 27: ... test the LED indicator lamps This test will automatically test all status indicators and each zone indicator in turn and then terminate LCD To test the alphanumeric display ZONES To perform a Walk Test on one or more zones If the test is performed With Sounders all relay and sounder outputs will be activated in continuous mode regardless of pattern logic OUTPUTS To test the relay and sounder outp...

Page 28: ...tors and through all of the Zone FIRE LED Indicators The test will automatically stop after 60 seconds 5 3 1 2 LCD Test To select the option press 2 To terminate the test press X The alphanumeric display will flash all displayable characters in all positions of the display The test will automatically stop after 60 seconds 5 3 1 3 Zones Test EN54 9 EN54 2 10 Test Condition When zones have been conf...

Page 29: ...s 9 to confirm X Exit Press the 9 key to confirm the change of test state or press the X key to cancel any changes Repeat for each zone as required 5 3 1 3 3 Stopping ALL Zone Tests Press 2 to select the stop all tests option The display then shows Stop all Zones in Walk Test Press 9 to confirm X Cancel Press the 9 key to confirm the termination of all zone walk tests or press the X key to cancel ...

Page 30: ...est Type of Output Sounder Output 1 Sounder Output 2 Fault Relay Fire Relay Programmable Relay Table 6 Panel Internal Output Circuits 5 3 1 4 2 Loop SLC Outputs To select the option press 2 and the display shows to first available loop output circuit as follows SLC Test A008 SDR 9 Start Test R Select Output X Exit Press the Ï and Ð keys to select the required output The display shows the address o...

Page 31: ...d as 0830 Press the 9 key to confirm the change and return to the clock menu Press the X key to cancel any change and return to the clock menu If the time entered is not recognised a brief message is shown before returning to the clock menu as follows Invalid Value Entered 5 3 4 Change the Date To change the date press 2 and the display shows ENTER NEW DATE format dd mm yy BackSp 9 Confirm X Exit ...

Page 32: ...nance to prevent unwanted activation of bells or other outputs If a device is faulty or if it is erroneously reporting a fire condition the device can be disabled to prevent this condition from being registered by the panel In this case 1 disable the device or zone group input or output as required 2 press the RESET key to clear the latched fault or fire condition NOTE If the condition still exist...

Page 33: ...n the zone are enabled disabled NOTE Sounder type outputs can only be disabled using this option if this function has been configured during panel commissioning 5 3 5 3 Disable Enable Groups A number of devices may have been configured to belong to a group This function allows all of the devices within this group to be disabled enabled with one action rather than having to disable enable each indi...

Page 34: ... Manual for more information Press 1 2 or 3 are as required The display then shows the following if the outputs are currently enabled Disable ALL Sounder Outputs Press 9 to Confirm X Cancel Disable ALL Fault Relay Outputs Press 9 to Confirm X Cancel Disable ALL Relay and CTL Outputs Press 9 to Confirm X Cancel The display shows the following if the outputs are currently disabled Enable ALL Sounder...

Page 35: ...tion simply turns on off the detection mode programmed To end disable or start enable the operation of the detection mode press 5 and the display prompts for whether the detection mode should be started or ended depending in its current operational state For example Start Detection Mode Press 9 to Confirm X Cancel End Detection Mode Press 9 to Confirm X Cancel The detection modes available are pro...

Page 36: ...tate For example Disable Local Inputs Press 9 to Confirm X Cancel Enable Local Inputs Press 9 to Confirm X Cancel Press the 9 key to disable enable these input circuits as appropriate Press the X key to cancel and make no changes 5 3 6 View Mode To display the View Mode Menu press 5 and the display shows the first page of options Press the Ï and Ð keys to view the additional menu display U0 View 1...

Page 37: ...ollo and Hochiki devices L1 Sensor 001 Type OPT Level 029 PW1 149 2 149 3 443 4 0355 5 0445 X Exit The display shows for example the loop number L1 the address of the device the type of device OPT the current analogue value of the fire level 29 and the timing values for the return current pulses Press the Ï and Ð keys to view other devices Press X to return to the View menu 5 3 6 1 1 System Sensor...

Page 38: ...de The display shows the following information Device Type OPT For a list of the device type abbreviations refer to Table 4 Device Type Abbreviations Level 023 Analogue Value This is a normalised number to account for offsets calibration and differences in device type For sensors default pre alarm level is 45 default fire alarm level is 55 For modules fault level is 4 normal level is 16 and input ...

Page 39: ...ess X to return to the View menu 5 3 6 3 View Faults Press 3 to select the View Faults option The display shows the first fault For example FAULT 01 03 Z01 L1 S010 OPT 11 22 NO REPLY FROM DEVICE back R more text Press the Ï and Ð keys to view other faults For example FAULT 02 03 MON INPUT 1 11 23 INPUT OPEN CIRCUIT back R more Press X to return to the View menu If there are no fault conditions pre...

Page 40: ...o return to the View menu 5 3 6 5 View Service Information Press 5 to select the View Service Information option The display shows the date of the next scheduled service visit the reference name of the site and the telephone number of the service organisation as follows Next Service Due 09 10 03 Panel Name Text 01234 567890 Press X to return to the View menu 5 3 6 6 View the Alarm Counter EN54 9 E...

Page 41: ...ent of the battery wiring resistance1 mOhms 350 200 500 MONITORED INPUT 2 Measurement of the input signal condition Count 500 480 520 MONITORED INPUT 1 Measurement of the input signal condition Count 500 480 520 SOUNDER 2 Measurement of the output wiring condition Count 190 170 210 SOUNDER 1 Measurement of the output wiring condition Count 190 170 210 EARTH Measurement of the earth condition Count...

Page 42: ...nction is in the active period the Delayed Mode LED will be illuminated 6 1 Stage 1 When a fire alarm condition is detected during delayed day mode the internal buzzer will sound The sensor location including zone location and point location text will be shown on the display along with a warning that the panel has entered stage 1 of a delayed alarm The time remaining to acknowledge the alarm is in...

Page 43: ...aults Disablement Test Investigate the cause of the fire alarm signal If the fire alarm is found to be a false alarm press SYSTEM RESET within the time allowed thereby resetting the panel If the fire alarm is found to be genuine activate a call point to override the remaining delays if possible in any case the panel will automatically sound the alarms at the end of the stage 2 period Press MUTE BU...

Page 44: ...lock in this position and cannot be removed To turn off Level 2 access turn the key anti clockwise and remove If the key switch is programmed for class change or bomb alert functions insert the key and turn clockwise The sounders bells will ring as programmed whilst the key is in this position Turn the key anti clockwise and remove to silence the sounders bells 7 2 Function Keys The function keys ...

Page 45: ...isconnect the earth lead from the back of the cover and place the cover in a safe place Tear off the printer roll and remove the roll from the spindle Use the green knob to feed the residual paper from the printer mechanism Take a new roll and place on the spindle in the orientation shown 0 WORD 7 PQRS 8 TUV 9 WXYZ 4 GHI 5 JKL 6 MNO 1 2 ABC 3 DEF F1 F2 11 12 13 1 4 1 5 16 1 7 18 19 2 0 21 2 2 23 2...

Page 46: ...l events resulting from or affecting the system The logbook should be kept in a place accessible to authorized persons preferably near the main panel All events should be properly recorded events include real and false fire alarms faults pre alarm warnings tests temporary disconnection s and service visits A brief note of any work carried out or outstanding should be made 10 1 Inspection Testing I...

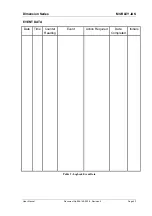
Page 47: ... sample below is for reference data e g the name of the responsible person while the sample on the next page is for the entry of event information REFERENCE DATA Site Name and Address Site Telephone Number Responsible Person Date Date Date Date The system was installed by Date And is maintained under contract by Until Contact Telephone Number if Service is Required Table 8 Logbook Reference Data ...

Page 48: ...Dimension Series MORLEY IAS User Manual Document No 996 148 000 5 Revision 5 Page 43 EVENT DATA Date Time Counter Reading Event Action Required Date Completed Initials Table 9 Logbook Event Data ...

Page 49: ...MORLEY IAS Dimension Series Page 44 Document No 996 148 000 5 Revision 5 User Manual NOTES ...

Page 50: ... MORLEY IAS All rights reserved The MORLEY IAS Logo is a registered trademark MORLEY IAS Fire Systems Charles Avenue Burgess Hill West Sussex RH15 9UF England Web site www morleyias co uk ...

Reviews: