background image

Maintain

Maintain

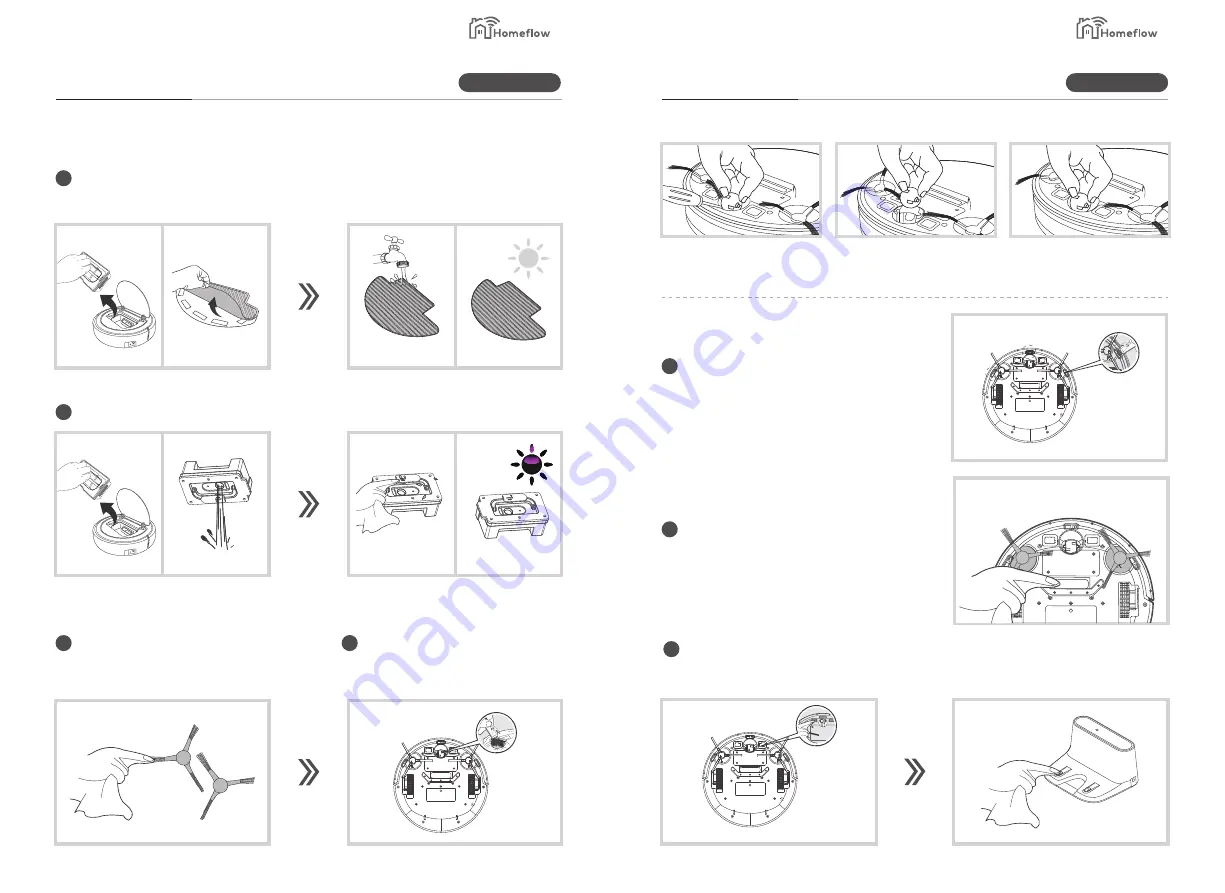
4.3 Clean tank

2

Clean the tank

5

Clean downward sensor

Use a dry soft cloth or cotton swab to 
wipe the sensors.

6

Clean suction area

Please use the cloth to clean the dust 
around the suction area.

7

Clean electrode patch

Use dry cloth to clean electrode patch on bottom set of host and on charging dock.

4.4 Clean the other accessories

1

Clean the side brush, Rotate the floor 
brush and use scissors in the 
packaging to remove any tangled 
threads.

2

Clean the universal wheel with dry cloth

1

Clean the cloth

After mopping take off the cloth and wash and dry the cloth.

Step 1: Take out the universal 
wheel with special tool carefully.

Step 2: Take off the wheel, and 
clear the hair

Step 3: Put the wheel back the 
and press it tightly.

Product Information

Product Information

Smart Living

Smart Living

19

20

Summary of Contents for Smart Robot Vacuum

Page 1: ...Robot vacuum cleaner User manual Smart Living Smart Living...

Page 2: ...or supplied by Home ow Smart Living Safety instructions Product parts Host Charging dock Remote control Product speci cation Accessories list Product operation Important matters Charging mode Installi...

Page 3: ...obot Vacuum to the Charger Base Station Always switch off and disconnect the mains power adaptor before cleaning or attempting any maintenance task If the vacuum will not be used for a long time sever...

Page 4: ...High Ef ciency Filter Sealing Ring Middle cover Dust box water tank Spring contacts DC port Power on off Component Component Product Information Product Information Pull tab Rag Stent Water Seepage R...

Page 5: ...nd Planning designated along wall booking mop oor About 280mins About 100 120mins Physical buttons Diameter Height Net weight Voltage Battery Power Dust box volume Water tank volume Charging mode Swee...

Page 6: ...refer to the following instructions Operation Accessories Sundries such as power cords scattered on the ground can trip or entangle products pleasekeepthemaside Roll up the side of the carpet fringe...

Page 7: ...the brush well 1 Charging dock placement Place the Charging Dock on a non re ective level oor preferably against the wall There should be no objects around the area for 3m in front and 0 5m each side...

Page 8: ...the machine right in selection mode Mop mode 6 Random Pattern 7 Along the wall cleaning 8 Fixed Point Pattern 9 WiFi Connect 10 Press the key to start the mopping mode after you have correctly insert...

Page 9: ...Family Management Family Name Remove Family Con rm to Leave 3 After the device is disconnected if you need to connect it again Please refer to App Operation guide for re connct Disconnect with mobile...

Page 10: ...een concentrated Machine will clean in a spiral mode and will proceed with normal cleaning after the concentration cleaning has been completed Sweep along the wall mode 4 This mode is for cleaning the...

Page 11: ...the vacuum stops working then please add more water or clean the water see page rag and restart the machine Please do not mop on the carpet Please remove the tank when charging the machine Stick the w...

Page 12: ...charging dock 4 4 Clean the other accessories 1 Clean the side brush Rotate the oor brush and use scissors in the packaging to remove any tangled threads 2 Clean the universal wheel with dry cloth 1 C...

Page 13: ...stuck Please check the side brush whether it is stuck Fan is abnormal Check whether front bump is stuck Remove the machine to empty area Cloth and bracket unset Reason Solution Battery is lower than...

Page 14: ...23 24...

Reviews: