background image

4.1  Maintenance and Checkup 

4 - 2


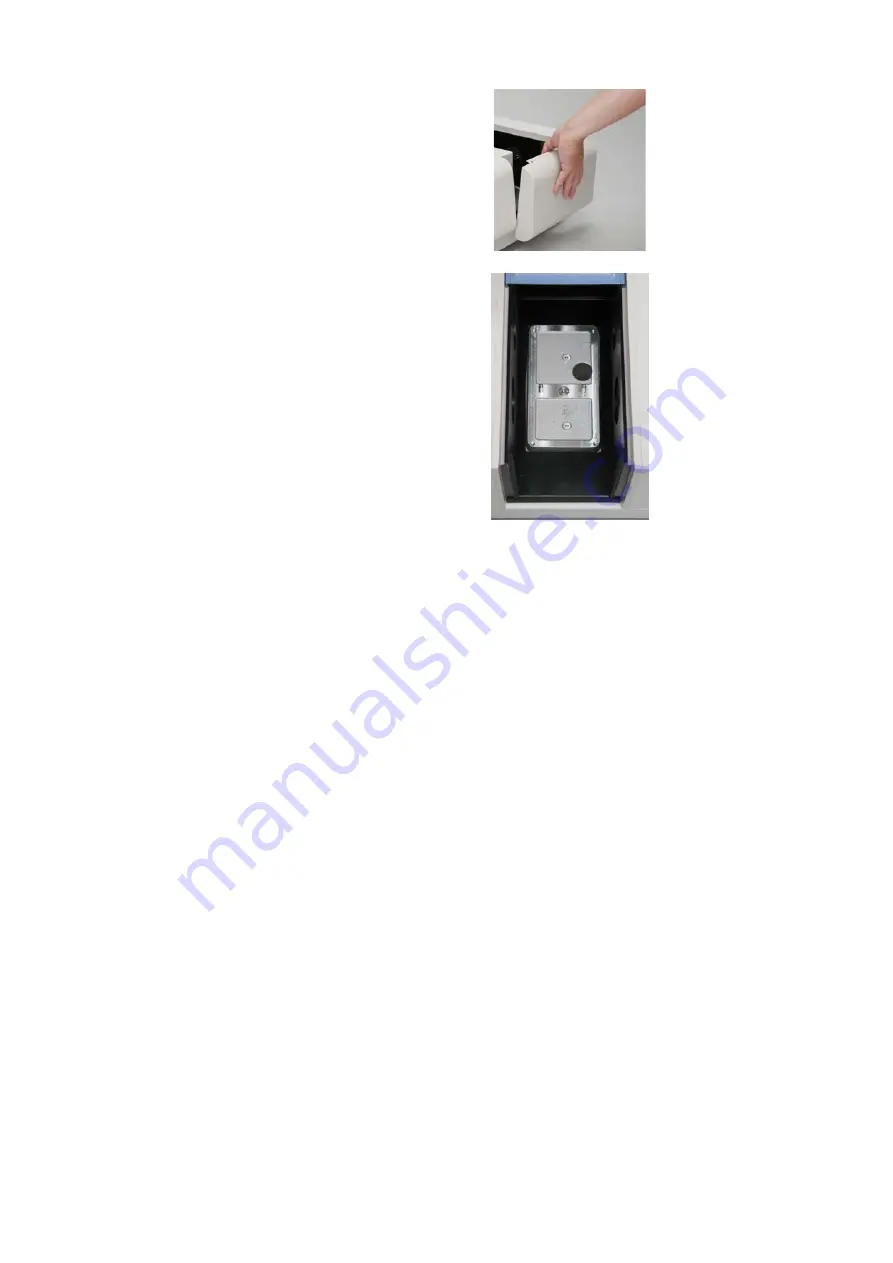
Fig. 4-2


(3)  Clean the sample compartment base thus removed, and the 

inside of the sample compartment; otherwise, the optical 
performance of the instrument may be degraded.   

 
(4)  After cleaning, replace the sample compartment base along the 

guide pins pushing the base to leave no gaps.   


4.1.3  Cleaning Spectrophotometer Cover  


Do not put any item such as a measuring sample on the 
spectrophotometer.  
If a sample spills on the instrument, clean the spill using a soft cloth 
moistened with water or non-stimulating detergent as immediately 
as possible.    After cleaning, let it dry up.     
Take particular care not to spill a sample over the keypad. 

Summary of Contents for U-2910

Page 1: ...INSTRUCTION MANUAL 2J1 9006 009 Ver 10 October 2020 Double Beam Spectrophotometer MODEL U 2910 UV VIS SPECTROPHOTOMETER MAINTENANCE ...

Page 2: ...hted by Hitachi High Tech Science Corporation with all rights reserved No part of this manual may be reproduced transmitted or disclosed to a third party in any form or by any means without the express written permission of Hitachi High Tech Science Corporation 3 Hitachi High Tech Science Corporation assumes no liability for any direct indirect or consequential damages arising from use not describ...

Page 3: ...edures to use this instrument Be sure to read this manual thoroughly before use to ensure correct use of the instrument Be sure to read instruction manual also to ensure correct use of the instrument ABOUT THIS MANUAL This manual is prepared for users of Model U 2910 Double beam UV VIS Spectrophotometer This manual describes the operating instructions and maintenance checkpoints At first read IMPO...

Page 4: ... If you need to discard this product or discard user serviceable parts Please contact your local sales representative or distributor who will inform you of the recycle of the product You might be charged for the costs arising from take back and recycling 2 In other Countries outside the EU If you wish to discard this product please contact your local authorities and ask for the correct method of d...

Page 5: ...out charge A substitute part may be used for repair or replacement with an equivalent product may be made instead of repair Such system components as a personal computer and printer to be updated frequently for improvement may not be available in original versions at the time of replacement The manufacturer assumes no liability for any damage to data or application software due to any possible fau...

Page 6: ... circuits or deterioration of the optical elements due to highly corrosive atmospheric gas e Failure due to use of software hardware or spare parts not supplied by the manufacturer f Failure due to use not described in the manual or improper repair not approved by the manufacturer g Failure due to maintenance or repair by other than service personnel qualified by the manufacturer h Failure due to ...

Page 7: ...ty THE MANUFACTURER MAKES NO WARRANTIES EITHER EXPRESS OR IMPLIED EXCEPT AS PROVIDED HEREIN INCLUDING WITHOUT LIMITATION THEREOF WARRANTIES AS TO MARKETABILITY MERCHANTABILITY FOR A PARTICULAR PURPOSE OR USE OR AGAINST INFRINGEMENT OF ANY PATENT IN NO EVENT SHALL THE MANUFACTURER BE LIABLE FOR ANY DIRECT INCIDENTAL OR CONSEQUENTIAL DAMAGES OF ANY NATURE OR LOSSES OR EXPENSES RESULTING FROM ANY DEF...

Page 8: ...is continued without receiving the safety check the instrument might become faulty and cause a danger Note that replacement may be recommended as a result of the safety check Installation Relocation and After sale Technical Service 1 Installation and Relocation a Installation at delivery shall not be carried out by the user It shall be carried out by our sales representative or the engineers who h...

Page 9: ...e manufacturer And if a part or unit is unavailable due to the discontinuance of its manufacture a substitute part or unit may be supplied for which we request your understanding d It may be impossible to supply the main unit components other than the maintenance parts and consumables due to the discontinuance of main unit manufacture etc If the instrument becomes faulty it might be irreparable du...

Page 10: ...n handling storage and disposal of chemicals and samples used in analytical operations with this instrument 2 Reagents standard solutions and accuracy control samples shall be handled stored and discarded as instructed by the respective suppliers 3 Samples that may have been infected with bacteria or viruses are not applicable to this instrument ...

Page 11: ... DANGER Indicates an imminently hazardous situation which if not avoided will result in death or serious injury This warning does not apply to this product WARNING Indicates a potentially hazardous situation which if not avoided can result in death or serious injury This warning does not apply to this product CAUTION Indicates a hazardous situation which if not avoided will or can result in minor ...

Page 12: ...follow all the methods of use instructed in the manual for operating the product Do not modify the instrument use non specified parts nor remove safety devices as it could be hazardous Do not perform any operation or action other than described in this manual When in doubt please contact your nearest Hitachi High Tech Science Corporation service office or representative When using a chemical for a...

Page 13: ...n operation of the instrument It is not permitted for the user to carry out installation After completion of installation check that all the standard parts are equipped If the instrument is made active with any one of the standard parts not equipped a failure could occur to result in a hazardous condition If any item is missing or damaged or if you have any question notify the installation personn...

Page 14: ...t with a new one The parts having a useful lifetime indicated in this manual must be replaced periodically as specified If the instrument is operated though the replacement of life limited parts has already been required the instrument might become faulty due to part deterioration etc causing leak fuming combustion or the like trouble on safety For other than the replacement procedures instructed ...

Page 15: ... V Touching the D2 lamp power supply voltage 500 V may cause an electric shock resulting in fatal or serious injury Before replacing the D2 lamp make sure that the POWER switch of the spectrophotometer main unit is turned OFF Chapter 5 Electric Shock upon touching Hazardous Voltage Touching the power supply voltage may cause an electric shock resulting in fatal or serious injury Before connecting ...

Page 16: ...e fatigue to accumulate in the eyes and body To avoid this one should take a break for 10 to 15 minutes at every hour in order to rest the eyes and body Burns upon touching Hot Surface The D2 lamp and WI lamp are very hot Touching the lamp can burn you Turn off the POWER switch and allow the lamps to fully cool down before replacing or adjusting the lamp Chapter 5 ...

Page 17: ...on of Measured Values Carry out periodic inspection and check whether the system is operating normally If necessary conduct measurement on a control sample Data Backup Data stored on the hard disk may become unusable due to a system failure wrong operation computer virus infection etc To ensure data integrity in case of accidental damage to the hard disk periodically make backup copies of hard dis...

Page 18: ...ion are Downloading a virus laden program through communication Using a floppy disk or other storage medium infected by a virus Note also that once any personal computer is infected by a virus it may spread to other computers via communication or storage medium Never use a program or storage medium that is suspected of containing a virus If there is a possibility of virus infection check for a vir...

Page 19: ...sociation guidelines for protection against momentary power voltage drop in personal computers Turning On Off Personal Computer Do not turn off power to the personal computer while the hard disk or floppy disk drive is active If power to the personal computer is turned off while the hard disk or floppy disk is being accessed the personal computer may become faulty or data software stored in it may...

Page 20: ...ales representative for this spectrophotometer or our service office nearest Entrust the battery replacement to the service person qualified through our technical training course therefor Battery replacement after expiration of the warranty period is a fee charging service This term is not mentioned in the text of this instruction manual Caution in Moving Instrument This spectrophotometer is a hea...

Page 21: ...se warning labels to see if they are clean to allow easy reading over a safe distance If any one of the warning labels becomes illegible due to deterioration contact your local Hitachi High Tech Science Corporation sales representative or service office of Hitachi High Tech Science Corporation sales representative for replacement with a new one Light source compartment Side of spectrophotometer ma...

Page 22: ...SAFETY 12 SAFETY SUMMARY Caution Label Light source compartment 1 Burns due to Contact with Hot Part ...

Page 23: ...Relocation SAFETY 3 Cautions on Installation Maintenance Relocation SAFETY 4 Safety Instructions in This Manual SAFETY 5 DANGER Indications SAFETY 5 WARNING Indications SAFETY 5 CAUTION Indications SAFETY 6 NOTICE SAFETY 7 Warning Labels SAFETY 11 Caution Label SAFETY 12 1 INSTALLATION 1 1 1 1 UNPACKING INFORMATION TO CUSTOMER 1 1 1 2 INSTALLATION CONDITIONS 1 2 1 2 1 Power Requirements 1 2 1 2 2 ...

Page 24: ...3 Wavelength Scan 2 7 2 4 4 Time Scan 2 7 2 4 5 Secondary Processing of Data 2 7 2 4 6 Baseline Correction 2 8 2 4 7 Auto Calibration and Self Diagnosis Functions 2 8 2 5 SPECIFICATIONS 2 9 3 CALIBRATION OF INSTRUMENT 3 1 3 1 INTRODUCTION 3 1 3 2 0 T MEASUREMENT 3 2 3 3 WAVELENGTH CALIBRATION 3 2 3 4 SYSTEM BASELINE MEASUREMENT 3 2 4 MAINTENANCE 4 1 4 1 MAINTENANCE AND CHECKUP 4 1 4 1 1 Purpose of...

Page 25: ...HT SOURCE LAMP 5 2 5 3 1 Light Source Lamp Replacement Procedure 5 2 5 3 2 Lamp Turn On Time Resetting 5 5 5 3 3 Lamp Adjustment 5 6 5 4 STORAGE 5 9 5 4 1 After Measurement 5 9 5 4 2 When Instrument will not be used for Long Time 5 9 APPENDIX 1 ABSORPTION SPECTROPHOTOMETRY APPENDEX 1 APPENDIX 2 FOR PROPER USE OF SPECTROPHOTOMETER APPENDEX 2 INDEX INDEX 1 ...

Page 26: ...firmly at both sides thereof and then move very carefully to prevent injury due to accidental dropping Fig 1 1 Model U 2910 Spectrophotometer NOTICE 1 The light source switching mirror is temporarily protected with a sponge packing for safe transportation Prior to use remove the packing opening the light source cover 2 WI lamp is temporarily secured with a temporary fastener while transportation R...

Page 27: ...more in consideration of joint use of associated accessory devices Grounding line Grounding resistance should be 100 or less 1 2 2 Installation Place Floor area Width of 500 mm and depth of 605 mm or more Give space at least 200 mm on both sides of the main unit Work table strength Flat top table capable of withstanding weight of 29 kg or more 1 3 INSTALLATION ENVIRONMENT 1 3 1 Operating Temperatu...

Page 28: ...rner electric heater or oven in order to prevent the instrument cover being heated beyond 60 C 4 Avoid the vicinity of instruments that generate a strong electric field such as an electric welding machine high frequency furnace or pole transformer 5 Avoid a dusty environment otherwise optical performance might become out of order 6 The instrument should be free from an abrupt variation of power su...

Page 29: ...e power supply voltage may cause an electric shock resulting in fatal or serious injury Do not connect the power cord to the outlet until the assembly work is completed The light source switching lever in the light source compartment is held in place by sponge material to prevent its moving during transport Remove the sponge material in the following procedure 1 Remove the light source cover to op...

Page 30: ...d Each of the threaded screw holes is for a 4 mm screw and the spacing of two holes is 50 mm The user needs to prepare clamps and screws Part No 2J1 1365 Fastening Plate Drawing of the clamp used in Fig 1 2 Fig 1 2 Example of securing spectrophotometer Secure the personal computer on the laboratory table with retaining bands as needed Fig 1 3 Example of securing personal computer Stamping 14 x 6 f...

Page 31: ...se make sure the power cord is disconnected First check if the line voltage to be used matches the allowable line voltage indicated on the label beside the power connector on the spectrophotometer Fig 1 2 Power Connector Check if the fuse capacity is suitable for the line voltage to be used Table 1 1 Voltage Fuse Capacity Part No 115 V 5 A time lag type J821399 220 V 230 V 240 V 3 15 A time lag ty...

Page 32: ...ric shock resulting in fatal or serious injury Make sure the power switch is OFF before the cable connection and connect the power cord last Fig 1 4 Cable Connection Printer Optional supply Printer cable Optional supply To AC power source RS 232C cable Computer Optional supply Printer Personal computer PC Spectrophotometer main unit ...

Page 33: ...unding wire is connected securely to the grounding terminal Fig 1 6 Grounding 電源コンセント 分光光度計 アース端子 接地抵抗 100Ω 以下 地下部 アース線 緑 電源コード E910016 300 mm 2 mm COMMON W COMMON 白 HOT S HOT S HOT 黒 GROUND 緑 GROUND GROUND COMMON To power receptacle Grounding resistance 100 or less Grounding terminal Grounding wire green Underground 75 cm or more below ground surface Spectrophotometer Power cord E910016 Copper pl...

Page 34: ...ing wire grounded according to the specification 5 Is the cord connected correctly between spectrophotometer main unit and the computer 6 Is the printer installed and connected correctly 7 Is there any object that cuts off the light beam in the sample compartment of the spectrophotometer Make sure there are no other abnormalities and close the lid of the sample compartment in place 1 11 POWER ON P...

Page 35: ... the termination or quitting command from the file menu Fig 1 7 Choose Yes to end UV Solution program 2 Turn OFF the power switch on the spectrophotometer main unit 3 Click Start button on Windows XP Choose closing Windows choose Bring computer ready to be switched off and then choose Yes 4 Turn off the personal computer and its monitor 5 Turn off the printer ...

Page 36: ... Model U 2900 spectrophotometer Some switches or connectors on the instrument will not function 2 2 INSTRUMENT APPEARANCE This instrument is comprised of the spectrophotometer main unit and the control data processing unit Fig 2 1 shows the appearance of this instrument In an optional supply a printer is available as a data output unit Fig 2 1 Model U 2910 Spectrophotometer Control data processing...

Page 37: ...is connection is an exclusive use for UV Solutions control program 3 For connecting a printer cable does not function in Model U 2910 as a computer controls the instrument Connect the printer cable to the printer port on the computer 4 For connecting a cable for AS 1010 5 For connecting a connector from an accessory such as Auto Sipper 6 cell Positioner 6 In Model U 2910 a computer controls storin...

Page 38: ...er switch and continues to light until the power switch is turned off The lamp being not lighting or flickering represents something being wrong with the computer Turn off the power switch once and on again If such unstable lighting state repeats or still continues take action for remedy according to the instructions described in 4 4 Trouble Shooting 2 In Model U 2910 this knob does not function t...

Page 39: ...ough a filter toroidal mirror M2 and is separated into sample beam and reference beam by half mirror HM The sample beam that has passed through the sample in the sample compartment enters a detector where it is converted into electric signal The reference beam also passes through the sample and enters a detector in the same way and this signal is used as a reference in photometry Fig 2 5 Optical S...

Page 40: ...es A D conversion after which it is log converted by the software and becomes absorbance data The result of measurement appears on the LCD and is printed out from the printer Fig 2 6 Signal Processing and Control System Signal data processing section Battery Printer Personal computer RS 232C serial interface Parallel interface A D converter Monochromator section Detector Half mirror Detector Sampl...

Page 41: ...ible to measure each standard up to 5 times and then obtain the average values for generating a calibration curve b The calibration curve can be regenerated upon re measuring specific standards c The calibration curve can be graphically displayed on the LCD and the value at each point can be read out by moving the cursor to each point d The calibration curve can be graphically plotted with the pri...

Page 42: ...at a specified time interval 2 Results of rate calculation can be displayed and printed out 3 Measuring time length can be specified 60 to 99999 seconds 2 4 5 Secondary Processing of Data The instrument can store measurements in the memory permitting stored data to be processed in various manners Automatic Readout of Data A cursor can be displayed on the graph currently appearing on the LCD and th...

Page 43: ...vailable Font for Displaying and Printing Font style and size of characters for displaying and printing are changeable as desired 2 4 6 Baseline Correction The baseline is stored in the backup RAM in the spectrophotometer main unit Data is retained even if the power is turned OFF System baseline User baseline 2 4 7 Auto Calibration and Self Diagnosis Functions Model U 2910 is equipped with the fol...

Page 44: ... 0 to 2 0 Abs 0 1 T Wavelength scan speed 10 100 200 400 800 1200 2400 3600 nm min These speeds are not applicable during filter or light source replacement Baseline stability 0 0003 Abs hr 500 nm 2 hours after power on Baseline flatness 0 0006 Abs 200 to 950 nm Noise level 0 00015 Abs 500 nm Response Fast Medium Slow Light sources WI and D2 lamps Light source switching Auto changeover linked with...

Page 45: ...transmittance is required with high accuracy An error message Calibrate is indicated on the screen as shown in Fig 3 1 Fig 3 1 NOTICE Use this function only after the spectrophotometer is fully stabilized at least about 2 hours after turning ON the power switch The calibration of the instrument should be conducted in the order 0 T measuring wavelength calibration and then baseline measuring system...

Page 46: ...ation command on the spectrophotometer menu The wavelength calibration starts automatically NOTE In this instrument wavelength is calibrated automatically on start up Wavelength may change due to thermal expansion over time of components of the spectroscope depending on the indoor environment For more precise measurement wavelength calibration is recommended after 30 minutes to 1 hour of power on ...

Page 47: ...3 4 3 3 2 Choose System and click at OK button Parameter Set at Data mode Abs Starting wavelength nm 1100 Ending wavelength nm 190 Scan speed nm min 200 Response Standard WI Lamp On D2 Lamp On ...

Page 48: ...r maintenance ensures this instrument a long lasting high accuracy 4 1 2 Cleaning Sample Compartment If a sample spills inside the sample compartment immediately remove and clean the sample compartment base as shown in Fig 4 1 Fig 4 1 Removal of Sample Compartment Base 1 Fully open the lid of the sample compartment 2 Remove the setscrew on the sample compartment base Then take out the sample compa...

Page 49: ... sample compartment base along the guide pins pushing the base to leave no gaps 4 1 3 Cleaning Spectrophotometer Cover Do not put any item such as a measuring sample on the spectrophotometer If a sample spills on the instrument clean the spill using a soft cloth moistened with water or non stimulating detergent as immediately as possible After cleaning let it dry up Take particular care not to spi...

Page 50: ...tometer has moving parts inside which have been lubricated at the factory before shipment If an abnormality is suspected in the internal mechanisms of the instrument notify your local service office authorized by Hitachi High Technologies Corporation 4 1 6 Cleaning Transmission Window Plate of Sample Compartment If the transmission window plate of the sample compartment is contaminated remove the ...

Page 51: ...power on leave the spectrophotometer for at least 30 minutes until it warms up Note however that a baseline stability check should be made at least two hours after the power being turned on The following describes the procedures for respective performance check items Adhesive cellophane tape Window frame Black Pull out with tweezers or the like Window opening Transmission window plate Spring Optic...

Page 52: ...ng Use D2 lamp only Switching wavelength nm 340 0 2 Number of measuring times 1 Cell length mm 10 1 Monitor tab Open data processing window after measurement ON Open data processing window after measurement with spectrum superimposed OFF Automatic printing on measuring end OFF Display spectrum on the screen with superimposed OFF 1 On choice setting is available This setting does not affect measuri...

Page 53: ...h at the peak portion in the spectrum If needed press the auto scaling button to change the scale 6 Print the spectrum to read the peak wavelength 7 Measure likewise with the start wavelength end wavelength changed to 490 nm 480 nm 8 Read the peak wavelength 9 Confirm that the peak wavelength thus read is within the specified range Energy Wavelength 0 Peak wavelength ...

Page 54: ...nly Switching wavelength nm 340 0 2 Number of measuring times 1 Cell length mm 10 1 Monitor tab Open data processing window after measurement ON Open data processing window after measurement with spectrum superimposed OFF Automatic printing on measuring end OFF Display spectrum on the screen with superimposed OFF 1 On choice setting is available This setting does not affect measuring 2 This item i...

Page 55: ...of the emission line of D2 lamp 656 1 nm 7 Conduct 2nd measurement changing the wavelength to 1100 nm using the wavelength shifting button or following the same procedures 3 to 6 indicated above 8 Conduct 3rd measurement changing the wavelength to 190 nm using the wavelength shifting button or following the same procedures 3 to 6 indicated above 9 Calculate difference between the maximum and minim...

Page 56: ...100 System condition Response Fast Light source switching D2 lamp only Light source switching wavelength nm 340 0 D2 lamp ON WI lamp ON 2 After setting up the above conditions press the Measurement Screen key The measurement screen will then appear on the display 3 Make sure that no sample is placed in the sample compartment then press the Start key Measurement starts 4 On completion of the measur...

Page 57: ...l length mm 10 Monitor tab Horizontal axis maximum 300 Vertical axis minimum 0 Open data processing window after measurement ON Open data processing window after measurement with spectrum superimposed OFF Automatic printing on measuring end OFF Display spectrum on the screen with superimposed OFF 1 On choice setting is available This setting does not affect measuring 2 Choose Edit Sample name Comm...

Page 58: ...4 2 4 4 11 Example Peak to peak value 0 0003 Abs Noise level 0 0015 Abs Peak to Peak 300 s ...

Page 59: ...nt mode Time scan Apply sample table OFF Instruemnt tab Data mode Abs Measuring wavelength nm 500 Measuring time s 3600 Response Medium Baseline correction User 1 1 Initial waiting time s 0 AutoZero before measuring ON Light source switching Automatic Switching wavelength nm 340 0 Cell length mm 10 Monitor tab Horizontal axis maximum 3600 Vertical axis minimum 0 Open data processing window after m...

Page 60: ...t print the spectrum If needed click the auto scale button before printing to print with the scale changed Draw a line as shown below passing the center of noises then calculate difference between the maximum and minimum on the line D 3600 s ...

Page 61: ... speed nm min 400 Response Medium Baseline correction User 1 Initial waiting time s 0 AutoZero before measuring OFF Light source switching Automatic Switching wavelength nm 340 0 Number of measuring times 1 Cell length mm 10 Monitor tab Open data processing window after measurement ON Open data processing window after measurement with spectrum superimposed OFF Automatic printing on measuring end O...

Page 62: ... scale button before printing to print with the scale changed Draw segmental lines as shown below connecting centers of noises then calculate difference between the maximum and minimum on the line segments Calculate the breadth from the mid point of the difference 200 to 950 nm Flatness ...

Page 63: ...mp broken Replace 4 Error message appears on screen Improper operation Redo following instruction message on screen 5 Large fluctuation in displayed data a Lamp deterioration b Lamp contamination with fingerprint c Dirt or water drip on cell or window plate a Replace b c Remove If the instrument does not work normally even after the remedy according to the above troubleshooting action table contac...

Page 64: ...ts to be kept as spares For purchasing these parts contact your local sales representative or service office of Hitachi High Tech Science Corporation WI lamp Part No 885 1200 D2 lamp Part No 2J1 1500 Main fuse Part No J821399 5 A 115 V Part No J821397 3 15 A 220 230 240 V Guaranteed service life of WI lamp and D2 lamp Guaranteed Life Guaranty Period Part No WI lamp 1000 h 6 months after purchased ...

Page 65: ...p becomes fully cool When installing a new lamp wear clean gloves so that your fingerprints will not be left on the lamp bulb surface When handing a new D2 lamp use particular care not to leave your fingerprints on its protruded part When you check the lighting of the lamp after replacement do not stare into the lamp with the unprotected eye at a near position After replacing the light source cove...

Page 66: ...5 3 1 5 3 Fig 5 2 When the cover is removed the lamps appear as shown in Fig 5 3 Fig 5 3 WI lamp D2 lamp Screw P ...

Page 67: ...en the retaining spring and remove the WI lamp When installing a new WI lamp push the lamp deeply enough so that its root will be seated correctly Fig 5 4 WI Lamp Replacement NOTICE Pull WI lamp straightly upward to remove An oblique pull may make it hard to pull out WI lamp ...

Page 68: ... it counterclockwise to remove c Install a new D2 lamp in the reverse order of removal 4 Replace the light source cover 5 3 2 Lamp Turn On Time Resetting After lamp replacement reset the lamp turn on time indication to zero For details refer to the separate volume for UV Solutions Instruction Manual D2 lamp Connector ...

Page 69: ...ht source position carry out the adjustment while observing the cautionary instructions given below 1 Do not touch the WI lamp and D2 lamp they are extremely hot when being turned on 2 The D2 lamp emits intense ultraviolet rays Wear ultraviolet blocking glasses whenever staring into the lamp is unavoidable 1 Adjustment of WI Lamp Position Turn off the D2 lamp Fig 5 6 Click check mark ...

Page 70: ... A in the light source compartment If the lamp image deviates lengthwise check the lamp mounting conditions for being in position Make sure that the lamp is not inclined If the lamp image deviates still contact your local service office of Hitachi High Tech Science Corporation Fig 5 8 At the end of the adjustment be sure to secure the nut A tightly Slit Lamp image Sidewise deviation Lengthwise dev...

Page 71: ...n Fig 5 9 then check mark disappears causing WI lamp to be turned off Press the wavelength shift key to shift to 300 nm Then the light source mirror turns to face with D2 lamp causing the slit to be rayed by an incident light from the D2 lamp Open the light source cover and check that the image of the lamp forms as shown in Fig 5 9 Fig 5 10 If the lamp image deviates sidewise adjust the nut B and ...

Page 72: ...ument preventing exposure to a high temperature 60 C or higher a low temperature 20 C or lower a high humidity 80 or higher and intense vibration 2 Place the cover sheet over the instrument without fail 3 Take care so that a detrimental gas such as a strong acid alkali vapor will not intrude into the instrument 4 Before moving the instrument to a storage place be sure to fix the light source mirro...

Page 73: ... the sample substance and t represents the transmittance of the sample As a common practice in spectrophotometry the value of transmittance is expressed as t 100 T Percent transmittance or transmittance or T Using the common logarithm of the reciprocal number of the transmittance t the relationship can be expressed also in log 1 t ε c ℓ E 2 where E represents the absorbance Abs of the sample Since...

Page 74: ... widely used in common applications For details refer to Lectures on Experimental Chemistry Vol 15 Part I edited by the Chemical Society of Japan Table A2 1 Applicable Wavelength Ranges Indicated by the solid lines Wavelength Solvent Cyclohexane Ethyl alcohol Methyl alcohol Ethyl ether Dioxane Hexane Chloroform Isopropyl alcohol Acetic acid Ethyl acetate Carbon tetrachloride Benzene Methyl ethyl k...

Page 75: ...the following samples Fluorescing samples Samples having high turbidity In measurement of a solid sample such as glass plate a loss r in optical energy occurs due to reflection on the sample surface In this case the following equation is valid It I0 10 ε c ℓ r 3 where r varies depending on the sample substance ...

Page 76: ... 1 7 Consumable parts 5 1 Cleaning sample compartment 4 1 Cleaning transmission window plate of sample compartment 4 3 Control system 2 5 Cleaning and storage of cell 4 3 D Data mode 2 7 3 3 Differentiation 2 8 E Error message 3 1 Earthquake measure 1 5 F Frequency 1 2 File conversion 2 8 Floor area 1 2 Fuse 1 6 4 16 G General tab 4 5 4 7 4 9 4 10 4 12 4 14 Grounding line 1 2 I Installation 1 1 In...

Page 77: ... 9 Photometric repeatability 2 9 Photometric accuracy 2 9 Photometric range 2 9 Power supply voltage 1 2 Power source capacity 1 2 Power switch 4 16 Peak detection 2 7 Q Quantitative calculation 2 6 R RS 232C 2 2 2 9 Replacement of parts 5 1 Replacement of light source lamp 5 2 RUN Lamp 2 3 Rate calculation 2 7 Response 2 9 3 3 S System baseline 2 8 3 2 Specifications 2 9 Signal processing 2 5 Sca...

Page 78: ...ture 1 2 Stray light 2 9 Spare parts 5 1 T Troubleshooting action table 4 16 Time scan 2 7 U User baseline 2 8 W Work table strength 1 2 Wavelength drive system 2 8 Wavelength calibration 3 2 Wavelength scan 2 6 2 7 Wavelength accuracy 2 9 4 5 Wavelength setting repeatability 2 9 4 7 Z Zero measuring on the sample side 3 2 ...

Reviews: