background image

www.hi-velocity.com

© 1995-2020 Energy Saving Products Ltd.

© 1995-2020 Energy Saving Products Ltd.

Mounting the cooling coil to the fan coil can be done with the T brackets supplied 

(Fig. 12), ensure that no screws puncture the drain pan or coil. Use the provided double 

sided tape to air seal the RBM to the fan coil.See specifications page for the dimensions 

of the fan coil units and cooling modules.

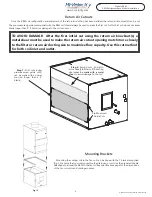
Once the RBM coil configuration and placement of the return air ducting has been decided, the return air knockout(s) can be cut. 

The pre-measured guide cuts supplied with the RBM coil should always be used to make the first cut. For this first cut, do not use a saw 

blade longer than 5” (125mm) or damage to the coil can occur.  

Return Air Cutouts

Mounting Brackets

Fig. 12

TO AVOID DAMAGE:  After the first initial cut using the return air knockout(s) a 

metal shear must be used to make the return air cutout opening match more closely 

to the filter or return air ducting size to maximize flow capacity. Use this cut method 

for both coil inlet and outlet.

Step  1:

  First  cuts  (using 

pre-measured guide cuts) 

can be made with a power 

tool (no longer than a 5” 

blade)

Step 2:

 Second cuts  (to match 

more closely to filter or R/A ducting 

size) 

must be made with a metal 

shear

 to avoid damage to the coil

Pre-Measured 

Guide Cuts

-5-

-5-

Module RBM

RBM Refrigerant Base Module Installation

Summary of Contents for RBM-100

Page 1: ...e Installation 052020 RBM Refrigerant Base Module Installation Manual Small Duct High Velocity Heating Cooling and Home Comfort Systems RBM 50 1 5 2 Tons RBM 70 2 5 3 Tons RBM 100 3 5 5 Tons Includes Pre Piped TXV Freeze Stat Service Access Ports T Mounting Brackets Double Sided Mounting Tape Hole Plugs 2 ...

Page 2: ......

Page 3: ...es can be used on any R 410A condenser if R 410A refrigerant components are used All Energy Saving Products R Series modules come standard with R 410A refrigerant components 3 3 The RBM module can be installed as a stand return air base for the fan coil or as a side mounted coil When the desired air inlet side has been determined the module can be adapted The module comes ready as left to up right...

Page 4: ...e unit 90 deg clockwise Fig 07 Fig 07 6 Replace the drain pan in new bottom location Fig 09 Fig 09 Fig 06 3 Slide out the air flow deflector plate Fig 06 Fig 08 5 Slide the air flow deflector plate back into the section it was removed from in the new orientation Fig 08 Fig 10 7 Remove round knock outs on the door to fit drain lines Plug previously used drain holes with provided plugs Fig 10 Insert...

Page 5: ... should always be used to make the first cut For this first cut do not use a saw blade longer than 5 125mm or damage to the coil can occur Return Air Cutouts Mounting Brackets Fig 12 TO AVOID DAMAGE After the first initial cut using the return air knockout s a metal shear must be used to make the return air cutout opening match more closely to the filter or return air ducting size to maximize flow...

Page 6: ...ring needs arise in which the outdoor unit is controlled through another means of wiring the Freeze Stat should be connected in series on the input side of the control wiring Refrigerant Bypass All RBM coils come with a pre installed check valve ready TX valve used for AC only or heat pump condensing units Third party TX valves may require a bypass check valve Fig 14 Bypass check valve 6 6 Freeze ...

Page 7: ...eck local codes Run the proper size copper wires to the unit and connect as per the manufacturer s recommendations Ensure that the unit is setup for a TX system If not a hard start kit may be required Evacuating The system must be brazed under a nitrogen purge to prevent oxidation of the pipe during the brazing process After the piping is installed and all components have been brazed together a va...

Page 8: ...ing brackets are located at the base of the unit for secure mounting The receiver is to be located on the liquid line of the system anywhere between the indoor and outdoor coils As the unit is of a bi flow design it does not matter which end faces towards the indoor coil The inlet outlet ports are constructed of steel and require the use of a 35 45 Silver Solder and Flux for brazing The use of sta...

Page 9: ...HV 70 71 LV 70 HE Z HE P HE B HE HV 100 101 Part Number 41090300050 41090300070 41090300100 Tons 1 1 5 2 0 5 3 7 0 kW 2 5 3 0 8 8 10 6 kW 3 5 5 0 12 3 17 6 kW Refrigerant Type R 410A R 410A R 410A TX Cooling MBH 2 18 24 5 3 7 0 kW 30 36 8 8 10 6 kW 42 60 12 3 17 6 kW Latent Cooling MBH 6 8 8 9 2 0 2 6 kW 11 7 13 7 3 4 4 0 kW 16 0 22 2 4 7 6 5 kW Fin Material Aluminum Aluminum Aluminum Tubing Mater...

Page 10: ...ain Conn Refrigerant Modules B C A D E F RBM 50 14 1 2 368mm 18 1 4 464mm 18 1 4 464mm 3 8 o d 7 8 o d 3 4 M CPVC RBM 70 19 1 2 495mm 18 1 4 464mm 18 1 4 464mm 3 8 o d 7 8 o d 3 4 M CPVC RBM 100 25 1 2 648mm 18 1 4 464mm 18 1 4 464mm 3 8 o d 7 8 o d 3 4 M CPVC RBM Series Sizing A B C D E F 10 10 Module RBM RBM Refrigerant Base Module Installation ...

Page 11: ...and other products or materials furnished by the installer TERMS CONDITIONS Any repair performed under warranty must be approved by Energy Saving Products Ltd for this warranty to be valid This warranty replaces all other warranties expressed or implied www hi velocity com Should there be multiple consecutive failures of a single part warranty will not be considered unless a contractor has contact...

Page 12: ...b Energy Saving Products prides itself on Customer Service and provides design services and contractor support For all of your Heating Cooling and Indoor Air Quality needs the Hi Velocity System is the right choice for you Phone 780 453 2093 Fax 780 453 1932 Toll Free 1 888 652 2219 www hi velocity com Hi Velocity HE Z Fan Coils Hi Velocity HE Z Fan Coils Green Green Technology Technology Build Sm...

Reviews: