background image

RUN /AHR TIMER

LOAD 

HOLIDAYS 

(OFF 

OVERRIDE

)

 SETUP

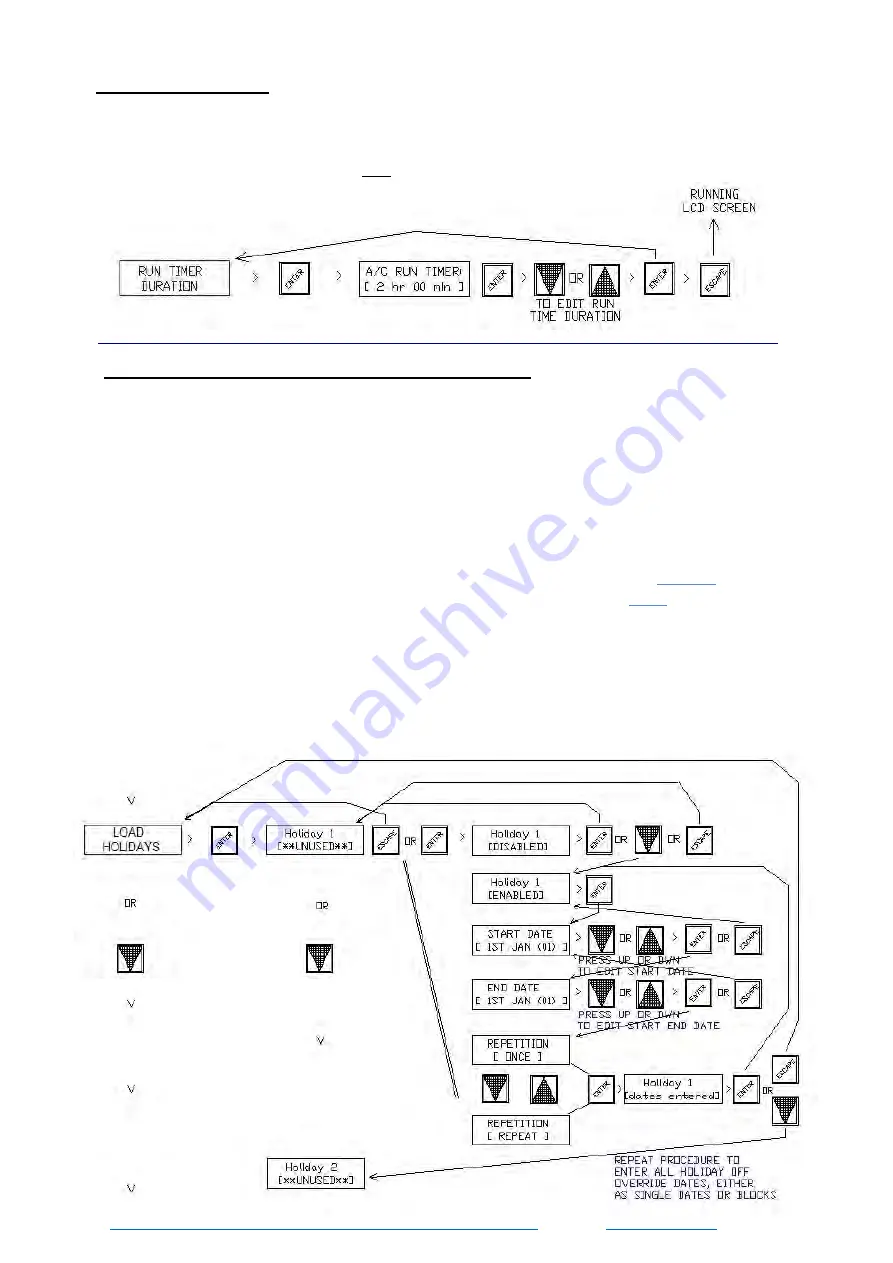
Individual or group of dates can be programmed as holiday 

time switch

 “OFF” 

overrides. To edit or set Holiday dates, Press the fascia button labeled “

ENTER

” to 

have the LCD 

display jump to the 1st menu item in the menu tree - 

"SET  CLOCK"

HEVAC CONTROL AGENCIES PTY LTD.  7/54 HOWLEYS RD. 

NOTTINGHILL,  VIC.  95627888 

www.hevac.com.au


2

3

/10/19

12/2

8


scroll down through 

the menu tree with the “

DOWN

” arrow button until 

LOAD


HOLIDAYS

” is displayed. Pressing the “

ENTER

" button will then display either 

the 1

st

 existing Holiday date or 

HOLIDAY


DISABLED

. If disabled, press the “

DOWN

” 

button to change to 

ENABLED

. Once enabled, the 1st holiday default start date of 1

st


JAN (01) will be displayed, (01) means the 1st holiday. Using the “

UP

 or 

DOWN

” 

buttons scroll through calendar dates until the required 1st 

HOLIDAY START date

 is 

displayed, press “

ENTER

” to then 

also 

program the 1st 

HOLIDAY END date

 which can 

either be the same as the start date (if a single day holiday) or a future inclusive date 

for a group of days (i.e.: Easter or a school holiday term break). The controller asks 

after each holiday is set whether this holiday OFF override event should only execute 

once or repeat each year on the same date(/s), set as either 

ONCE

 or 

REPEAT

 using 

the “

UP

” or “

DOWN

” buttons, press “

ENTER

” to accept settings then the “

DOWN

” 

button to jump to the next holiday start date to program. Repeat this procedure until all 

holiday dates are set.

Whether the Run Timer is used as a short duration type “After Hours”(

AHR

) Run timer

(if the system normally operates by the controllers internal time switch), or set for a 

longer period

,

 typically as a 

“Run For Timer"

, the procedure to set up the timer is the 

same. 

Summary of Contents for ENDEAVOUR V2

Page 1: ...4 ADJUSTABLE MIN MAX SETTINGS FOR Y1 Y2 0 10v O P s 5 SUPPLY AIR TEMPERATURE SENSOR MONITORING INPUT 6 EXTERNAL A C FAULT D3 AUX I P D4 BMS MONITORING INPUTS 7 ACTIVE 0 10vdc SENSORS NOW SCALABLE 8 AD...

Page 2: ...CONFIGURATION 8 MODBUS SETUP MEMORY MAP 17 FACTORY DEFAULTS also see page 25 22 23 HEVAC CONTROL AGENCIES PTY LTD 7 54 HOWLEYS RD NOTTINGHILL VIC 95627888 www hevac com au 28 11 19 PAGE TYPICAL CONNE...

Page 3: ...ated A C fault monitoring input D4 is a general purpose on off status input that could be used for example to monitor prove supply air fan running operation via a mechanical pressure switch Remote Sys...

Page 4: ...as RS485 MODBUS Outputs X7 can be set to ground via a 100 ohm resistor for use as a comms shield connection if not used as a CO2 sensor connection ANALOG INPUTS X1 Main Temperature Sensor Input config...

Page 5: ...M Signal ground Y1 Analog Modulating Output 0 10 vDC Y2 Analog Modulating Output 0 10 vDC X1 Main Temperature Sensor Input Passive or Active X2 Remote S P input Passive or Active Optional connection...

Page 6: ...he UP DOWN arrow buttons to scroll through the menus pressing ENTER to open a particular menu to edit The relay assignments are user programmable and as such the relay use identifier text box above ea...

Page 7: ...PROGRAM R5 FAN TO CYCLE WITH HEAT COOL CALL OR CONTINUOUS Y1 Y2 ANALOGUE PROGRAMMING SET MODE SETTINGS FOR THE 2 PROGRAMMABLE ANALOGUE Y1 Y2 O P s X1 SENSOR CONFIGURATION SET MAIN CONTROL SENSOR WHIC...

Page 8: ...nu item in the menu tree SET CLOCK Press the ENTER button to check and edit the controllers time date and day light saving enable or disable settings Daylight saving if enabled starts on the 1st Sunda...

Page 9: ...em Switch or external interlock wired in parallel with the 2 sensor wires connected to our passive temperature sensor or alternatively shorting the controllers D1 M terminals which has the same affect...

Page 10: ...te at any time day s and set as a switching ON event or OFF event Typically the switching events would be programmed in the order of ON events with common days time followed by an OFF event with match...

Page 11: ...time leave as for disabled days After Sunday is entered the display will jump to the ON time setting screen use the UP DOWN buttons to set the ON time then press ENTER The controller will then ask sh...

Page 12: ...e UP or DOWN buttons scroll through calendar dates until the required 1st HOLIDAY START date is displayed press ENTER to then also program the 1st HOLIDAY END date which can either be the same as the...

Page 13: ...the LCD display jump to the 1st menu item in the menu tree SET CLOCK scroll down through the menu tree with the DOWN arrow button until RELAY PROGRAMMING is displayed Press the ENTER button to open t...

Page 14: ...relay stage turns on after exceeding the deadband setting RELAY SUMMARY SCREEN EXAMPLES R M RELAY 1 4 MODE OF OPERATION H C B 0 TIME SW2 D_B DEADBAND 0 25c S_D SWITCHING DIFFERENTIAL 0 1 20c Tdly TIME...

Page 15: ...ortable To set or edit the two analogue outputs Y1 Y2 for mode of operation and output characteristics Press the fascia button labeled ENTER to have the LCD display jump to the 1st menu item in the me...

Page 16: ...DEADBAND 0 25c P_B PROPOTIONAL BAND 1 25c P I INTEGRAL TIME 1 60min or P only HEVAC CONTROL AGENCIES PTY LTD 7 54 HOWLEYS RD NOTTINGHILL VIC 95627888 www hevac com au 07 11 19 OR OR USE UP DOWN BUTTON...

Page 17: ...ble from 5 to 5c for 0v adjustable upto 100c for 10v HEVAC CONTROL AGENCIES PTY LTD 7 54 HOWLEYS RD NOTTINGHILL VIC 95627888 www hevac com au 21 10 19 17 28 LAST STATE DISPLAYED Note if active sensor...

Page 18: ...h the DOWN arrow button until X3 O AIR TEMP CONFIGURATION is displayed Press the ENTER button to open this menu and the existing status is displayed If DISABLED is displayed press the DOWN arrow butto...

Page 19: ...also necessary to reposition a physical input select jumper on the controller s bottom pcb Remove screws holding the lid to base and hinge lid to the right locate the row of red jumpers located under...

Page 20: ...fascia button labeled ENTER to have the LCD display jump to the 1st menu item in the menu tree SET CLOCK using the DOWN arrow button scroll down the menu until X7 CO2 SENSOR CONFIGURATION is displayed...

Page 21: ...cycle dampers connected to analog output Y1 to reposition to the full fresh air mode These output states are maintained until the room temperature drops to a settable temperature difference in relatio...

Page 22: ...7 isnt used for CO2 measurement X7 can be set as ground source for the modbus shield connection by setting input pin CN4 to the C position otherwise the shield wire needs to be connected to a good ear...

Page 23: ...to a minimum value even in time switch only mode for use as a time switch controlled fixed analogue output module OTHER NOTABLE FACTORY SOFTWARE DEFAULT SETTINGS CONTROLLER SET AS STANDARD TEMP MODE...

Page 24: ...NSOR ON OFF SWITCH C W SETPOINT POT C W S P ON OFF SW DUCT TEMPERATURE SENSOR OUTSIDE AIR SENSOR PASSIVE OUTSIDE AIR SENSOR ACTIVE ROOM CO2 SENSOR 3 WIRE 3 WIRE HCRW5 ROOM TEMP CO2 SENSOR 4 WIRE OPERA...

Page 25: ...tch on period BOTH 3 0 1 0 3 00 COMPRESSOR 3 BOTH 2 0 0 5 2 00 COMPRESSOR 2 BOTH 1 0 0 3 1 00 COMPRESSOR 1 HEAT 0 5 0 4 0 10s rev valve HEAT Y1 Y2 ANALOGUE OUTPUT ASSIGNMENTS ANALOG O P I MODE IDEADBA...

Page 26: ...ME _____ _____ ACTION ON OFF TIME _____ _____ ACTION ON OFF TIME _____ _____ ACTION ON OFF TIME _____ _____ ACTION ON OFF TIME _____ _____ ACTION ON OFF TIME _____ _____ ACTION ON OFF TIME _____ _____...

Page 27: ...PI MAX O PI NOTES X ANALOGUE INPUT CONFIGURATIONS X I P I PURPOSE IActive PassiveI OFFSET I 10v I PCB JUMPER POS I NOTES X1 I MAIN TEMP SENSOR __I I I I I X2 I REMOTE SETPOINT I I I I I X3 I OUTSIDE A...

Reviews: