Installation
Suprasetter A52/A75 – Installation
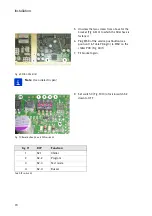
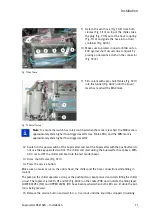
Fig. 71 Vent hose
Fig. 72 Shutoff valve
Note:
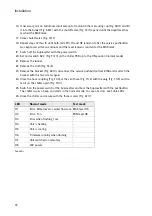
To ensure the switch has safely switched when the mark is reached, the MAX mark is
approximately 2mm higher than trigger level H1 (see Table
approximately 2mm higher than trigger level H2.
12. Switch on the power switch of the Suprasetter and boot the Suprasetter with the pushbutton (do
not use the key-operated switch). The chiller will start during the Suprasetter boot phase. With
S2-3 set to OFF the chiller will boot into the test mode (beep).
13. Close shutoff valve (Fig. 72/1).
14. Press the service button.
Make sure no leaks occur on the optics head, the chiller and the hose connections while filling in
coolant.
The pump in the chiller operates as long as the pushbutton is kept pressed and starts filling the chiller
circuit. The topmost red LEDs H1 and H2 (Fig. 69/2) on the chiller PCB now indicate the filling level:
LOWER LEVEL (H2) and UPPER LEVEL (H1) have been reached when both LEDs are lit while the but-
ton is being pressed.
15. Release the service button and wait for ca. 3 seconds until the liquid has stopped circulating.
9. Detach the vent hose (Fig. 71/2) from both
clamps (Fig. 71/3) on top of the chiller, take
the plug (Fig. 71/5) out of the hose coupling
(Fig. 71/4) and guide the hose into a fluid
container (Fig. 68/5).
10. Make sure to protect connector X146 on fan
E30 against short circuits due to liquids by
placing an absorptive cloth on the connector
(Fig. 72/2).
11. Fill coolant with open shutoff valve (Fig. 72/1)
into the funnel (Fig. 68/2) until the liquid
level has reached the MAX mark.
i
i
Summary of Contents for Suprasetter A52
Page 6: ......
Page 24: ...Safety 22 Fig 24 Filter replacement Fig 13 4 On the filter unit ...
Page 26: ...Safety 24 Fig 26 Warning sign copy template ...
Page 36: ...Installation Preparation 34 Pallet Installation Instructions ...
Page 82: ...Technical Data 80 Resolution 1000 pixels cm 2540 dpi Type Value Comment ...
Page 84: ......
Page 85: ......

