74
H4D
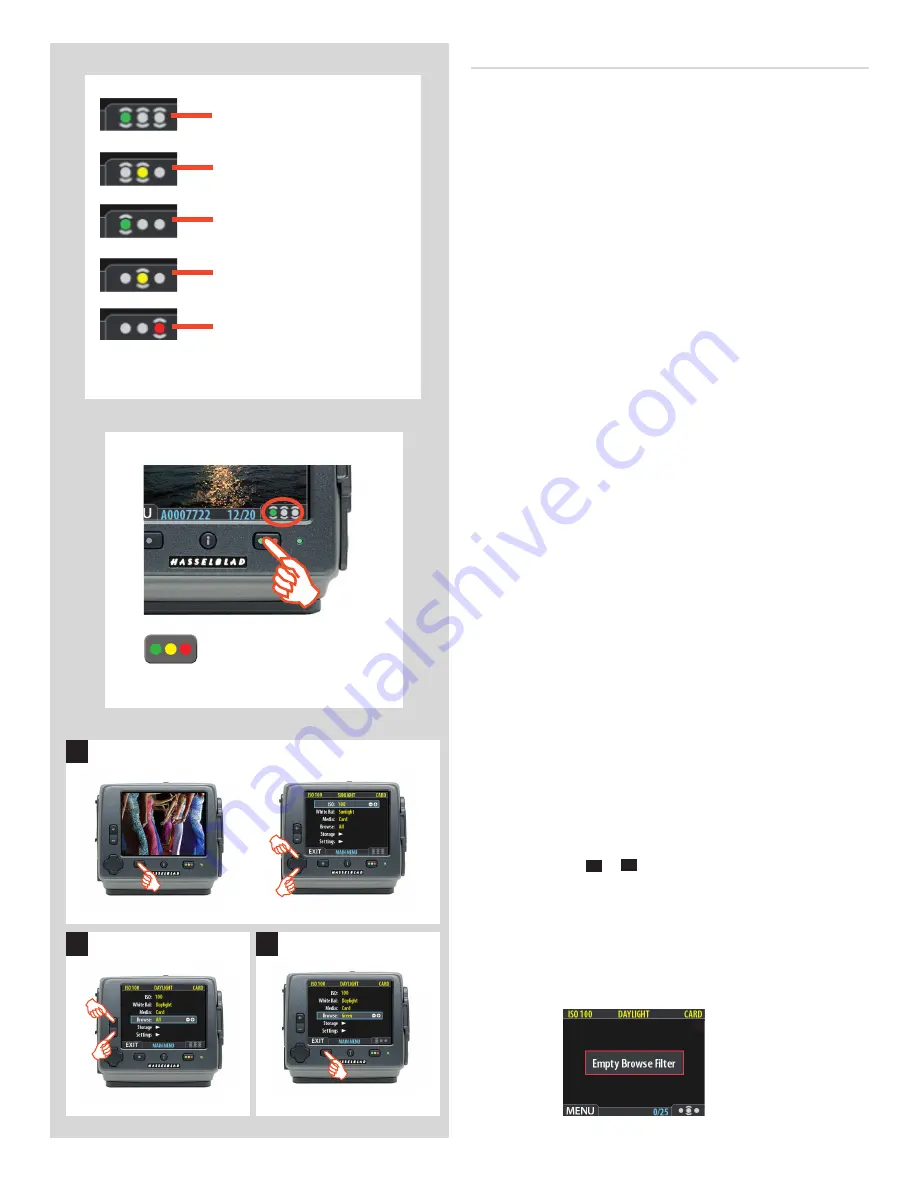
Browsing by approval status
You can set the camera to browse by approval status, which
means, for example, that you will see only green-status images as
you browse a batch (or both green and yellow, or only red, etc.).
The current fi lter setting is indicated on-screen, as illustrated. Fil-
tered images are still there, but they will not be shown until you
change the fi lter setting. Also, if you change the status of an im-
age, the image may ‘disappear’ if it no longer passes the fi lter. For
example, if you have set the camera to browse only green-status
images and then change an image to yellow status, that image
will not be shown again until you change the browse fi lter. You
have the following choices:
All:
•
browses all of the images in the current batch, regardless of
their approval status. This is the default.
Red:
•
browses only red-status images from the current batch. These
are images that you have marked for likely deletion. You might
browse these images to make sure you have not eliminated any
usable images and/or to fi nd images that you can delete to make
room for new shots.
Green:
•
browses only green-status images from the current batch.
These are either new shots that did not trigger an exposure warning
or shots that you manually assigned to green after overriding an
exposure warning.
Green & Yellow:
•
browses green and yellow-status images, but
does not show red-status images. These are probably images that
you have either decided to keep or not yet checked for approval
status.
There are many ways to make use of this feature. For example:
• Set the fi lter to show only yellow images. Then step through
each image and decide whether any of them should be pro-
moted to green or demoted red.
• If you are running out of space, set the fi lter to show only red
images and then step through to fi nd shots you can delete.
• Set the fi lter to show only green images. Then step through
to make sure you have at least one ‘good’ example of each
shot that you need.
There are two ways to set the browse fi lter:
1. Choose
MAIN MENU > Browse
. The current setting is displayed
here.
2. Use the zoom (
–
or
+
) button to step through the fi lter
options (described above) until you have selected the fi lter
you wish to use.
3. Press the menu button to exit the menu system and keep
your setting.
The appearance of the ‘Empty Browse Filter’ message signifi es
that there are no images with that particular approval status.
Show all
(brackets on all)
Show green and yellow only
(brackets on green and yellow)
Show green only
(brackets on green only)
Show yellow only
(brackets on yellow only)
Show red only
(brackets on red only)
1
2
3
Press and hold (do not click!) the Instant
Approval button until the approval status
colour appears. Browsing will then only
display the images with that classifi cation.
Browse fi lter shortcut


