background image

30

H4D

   Manual focus

There is both a 

Manual Focus

 mode setting and a 

Manual Override

 capability. 

Man-

ual  Focus

  is  a  specifi c  setting  that  you  actively  make,  whereas 

Manual  Override

  is 

always available as a temporary override of an autofocus setting.
In 

Manual Focus

 mode, focusing is carried out by rotating the focusing ring in the con-

ventional manner. The focus setting remains until changed as with a conventional non-

autofocus lens. This means that pressing the shutter release button will not activate a 

focus setting change as it does in autofocus. To change back to autofocus, you must 

make a new setting (by pressing the 

AF

 button and choosing 

AF S

 or 

AF C

). 

With 

Manual Override

, you can manually alter a focus setting that has been made in 

the autofocus mode, by rotating the lens barrel in the conventional manner and without 

having to change modes. As long as the shutter release button is kept at the half-press 

position, the new focus setting is maintained. By releasing the pressure on the shutter 

release button and pressing again, the autofocus function is immediately reactivated.
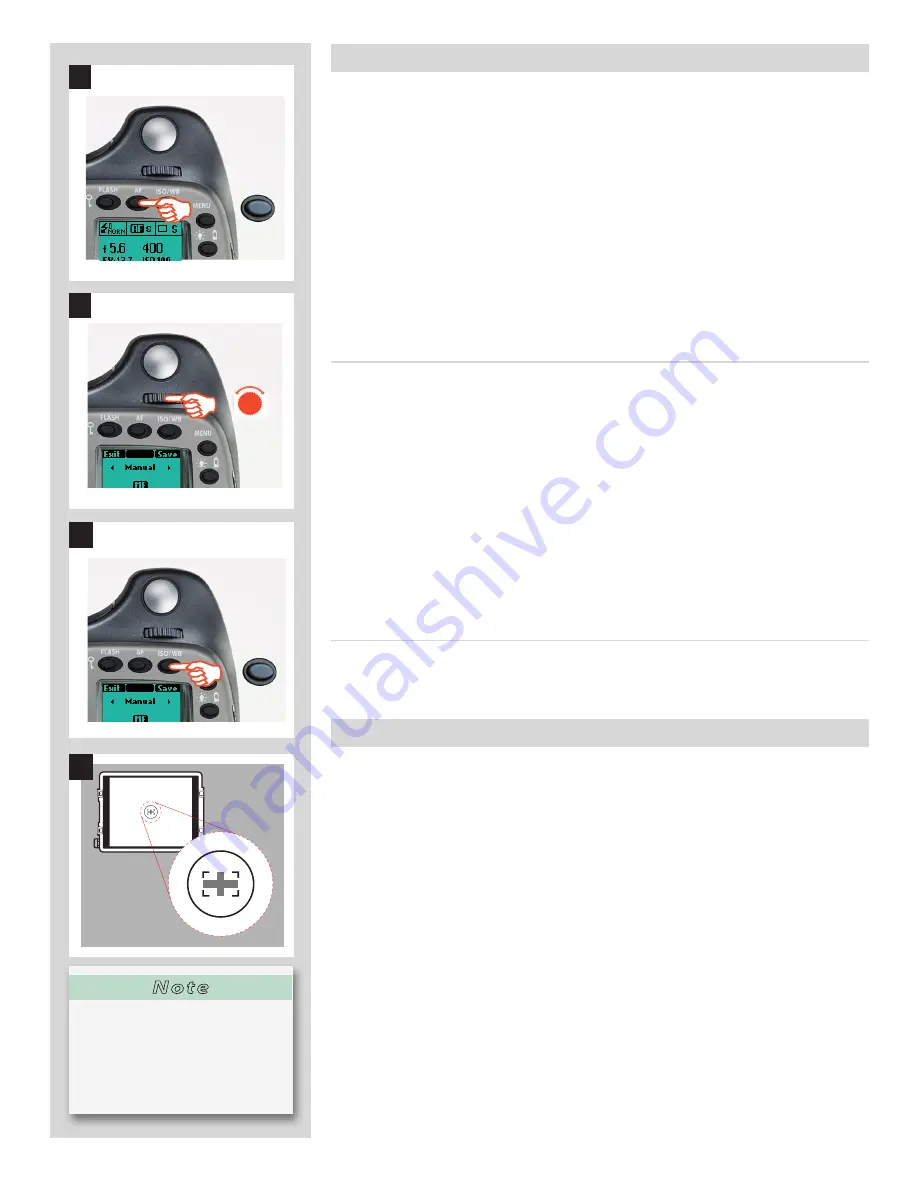
Manual focus mode

The 

Manual focus mode

 is set by the front control wheel on the grip in the following 

manner:

In camera active mode:
1)   Press the 

AF

 button on the grip.

2)   Turn the front control wheel to: Manual 
3)   Press 

Save

 to store the setting.

Natural friction is inherent in the design to purposely reproduce the secure feel of a com-

pletely manual lens. 
Please note that when focusing manually, the infi nity and closest distance marks on the 

lens scale can appear to be positioned beyond the central index. This is only an apparent 

eff ect and does not change the focusing range of the lens. 

Autofocus override in Manual mode

See Autofocus section for a description of how to use the advantages of a rapid autofo-

cus check while remaining in Manual mode.

   Autofocus 

Autofocus mode can be either 

Single Shot

Continuous

 or 

True Focus 

(see note be-

low)


and is activated by pressing the shutter release to the half-press position. Its op-

erative range from EV1 - 19 at ISO100. The point of focus is determined according to 

the vertical and horizontal areas (see illus 4.) within the central rectangular zone on the 

focusing screen. When light levels are too low or the contrast of the subject is too low, 

auxiliary illumination (situated on the top of the grip) is automatically activated if de-

sired. The operative distance is approximately six metres from the camera. Alternatively, 

a suitable attached fl ash unit that has a similar facility ( a Metz 54/70, for example) can 

also be used instead. This feature can be altered in settings; see under Custom options/

AF assist light.

 

The True Focus function can also be combined with Single Shot, Continuous and Manu-

al. See below for a full exlanation.

 

The autofocus range on the HC 4/120 Macro lens can be limited by a specifi c setting on 

the camera allowing for near range, far range or full range. This only appears on the 

grip display together with that particular lens. 

1

2

F

3

ISO / WB

Save

4

N o t e

The autofocus function is not pos-

sible  with  certain  combinations  of 

lenses and accessories. However, a 

warning  is  displayed  which  disap-

pears after confi rmation. 

AF

Summary of Contents for H4D 40

Page 1: ...H4D User Manual H4D 40 H4D 50 ...

Page 2: ...edia 62 Introduction 4 1 General overview controls and displays 9 Button functions 10 Display information 11 Grip display 12 Viewfinder display 13 Digital capture unit display 14 Buttons and control details 15 Audio feedback 17 2 Camera Body 19 Carrying strap 20 Rechargeable battery 20 Battery charger 20 Charging the battery 21 Rechargeable battery grip general 21 Rechargeable battery grip precaut...

Page 3: ... mode 69 Battery saver mode 69 Full screen mode 69 Overexposure indicator 69 12 IAA Instant Approval Architecture 70 Using IAA 71 Default approval status 73 Browsing by approval status 74 Deleting by approval status 75 13 File storage 76 Organizing work with batches 78 Creating a new batch 78 Navigating media and batches 79 14 Deleting images 80 Delete 82 Deleting several images from a batch 83 De...

Page 4: ...rds always to produce a better product By using Hasselblad equipmentyousharethedecisionmadebyofsomeoftheworld sbestandmost famous photographers Congratulations on picking a winner you won t be dis appointed Medium Format digital capture advantage In digital photography the advantages of large format cameras have become even more obvious The 6 4 5 cm window allows the H4D to use the largest image s...

Page 5: ...easy to use portable tilt shift solution for 5 HC HCD lenses ranging from 28mm to 100mm The CF adapt er optional accessory allows use of the classic CF lenses from the Hasselblad V System with full use of their central shutters allow ingflashtobeemployedatshutterspeedsupto1 500s Thecentral shutter also improves image quality by reducing camera vibration And thanks to the large format of the H Syst...

Page 6: ...e and visual signals for each image captured notifying the photographer immediately of its classification status The infor mation is recorded both in the file and in the file name providing a quick and easy way to classify and select images in the field or back at the studio IAA is a Hasselblad trademark and Hasselblad has a patent pending on the invention Extra large 3 display on the H4D provides...

Page 7: ...nd competent digital workflow is crucial in a working environment The best medium format digital captures in the world should be handled in a qualified and proficient manner to provide the last links in the chain Phocus by Hasselblad does just that Hasselblad s Natural Color Solution HNCS enables you to produce outstanding and reliable out of the box colors with skin tones specific product colors ...

Page 8: ...tal capture unit for cleaning as the exposed CCD sensor protective filter is vulnerable to damage Keep all cables connected to or from your camera and computer out of the way where they will not be tripped over Ensure the ventilation openings remain uncovered on the digital capture unit when it is active Your new Hasselblad camera may have been supplied in kit form or as sepa rate items There are ...

Page 9: ...neral overview controls and displays This section provides an introduction to the control buttons functions as well as the information provided on the display screens Photo Benjamin A Monn Hasselblad Masters 2008 ...

Page 10: ... button Accesses ISO and White Balance set tings Also acts as Save button Front control wheel Accesses and changes various settings MENU button Accesses menu Illumination Battery status button Illuminates grip display Accesses battery status and general informa tion screen ON OFF PROFILES ESC button Turns the camera on and off Access es Profiles and acts as escape button for other functions Rear c...

Page 11: ...ttings for ex ample are only changed on the grip but are nevertheless mir rored in the viewfinder and digi tal capture unit displays Please note that the grip and digi tal capture unit displays also il lustrate many more specialist set tings These are covered in detail further on in this manual Display information overview Metering method Aperture setting Shutter speed Exposure method Capture coun...

Page 12: ...n is chosen by the rear con trol wheel front control wheel rear control wheel Setting information The lower row on the screen displays information about the current state of the setting In short the upper row displays what you can do and the lower row displays the current state of settings or what you have done Typical camera grip display the information in brackets describes this particular examp...

Page 13: ...Aperture setting f 5 6 Metering method setting Centre weighted Warning triangle LED Exposure compensation setting 0 7 EV Shutter speed setting 1 30 second Capture counter Focus Aid LED Flash LED Normal screen with True Focus Normal screen with AE lock Normal screen with exposure activated acivated compensation set Standard settings Some examples of various viewfinder displays Flash mode Drive mode...

Page 14: ...ures for browsing and enlarge them for detailed inspection When shooting you can control the amount of information visible together with the current preview by choosing various modes see Preview Modes section further on in this manual In the upper left example the preview is showing a histogram overlay with ISO and white balance information etc as an example See Digital capture unit general overvi...

Page 15: ...e main screen See separate section for full details It also acts as the ON and SEL select buttons for many other settings ISO WB button SAVE ENTER D This is a triple function button It provides direct access to the ISO and White Balance settings see separate section for full details It also acts as the SAVE and ENTER buttons for many other settings as well as an OK but ton when navigating the digi...

Page 16: ...ull details On the front of the grip there are two more control buttons plus the remote cord release port M UP button M Press this button to raise the mirror and press again to lower it toggle function A quick double press of the button two within a half second will immediately access the Self timer function Can be reassigned in Custom Options to another function Remote release cord port N For att...

Page 17: ...rror Ready Overexposure Low battery ON OFF Error Ready Low Battery ON OFF Media full IAA yellow Error Ready Overexposure Underexposure 5 images left 1 image left Low battery ON OFF Media full IAA yellow Overwrite red Transfer complete Error Ready Overexposure Underexposure 5 images left 1 image left Low battery IAA yellow Overwrite red Transfer complete Overexposure Underexposure 5 images left 1 i...

Page 18: ...in the menu on the grip display Enter moves screen down one level on the menu Exit moves screen back up one level on the menu Does not save any settings Off deactivates the particular function being set On activates the particular function being set Sel Select selects the character marked for image info and profile name ESC Escape terminates an action and returns to the main screen Does not save a...

Page 19: ...lso contains the viewfinder screen which can be easily removed or exchanged without the use of special tools or adjustment procedures Please take extra care when handling the camera body with out a protective cover or the digital capture unit in place to protect the auxiliary shutter Likewise the front opening of the camera body reveals the mirror when unprotected by a cover or lens Do not touch o...

Page 20: ...e the battery from the camera by depressing the battery holder button A and simultaneously swinging the battery hold er retaining lever B down until it stops Pull the battery down wards C If you intend to store the battery separately from the camera you should ensure that the safety cover is in place to prevent short circuiting It snaps into place and is removed by pulling outwards and upwards on ...

Page 21: ...ce of the Replace battery warning on the grip display As the battery is a Li ion type it has no memory effect of practical importance and therefore frequent recharges will cause no problems such as loss of capacity or poor performance It is therefore better policy to recharge the battery at very regular intervals regardless of use Remove the battery if you intend to store the camera for some while...

Page 22: ...the battery flat against the camera body and aligning the two upper lugs with the slot slide it back into position as far as it will go Swing back the battery holder retaining lever as far as it will go into the locked position The lithium battery grip should be seen as a reserve for emergency use only Battery life 11 12 13 Battery life is dependent on a number of variable factors and therefore ca...

Page 23: ... The camera can be set at two active power modes ON or Standby as well as OFF In active modes battery consumption is least in Standby mode and most in ON mode The camera enters Standby mode to preserve battery consumption after 10 seconds De fault Can be changed in Custom Options 1 Both the grip and the digital capture unit displays are dimmed accordingly The digital capture unit becomes inactive ...

Page 24: ...empt to clean the screen by immersing it in water or use any kind of cleaning fluid If the screen becomes damp do not use hot air to dry it Use a soft cloth on the upper surface only Seek advice from an Authorized Hasselblad Service Center if the screen becomes particularly soiled Remember that parti cles or greasy marks on the screen might impair the viewfinder image but have no effect whatsoever...

Page 25: ... suit preference each of them naturally indicating the spot light metering area for accuracy in exposure calculation The information display located beneath the viewing frame is continually updated and visible and is back lit for optimum visibility This display also duplicates much information visible on the grip display for immediate checking In addition to the display there are four LEDs providi...

Page 26: ...or viewing or not Personal eyepiece adjustments can be carried out by pointing the camera at the sky or similar smoothly toned area While holding the camera in your left hand you can with your right thumb turn the adjustment wheel until the markings on the viewfinder screen reach the optimum sharpness for your eyesight If you normally wear eyeglasses for distance viewing and intend to wear them fo...

Page 27: ...n specially formulated for the H system to produce the extremely high performance expected from Hasselblad In addition to exceptional sharpness the design also incorporates a very pleasing boké All lenses feature an electronically controlled central shutter designed to extreme ly fine tolerances for supreme accuracy To ensure reliable and fast autofocus in low contrast and low light conditions an ...

Page 28: ...using polarizing or graduated filters where the orientation is normally critical Lens shades 5 6 All lenses are supplied with lens shades that additionally pro vide extra protection for transport and storage when mounted in reverse Lens shades have a bayonet fitting and are turned clockwise into place after ensuring the index on the lens shade aligns with the index on the front of the lens When mo...

Page 29: ...s 9 As infrared rays form an image at a different plane to that formed by visible light the normal focus settings do not apply Proceed as follows in manual focus mode 1 Focus the lens in the conventional manner until satisfied 2 Note the distance setting against the central lens index 3 Re align this distance setting against the infrared mark coloured red instead of the central lens index Alternat...

Page 30: ... infinity and closest distance marks on the lens scale can appear to be positioned beyond the central index This is only an apparent effect and does not change the focusing range of the lens Autofocus override in Manual mode See Autofocus section for a description of how to use the advantages of a rapid autofo cus check while remaining in Manual mode Autofocus Autofocus mode can be either Single S...

Page 31: ...u minimize the amount of time needed for the lens to check focus thus ensuring a split second shot at optimum focus True Focus The True Focus setting AF T is generally used in specific circumstances to automatically correct for camera angle focus setting discrepancies It can also be combined with AF C AF C and M See below for full description Focus mode Focus mode is set via the control wheels in ...

Page 32: ...anted focus restrictions d The mechanics of True Focus use amongst other things camera to subject distances to calculate the required amount of adjustment It therefore follows that if the cam era or the subject move after the initial setting has been made the calculations will not be applicable anymore So to ensure the optimum correction both the pho tographer and the subject should restrict movem...

Page 33: ... logs camera movement as the basis for an extremely rapid compensatory focus reset without any shutter lag The H4D s firmware then further perfects the focus using the precise data retrieval system found on all HC HCD lenses A ca 2 5m B ca 2 5 m Distance when camera perpendicular ca 2 4 m A normal autofocus setting is made on the model s face and locked The focus setting is approximately 2 5m When...

Page 34: ...mains active for as many shots as you like In other words the AF T function is automatically de activated after the first shot if the button is released B You want to use autofocus in AF T mode but want to retain True Focus for a number of shots 1 Set the camera to AF T mode Standard autofocus is now deactivated that is pressing the shutter release will not automatically instigate a new focus sett...

Page 35: ... appear in the viewfinder and the audio confirma tion signal 4 Recompose the picture and press shutter release button camera does not re focus because it is temporarily in AF T mode The True Focus icon disappears from the viewfinder Camera reverts to AF S Note that camera reverts to AF S if the focusing ring on the lens is moved In this mode the True Focus function is activated by pressing an assi...

Page 36: ...ion transfer is rapid and auto matic ensuring consistently correct exposure settings even in difficult and changeable lighting situations Light measurement is made through the lens TTL and ex posure is controlled manually or automatically by the control wheels and or settings The information is visible on both the grip display and the viewfinder display A great deal of control is available ranging...

Page 37: ...ommore traditional displays For example the position between f 8 and f 11 is displayed as f9 5 and likewise the position between 1 30s and 1 60s is displayed as 45 Therefore a display showing f 9 5 45 simply means f 9 5 at 1 45 second The appearance of an s after the shutter speed signifies whole seconds so for example 32s on the display signifies an ex posure time of 32 seconds not 1 30 ISO White...

Page 38: ...ellent for tonal comparison measurements The spot mode can display zones instead of EVs in the viewfinder display see Camera Options Selecting metering method Proceed as follows with the camera in active mode 1 Press the EXP button on the viewfinder 2 Turn the rear control wheel in either direction 2a to successively access the three choices Centre Weighted Centre Spot and Spot 2b 3 Press Save ISO...

Page 39: ... exposure compensation setting See later section on Exposure compensation The actual aperture settings and shutter speeds are indicated to the right of the exposure scale in the conventional manner Note full stops half stops and third stops are also displayed ac cording to setting see increment setting For example a setting between f 8 and f 11 will appear as f 9 5 if half stop is chosen Automatic...

Page 40: ...he status Press the AE L button again to unlock toggle function In the locked setting the aperture and shutter speed become in terlocked In this way a new aperture shutter combination that still represents the same EV can be rapidly chosen For example if you set the shutter at 1 125s and the aperture at f 8 and lock them together you can access new EV equivalent combinations of for example 1 30s a...

Page 41: ...osure range by their new Zone clas sification Alternatively you can also pre set the initial zone reading in order to save time and effort where there is no freely available zone 5 subject for light measuring For example you might be on a san dy beach where you know that sand is normally classified as zone 6 You can pre programme the zone placement by holding down the AE L button while choosing th...

Page 42: ... 1 3 EV steps 3 The amount is displayed in the viewfinder as both an EV fig ure complete with a minus or plus prefix A in illustration and as a marker above a minus to plus scale B in illustra tion 4 Press Clr AF button to reset any compensation back to zero 5 Press Save ISO WB button to retain the setting 6 A symbol is then displayed between the aperture and shutter speed setting as confirmation ...

Page 43: ...43 H4D 6 Profiles Profiles not only allow for rapid setup in changing working environments but also ensure an element of security Photo Gregor Halenda Hasselblad Masters 2008 ...

Page 44: ...ash normal flash sync adjusted output 1 7EV autofocus single single drive autoexposure average metering Spare customized profiles The default setting is highlighted on the display for easy and rapid access Access to pro files lower on the list is via a scroll bar visible on the right of the display Rotate the rear control wheel to bring them into view All user profiles can be restored to default v...

Page 45: ... the desired profile 3 Press Load AF button The camera is now set according to all the parameters stored according to the name Changing a profile name You can change a profile name except Standard at any time Proceed as follows 1 From the main screen click PROFILES ON OFF button on the grip and the profile screen will appear 2 Use the scroll bar to go through the list and highlight the desired pro...

Page 46: ...46 H4D 7 Digital capture unit introduction Photo Benjamin A Monn Hasselblad Masters 2008 ...

Page 47: ... three displays the digital capture unit display the grip display and the HV viewfinder display For example exposure controls are visible on the grip display in the viewfinder display and in Phocus when tethered but not on the digital capture unit display Storage infor mation is visible on the digital capture unit display but not the grip display However there are certain settings which are not on...

Page 48: ...tches and media Also acts as a selection button for value setting on the menu MENU EXIT button B Opens and closes the menu system Also used for vari ous other tasks EXIT button for example as you issue commands within the menu system indicated by a de scription beside the button on the preview screen Navigation button C A four way rocker button enabling you to step through pre view images and navi...

Page 49: ...ch connector protected behind a rubber cover for when the digital capture unit is used with a view large format camera Flash sync output O Flash synch connector protected behind a rubber cover for when the digital capture unit is used with a view camera FireWire connector P FireWire 800 port for computer connection General digital capture unit care Time Date settings on the digital capture unit wh...

Page 50: ...sing either on the left symbol on the navigation button or on the EXIT MENU button again When you reach the final destination of your choice this might take several moves PLUS and MINUS symbols appear to the right in the frame round the item You then press the ZOOM IN ZOOM OUT buttons to access a loop list of choices In the example on the left 100 is the ISO value shown By pressing either button t...

Page 51: ...n see where all the screens are situated with regard to each other Navigating to them is just a matter of tracing along the paths using the Navigation button You can revert by either pressing the Navigation button in the opposite direction or the Menu Exit button ...

Page 52: ...orage BATCH Usedtocreatenewstorage Usedtocreatenewstorage Usedtocreatenewstorage folders batches andname Usedtocreatenewstorage folders batches andname Usedtocreatenewstorage folders batches andname them folders batches andname folders batches andname folders batches andname folders batches andname BATCH Used to create new storage folders batches and name them DEFAULT APP LEVEL Assigns a default I...

Page 53: ...l capture unit overview initial settings Photo Morfi Jiménez Mercado Hasselblad Masters 2008 This section deals with getting started as well as a general overview of tethered and untethered shooting and capture storage modes ...

Page 54: ... below illustrates how the language choice is set it is also a general introductory illustration of how settings are changed Setting the menu language Proceed as follows 1 Press the MENU EXIT button to open the menu 2 Press the NAVIGATOR button and to select the SETTINGS sub menu 3 Press the NAVIGATOR button to open the SETTINGS menu 4 Press the NAVIGATOR button to select the USER INTERFACE sub me...

Page 55: ...e rate 2 Tethered Studio mode This mode enables you to connect the H4D directly to a computer and to control it using Hasselblad Phocus software and store captures on a computer hard disk The main advantages with this mode are the almost limitless storage capacity re mote camera control and being able to the images with Hasselblad Phocus on a large screen The main disadvantage with this mode is th...

Page 56: ...unit preview screen as in the illustration Gently press the card into the slot If you encounter resistance it might be because you are holding the card backwards or upside down 4 If the card can be easily inserted nearly all the way into the unit then you are inserting it correctly Press the card anoth er couple of millimeters firmly into place 5 Close the slot cover shut again Removing a card 1 O...

Page 57: ...cards The quickest way is to use the Format card button on the grip If you prefer you can also use the menu on the digital capture unit Format button Press the Format button on the camera grip It is purposely re cessed to avoid unintentional use so use a ball point pen or simi lar A warning is displayed as confirmation Format on digital capture unit menu 1 Select MAIN MENU STORAGE Format 2 Press t...

Page 58: ...tter and strobe flash if any The unit then sends the capture back over the FireWire connection to the computer where it is displayed on the com puter screen and saved as a 16 bit 3F file in the currently selected folder on the computer hard disk 3FR is a proprietary Hasselblad format for storing raw captures It contains the complete raw image exactly as it was captured by the camera plus technical...

Page 59: ...59 H4D 9 Digital capture unit getting started Photos Louie Palu Hasselblad Masters 2008 This section covers basic initial settings ISO white balance and selection of media ...

Page 60: ... the top menu so it will be selected by default when you enter the menu system 2 Use the zoom or buttons to step through the avail able ISO settings until the setting you want is shown 3 Press the menu button to exit the menu system and keep your setting White balance Grey balance setting There are several ways to make a white grey balance setting adjustment When untethered on location you might p...

Page 61: ...heel to choose a color tempera ture 2000 10000 K 4 Press SAVE ISO WB button to save the setting 1 ISO WB 2 R 3 4 Save ISO WB To set the white balance on the digital capture unit To select a preset white balance 1a Press the MENU button on the digital capture unit 2a Use and to select White Bal 3a Use the zoom or button to step through the available choices until the one you want is shown 4a Press ...

Page 62: ...ere new captures are stored and which stored captures will be visible in the browse window Often you have just one type of storage media available the internal compact flash card However if you have several media attached e g a card and one or more external disks then you may need to switch between them If your selected storage medium has more than one batch folder on it then the batch selected wh...

Page 63: ...63 H4D 10 Browsing images Photo Bronek Kozka Hasselblad Masters 2008 This section is an overview of the various ways of browsing zooming sorting and viewing images ...

Page 64: ...you wish to zoom into with the navigation button 2 Press the zoom in button to zoom in one step The screen updates to show both a zoomed image and a thumbnail image that includes a red box outlining the portion of the images currently shown 3 You can now do the following as needed Use the navigator button to move the zoom area if you wish to inspect a different part of the image Zoom further by pre...

Page 65: ...ges excluded by the filter but they are still there See IAA Instant Approval Architecture for complete details about how to check and set the browse filter Viewing modes Various amounts of information can be displayed when viewing previews This rang es from histograms to a set of metadata There are five modes See Preview Modes for details Note If you continue to zoom out be yond the nine thumbnail...

Page 66: ...66 H4D 11 Preview Modes Photo Andrej Kopac Hasselblad Masters 2008 The preview can be set to various modes to show or hide technical information It can be changed in seconds ...

Page 67: ...n still use the menus and take pictures Full screen preview Shows the preview only with no frame or settings information Regardless of the current mode if you zoom in on the image or zoom out to the thumb nails the display reverts to showing the standard preview frame which shows infor mation about the current image and camera settings around the edges When you re turn to the standard zoom level h...

Page 68: ...ure Overexposure 3 A histogram display that is concentrated on the right with few pixels elsewhere indicates a likely overexposure Many details will be lost in the highlights The histogram is only an indicator that should be interpreted there are many situa tions in which a questionable histogram will match an exposure that is perfectly accept able for the intended effect and vice versa The Standa...

Page 69: ... no effect This will prevent you from accidentally assigning the wrong status without knowing it Overexposure indicator 7 Though the histogram shows you when some of your pixels are overexposed it does not tell you which ones In a shot with many bright areas it can be hard to know whether the key parts of your image are just bright or completely overexposed To help you find them the digital captur...

Page 70: ...t Approval Architecture Photo Bronek Kozka Hasselblad Masters 2008 IAA should be considered as a necessary part of your meth ods It can help you browse efficiently and help in sorting be fore you download to a workstation ...

Page 71: ...over or underexposed If it suspects a problem it does the following provides audio feedback if this option has been chosen by making a warning sound which immediately alerts you to a possible problem even if you are not look ing at the screen The warning sound is a rapid string of notes going up the musical scale if the image is judged as overexposed or conversely a rapid string of notes going dow...

Page 72: ...e your images at the single image four thumbnail or nine thumbnail level you can easily see the current approval status of each of them To change the approval status of the currently displayed selected image simply press the approval button until the desired approval status is shown Press the approve button to change the status of the currently selected image Changing the IAA approval status of in...

Page 73: ...utton 2 Press to navigate down and select the Storage level Press and then to navigate down and select Default Appr level Press to open the Default Appr level dialog 3 Use the the or button to step through the available set tings until the default status you wish to use auto green or yellow is shown 4 Press the menu EXIT button to exit the menu system and keep your setting 1 2 3 4 Setting the defa...

Page 74: ... warning Green Yellow browses green and yellow status images but does not show red status images These are probably images that you have either decided to keep or not yet checked for approval status There are many ways to make use of this feature For example Set the filter to show only yellow images Then step through each image and decide whether any of them should be pro moted to green or demoted...

Page 75: ...AGE Delete See also Navigating the Menu System for details about how to find this setting 2 Use to enter the Delete submenu or use shortcut 3 Use the or button to select A This image deletes the current image only B All red in batch deletes all red images in the current batch C All yellow red in batch deletes all yellow and red images in the current batch D All in batch deletes all images in the c...

Page 76: ...nd batches Photo Julia Fullerton Batten Hasselblad Masters 2008 This section covers navigation of the menu regarding storage media the storage of captures in batches viewing batches as well as rating and browsing captures of using the IAA system ...

Page 77: ...l be saved to the CF card and not the FireWire disk This is the Current Medium Number of green yellow and red shots currently stored on the medium Medium name Medium type icon Compact Flash Batch name Date the batch was created Number of green yellow and red shots in the batch IAA classification The BATCH screen The blue frame around a folder tells you that it is the Current Batch Batch name Date ...

Page 78: ...ntion Creating a new batch 1 Press the MENU button 2 Press to navigate down and select the Storage dialog Press and then to navigate down and select Batch 3 Press to open the Batch dialog The new batch name will always begin with a three digit number which automatically increments by one with each new batch Following this is five letters which you can assign yourself to help make the batch easier ...

Page 79: ...on that medium For example if you see a card that shows 18 5 3 then that card contains a total of 26 images 18 green APPROVED 5 yellow UNCLASSIFIED and 3 red DELETE If more than one medium is listed then use and to high light the medium you wish to use 3 The currently selected medium shows a blue border 4 Press the zoom in button to zoom in on the currently highlighted medium 5 A list of batches o...

Page 80: ...80 H4D 14 Deleting images Photo Benjamin A Monn Hasselblad Masters 2008 ...

Page 81: ...81 H4D Menus for deleting several images from all batches from a selected storage medium Menus for deleting several images from a batch Menus for deleting single or several images from the current batch ...

Page 82: ...contain ing nine images To delete a single image 1 Use the button to go to the nine thumbnail in this case view to make an initial search 2 Use the navigator button to select the image you wish to delete When you are viewing thumbnails the selected image has a coloured border around it When you are viewing single images the selected image is the one currently shown You can delete an image either f...

Page 83: ...n the current batch D All in batch deletes all images in the current batch 4 Press OK to confirm the delete to exit without delete press EXIT 5 You now return to the main menu Press the menu EXIT but ton to exit the menu system Deleting several images from a selected medium To delete several images at once 1 Starting at the single image preview display press the but ton until you reach the media l...

Page 84: ...ital capture unit to a computer us ing a FireWire cable and then run Phocus Alternatively use a card reader and connect to a computer See the Phocus manual for details See also ConnectingtotheComputer for details about how to con nect to a computer 4 5 6 7 8 Note Use the delete shortcut immedi ately after an unwanted capture to save space on a card Note Another way of working is to simply assign u...

Page 85: ...85 H4D Settings This section covers various diverse settings such as sound date time display brightness etc 15 Photo August Bradley Hasselblad Masters 2008 ...

Page 86: ...y The effect is exactly the same as though you had pressed the off button on the camera Once it has powered down you must turn the H4D on before you can continue working Set this to Never to disable this feature this is the default setting Set to a value between 3 and 99 minutes to establish a time out Mark Overexp This feature helps draw your attention to areas of your images that are over expose...

Page 87: ...feature also sets the Brightness on a scale of 1 10 on the display This sets the brightness shown on the screen Usually you should leave this set to the default level of 5 however in some viewing environments and or with some types of images you may wish to in crease or decrease this value A value of 10 provides maximum brightness a value of 0 provides minimal brightness You can also help save bat...

Page 88: ...ystem Status to obtain the optimum performance Each digital capture unit is carefully adjusted to match the corresponding camera body which in turn produces the matching verifications respectively If you want to use different digital capture units with different cam era bodies please refer to a Hasselblad Service Center for more information To obtain the About information 1 Select MAIN MENU SETTIN...

Page 89: ...d unintentional orientation changes whenthecameraispointingstraightupordown forexample thetilt setting can be locked at Auto Lock at 0 degrees Lock at 90 degrees Lock at 180 de grees and Lock at 270 degrees Menu Ctrl This sets whether the front and rear control wheels are active or inac tive when navigating the sensor menu Display This setting allows you to turn the digital capture unit display on...

Page 90: ...90 H4D 16 Digital capture unit use with view cameras Photo Hans Strand Hasselblad Masters 2008 This section covers using the digital capture unit when attached to a view or large format camera ...

Page 91: ...n if you change camera model The five options are H4D For automatic setting in normal H4D use Schneider For use with view cameras and Schneider lenses LensCtrlS For use with view cameras Pinhole Intended primarily for use in a studio environment where complete dark ness can be achieved and captures made accordingly also useful for light painting In this mode the H4D uses the exposure time as well ...

Page 92: ... 9 Press the menu EXIT button to exit the menu system and keep your settings Options available for PINHOLE and FLASH SYNC Shutter Delay The normal setting is Default and cannot be changed Exposure Time This setting should be changed for cable free exposure times lon ger than 1 8 second ensuring that it matches the shutter speed exposure time on the camera lens The settings range from 1 8 second to...

Page 93: ...ETTINGS sub menu 3 Press to open the SETTINGS menu 4 Use and to select CAMERA 5 Press to open the CAMERA menu 6 Press either the or button to select PINHOLE 7 Press or to select EXPOSURE TIME 8 Press either or to make an exposure time setting 9 Press to select CAPTURE SEQUENCE 10 Press to open the CAPTURE SEQUENCE menu 1 2 7 8 9 10 3 4 5 6 ...

Page 94: ... sequence 14 Press to select COUNT 15 Press either or to make a COUNT setting This setting controls the number of captures in the sequence 16 Press OK to confirm all the settings 17 The unit is now ready for a sequence start Note that the MENU EXIT button now diplays START instead 18 Press START to set the sequence running 19 Note that the EXIT button now displays STOP The sequence can be stopped ...

Page 95: ...loited to ob tain the optimum in customized workflow The custom options are designed to work for you in the back ground ensuring security and also helping to bring down the barriers between you and capturing the image Each one can be changed to suit your preferences so that the whole camera becomes a reflection of the way you like to work ...

Page 96: ...96 H4D Interval options Settings options Self timer options Bracketing options General overview of camera menu MENU Text setting Text Drive Custom Options System status ...

Page 97: ...combina tions of symbols on the display at any time will not nec essarily be the same as many of the screens illustrated in this manual To simplify the descriptions reference is often made to a main or standard screen Apart from default settings there is no actual standard setting in the normal sense and therefore you create your own standard which of course can be changed at any time The main scr...

Page 98: ...l upper row on display 1 Self timer The self timer allows a delay in the activation of the shutter and a change in sequence of the mirror movement Normally the mirror is raised before the shutter is tripped creating a pause between the two actions to minimize camera vibration However during this pause there will be no image in the viewfinder and no light metering available for any eventual exposur...

Page 99: ...es down Mirror returns to its normal position and the camera is made ready for the next capture Mirror raised Mirror remains in raised position No image is visible in the viewfinder until M UP button pressed 8 Press On AF button Note that this now reads Off and the line of text at the bottom of the screen reads Self timer on 9 Press SAVE ISO WB button to save the setting 10 Press ENTER ISO WB butto...

Page 100: ...anual or Auto is the EV that determines the calculations for the bracketing sequence Note the difference in operation between Single and Continuous drive settings In Single you must press the shutter release button separately for every separate cap ture until the sequence is finished In Continuous you can either maintain the pressure on the button to take all frames without stopping or you can rel...

Page 101: ...t this now reads Off and the line of text at the bottom of the screen reads Bracketing on Half press the shutter release button to standby mode for this function press the shutter release button again full press for activation or full press the shutter release for immediate activa tion To escape from this mode press MENU then Enter ISO WB but ton on the Bracketing screen then Off AF button Number of...

Page 102: ...r of captures required 2 no limit 6 In Interval duration turn the rear wheel to choose 1 second 1 hour 7 Press SAVE ISO WB button to save the setting 8 Press ENTER ISO WB button again from the Interval screen to activate the function Press On AF button Note that this now reads Off and the line of text at the bottom of the screen reads Interval on Half press the shutter release button to standby mod...

Page 103: ...he grip 4 Turn the front control wheel to access 4 1 Custom options 5 Press the ISO WB Enter button to access the more than 25 choices available 6 Turn the front control wheel to the desired Option 7 Turn the rear control wheel to the desired Setting 8 Press Save In the following list the options marked in red are the default set tings So in the case of the User button for example as None is the d...

Page 104: ...s and figures in red signify the default setting for that option Stop down button function 6 Stop Down but can be reassigned to B mode T mode Flash Measure In terval timer Cycle LM mode Expose Standby Histogram IAA toggle Digi tal focus check Delete last image Grey balance exposure None AF drive AE lock Self Timer Bracketing Mirror up M UP button function 7 Mirror up but can be reassigned to Stop ...

Page 105: ...option Spot mode 14 Normal Zone Determines how the camera behaves when set to Spot Mode Normal makes the camera behave in the same fashion as when set to Average or Centre Weighted Zone makes the camera behave in the same fashion as the Hasselblad 205FCC That is the central spot is placed over a particular area of the subject and the AE L buttonispressed Theexposureisthencal culated assuming that ...

Page 106: ... automatic return to standard setting after a capture Stay retains the setting after a capture AE lock Quick adjust 22 Exp reset Saved Allows either the AE Lock or Quick ad just mode to remain active after a cap ture or immediately return to standard setting Exp Reset clears the settings and produc es an automatic return to standard setting after a capture Saved retains the AE Lock or Quick adjust...

Page 107: ...0 ms 100 ms 200 ms None 25 ms Extends the delay period between the mirror being raised and the opening of the lens shutter thereby reducing the negative effect of vibration on longer exposure times True Focus in AF S 31 Off on Re assigns half press of shutter release button to activate True Focus function instead of standard automatic focus single Always return mirror 32 No Yes Automatically lower...

Page 108: ...e Changes the light metering method in a loop manner Centre Weighted CentreSpot Spot Expose Acts as alternative shutter release button Standby Sets the camera in standby mode to save battery consumption Histogram Recalls the last shown histogram on the grip LCD IAA toggle Allows IAA rating change of last capture Dig foc check Displays last exposure taken at 100 scale on digital backs with LCD Dele...

Page 109: ...r will will move to the left and right in the available char acters while the rear control wheel moves it up and down The chart of characters will automatically scroll to reveal the whole set The space character is top left in the list On the left side of the screen there is a small box frame con taining two arrow symbols and an X symbol By selecting the arrows you can position the cursor in the l...

Page 110: ...ted by the selec tor cursor in this case the copyright symbol and press Save Note that more symbols have automatically appeared as you scrolled down the screen 5 Choose the next character in the same manner in this case a space and press Save 6 The capital letter J has been highlighted and saved in this example 7 Repeat the procedure until all the letters and characters you want appear As you prog...

Page 111: ...n 6 The display now shows a list of camera components Info Usage and to the right of each individual component a fig ure that represents the number of actions taken by that com ponent Please note that even a completely new camera will have registered actions as these occur during testing before delivery 7 Press the Next ISO WB button to display Info Version to display the software version for each...

Page 112: ... Continuous mode the camera automatically makes captures and makes ready for the next capture in a continuous manner as long as you maintain pressure on the shutter release Please note the speed is dependent on the time taken to save the capture ac cording to equipment In camera active mode 1 Press the MENU button on the grip 2 Turn the front control wheel to Drive 3 Press Enter ISO WB button 4 Tu...

Page 113: ...demands for a variety of situations where flash is required It includes an integral flash primarily intended for fill flash use but strong enough for simple close work Combined with an adapter and a portable unit H cameras can exploit the automatic features offered by Metz and other top names in the field for powerful and reliable solutions When in the studio the H system is capable of providing f...

Page 114: ... regarding any potential restrictions You can use the flash metering capability with external flash units of all kinds TTL flashes must be set to Manual mode Rear sync is a useful feature used either for effect or to produce a more natural look when combining long exposures involving light trails and flash When using suitable dedicated units compatible with SCA3002 adjustments are made automatical...

Page 115: ... 600º K To raise the flash unit into its operative position slide the flash unit catch backwards in the direction of the flash symbol To re turn the flash unit into its closed position push down on the top of the unit until it clicks back into place The flash unit is auto matically activated when it is in the operative position and de activated when returned to its stored position The green LED fl...

Page 116: ...ed flash units and SCA3902 compatible flash units set to M mode where the camera acts much as a flash meter would The aperture setting can be adjusted and more trial exposures made until the information on the grip display is satisfactory To use flash measure 1 Press the FLASH button on the grip to access the flash option screen 2 Turn the rear control wheel until Flash measure appears 3 Press Save...

Page 117: ...H4D Multi Shot This section provides an overview of the H4D MS model 20 Photo August Bradley Hasselblad Masters 2008 ...

Page 118: ...s will also stand up to greater enlargement later in production In use it is essential to ensure that there is no movement in ei ther the camera or the subject Because of this these methods are only suitable for tripod camera stand use for studio like environ ments technical shots product shots architectural subjects and similar Download the H4D MS datasheet from the Hasselblad website for a full ...

Page 119: ...upling Flash adapter Filters Support strap H Camera strap H Focusing screens Release cord Lens accessories Photo Morfi Jiménez Mercado Hasselblad Masters 2008 Optional accessories provide the opportunity to extend the capabilities of your system or just to add extra convenience to suit your way of working ...

Page 120: ...epeatable position Two integrated spirit levels make horizontal positioning of the camera easy The Tri pod quick coupling H fits 1 4 and 3 8 tripod threads and has a safety catch GIL Global Image Locator 3053300 The Hasselblad GIL 3053300 provides automatic creation and storage of GPS information for all H system digital cam eras The data is tagged to each individ ual image file and can be read di...

Page 121: ...le in three sizes 13mm 26mm and 52 mm As the H4D has a TTL light metering system expo sure compensation is automatic Focusing screens H3D All focusing screens are of the Spheri cal Acute Matte D type with or without grid and central markings for spot ø 7 5 and AF metering area Grid patterns provide aid in technical architectural documentation and other similar fields Available with or without mask...

Page 122: ...ion 0 f stop 35 mm Specification subject to change without notice LENS DESIGN 13 elements in 11 groups 1 Aspherical surface FoCuS tYPE Internal focusing ENtRANCE PuPIL PoSItIoN 35 mm setting 187 mm 50 mm setting 178 mm 90 mm setting 193 mm In front of the image plane at infinite focus setting CoMPAtIBILItY the HCD 4 0 5 6 35 90 mm lens is not compatible with the converter H1 7x and the HtS 1 5 til...

Page 123: ...C80 and HC100 including exten sion tubes Camera body Sensor unit included HVD90x viewfinder included Accessories GIL GPS receiver View cameras Flash sync shutters View cameras Electronic shutters SCA3902 TTL Flash Adapter Schneider Shutter Control ES Schneider Shutter Control ES Host computer with FireWire running Phocus Rollei electronic shutter Rollei electronic shutter Any view camera with Hasse...

Page 124: ...explanatory charts Technical specifications Problems Equipment Care Service This section provides an insight into the more tech nical aspects as well as some important reference information Photo Kevin Then Hasselblad Masters 2008 ...

Page 125: ...f light appears as illustrated by the red dashed curve The effective shutter speed is now increased to T2 which is longer that T1 The result is that the exposure is not reduced by exactly one stop 1EV however but slightly less At the shorter shutter speeds the exposure error can be as much as 0 5 0 8 EV The True exposure mode can compensate for this exposure er ror since the behaviour of the shutt...

Page 126: ...4 0 5 6 11 16 22 32 45 64 90 1 4 Aperture 1 0 1 2 3 4 5 2 3 4 5 6 7 8 9 1 0 11 EV 12 23 22 21 20 19 18 17 16 15 14 13 210 80 35 150 120 50 50 110 50 50 110 110 Pv mode 8 Shutterspeed 1000 500 250 125 60 30 15 8 4 2 1s 2s 4s 8s 16s 32s 64s 2 0 2 8 4 0 5 6 11 16 22 32 45 64 90 1 4 Aperture 1 0 1 2 3 4 5 2 3 4 5 6 7 8 9 1 0 11 EV 12 23 22 21 20 19 18 17 16 15 14 13 210 80 35 150 120 50 50 110 50 50 1...

Page 127: ...re Weighted and CentreSpot Metering range at f 2 8 and ISO100 Spot EV2 to 21 Centre weighted EV1 to 21 CentreSpot EV1 to 21 Bracketing using predetermined number of captures 2 3 5 7 or 9 in 1 3 1 2 or 1 EV step difference intervals Number of captures from 2 to no limit and interval from 1 second to 1 hour ISO range 100 to 1600 40Mpix 50 to 800 50Mpix The camera features two dot matrix displays tha...

Page 128: ... 1 seconds per capture 50capturesperminute 33 captures per minute 4GBCFcardholds75images 4 GB CF card holds 60 images onaverage on average ISO100 200 400and1600 ISO 50 100 200 400 and 800 Single shot 16 bit Hasselblad Natural Color Solution CF card type U DMA e g SanDisk extreme IV red to a Mac or PC RechargeableLi ionbattery 7 2VDC 1850mAh Yes TFT 3 inch 24 bit color Yes Mounted on CCD sensor Los...

Page 129: ...n Mirror up 8 Control wheel direction CW 9 Flash ready exposure lock Yes 10 Magazine exposure lock Yes 11 Lens exposure lock Yes 12 Out of range exposure lock No 13 True exposure On 14 Spot mode Normal 15 Focus aid in MF Half press 16 AF assist light Ext Flash 17 Rear wheel quick adjust Yes 18 Control lock All controls 19 Beeper On 20 Show histogram Yes 21 Interval Selftimer Exit 22 AE lock Quick ...

Page 130: ...g the safety catch backwards on the digital capture unit 3 illus A push the lever of the digital capture unit release button to the right 3 illus B and while maintaining that position press the centre of the button firmly inwards towards the camera body 3 illus C to finally release the magazine 4 Clean the outside surface of IR filter by spraying it with clean compressed air see warning above firs...

Page 131: ...idth of the IR filter 4 Apply firm pressure using two or three fingers at the edge of the wipe to ensure an even firm contact with filter surface Wipe the surface in one unbroken motion Note Do not use same side of the e wipe twice as you will be likely to reapply any par ticles removed in the first pass 5 Finally check if the IR filter has been properly cleaned either by visual inspection or by m...

Page 132: ...ment to acclimatize before assembly Try to ensure the storage conditions in such environments are as dry as possible Dust and grit Take care to prevent dust and grit from getting into your equipment In coastal areas take measures to protect your equipment from sand and salt water spray Dust on the lens glass and focusing screen can be removed with a blower brush or very soft lens brush if necessar...

Page 133: ...ual Victor Hasselblad AB Hasselblad A S All images in this manual not credited to the specific photogra pher Jens Karlsson Hasselblad and David Jeffery Cover shot Mats Bengtsson Victor Hasselblad AB Hasselblad A S assumes no responsibility or liability for any errors or inaccuracies that may appear in this manual Victor Hasselblad AB Hasselblad A S assumes no responsibility or liability for loss o...

Page 134: ...134 H4D Hasselblad A S Hejrevej 30 DK 2400 Copenhagen Denmark Victor Hasselblad AB Box 220 SE 401 23 Göteborg Sweden H4D 40 H4D 50 UK v 2 02 2010 ...

Reviews: