


60
H4D
Settings check
ISO, White Balance, Media
and
Browse
settings should be checked
before each session. They are therefore placed at the top level
of the menu for quick and easy access. They are also shown on-
screen in most preview modes, so you can easily keep an eye on
them as your work.
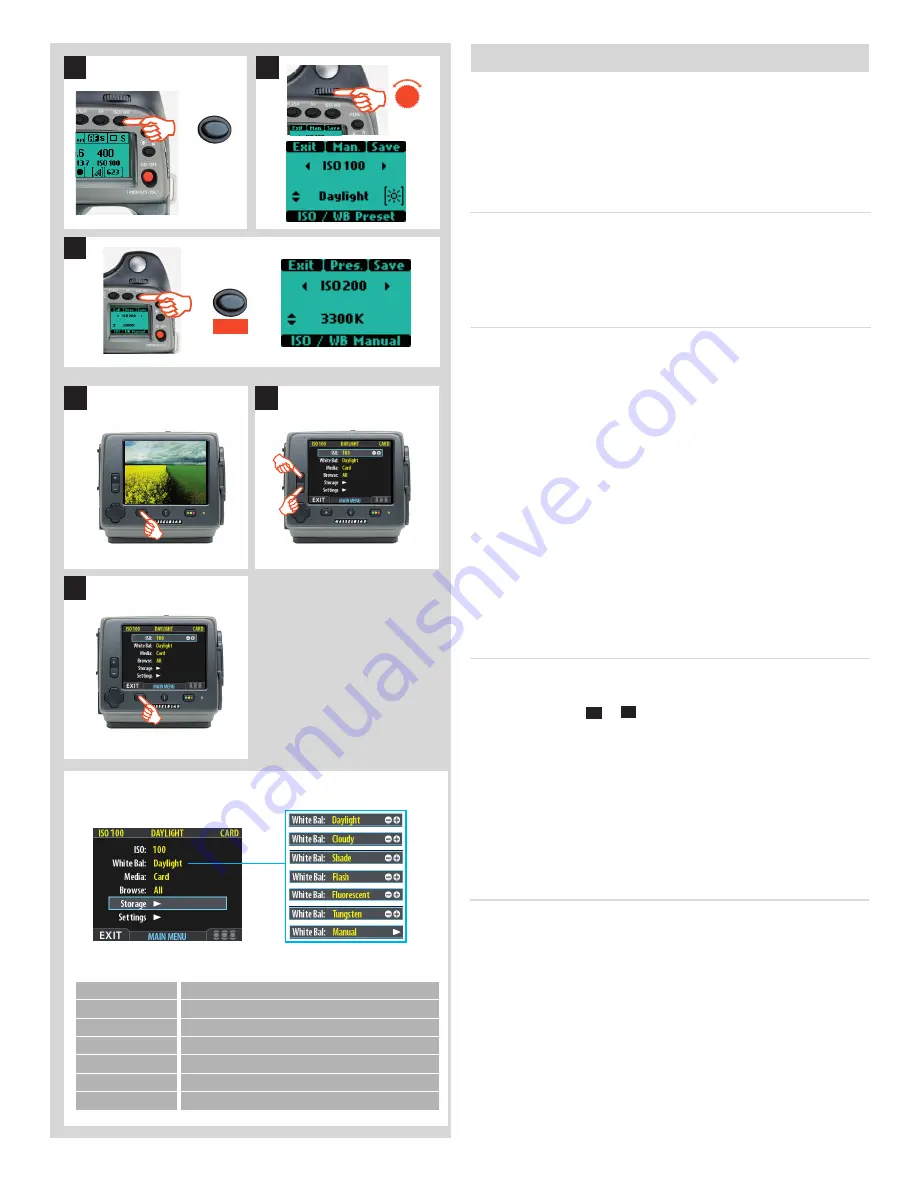
ISO
The ISO setting can be made using the ISO
/
WB button on the grip
or on the digital capture unit. The “natural” sensitivity of the CCD
is ISO 100, so you will get best results with this setting if the light
conditions allow.
To set the ISO on the grip:
The
ISO/WB
button provides immediate access to ISO settings.
The front control wheel is used to make the desired changes.
The settings are automatically and simultaneously transferred
from the camera to the digital capture unit. Please note that the
changes are only displayed on the digital capture unit when the
settings have been saved.
1) Press the
ISO/WB
button on the grip.
2) To make an
ISO
setting, turn the front control wheel to
choose between:
100, 200, 400, 800 and 1600
(40 Mpix)
50, 100, 200, 400 and 800
(50 Mpix)
3) Press
SAVE
(
ISO/WB
button) to save the setting.
1
ISO/WB
2
F
3
Save
ISO/WB
To set the ISO on the digital capture unit
1. Choose
MENU > ISO
. This is the top item of the top menu, so it
will be selected by default when you enter the menu system.
2. Use the zoom (
–
or
+
) buttons to step through the avail-
able ISO settings until the setting you want is shown.
3. Press the menu button to exit the menu system and keep
your setting.
White balance / Grey balance setting
There are several ways to make a white/grey balance setting
adjustment. When untethered on location you might prefer to
make a quick preset adjustment setting at the same time that
you check the
ISO
and
Media
settings. Tethered in the studio you
might prefer to take the fi rst shot of a grey card/scale and make
the adjustment in Phocus for that session. In addition, you might
want to assign the
User Button
as a rapid white balance check in a
mixed lighting situation.
A white balance setting can be made either on the grip or on the
digital capture unit. Changes made on one are recorded and dis-
played on the other.
3
1
2
White Bal. Setting
Setting description
Daylight
For general outdoor use in direct sunlight.
Cloudy
For general outdoor use in cloudy weather.
Shade
For general outdoor use in shady locations out of direct sunlight.
Flash
For general indoor use when using a normal fl ash/strobe system.
Fluorescent
For use when using fl uorescent lighting (strip lights).
Tungsten
For use when shooting indoors under standard tungsten/B lamps.
Manual
For a manual setting
There are seven ‘White Balance’ settings to choose from.


