


G1 SCBA Radio Pairing Guide |
Harris
Rev. 5-23-2019
Page
6
of
13
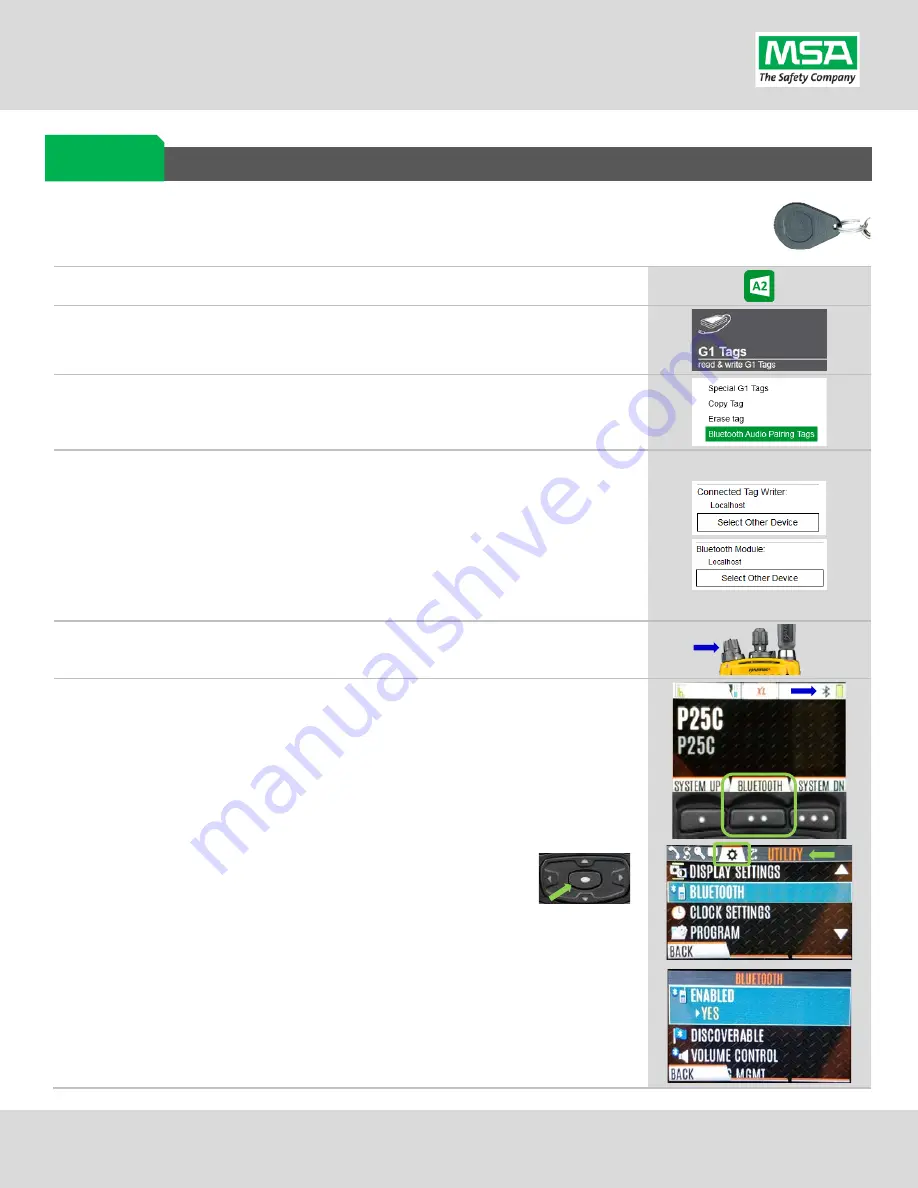
Creating a Harris XL-185P | XL-200P Radio Pairing Tag
To pair the radio to the G1 SCBA, a “Bluetooth Audio Pairing Tag” needs created in the A2 Software.
Once the Pairing Tag is created, it can be applied to the SCBA, which “programs” the SCBA to connect
to that specific radio.
Step 1.
Launch the MSA A2 Software
Step 2.
Select the “G1 Tags” Tile on the A2 Dashboard (Under the “G1 Devices”
column)
Step 3.
Select tag type: “Bluetooth Audio Pairing Tags”
Step 4.
Ensure that your PC's Bluetooth adapter is on, and selected for use in A2,
and that your RFID Reader/Writer is connected and ready.
•
Both modules appear in lower left of A2 display. Generally they will
appear as the computer's name, or as "localhost".
•
If either is not visible there or under "Select Other device":
disconnect and reconnect the hardware;
•
Restart the A2 service if necessary.
Step 5.
Turn on the Harris Radio using the volume knob.
Step 6.
Ensure
Bluetooth
is
“
ON
”
(BT Icon is visible).
The Radio should start with Bluetooth enabled,
but if has been turned off
:
(A)
If Soft Button (front Display) is configured for Bluetooth on/off:
Press “Bluetooth”. The Bluetooth Icon should appear on the upper
display bar.
(B)
Use the Settings menu:
a.
Press the button in the Center of the arrow pad to enter the
radio’s settings menu sets.
b.
Use the Left or Right arrow until the “
Utility
” menu (
Gear Icon
) is
highlighted on the little tabs at the top of the screen.
c.
Up or Down arrow until “
Bluetooth
” menu is highlighted
d.
Press the button in the Center of the arrow pad to open it.
e.
Up or Down arrow until [Bluetooth] “
Enabled
” is highlighted
f.
Press the menu button in the Center of the arrow pad to change
“Enabled” to “
YES
”.
Radio ID
Pair Tag


