background image


G1 SCBA Radio Pairing Guide | 

Harris


Rev. 5-23-2019 

Page 

5

 of 

13


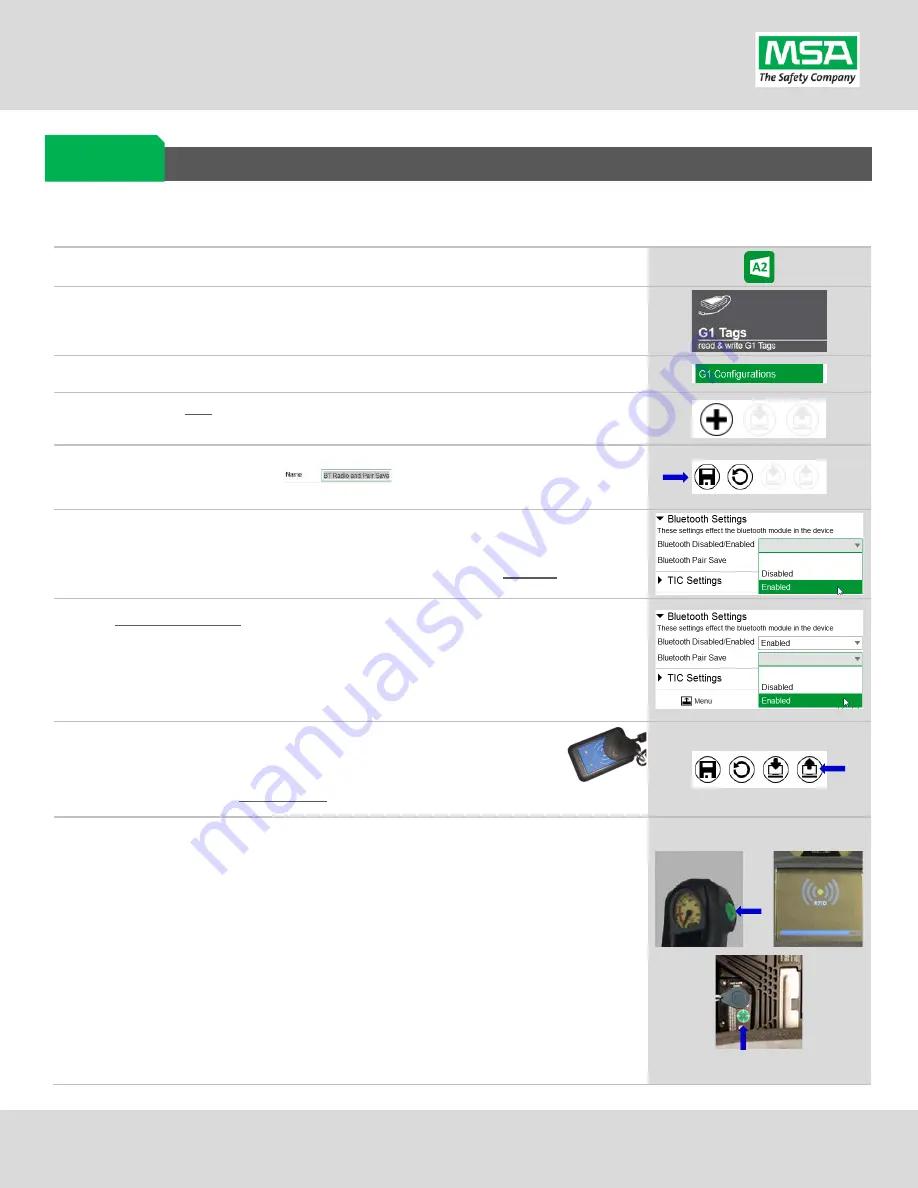
Creating a G1 SCBA Configuration Tag 

(for Bluetooth Pair Save Preferences)


The purpose of this section is to:  (1) enable the Bluetooth radio on the G1 SCBA and  

(2) to set Bluetooth Pair Save behavior based on the department’s preference. 


Step 1.


Launch the MSA A2 Software. 


Step 2.


Select the “G1 Tags” Tile on the A2 Dashboard (Under the “G1 Devices” 

column). 


Step 3.


Select tag type: “G1 Configurations” 


Step 4.


Select the Add (

+

) icon (top-right hand side of A2 application) to create the 

configuration template, which will be used to change these 2 settings. 


Note:  


Tag can be written without saving the template, but the template can be saved for 
future use if given a name:  

   The Save Icon (top-right) is enabled 

when the Name is filled in.  


Step 5.


Enabling the G1 SCBA’s Bluetooth Radio: 

(D)


Expand the “Bluetooth Settings” section. 

(E)


Change “Bluetooth Disabled/Enabled” setting to “Enabled”. 


Step 6.


Preference Choice:  “Bluetooth Pair Save” setting options

:


(

Generally, a department’s operating procedures will determine its preference) 

(A)


To apply a Radio Pairing Tag every time SCBA is turned on, choose “Disabled” 

(B)


To retain the Radio Pairing on the SCBA until it’s cleared 

*

, choose “Enabled”


*


- See “Clearing Radio Pairing Info from the G1 SCBA” page.


Step 7.


Writing the G1 Configuration Tag: 

(A)


Place RFID Tag on the RFID Reader / Writer 

(B)


Select the Write G1 Tag icon (top-right hand side of A2 application) 


Step 8.


Applying the G1 Configuration Tag to the G1 SCBA(s): 

(A)


Power on the G1 SCBA 

(B)


Press & hold

 either of the 

green


Control Module buttons to activate 

the RFID mode. 

For iTIC Control modules: Press & Hold Both Green Buttons.


(C)


Place Bluetooth Pairing Save Tag over G1 Power Module RFID Target. 


The G1 SCBA is now configured with the settings: 

- G1 Bluetooth is now enabled    - G1  Bluetooth Pair Save (as chosen).


The G1 SCBA is now ready to accept a Radio Pairing tag.


Repeat this “Step 8” for each SCBA to apply these 2 settings. 


G1 Bluetooth 

Settings Tag 

Summary of Contents for XL-185P

Page 1: ...CBA Configuration Tag for Bluetooth Pair Save Preferences 5 Creating a Harris XL 185P XL 200P Radio Pairing Tag 6 Pairing a G1 SCBA and Harris XL 185P XL 200P Radio 8 Using the G1 SCBA and Harris XL 1...

Page 2: ...r that is running RPM2 Step 5 Turn on the Radio using the volume knob Wait a few seconds for the screen to illuminate and start up to complete Step 6 Navigating to the Radio s Personality into RPM2 A...

Page 3: ...lect Accessory Only If the Harris radio is equipped with a Harris FSM Speaker the Rx audio will always be routed to BOTH the Harris FSM speaker AND the MSA G1 lapel speaker If desired the firefighter...

Page 4: ...oth ON OFF In this example we ll program the front center softkey PF2 Back under the Personality s Options Select Scroll down to the button named Key PF2 Set its Operation to Bluetooth Enable Disable...

Page 5: ...oth Disabled Enabled setting to Enabled Step 6 Preference Choice Bluetooth Pair Save setting options Generally a department s operating procedures will determine its preference A To apply a Radio Pair...

Page 6: ...her is not visible there or under Select Other device disconnect and reconnect the hardware Restart the A2 service if necessary Step 5 Turn on the Harris Radio using the volume knob Step 6 Ensure Blue...

Page 7: ...CREEN Step 8 Discovering the Radio in A2 A Click Discover Devices You may have to scan twice if the Friendly name doesn t appear B Select the tile for the discovered Radio in A2 to select it The disco...

Page 8: ...dure to turn it ON If you left the Bluetooth Utility Menu navigate back to it using the procedure found on Page 6 Step 6 method B steps a through d and then D Up or Down arrow until Discoverable is hi...

Page 9: ...successful pairing if the regulator is shut off the G1 SCBA will not remain connected to the radio and the radio is available for non Bluetooth use The G1 SCBA will automatically re connect to the ra...

Page 10: ...ly activate when breathing If the connection is not established the pairing process described in the previous section should be repeated Step 4 Begin breathing with the regulator attached and the radi...

Page 11: ...learing SCBA Pairing Info from the HARRIS XL 185P XL 200P Radio section hereafter G1 Pairing Removal Method 2 Pair New Radio Step 1 Pair a different Bluetooth Harris Radio with the G1 SCBA using the n...

Page 12: ...and press the button in the Center of the arrow pad to enter it Step 4 Press Down arrow until Pairing Mgmt is highlighted and press the button in the Center of the arrow pad to enter it Step 5 Select...

Page 13: ...across battery removals Review instructions for G1 SCBA Configuration Tag and Bluetooth Paring Save settings Bluetooth pairing information will no longer be cleared on every battery removal Radio will...

Reviews: