background image

Advanced Settings

62

AMX RoomBook Scheduling Touch Panels - Instruction Manual

Reverting to Factory-Installed Firmware

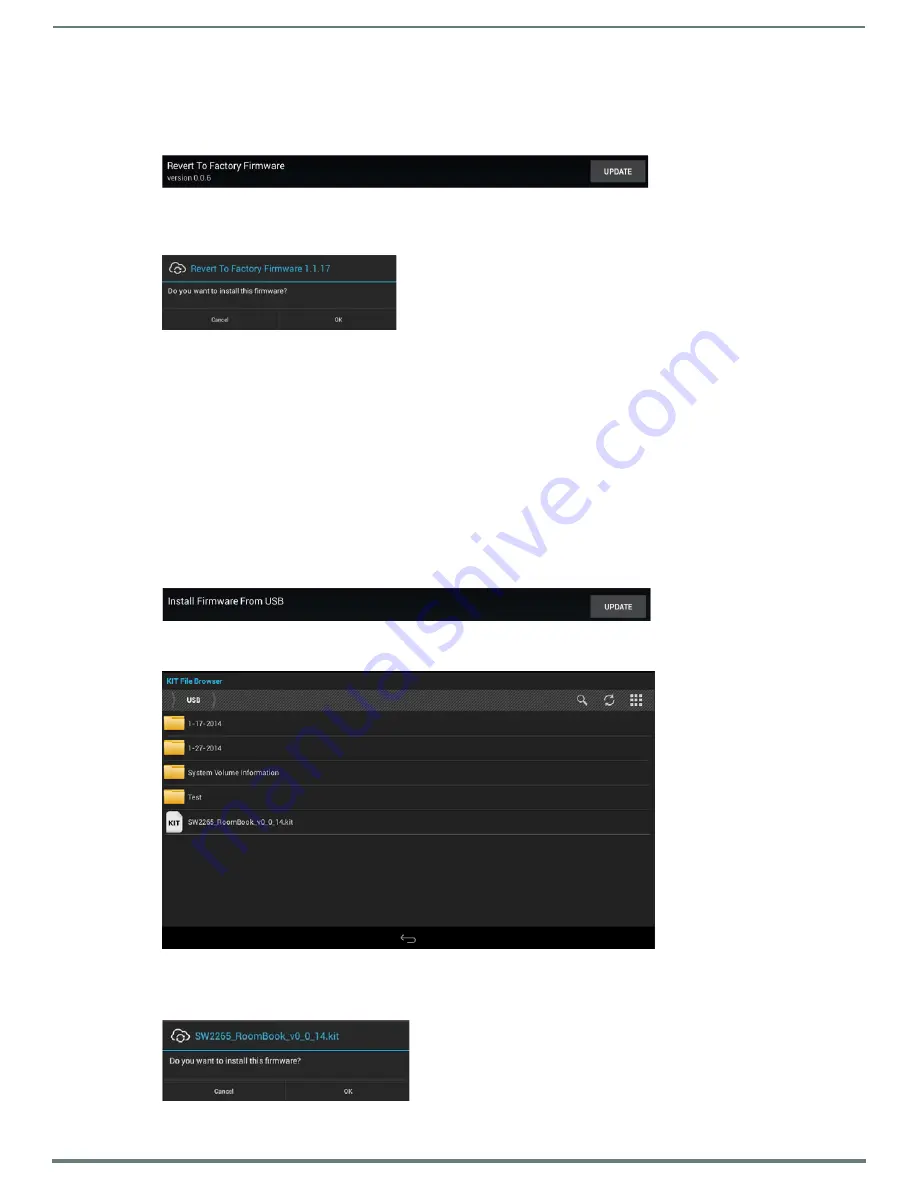
In certain circumstances, it may be necessary to uninstall the current firmware on a panel and return it to the original factory 

default firmware. To reset the panel to its original factory firmware:
1.

From the 

Firmware Manager

 window, select 

UPDATE

 next to 

Revert to Factory Firmware 

(FIG. 117): 

2.

A System Message window is displayed that indicates the factory firmware version that will be installed, and prompting you to 

verify this action (FIG. 118): 

3.

Select 

OK

 to install the previous firmware version and 

Cancel

 to return to the 

Firmware Manager

.

4.

If you choose 

OK

, the panel will reboot and restart with the factory installed firmware.

NOTE: 

Resetting the panel to its original factory firmware will remove all updates made to the Settings menu since that version.

Installing New Firmware From An External USB Stick

To install new firmware to the panel from a USB stick:
1.

Download the latest Acendo Book panel firmware from 

www.amx.com

 and save it to a USB stick or other external drive with 

USB capability.

NOTE: 

The firmware can be saved at the root directory, or be saved in a folder in the USB stick directory.The folder name is not 

case sensitive.

2.

Insert the USB stick into an available USB port. This may require disassembling wall-mounted panels to access the USB ports 

if a USB extension was not already installed.

3.

From the 

Firmware Manager

 window (FIG. 116 on page 61), select 

UPDATE

 next to 

Install Firmware from USB

 (FIG. 119)

4.

The 

KIT File Browser 

window presents a listing of firmware available on the USB stick (FIG. 120): 

5.

Select the KIT file to be installed.

6.

The panel will prompt you to verify this action. Press 

OK

 to proceed (FIG. 121): . 

FIG. 117  

Firmware Manager - Revert To Factory Firmware

FIG. 118  

System Prompt - Revert To Factory Firmware?

FIG. 119  

Firmware Manager - Install Firmware from USB

FIG. 120  

KIT File Browser window

FIG. 121  

Verify Firmware Installation

Summary of Contents for RMBK-1001

Page 1: ...INSTRUCTION MANUAL AMX ROOMBOOK SCHEDULING TOUCH PANELS RMBK 1001 RMBK 701...

Page 2: ...ched particularly at plugs convenience receptacles and the point where they exit from the apparatus 11 ONLY USE attachments accessories specified by the manufacturer 12 USE ONLY with a cart stand trip...

Page 3: ...Restriction of Hazardous Substances Recast RoHS2 Directive 2011 65 EU European Union WEEE recast Directive 2012 19 EU European Union Eco Design Directive 2009 125 EC European Union Registration Evalu...

Page 4: ...lation 14 Installation Recommendations 15 Mounting Options 15 Power Over Ethernet 15 Plastic Backbox 15 STEP 1 Install the Plastic Backbox 16 STEP 2 Insert Connectors on the Touch Panel 18 STEP 3 Secu...

Page 5: ...Acendo Panel 36 Proxy Setup 37 SERVICE CONTROLLER 37 PROXY SETTINGS 37 ACCOUNT INFORMATION 37 Viewing Editing Calendar Settings 38 More Information 38 Viewing Editing Localization Settings 38 Changin...

Page 6: ...c IP Information 50 Entering a New Hostname 50 SYSTEM Date Time 51 Manually Setting a Custom NTP Server 51 Manually Setting the Time Zone 52 SYSTEM Language Input 52 KEYBOARD INPUT METHODS 52 PHYSICAL...

Page 7: ...a Meeting From the Calendar 72 Appendix A Configuring RoomBook Panels for Microsoft Exchange Office 365 73 Overview 73 RoomBook Service Account 73 Microsoft Exchange Office 365 Username and Calendar E...

Page 8: ...hange Meeting Reservation Not Indicated on the Panel No Error Message 83 Possible Solution 83 1 Creating a Service Account 83 2 Creating a Room Delegate 83 Configuring Delegation Exchange 2010 83 Usin...

Page 9: ...ngle of screen and availability bar LEDs and a low profile design for a subtle aesthetic The RMBK 1001 701 can be mounted on any flat surface including glass or stone inside or outside a conference ro...

Page 10: ...ese LEDs can be disabled via options on the Room setup page see the Setup Wizard Step 6 ROOM section on page 31 Recessed Settings pushbutton located on the left top edge provides access to the SETTING...

Page 11: ...Landscape 1024x600 Aspect Ratio Landscape 16 9 Brightness 400 cd m2 Contrast Ratio 800 1 Color Depth 16 7M colors Illumination LED Touch Overlay Resistive VIEWING ANGLE 89 89 89 89 Up Down Left Right...

Page 12: ...ge 22 for details on initial setup and configuration RMBK 701 Product Specifications Cont CERTIFICATIONS FCC Part 15 Class A C Tick CISPR 22 Class A CE EN 55022 Class A and EN 55024 IEC EN 60950 UL 60...

Page 13: ...es Refer to the Scheduler Settings section on page 35 for details Configuring Touch Panel Settings ADVANCED SETTINGS are used to configure settings for the touch panel itself Touch panel specific sett...

Page 14: ...into consideration to maintain the product within the specified operating temperature FIG 6 shows an AMX device installed in a wall with a filled volume such as with insulation or concrete as well as...

Page 15: ...ith each mounting kit for instructions Power Over Ethernet Power for AMX RoomBook Scheduling Touch Panels is supplied via Power Over Ethernet PoE utilizing an AMX certified PoE injector such as the PS...

Page 16: ...screws or nails from the drywall before beginning the cutout process MXD 1001 L Template Backbox 10 1 Touch Panel Modero S Series 68 2265 03 MXD 701 L Template Backbox 7 0 Touch Panel Modero S Series...

Page 17: ...ounting surface should also be smooth and flat For thin walls or solid surfaces use mounting screws not included see FIG 8 5 Extend the Locking Tabs by tightening the Locking Tab screws until snug FIG...

Page 18: ...bottom edge of the touch panel into position until it rests against the lower outside edge of the Backbox NOTE If a gap is observed between the panel and the Backbox or binding is felt while locking...

Page 19: ...t the two bottom clips FIG 16 FIG 17 2 Grasp the bottom of the panel and pull gently outward until the side of the panel is free of the snap Use your other hand to stabilize the front of the touch pan...

Page 20: ...arefully lift up and out to release the tabs on the top edge of the panel Installation Dimensions RMBK 1001 Dimensions Detailed specifications drawings for the RMBK 1001 are available to download from...

Page 21: ...imensions Detailed specifications drawings for the RMBK 701 are available to download from www amx com FIG 20 RMBK 701 Notes Dimensions in parenthesis are in millimeters Additional detailed installati...

Page 22: ...r details Press the Next button in each Wizard page to save changes and proceed to the next page Note that these settings can be changed later via the Settings pages see the Scheduler Settings section...

Page 23: ...sabled Static Select to manually configure the IP address for this panel using the fields provided on this page IP Address Enter a valid IP Address for this panel Subnet Mask Enter a valid Subnet Mask...

Page 24: ...Acendo Book Panel for use with Microsoft Exchange 1 In the Setup Wizard Step 3 Calendar page select Microsoft Exchange to invoke the following options FIG 26 FIG 25 Setup Wizard Step 3 CALENDAR Micro...

Page 25: ...HOSTNAME EWS Exchange asmx Username Enter the Username including domain required to login to the scheduling server as required Example JaneDoe acme onmicrosoft com Password Enter the Password required...

Page 26: ...tion 2 Press Add to invoke the Google sign in page FIG 30 3 In the Google Sign In Page enter your Google Service account login information and press Next 4 When prompted to allow Acendo Book to manage...

Page 27: ...se fields and press Verify to verify that the scheduling panel can connect to the scheduling system using the information currently entered on this page 8 Press Next to proceed press Back to return to...

Page 28: ...priate time zone Time Format Indicates the current time display setting for this panel default 12 hour To change the time display to 24 hour format press the 24 hour button Date Format Indicates the c...

Page 29: ...d as Members of a Master panel s Group for a total of 50 panels including the Master However note that when configuring Scheduling Groups smaller Room Groups typically have quicker responsiveness for...

Page 30: ...ter panel s Group 1 In the Setup Wizard Step 5 GROUP page select Member 2 Enter the IP or Hostname of the Master panel 3 Enter the Username and Password for the Master panel 4 Press Next to proceed to...

Page 31: ...to preview the specified image The LOGO IMAGE window provides a preview of the selected logo as it will appear on both the Available green and Occupied red backgrounds FIG 41 FIG 39 Setup Wizard Step...

Page 32: ...t is displayed next to Logo Image FIG 44 Once a logo image has been uploaded a Delete button is provided on this page Press Delete to delete the current custom logo image FIG 41 Setup Wizard Step 6 Ro...

Page 33: ...ng PIN Code When enabled the PIN code will be required to reserve a meeting edit Meeting Time Details and Delete Meeting Press to enable this option default disabled Meeting PIN Code Enter the 4 digit...

Page 34: ...use Exchange Office 365 or Google privacy flag A meeting marked as private will behave the same way the global Acendo Book Privacy Mode behaves In order for the Acendo Book panel to be able to read t...

Page 35: ...the Administrator password for the scheduling system in the ENTER PASSWORD field FIG 50 The default password is 1988 This password is configured in the Security page of the Setup Wizard see Setup Wiz...

Page 36: ...e manually entered When DHCP is selected only the Hostname field is enabled for editing 5 Press Proxy Setup to enable disable the Proxy option and configure Proxy Settings and Account Information as r...

Page 37: ...Host Press to manually enter the Host IP Address of the proxy server Port Press to manually enter the Port number on the proxy server that will be used for this RMBK panel Proxy Type Press to select...

Page 38: ...Configuring RoomBook Panels for Microsoft Exchange Office 365 on page 73 See Appendix C Configuring Google Resources on page 77 See Appendix D Troubleshooting on page 82 Viewing Editing Localization S...

Page 39: ...isting of all time zones that can displayed on this Acendo panel in the SELECT TIMEZONE window FIG 60 NOTE Press anywhere outside the SELECT TIMEZONE window to close the window without making a select...

Page 40: ...n Page 2 Press Edit to access the LOCALIZATION Settings page 3 Next to Default Meeting Length Increment press to select 15 mins default setting 30 mins or 60 mins 4 Press Save in the LOCALIZATION Sett...

Page 41: ...d on page 31 4 Press Save to save changes and close the ROOM Settings page Viewing Editing Security Settings 1 In any SETTINGS page press Security to view the current Room settings for this panel FIG...

Page 42: ...be altered with changes in connectivity connecting a USB stick to the panel for instance or changes to other pages within the menu Advanced Settings Menu Options The Advanced Settings Menu is separate...

Page 43: ...isplays basic panel information such as available memory and screen resolution dimensions read only FIG 68 INFO Device Info page INFO Device Info page options DEVICE Device IP Displays the panel s IP...

Page 44: ...out rebooting press Cancel or press outside the Reboot window Shutting Down the Panel 1 In the Maintenance page select Shutdown This opens the Shutdown window FIG 71 2 Press OK to shut down the panel...

Page 45: ...e Default notification sound window FIG 74 2 Choose a sound from the presented list selecting a new sound will play it once The sound will only be audible if the Notifications slide bar in Volumes is...

Page 46: ...CE Display page DEVICE Display page options Brightness Sets the display brightness and contrast levels of the panel See Adjusting Panel Brightness on page 46 for details Display Timeout Indicates the...

Page 47: ...o Book panels automatically self calibrate on startup The Calibration Test page may be used to verify the accuracy of that calibration Select Calibration Test to open the Calibration Test page FIG 78...

Page 48: ...default setting is OFF FIG 79 Calibration Test Options window FIG 80 DEVICE VNC page DEVICE VNC page options VNC Enable Disable Press to toggle on off the VNC server on the panel default enabled VNC...

Page 49: ...ns DHCP Static Sets the panel to either DHCP or Static communication modes DHCP is an IP Address assigned to the panel by a DHCP server If DHCP is selected the other Network Connection fields are disa...

Page 50: ...ormation for each field presented If the field accepts alphanumeric characters a keyboard opens instead Press Next in the on screen keypad to proceed to the next field 5 When complete press OK to save...

Page 51: ...NTP Server window 2 Select Custom to invoke the NTP Server window FIG 87 3 Press Set NTP server to enter the IP address of the NTP Server to use via the on screen keyboard 4 Press OK to save changes a...

Page 52: ...l Settings menu fields Personal Dictionary Lists all words saved in the panel s personal dictionary file See Personal Dictionary on page 53 for details KEYBOARD INPUT METHODS Default Specify the defau...

Page 53: ...to the panel s personal dictionary 1 In the Language Input page press Personal dictionary to open the Personal Dictionary window FIG 91 2 Press the Add button in the upper right hand corner of the pag...

Page 54: ...ge you may also change the input method such as choosing a Dvorak keyboard To change the keyboard layout 1 In the Language Input page under KEYBOARD INPUT METHODS press Default to open the Choose Inpu...

Page 55: ...outside of the window to close the Choose Keyboard Layout window without changing the selection to return to the Keyboard Options window FIG 94 on page 54 Changing the Pointer Speed 1 Under MOUSE TRAC...

Page 56: ...y the default admin password for this panel See the Setting a Password for This Panel section on page 56 for details CREDENTIAL STORAGE Trusted Credentials Press this option to view a listing of all t...

Page 57: ...tificates is separated into two categories System and User The initial view of the Trusted Credentials page is the SYSTEM list an example is shown in FIG 102 NOTE It may be necessary to scroll down to...

Page 58: ...or the selected certificate An example is shown in FIG 105 To disable this system certificate press the Disable button The panel will prompt you to verify this action press OK to proceed FIG 107 shows...

Page 59: ...e System certificates can be used with Microsoft Exchange and Office 365 Calendar setups see FIG 25 on page 24 Supported certificate file extensions are crt pem and der 1 Insert an external USB storag...

Page 60: ...ESET Factory Data Reset Erases all data on the panel and resets the panel back to it s factory default settings See Factory Data Reset on page 60 for details Reset Settings Select to revert the panel...

Page 61: ...age without saving any changes press No NOTE The Scheduling Panel Setup Wizard will be launched again if a Reset Settings is performed on the panel see page 22 Enable Disable Web Services This option...

Page 62: ...New Firmware From An External USB Stick To install new firmware to the panel from a USB stick 1 Download the latest Acendo Book panel firmware from www amx com and save it to a USB stick or other exte...

Page 63: ...on page 61 select UPDATE next to Install Firmware from Web FIG 123 NOTE Press README to view any notes associated with the selected firmware file press Close to close the README window 2 The panel wil...

Page 64: ...evert to Factory Firmware and then select Yes on the confirmation window for the system to extract the factory firmware this can take a minute and then automatically initiate a firmware upgrade as usu...

Page 65: ...setup page see the Viewing Editing Room Settings section on page 41 NOTE Room Status may not be shown if a custom logo is in use Room Occupied Page If the Room is currently in use for a scheduled mee...

Page 66: ...ows to adjust the duration of the meeting if necessary Use the Start End Left Right arrows to adjust the start time of the meeting if necessary 3 Press Reserve to reserve this room for the time allote...

Page 67: ...regardless of whether the room is currently AVAILABLE or OCCUPIED 2 This invokes the BOOK ROOM page Use the options in this page to change the default settings as desired By default meetings are set...

Page 68: ...ays displayed on panels that are configured as a Member panel of a Scheduling Group see Viewing Editing Group Settings on page 40 for details on Scheduling Groups If the device is configured as the Ma...

Page 69: ...s in this page to set the meeting duration start end times add meeting details and reserve the room for the specified time a Book for Use the up down arrow buttons to adjust the length of the meeting...

Page 70: ...f Privacy Mode is on the Edit Meeting Details button is not provided If the meeting was NOT scheduled via the Acendo Book panel i e directly via the Email Web client software the Edit Meeting Details...

Page 71: ...N CODE page FIG 148 4 Press Submit to return to the Room page Edits made for the selected meeting are reflected in the updated calendar FIG 146 ENTER PIN CODE page FIG 147 EDIT MEETING TIME page FIG 1...

Page 72: ...ted enter the Meeting PIN Code in the ENTER PIN CODE page FIG 150 4 Press Submit to return to the Room page The selected meeting is removed from the updated calendar FIG 151 FIG 149 DELETE MEETING pag...

Page 73: ...dar Email IDs The Exchange 2010 2103 2016 or Office 365 Server has a unique User Name for each user and a unique Calendar Email ID for each room The Username and Calendar Email ID is entered for each...

Page 74: ...ge server must set the room s RemovePrivateProperty to false By default this is set to true Exchange 2010 Set a Delegate on a Resource Mailbox http technet microsoft com en us library bb124973 v exchg...

Page 75: ...log click CTRL C 8 Click New to create the new Mailbox and proceed to the New Mailbox Completion dialog 9 Click Finish Repeat this process for each RMS Location that will synchronize with RMS Addition...

Page 76: ...cipients select Resources 3 In the Resources page toolbar click the Add button to open the New Room Mailbox dialog 4 Fill in the fields and click Save to create the new mailbox and close the New Room...

Page 77: ...calendars with administrator see page 79 3 Share service calendars with room administrator account see page 80 4 Ensure calendar is set to deny conflicts see page 81 1 Create Resources 1 Log in to the...

Page 78: ...ces FIG 157 6 In the Resources pane select Create a new resource FIG 158 7 Define the Resource Name Resource Type and Description FIG 159 FIG 156 Google Admin Console Google Apps Page detail FIG 157 G...

Page 79: ...Apps window select the Calendar app FIG 162 4 In the Calendar share the new resource calendar by selecting Add a Coworkers Calendar under Other Calendars FIG 163 5 In the Add Coworkers Calendar windo...

Page 80: ...dar for the resource calendar in the My Calendars list FIG 166 2 In the Room Details Share This Calendar page paste the Room Manager account email address in the Person field FIG 167 3 Under Permissio...

Page 81: ...new calendar resource and select Calendar Settings FIG 171 2 In the Calendar Details page Auto accept invitations section verify that Auto accept invitations that do not conflict is selected FIG 172 3...

Page 82: ...ation check typically because the time on the Acendo Book Scheduling Panel is incorrect this can cause the certificate to appear to have expired FIG 174 Possible Solutions Verify that the current netw...

Page 83: ...requests Valid input for this parameter is true or false The default value is false NOTE 2 In the scenario that you do not want the recurring meetings rejected when they have an end date beyond the b...

Page 84: ...ailbox that you want to configure 3 In the action pane under the name of the resource mailbox click Properties 4 In Resource Mailbox Name Properties click the Resource Policy tab 5 Under Specify deleg...

Page 85: ...o False for the room with which the Acendo Book panel is associated Once disabled conflicting meetings will be declined by the scheduling system Problem Master Connection Error Displayed If the Master...

Page 86: ...th which the Acendo Book panel is associated See Appendix C Configuring Google Resources on page 77 for details Problem Browse Rooms Button Is Not Displayed On the Group Master If the master device do...

Page 87: ...X does not assume responsibility for errors or omissions AMX also reserves the right to alter specifications without prior notice at any time The AMX Warranty and Return Policy and related documents c...

Reviews: