


30
PROGRAMMED PLAY WITH CD
Programmed Play with CD
Program Play
Programmed play allows you to select any track,
title or chapter from a DVD in the DVD 20 for
playback in a specific order. This type of program-
ming is particularly useful for parties or other sit-
uations where you want continual playback of
specific selections for a long period of time. To
program the disc in the DVD 20 for playback, fol-
low these steps:
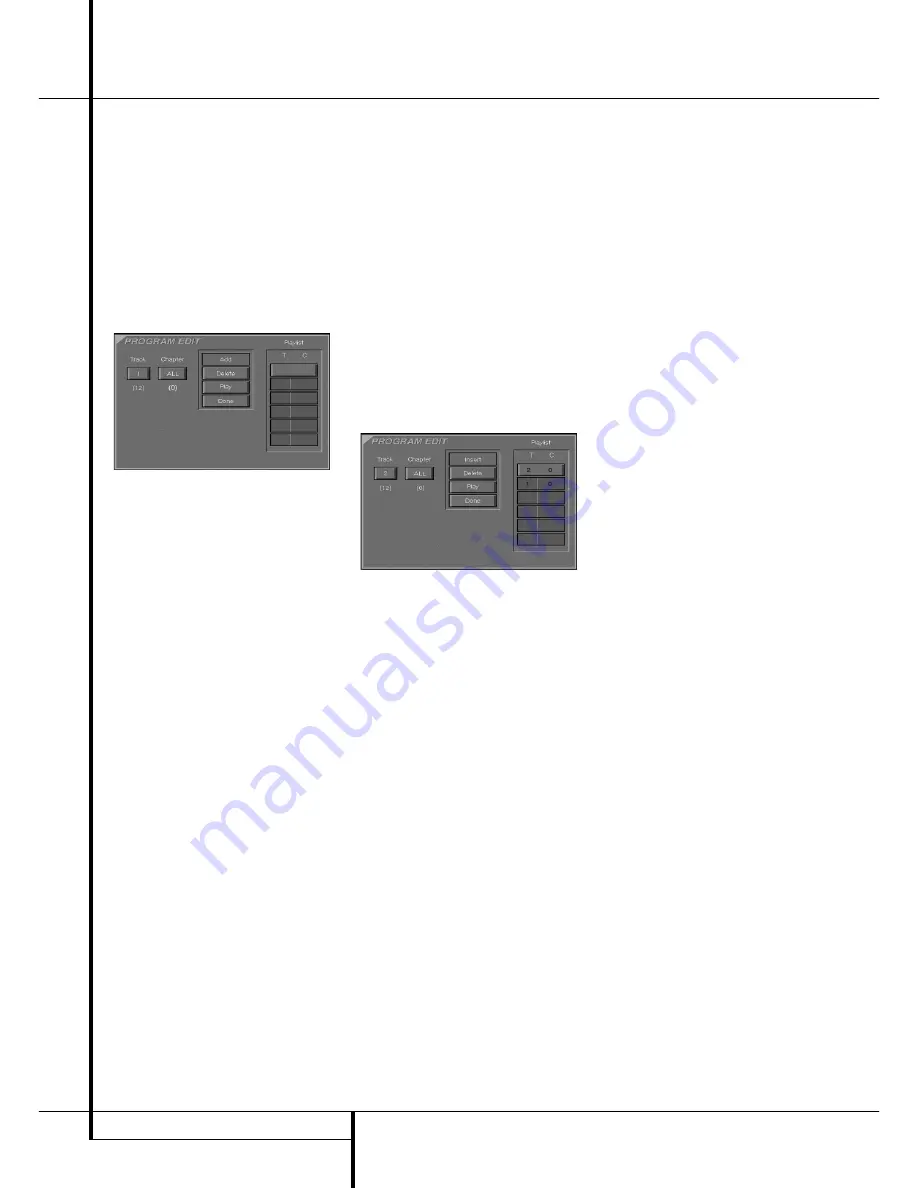
Program Edit
1. In Stop or Resume mode, press PROGRAM on
the remote, Program Edit Display appears.
■
If there is no programmed Track on the playlist,
the above Display appears when you press
PROGRAM. The number below the TRACK icon
indicates the number of tracks on the disc.
2. Select specific track by pressing ARROW (UP or
DOWN) or holding it pressed (will quickly scan
through track numbers). You can also select
track directly by entering its number with
NUMBER (0~9) keys. Then press PROG. to add
selected track to the playlist directly or press
ENTER three times.
3. You can select maximum 32 items by repeating
step 2.
4. When yo’ve completed program edit, select
PLAY icon and then press ENTER on the
remote or press PLAY on the remote to start
program play.
■
While a disc is playing, press PROGRAM on
the remote to start Program Play.
Delete Program
1. To delete any programmed track while the
Program Edit Display is on the screen, press
ARROW (RIGHT or LEFT) on the remote to
move the cursor (highlight) to the Playlist.
2. Press ARROW (UP or DOWN) to select the
track to be deleted. When it is selected (num-
bers will turn from white to black), press
CLEAR or select DELETE icon on the Program
Edit Display and press ENTER, selected track
will be deleted. Note that the next value in the
list will replace the deleted one and will be
selected automatically.
■
The program can be deleted completely by
moving the cursor to the top of the playlist
and pressing CLEAR for each value pro-
grammed or by turning the unit off (to
Standby) or opening the tray (see chapter
"Cancel Program Play" below)
Insert Tracks
Inserting tracks is possible only if tracks are
already programmed on the playlist and will
change the order of playback.
1. Press PROGRAM on the remote to insert a
track, Program Edit Display appears.
2. Move cursor to Playlist and press ARROW (UP
or DOWN) on the remote to select location
where you want to insert a track. It will be
inserted above the location selected (whose
numbers have turned to black), the following
display appears.
3. Move cursor to TRACK icon and select the
track to be inserted as described in the chapter
Program Edit above. The location where any
new selections will be inserted remains high-
lighted in white numbers.
4. Press PROGRAM to insert the selection. Or
select INSERT with ARROW (right) or ENTER
and press ENTER. Selected track will be insert-
ed.
■
When you finish adding values to Playlist and
want to return to normal play mode, press
RETURN or select DONE icon and press ENTER
on the remote.
Cancel Program Play
Program Play will be canceled:
1. When you open the tray; this will delete the
complete program.
2. When you turn Power off (to Standby), this
also will delete the complete program.
3. When you press STOP twice from the play
mode. Then the red PROG indicator will disap-
pear from display and the player will stop and
return to normal mode, but the program will
remain in memory and can be recalled by
pressing PROGRAM again.
4. To cancel Program play during play mode sim-
ply press PROGRAM, the red PROG. indicator
in the display will turn off and the unit will
continue with normal play. Pressing PROGRAM
during normal play will turn on the program
play mode again.
Editing the Program without Screen
To edit the contents of a Playlist using the Front
Panel Information Display only rather than the
on-screen display, follow these steps:
To check a previously programmed playlist (this is
possible during any play, resume or stop mode):
■
Press the CHECK Button. In Stop or Resume
mode, the first title of the disc together with
the first location number not programmed yet
will be displayed (TRACK will blink) and can be
modified and added to the playlist if desired,
see below. In play mode the first track number
programmed will be displayed.
■
Press the CHECK button again to step through
each of the programmed tracks. The Program
location Number will appear on the far right
side of the front Display, next to the PR: indi-
cation.
To edit a new program, to add tracks to a current
program or to delete from a program list (possi-
ble during resume or stop mode only):
■
Press CHECK until TRACK blinks in the display,
the first location Number not programmet yet
will be displayed.
■
Use the ARROW (Up or Down) buttons to
change the selection or enter the track number
directly with the number buttons on the
remote. Press PROGRAM to program the
selected item or to add it to current playlist
(if any).
■
Press the CLEAR button to remove a program
step selected by the CHECK button. Note that
this deletion will not be confirmed by any
change in the front display.
■
When all steps have been programmed, press
the PLAY button to begin programmed play, or
the RETURN button to exit the program edit
function and return to normal operation.
■
The program edited can be checked on screen
easily by pressing the PROGRAM button in
stop or resume mode or in the front panel by
pressing the CHECK button repeatedly as
decribed on the left.