Harman Kardon DVD 20 Owner'S Manual Download Page 19

18

SYSTEM SETUP

System Setup

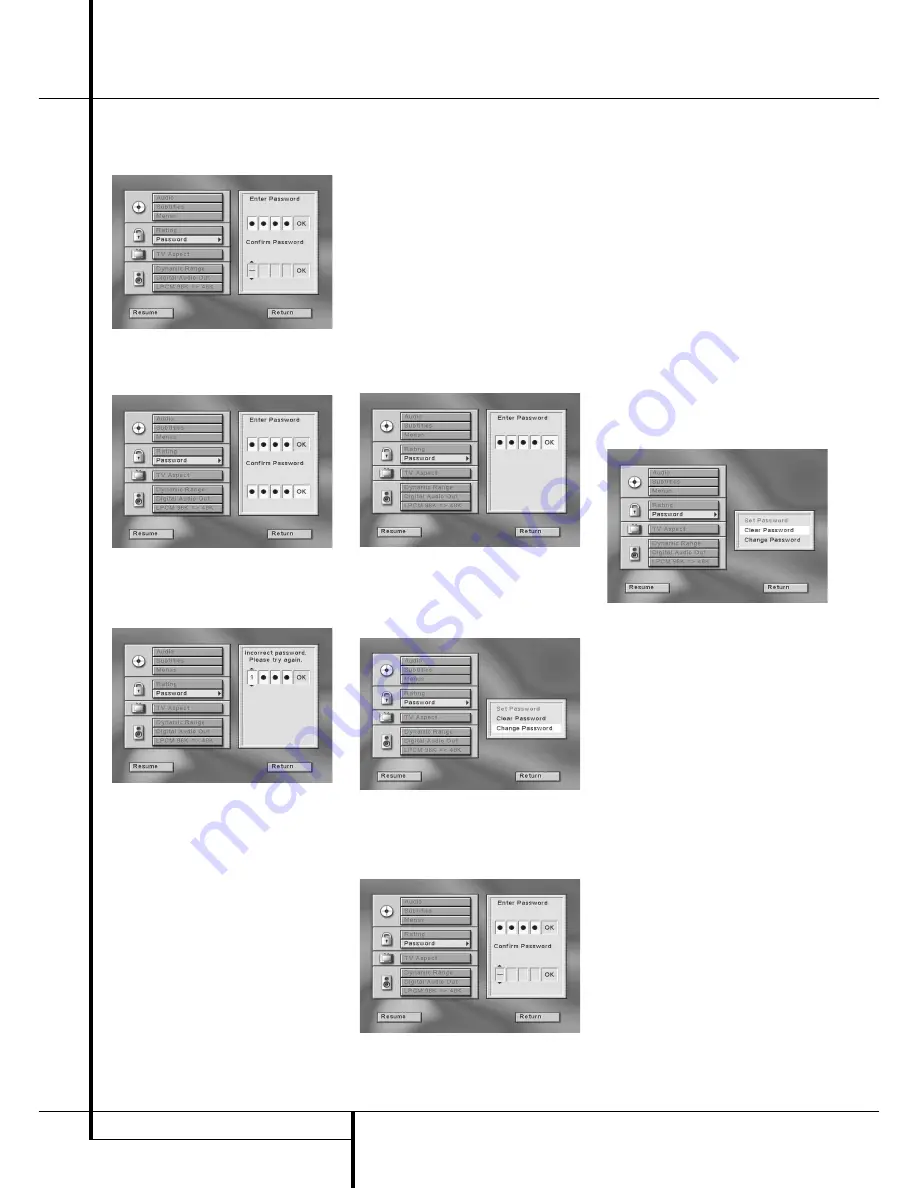
5. When the OK icon is highlighted, press ENTER

to finish password input, Confirm Password
display appears below Enter Password.

6. Press the NUMBER (0~9) buttons on the

remote to enter same password for con-
firmation.

7. When incorrect password is entered, new pass-

word menu with text "Incorrect password,
please try again" above appears and you can
enter and confirm the password again.

This time, as help the correct password is
repeated in each digit of the upper ”Try
Again” menu and the incorrect password in
the lower ”Confirm Password” menu, appear-
ing after the upper is passed.

8. After the correct password is entered in all

menus, press ENTER, the main password menu
will return (see right on top of page 17) and a
red key symbol appears in the front display. To
return to Set Up Menu press ARROW (left). The
lock symbol in the Set Up Menu appears
closed to indicate that the rating and password
system is locked.

After password is memorized, all password

menus are available only after correct pass-
word is entered. If incorrect password is
entered, new password menu appears where
the correct password can be entered again.

Note that the time delay before the password
can be re-entered will increase with each
attempt. This prevents attempts to find the
correct password by trial and error.

Change Password

Password can be changed at any time but at first
the current password must be entered:

1. Press ARROW (UP or DOWN) on the remote to

select ”Password” on the Set Up Menu 
Display.

2. Press ENTER or ARROW (right), Enter Password

Display appears.

3. Press the ARROW (UP or DOWN) or NUMBER

(0~9) buttons on the remote to enter the actu-
al password.

4. When the OK icon is highlighted, press ENTER

again, Password Display appears.

5. Press ARROW (UP or DOWN) on the remote to

select ”Change Password”.

6. Press ENTER, Enter Password Display appears

again (see right down on page 17).

7. Enter new password, then press ENTER,

Confirm Password Display appears.

8. Press the ARROW (UP or DOWN) or NUMBER

(0~9) buttons on the remote to enter same
password for confirmation.

9. After new password is entered correctly in all

menus, press ENTER. The main password menu
will return.
To return to Set Up Menu, press ARROW (left).

Clear Password

Password can be cleared easily, but first the cur-
rent password must be entered:

1. Press ARROW (UP or DOWN) on the remote to

select ”Password” on the SET UP MENU 
DISPLAY.

2. Press ENTER or ARROW (right), Enter Password

Display appears.

3. Press the ARROW (UP or DOWN) or NUMBER

(0~9) on the remote to enter the current pass-
word and press ENTER again, Password
Display appears.

4. Press ARROW (UP or DOWN) on the remote to

select Clear Password.

5. Press ENTER, Password is cleared, red key sym-

bol in the front display will disappear.

6. To return to Set Up Menu, press ARROW (left),

the lock symbol beneath "Password" in the
menu will be open again. To delete the Set Up
Display, press RETURN.

TV Aspect

This set up has several functions. At first the TV
aspect ratio can be selected, i.e. if a conventional
screen shape (4:3) or widescreen (16:9) is used in
your TV. With the second step you can configure
the video output on the TV SCART connector for
Video, S-Video or RGB video signals. Thirdly the
PAL60 mode can be turned on/off to enable play-
back of NTSC discs with non-NTSC TV’s. And last
a Test Still Video can be called up for testing all
settings and your screen´s performance.

TV Aspect Ratio

This step selects the TV aspect, ratio, conventional
screen shape (4:3) or widescreen (16:9), accord-
ing to your TV:

4 x 3 letterbox: Choose this setting if the DVD
20 is connected to a conventional (4:3) TV set
and you would prefer to see movies without
any parts being cut off. You will see the entire
frame of the movie and DVD’s recorded with
normal 4:3 format will fill the entire screen.
But movies in widescreen will occupy a smaller

Summary of Contents for DVD 20

Page 1: ...250 Crossways Park Drive Woodbury New York 11797 www harmankardon com Harman Consumer International 2 Route de Tours 72500 Ch teau du Loir France 2001 Harman Kardon Incorporated Part 0000000000...

Page 2: ...DVD20 Digital Versatile Disc Player OWNER S MANUAL DVD 20 STOP DIMMER TEST SKIP PL Power for the Digital Revolution...

Page 3: ...Repeat Play 24 A B Repeat Play 24 Random Play 25 Programmed Play with DVD 27 CD Playback 27 Compatibility of Discs 27 To Load and Play an Audio CD 27 Audio CD Playback Features 27 Using the Banner Di...

Page 4: ...ery nine units of height making them more like the screen in a movie theater The program material on a DVD may be recorded in either format and in addi tion you may configure the DVD 20 to play back i...

Page 5: ...unsuitable for some audiences DVD only Intuitive menu operating system Separate Buttons for convenient Fast Forward Fast Reverse Search and Track Skip 2x 4x Zoom during play and pause selection movab...

Page 6: ...eans that playback will stop but as long as the tray is not opened or the disc changed DVD playback will continue from the same point on the disc when the Play Button is pressed again Resume will also...

Page 7: ...en the programming functions are in use H Intro Indicator This indicator lights when the Intro Scan function is active I Repeat Indicators These indicators light when any of the Repeat functions are i...

Page 8: ...REV SLOW 0 7 A H AUDIO 5 2 9 C PLAY D F NEXT I K M 1 2 7 5 6 8 9 0 4 Q P O N L J G E B 8 6 1 4 3 SUBTITLE ANGLE 3 0 1 2 3 4 5 6 7 8 9 A B C D E F G H I J K L M N O P Q POWER ON POWER OFF AUDIO SUBTITL...

Page 9: ...this button search speed changes as below DVD F SEARCH1 F SEARCH2 F SEARCH3 F SEARCH4 F SEARCH1 CD F SEARCH1 F SEARCH2 F SEARCH3 F SEARCH1 F OPEN CLOSE Press to open or close the disc tray G PAUSE Fre...

Page 10: ...o your DVD Player The SCART cable carries both audio and video sig nals of the external unit These signals will be routed through the SCART connector of the DVD to the TV automatically when the DVD pl...

Page 11: ...outputs Video and S Video to your TV or AV Receiver only one of them Most European TV s are equipped with SCART connectors rather than with a normal video input yellow cinch In that case the SCART co...

Page 12: ...input on your device and the video S video output of this device to your TV For more details see the manual of your Audio Video amplifier receiver Note for Analog Audio The connection from Audio Out t...

Page 13: ...site video signal the S Video signal or the direct RGB signal delivering the best video performance possible all selectable in the Setup menu To view RGB video on your TV the RGB compatible SCART conn...

Page 14: ...e with any local regulations Do not simply throw them away but return to your dealer or special battery disposal centers Remote control operation range Point the remote control unit from no more than...

Page 15: ...r with an opti cal coaxial digital input which does not con tain a Dolby Digital AC 3 or DTS decoder be sure to select PCM as initial setting in the Digital Audio Output menu see also page 21 Otherwis...

Page 16: ...arch x2 the and Playback Mode Indicators will both light steadily In Fast Search x4 the outside or Playback Mode Indicator will flash and the inside indicator will remain steadily lit In Fast Search x...

Page 17: ...RROW UP or DOWN on the remote to select Audio on the Set Up Menu Display selected as default after the Set Up Menu appears 2 Press ENTER or ARROW right the Audio Menu appears 3 Press ARROW UP or DOWN...

Page 18: ...l require a password before being played all those with rating levels within the green number area will have free access 4 Press ENTER The rating menu will disappear and rating level selected will be...

Page 19: ...ENTER Enter Password Display appears again see right down on page 17 7 Enter new password then press ENTER Confirm Password Display appears 8 Press the ARROW UP or DOWN or NUMBER 0 9 buttons on the re...

Page 20: ...setting you can define the video format output by the TV SCART connector on the rear of the DVD 20 As the SCART connector can output Video Composite S Video or RGB video signals you must define which...

Page 21: ...ecrease the sharpness of the script then the Contrast has been turned up too much Reduce the contrast until these effects will disappear and the video still looks realistic 3 If you are watching TV wi...

Page 22: ...st contain DTS audio If you choose MPEG 2 DTS and you play a DTS disc but your receiver or decoder doesn t support DTS you won t hear any audio when you play the disc Important Note for MPEG Audio Tho...

Page 23: ...Title icon after a disc was read and the player is in Stop or Resume mode To return to the normal display press RETURN To select a specific title use the Title section in the Banner Display 1 During d...

Page 24: ...US on the remote the Banner Display appears 2 Press the ARROW LEFT OR RIGHT until the Camera icon is highlighted and press ENTER the Angle menu appears 3 Press ENTER or ANGLE on the remote to change a...

Page 25: ...he Front Information Display go out Repeat Play may be stopped by pressing the Stop Button twice A B Repeat Play The Repeat A B function allows you to select any portion of a DVD and have it repeat co...

Page 26: ...t to the Playlist 2 Press ARROW UP or DOWN to select the Title Chapter to be deleted When it is selected numbers will turn from white to black press CLEAR or select DELETE icon on the Program Edit Dis...

Page 27: ...a new program to add items to a current program or to delete items from a program list possible during resume or stop mode only Press CHECK until TITLE blinks in the display the first Location Number...

Page 28: ...M is pressed see page 29 and the Banner Display shown below appearing auto matically when the CD is played let you choose various playback features Track The number shown indicates the number of the t...

Page 29: ...works on both DVD and CD discs To Enter a Bookmark Follow These Steps 1 While a disc is playing press STATUS on the remote to see the Banner Display if not already shown 2 Use the ARROW RIGHT or LEFT...

Page 30: ...unction allows you to select any portion of a CD and have it repeat continually unit the unit is manually stopped To initiate a Repeat A B playback sequence fol low these steps while a disc is playing...

Page 31: ...re any new selections will be inserted remains high lighted in white numbers 4 Press PROGRAM to insert the selection Or select INSERT with ARROW right or ENTER and press ENTER Selected track will be i...

Page 32: ...D 20 Due to the differences in various versions of the MP3 format and the many differences between the CD R machines used to record MP3 discs on a computer it is possible that some MP3 discs may not p...

Page 33: ...te however that when the PBC is on some features are not available with that VCD they will be shown with grey background on the Status Bar rather than green Use of functions when the PBC is on will va...

Page 34: ...7185 Hausa 7265 Hebrew 7387 Hindi 7273 Hungarian 7285 Icelandic 7383 Indonesian 7378 Interlingua 7365 Interlingue 7369 Iunpiak 7375 Irish 7165 Italian 7384 Japanese 7465 Javanese 7487 Kannada 7578 Kas...

Page 35: ...ast or slow mode There is no audio playback on DVD discs during fast or slow modes Picture is distorted or jumps during MPEG 2 decoding It is a normal artifact of DVD playback for pictures fast forwar...

Page 36: ...Limits AC Power 220 240 V 50 Hz Power Consumption 12 Watts On 20 Watts Max Dimensions WxHxD 440x100x330 mm Weight 7 Kg All specifications subject to change without notice Harman Kardon and Power for...

Reviews: