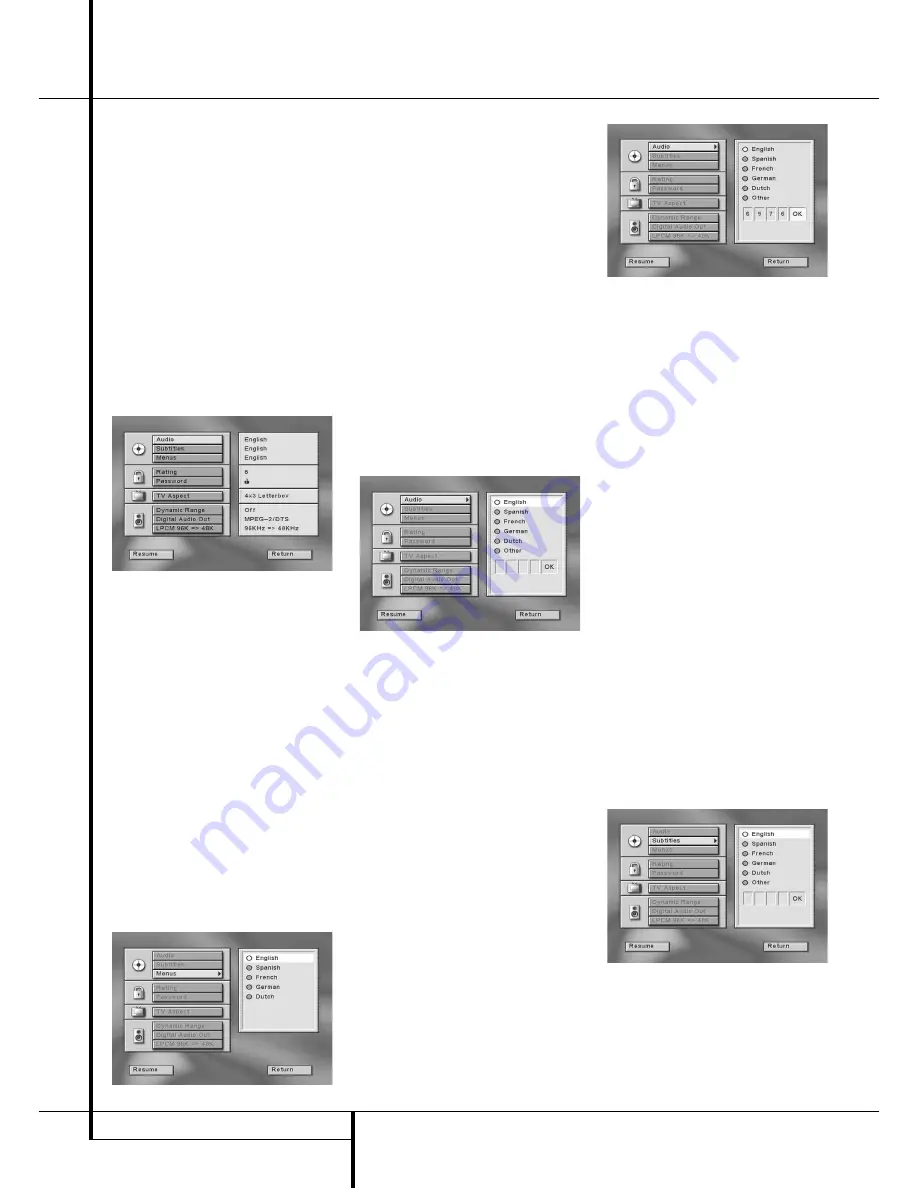
Harman Kardon DVD 20 Owner'S Manual Download Page 17

16

SYSTEM SETUP

System Setup

System Defaults

The final step of the installation is to establish
the system’s defaults. It is helpful to take a few
minutes to familiarize yourself with these set-
tings, as they may require change before the first
use and later from time to time.

Set Up Menu

The first step in checking or changing the system
defaults is to access the Setup Menu. First, make
certain that the DVD 20 is properly connected to
a video display, and that power is connected. For
this process, however, you do not need to load
any discs into the unit.

During STOP or RESUME mode, if you press MENU
on the remote, current Set Up Menu Display
appears on the screen showing all default settings.

This Main Menu and all menus in the following
may look different, listing the settings with different
languages, depending on the settings made
already. With the factory default setting all lan-
guages are set to "English", that´s why with all
menus the English version is shown in that manual.

Note:

Any item currently selected on the left side

of the Set Up Menu will be highlighted with
green rather than blue.

Menu Language

In order to be able to read all menues in the lan-
guage you prefer, at first the Menu language
should be selected. This set up will also define
the language of all other short messages shown
on the screen (not on the front display).

1. Press ARROW (DOWN) on the remote to select

”Menus” on the Set Up Menu Display.

2. Press ENTER or ARROW (right), the Menus

Menu appears.

3. Press ARROW (UP or DOWN) on the remote to

select specific Menu Language.

4. Press ENTER.

5. Press PLAY to resume normal playback or

RETURN to delete the Set Up Menu display.

Audio Language

Select Audio Language

This step will define the default audio language
(if disc was created with different language
tracks). Choosing an audio language from the
Banner Display or with the AUDIO button (see
page 23) will overwrite this setting only tem-
porarily.

1. Press ARROW (UP or DOWN) on the remote to

select ”Audio” on the Set Up Menu Display
(selected as default after the Set Up Menu
appears).

2. Press ENTER or ARROW (right), the Audio

Menu appears.

3. Press ARROW (UP or DOWN) on the remote to

select specific Audio Language. Selection will
be highlighted with bright green.

4. Press ENTER. Display returns to the Set Up

Menu, while the selected language appears
beneath "Audio".

5. Press PLAY to resume normal playback or

RETURN to delete Set Up Menu display.

You can exit any Submenu the as e.g. Audio

menu at any time without any change by
pressing the ARROW (left).

Select Another Audio Language

1. When Audio menu is on the screen, select

”Other”.

2. Press ENTER, the first digit in the square fields

below will be marked, waiting for your entry.

3. Input first number of language code (see table

on page 33) into the first digit by pressing
ARROW (UP or DOWN) on the remote, then
ENTER or ARROW (right) and enter the other 3
digits the same way. The code can also be
entered directly with the NUMBER (0~9) keys.

4. When cursor is on OK icon press ENTER.

5. Press PLAY to resume normal playback or

RETURN to delete Set Up Menu display.

Note that when a default language is selected,
it will be used whenever that language is pres-
ent on the DVD disc being played. However,
when that language is not present, the lan-
guage used will be the one preprogrammed
into the disc itself. Typically, that default will be
English, but the selection will vary at the dis-
cretion of the disc’s producer.

Although the default will set the language that
will be used when a disc is first put into play, the
language may easily be changed at any time by
using the AUDIO Button on the remote. See page
23 for more information.

Subtitle Language

Select Subtitle Language

With this set up you define the default subtitle
language (if disc was created with different subti-
tles). Choosing a subtitle language from the
Banner Display or by the SUBTITLE button (see
page 23) will overwrite this setting only tem-
porarily.

1. Press ARROW (UP or DOWN) on the remote to

select ”Subtitles” on the Set Up Menu 
Display.

2. Press ENTER or ARROW (right), the Subtitle

Menu appears.

Summary of Contents for DVD 20

Page 1: ...250 Crossways Park Drive Woodbury New York 11797 www harmankardon com Harman Consumer International 2 Route de Tours 72500 Ch teau du Loir France 2001 Harman Kardon Incorporated Part 0000000000...

Page 2: ...DVD20 Digital Versatile Disc Player OWNER S MANUAL DVD 20 STOP DIMMER TEST SKIP PL Power for the Digital Revolution...

Page 3: ...Repeat Play 24 A B Repeat Play 24 Random Play 25 Programmed Play with DVD 27 CD Playback 27 Compatibility of Discs 27 To Load and Play an Audio CD 27 Audio CD Playback Features 27 Using the Banner Di...

Page 4: ...ery nine units of height making them more like the screen in a movie theater The program material on a DVD may be recorded in either format and in addi tion you may configure the DVD 20 to play back i...

Page 5: ...unsuitable for some audiences DVD only Intuitive menu operating system Separate Buttons for convenient Fast Forward Fast Reverse Search and Track Skip 2x 4x Zoom during play and pause selection movab...

Page 6: ...eans that playback will stop but as long as the tray is not opened or the disc changed DVD playback will continue from the same point on the disc when the Play Button is pressed again Resume will also...

Page 7: ...en the programming functions are in use H Intro Indicator This indicator lights when the Intro Scan function is active I Repeat Indicators These indicators light when any of the Repeat functions are i...

Page 8: ...REV SLOW 0 7 A H AUDIO 5 2 9 C PLAY D F NEXT I K M 1 2 7 5 6 8 9 0 4 Q P O N L J G E B 8 6 1 4 3 SUBTITLE ANGLE 3 0 1 2 3 4 5 6 7 8 9 A B C D E F G H I J K L M N O P Q POWER ON POWER OFF AUDIO SUBTITL...

Page 9: ...this button search speed changes as below DVD F SEARCH1 F SEARCH2 F SEARCH3 F SEARCH4 F SEARCH1 CD F SEARCH1 F SEARCH2 F SEARCH3 F SEARCH1 F OPEN CLOSE Press to open or close the disc tray G PAUSE Fre...

Page 10: ...o your DVD Player The SCART cable carries both audio and video sig nals of the external unit These signals will be routed through the SCART connector of the DVD to the TV automatically when the DVD pl...

Page 11: ...outputs Video and S Video to your TV or AV Receiver only one of them Most European TV s are equipped with SCART connectors rather than with a normal video input yellow cinch In that case the SCART co...

Page 12: ...input on your device and the video S video output of this device to your TV For more details see the manual of your Audio Video amplifier receiver Note for Analog Audio The connection from Audio Out t...

Page 13: ...site video signal the S Video signal or the direct RGB signal delivering the best video performance possible all selectable in the Setup menu To view RGB video on your TV the RGB compatible SCART conn...

Page 14: ...e with any local regulations Do not simply throw them away but return to your dealer or special battery disposal centers Remote control operation range Point the remote control unit from no more than...

Page 15: ...r with an opti cal coaxial digital input which does not con tain a Dolby Digital AC 3 or DTS decoder be sure to select PCM as initial setting in the Digital Audio Output menu see also page 21 Otherwis...

Page 16: ...arch x2 the and Playback Mode Indicators will both light steadily In Fast Search x4 the outside or Playback Mode Indicator will flash and the inside indicator will remain steadily lit In Fast Search x...

Page 17: ...RROW UP or DOWN on the remote to select Audio on the Set Up Menu Display selected as default after the Set Up Menu appears 2 Press ENTER or ARROW right the Audio Menu appears 3 Press ARROW UP or DOWN...

Page 18: ...l require a password before being played all those with rating levels within the green number area will have free access 4 Press ENTER The rating menu will disappear and rating level selected will be...

Page 19: ...ENTER Enter Password Display appears again see right down on page 17 7 Enter new password then press ENTER Confirm Password Display appears 8 Press the ARROW UP or DOWN or NUMBER 0 9 buttons on the re...

Page 20: ...setting you can define the video format output by the TV SCART connector on the rear of the DVD 20 As the SCART connector can output Video Composite S Video or RGB video signals you must define which...

Page 21: ...ecrease the sharpness of the script then the Contrast has been turned up too much Reduce the contrast until these effects will disappear and the video still looks realistic 3 If you are watching TV wi...

Page 22: ...st contain DTS audio If you choose MPEG 2 DTS and you play a DTS disc but your receiver or decoder doesn t support DTS you won t hear any audio when you play the disc Important Note for MPEG Audio Tho...

Page 23: ...Title icon after a disc was read and the player is in Stop or Resume mode To return to the normal display press RETURN To select a specific title use the Title section in the Banner Display 1 During d...

Page 24: ...US on the remote the Banner Display appears 2 Press the ARROW LEFT OR RIGHT until the Camera icon is highlighted and press ENTER the Angle menu appears 3 Press ENTER or ANGLE on the remote to change a...

Page 25: ...he Front Information Display go out Repeat Play may be stopped by pressing the Stop Button twice A B Repeat Play The Repeat A B function allows you to select any portion of a DVD and have it repeat co...

Page 26: ...t to the Playlist 2 Press ARROW UP or DOWN to select the Title Chapter to be deleted When it is selected numbers will turn from white to black press CLEAR or select DELETE icon on the Program Edit Dis...

Page 27: ...a new program to add items to a current program or to delete items from a program list possible during resume or stop mode only Press CHECK until TITLE blinks in the display the first Location Number...

Page 28: ...M is pressed see page 29 and the Banner Display shown below appearing auto matically when the CD is played let you choose various playback features Track The number shown indicates the number of the t...

Page 29: ...works on both DVD and CD discs To Enter a Bookmark Follow These Steps 1 While a disc is playing press STATUS on the remote to see the Banner Display if not already shown 2 Use the ARROW RIGHT or LEFT...

Page 30: ...unction allows you to select any portion of a CD and have it repeat continually unit the unit is manually stopped To initiate a Repeat A B playback sequence fol low these steps while a disc is playing...

Page 31: ...re any new selections will be inserted remains high lighted in white numbers 4 Press PROGRAM to insert the selection Or select INSERT with ARROW right or ENTER and press ENTER Selected track will be i...

Page 32: ...D 20 Due to the differences in various versions of the MP3 format and the many differences between the CD R machines used to record MP3 discs on a computer it is possible that some MP3 discs may not p...

Page 33: ...te however that when the PBC is on some features are not available with that VCD they will be shown with grey background on the Status Bar rather than green Use of functions when the PBC is on will va...

Page 34: ...7185 Hausa 7265 Hebrew 7387 Hindi 7273 Hungarian 7285 Icelandic 7383 Indonesian 7378 Interlingua 7365 Interlingue 7369 Iunpiak 7375 Irish 7165 Italian 7384 Japanese 7465 Javanese 7487 Kannada 7578 Kas...

Page 35: ...ast or slow mode There is no audio playback on DVD discs during fast or slow modes Picture is distorted or jumps during MPEG 2 decoding It is a normal artifact of DVD playback for pictures fast forwar...

Page 36: ...Limits AC Power 220 240 V 50 Hz Power Consumption 12 Watts On 20 Watts Max Dimensions WxHxD 440x100x330 mm Weight 7 Kg All specifications subject to change without notice Harman Kardon and Power for...

Reviews: